Basement Bar Build Thread!

Homebrew Talk - Beer, Wine, Mead, & Cider Brewing Discussion Forum

Help Support Homebrew Talk - Beer, Wine, Mead, & Cider Brewing Discussion Forum:

This site may earn a commission from merchant affiliate links, including eBay, Amazon, and others.
Your bar is really awesome. I would assume that the height of your bar is around 42 inches but what is the height of the lower cabinet/countertop of your bar? Also, what was the stain color that you used? Thanks
 
Your bar is really awesome. I would assume that the height of your bar is around 42 inches but what is the height of the lower cabinet/countertop of your bar? Also, what was the stain color that you used? Thanks

The bar top is 42.5" high and the lower countertop is 36" high. The stain I used was Minwax dark walnut.

Thanks. That helps a lot.

If you post a build thread make sure to post a link to it here so I can follow along.
 
Awesome work, and love both your builds, especially the keezer. I totally understand the scheduling with work, wife, kids and what not. My build took years but included finishing the whole basement. I did everything except the taping and carpet.

I do regret not installing the bar back cabinets but space was a concern with an antique pool table we have/had. We didn't want obstructed shots so the bar back was eliminated and the bar ended up on the opposite side of the basement where the utilities are located so mines dry. Not a huge deal but I would highly recommend anyone thinking, dreaming or designing theirs to go wet. A small wet sink is much better than a bucket under the bar.

I also wasn't a brewer back then so there's no room for a keezer but there is in the workshop now as the pool table is sold and I get the space for the brew lab

I spent way too much time on my bar top with regards to the finish, I probably have ten+ coats of poly on mine, wet sand, poly, wet sand, poly and perfection until I drop the register grill on mine so I have a dime size divot that's a 1/16" deep (lots of poly) and it's still there years later and I don't care now as its a bar, use it. I also wish I did the bar rail but skipped due to costs and I spend most of the time behind the bar and the guests miss one but they're drinking for free so.

Here's a pic of the bar and mess during cleanup for Christmas

Bar.JPG
 
Awesome work, and love both your builds, especially the keezer. I totally understand the scheduling with work, wife, kids and what not. My build took years but included finishing the whole basement. I did everything except the taping and carpet.

I do regret not installing the bar back cabinets but space was a concern with an antique pool table we have/had. We didn't want obstructed shots so the bar back was eliminated and the bar ended up on the opposite side of the basement where the utilities are located so mines dry. Not a huge deal but I would highly recommend anyone thinking, dreaming or designing theirs to go wet. A small wet sink is much better than a bucket under the bar.

I also wasn't a brewer back then so there's no room for a keezer but there is in the workshop now as the pool table is sold and I get the space for the brew lab

I spent way too much time on my bar top with regards to the finish, I probably have ten+ coats of poly on mine, wet sand, poly, wet sand, poly and perfection until I drop the register grill on mine so I have a dime size divot that's a 1/16" deep (lots of poly) and it's still there years later and I don't care now as its a bar, use it. I also wish I did the bar rail but skipped due to costs and I spend most of the time behind the bar and the guests miss one but they're drinking for free so.

Here's a pic of the bar and mess during cleanup for Christmas

Your bar looks awesome! I wish I had the space for a longer bar. How long is yours? 15? 20 feet?

I almost went with a dry bar due to the pain of plumbing (which I hate doing in general) with having to install the sink pump and all, but ended up deciding to, which I'm very glad I did. I had also then thought about installing a small 18" dishwasher, but decided against it. With as many glasses as I've washed now in that tiny sink, I wish I had put in a dishwasher. Oh well!
 
I haven't updated in awhile, but I got a bit more done. If anyone is following my other thread, I finished the keezer and have six kegs on gas. I'll connect the beverage lines on Friday when they should be done (or close to it) carbonating, and I'll be pulling my first pint.

The last thing I need to do is to connect my drain pipe from the drip tray drain to the sink drain. It's looking like I'll be getting out of work a bit early on Wednesday, so hopefully I'll be able to get it installed then so I'll be ready for the inauguration of the taps on Friday!

I also put together a tap list sign:

20170205_101556-X2.jpg


And I finished my tap handles:

20170205_100602-X2.jpg
 
Your bar looks awesome! I wish I had the space for a longer bar. How long is yours? 15? 20 feet?

I almost went with a dry bar due to the pain of plumbing (which I hate doing in general) with having to install the sink pump and all, but ended up deciding to, which I'm very glad I did. I had also then thought about installing a small 18" dishwasher, but decided against it. With as many glasses as I've washed now in that tiny sink, I wish I had put in a dishwasher. Oh well!

Thank you, the bar is 13'6" in length and now that both kids are of legal age it gets more than its fair share of use. They even let us use it sometimes

I did pipe a water line there for use with an ice maker but but my business hit a dry spot back then and didn't pull the trigger a $900 ice maker. I still should've put in a sink.

I have HUGE tap envy with your setup, I'm going to build my keezer this summer now that I've gained space in the workshop. I still haven't jumped to kegging, yet.

I had also briefly considered an icemaker, but I didn't want a huge one, and there weren't many small ones that got good reviews and could have a water line plumbed in. I definitely wasn't interested in a countertop one that I had to manually add water to.

If you're going to build a keezer, it won't be too much more work to run lines to your bar. If it will be a long distance, you can use glycol chilled run. Just an idea.
 
What did you use as edging to cover up the plywood ends? Is that basic molding, or did you custom route some material?

I'm trying to figure out how to finish the edges on my bar as well, and I'm looking for ideas.
 
Looks good. Thanks. That's a nice, easy solution.

I was planning on getting some 1" Maple stock, attaching it to the edge using a Kreig jig and glue, then routing the edge to round it.

I assume you just glued it and used a brad nailer to attach it?

I'll have to hit a lumber yard and see if I can get it in Maple.

How is it holding up?

Yeah, quite an easy solution.

I glued it and used a 23 ga pin nailer. I used brads for the bigger things, but for most of the moulding I use the pin nailer. I use about twice as many nails as a brad, but they're nearly invisible, and don't require any putty to cover the holes. A pin nailer is a must if you're doing fine trim work IMO.

It's holding up great so far.

I picked up a cheap pin nailer online a few weeks back. The first one kept jamming, so I had to replace it. The second one works great. It's a nice little tool.

I used it to attach the edging for my bar. I used 3/4" thick strip of 1x maple on 3/4" maple plywood. It finished the edge nicely. You can't find a nail hole. They're completely invisible.

I wish I had one of these when I redid my kitchen.
 
Hello everyone. It's been awhile since I've posted here (or even logged in). I figured I'd start to add some updates, as I'm in the middle of a basement/house remodel. I've got another baby on the way, my fourth, due tomorrow actually.

What I'm doing:
-Removing all carpeting in house
-Installing laminate flooring in four bedrooms and the finished portion of the basement
-Adding a new bedroom to the finished portion of the basement
-Repainting four bedrooms and the entire finished portion of the basement
-Doing some electrical work (new receptacles, additional lighting, tracts for hidden HDMI cables, etc.)
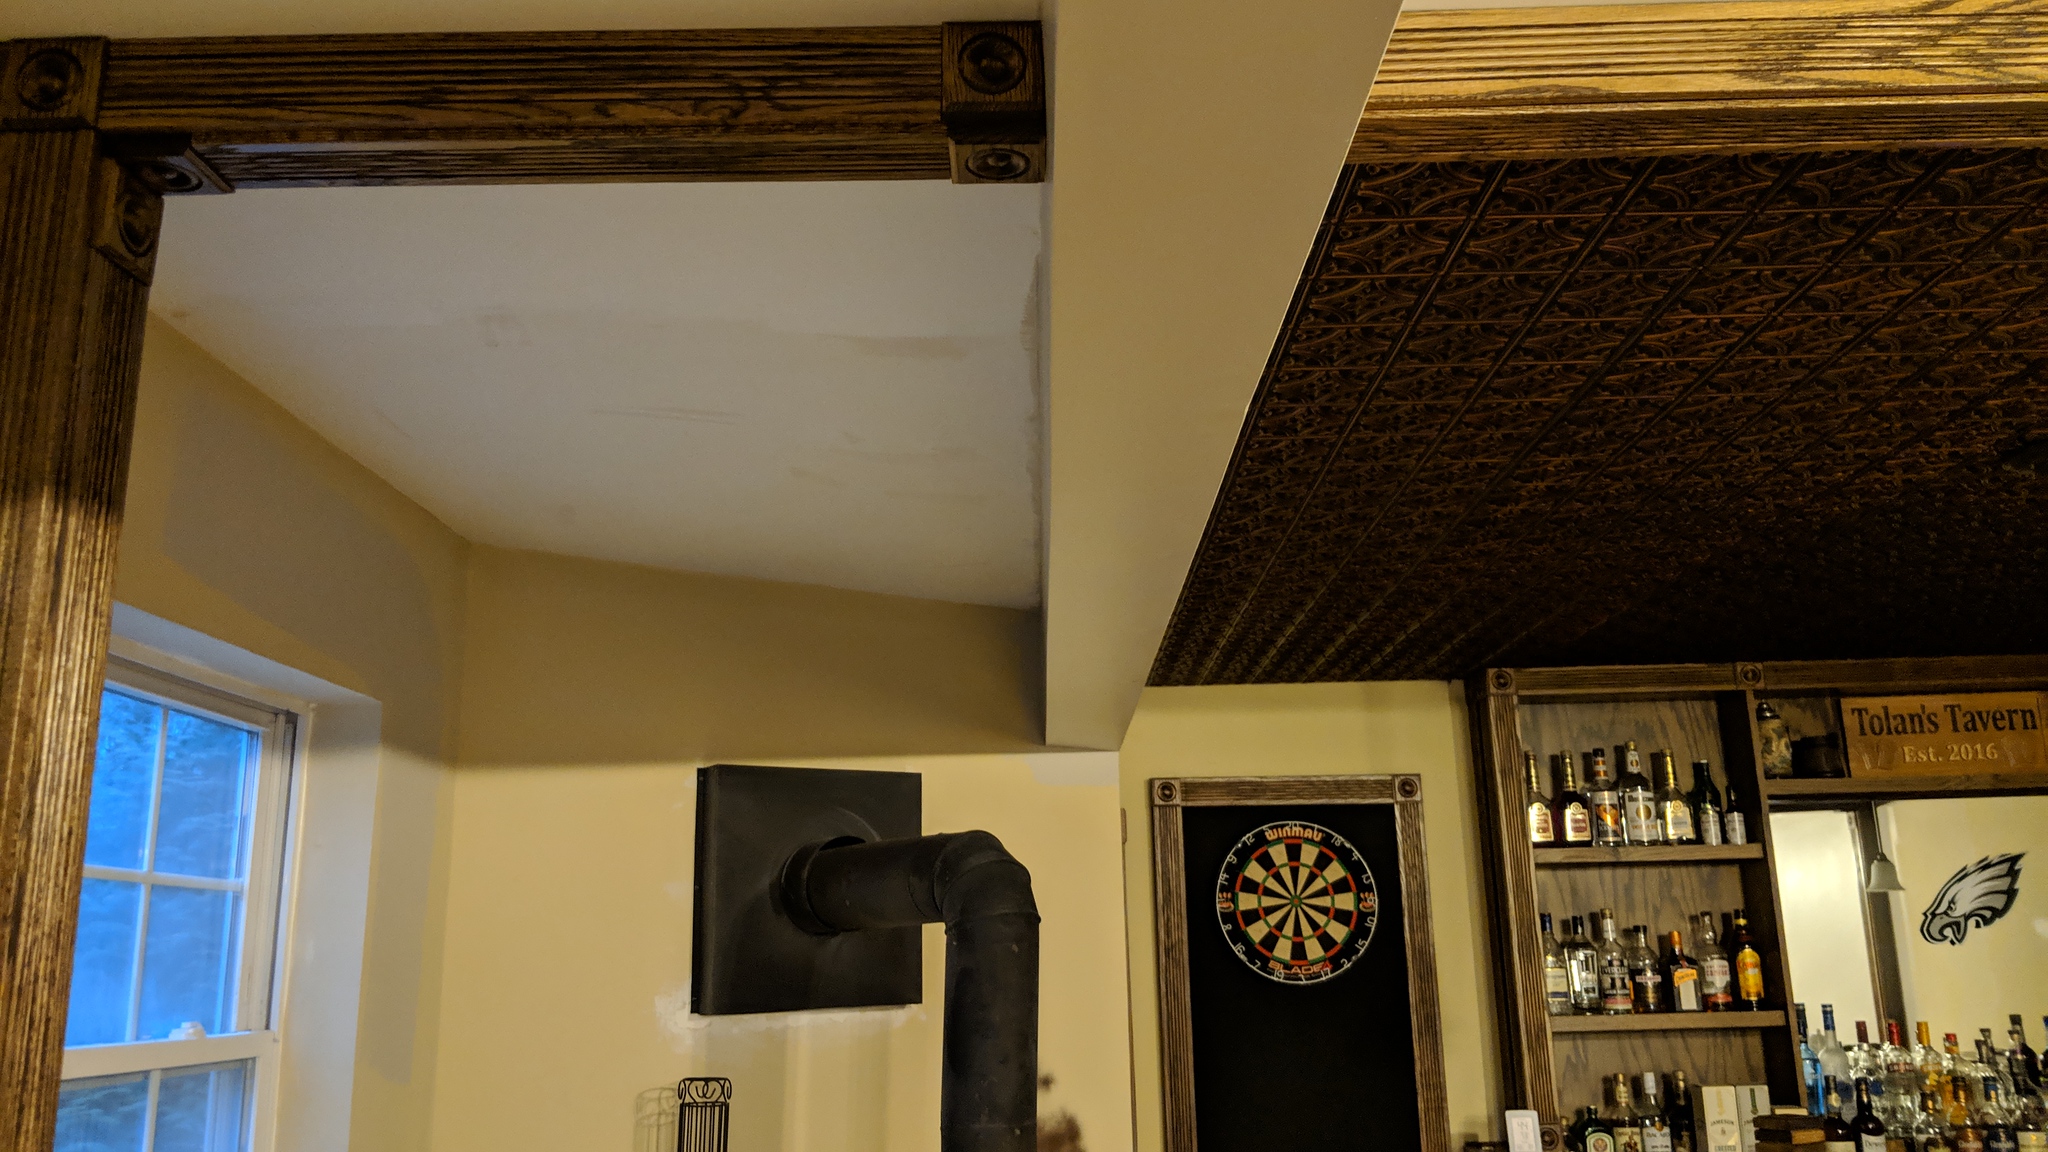
-Remove popcorn ceiling in basement
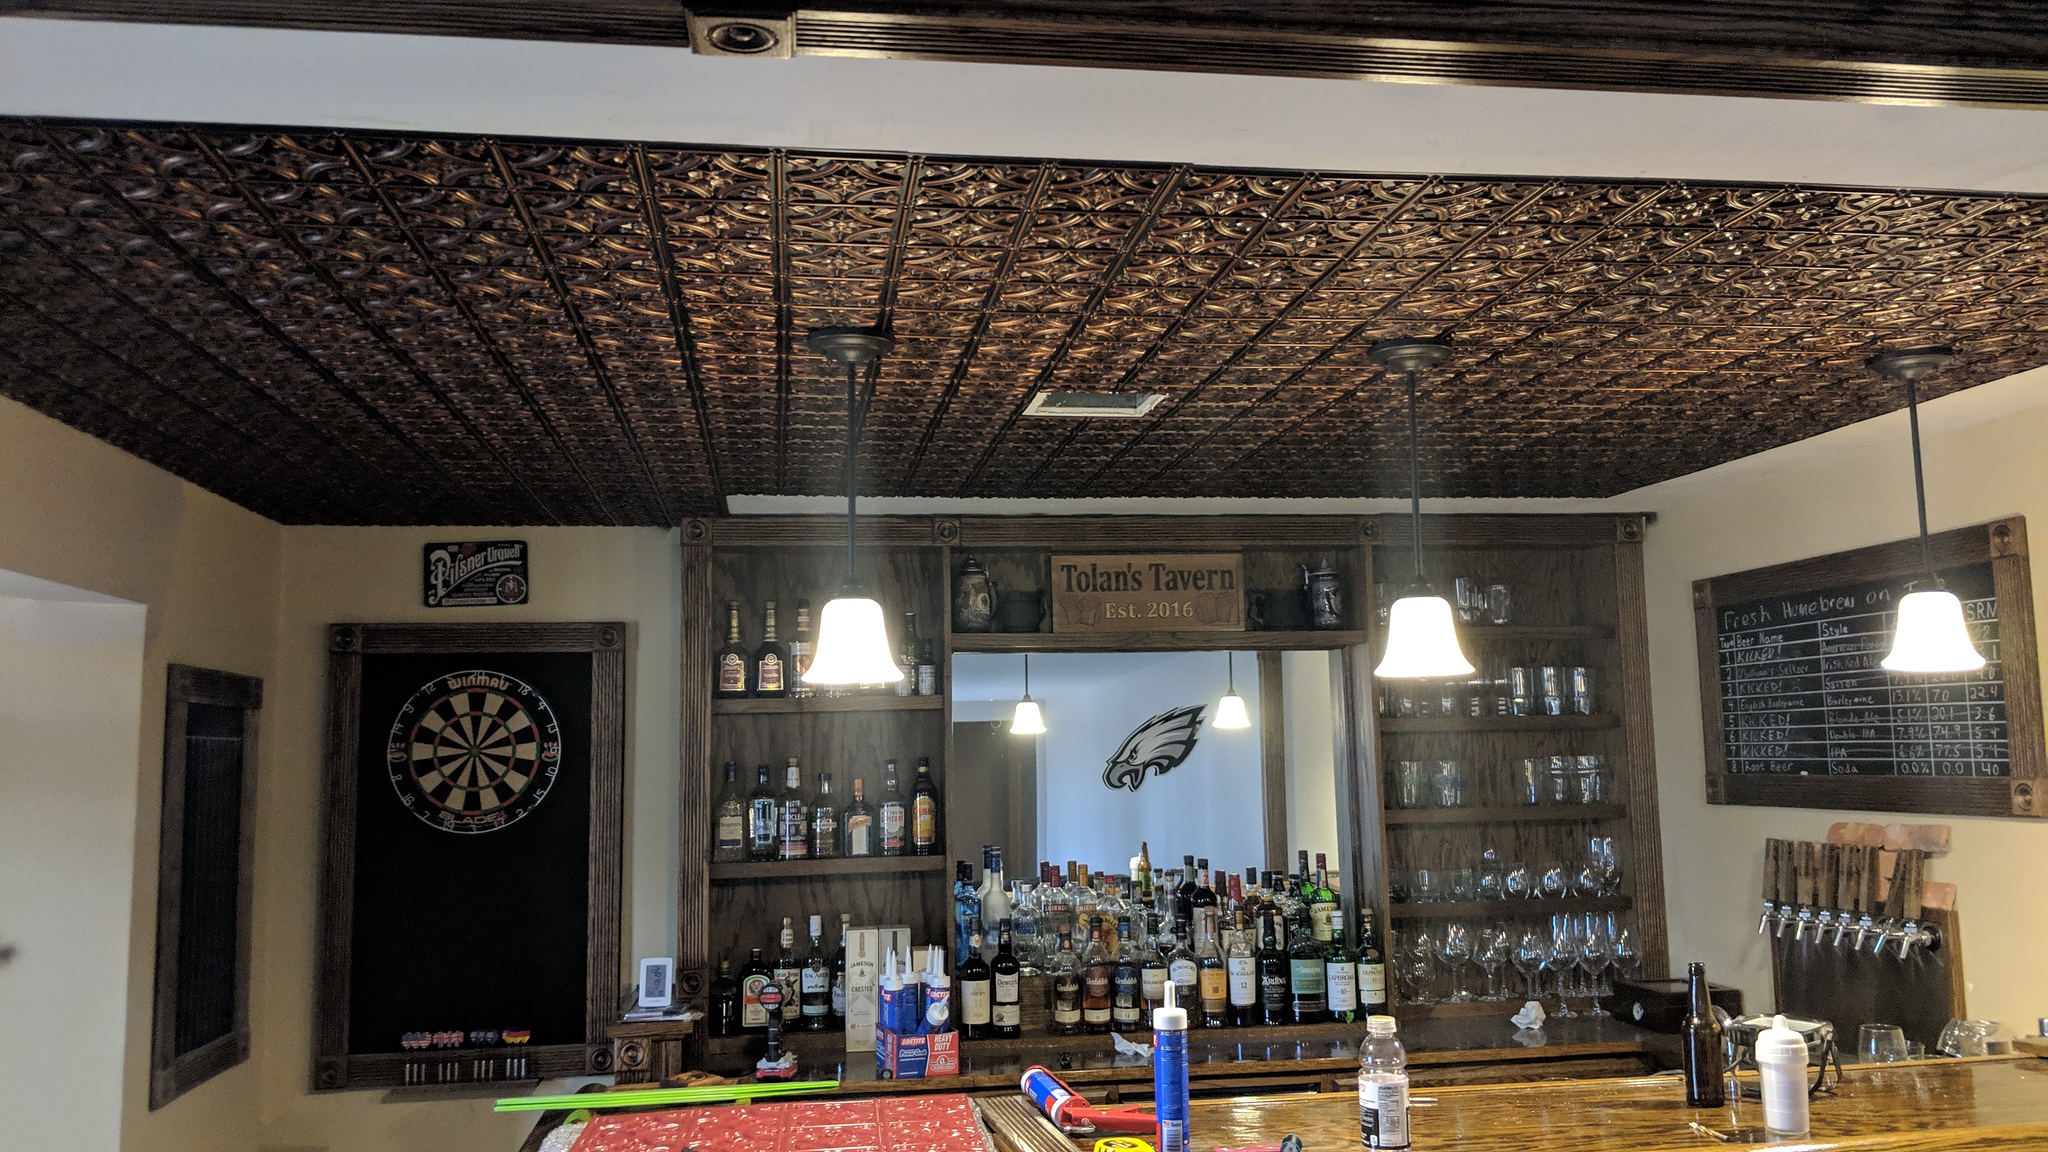
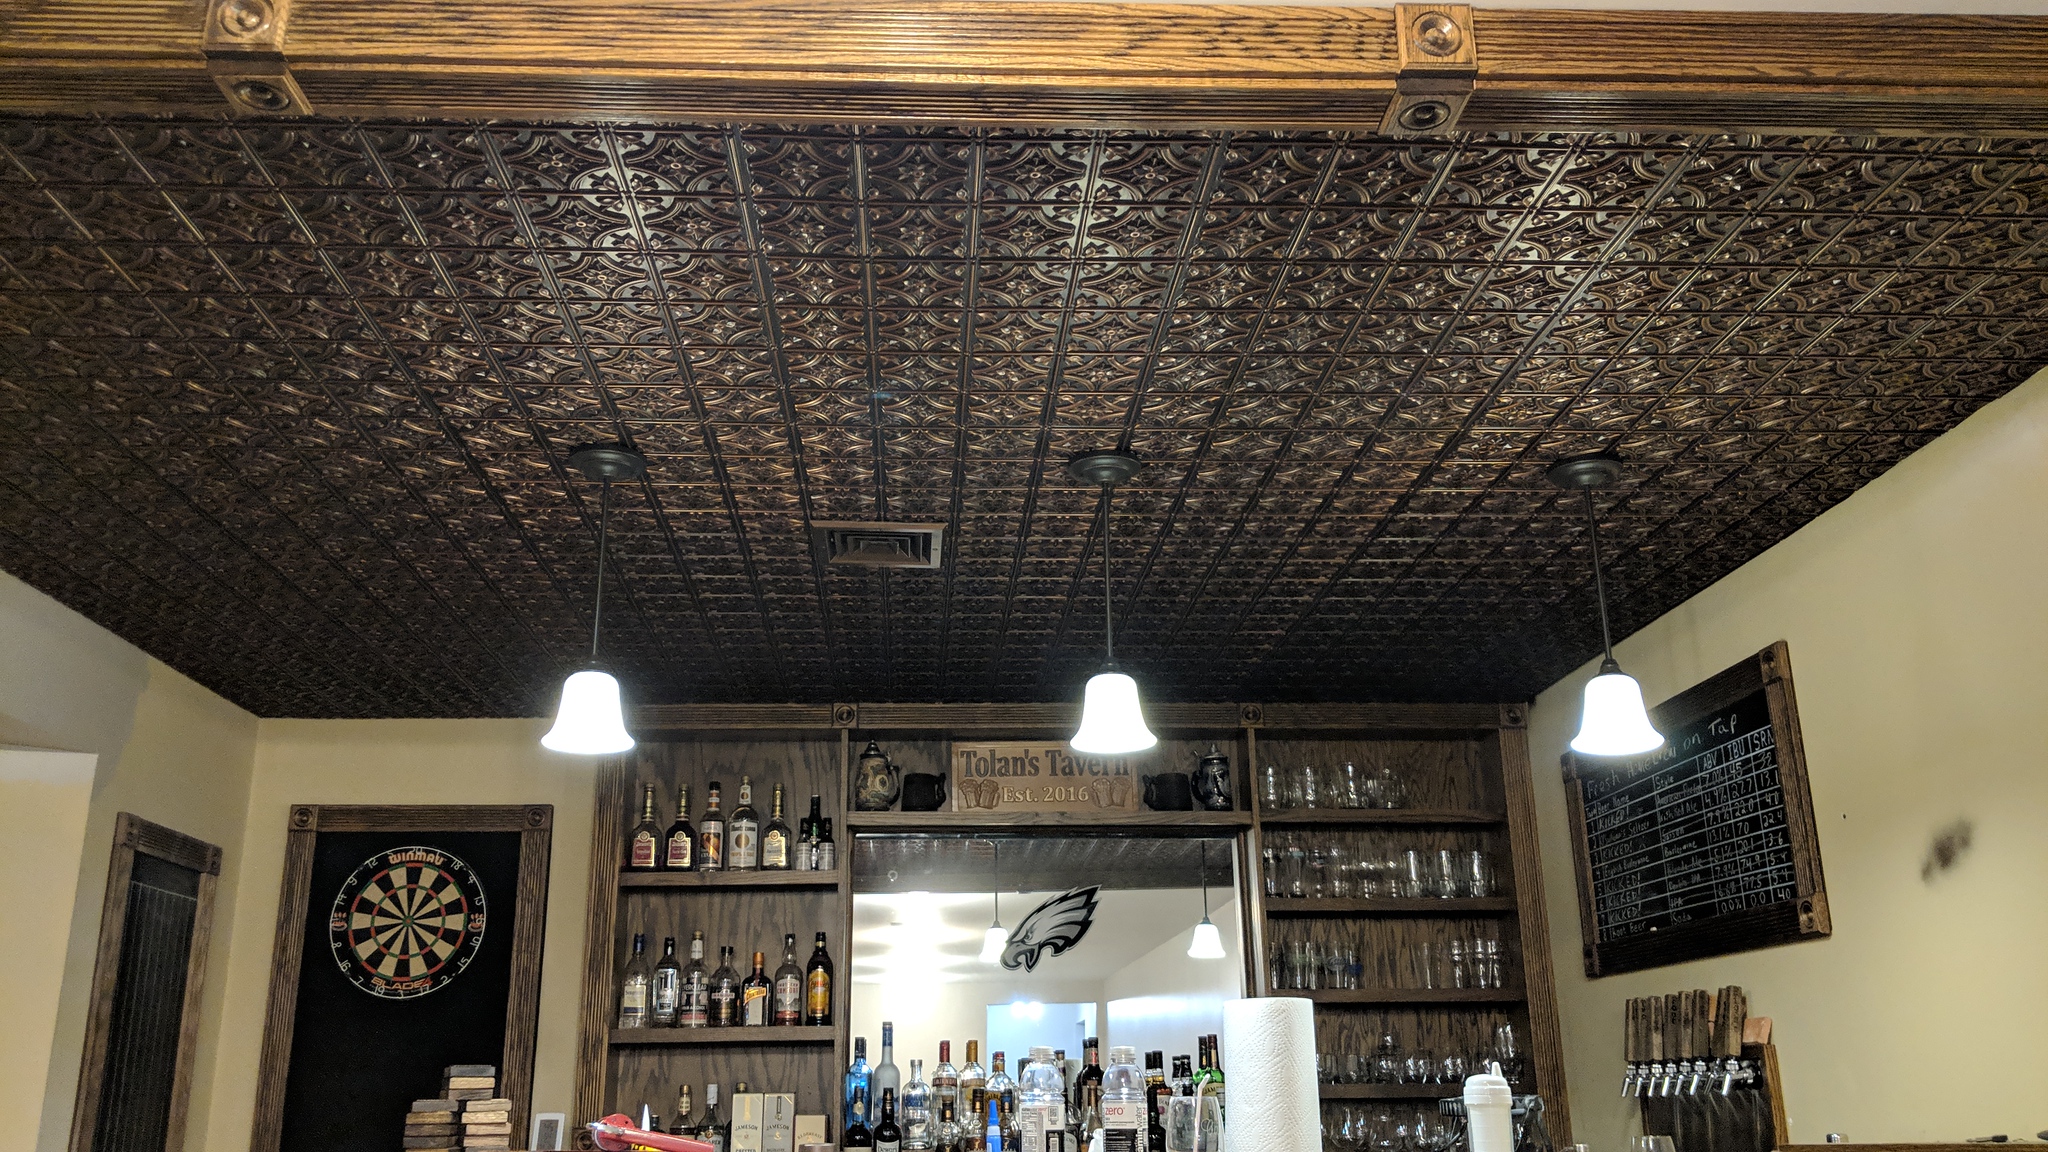
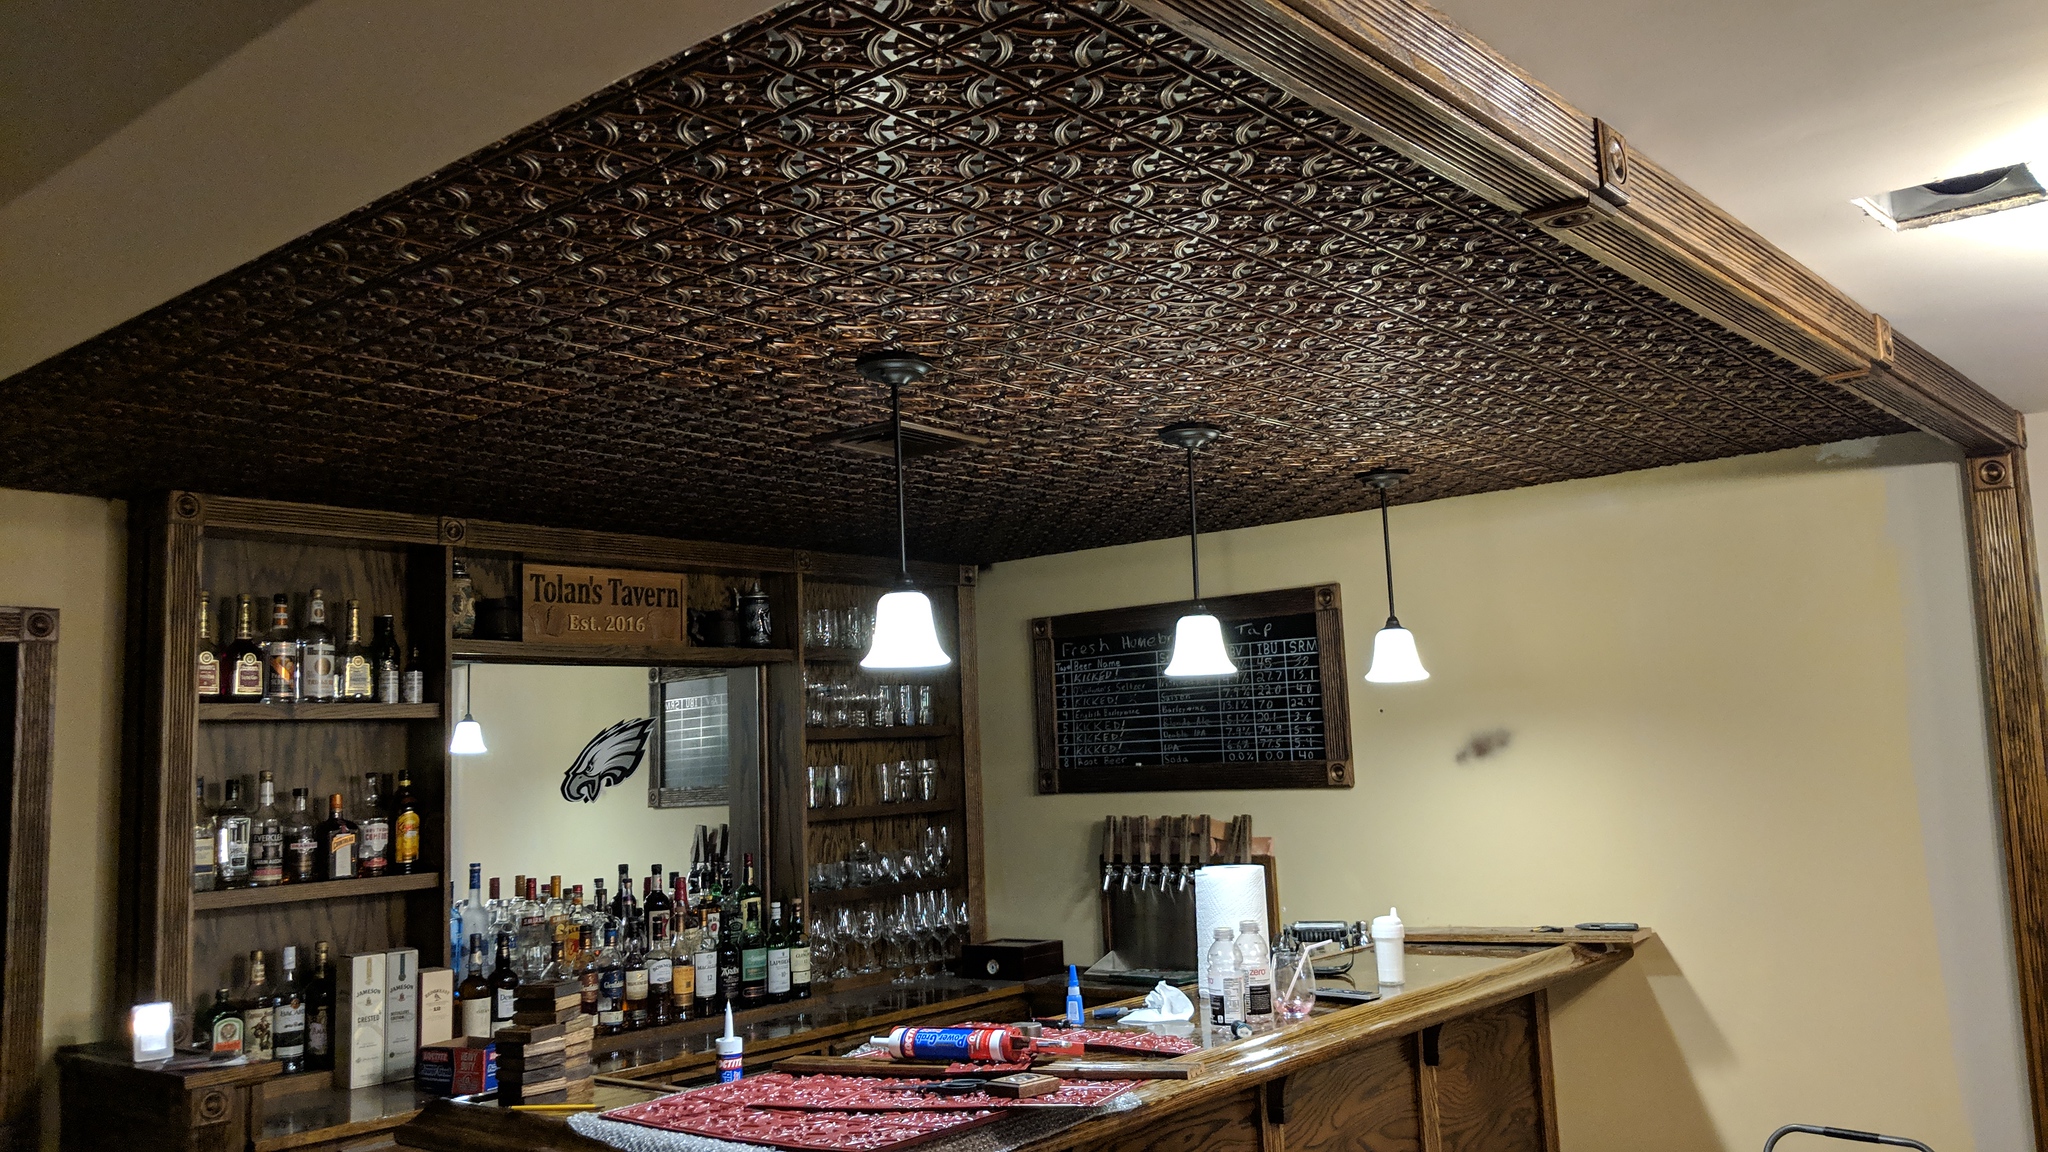
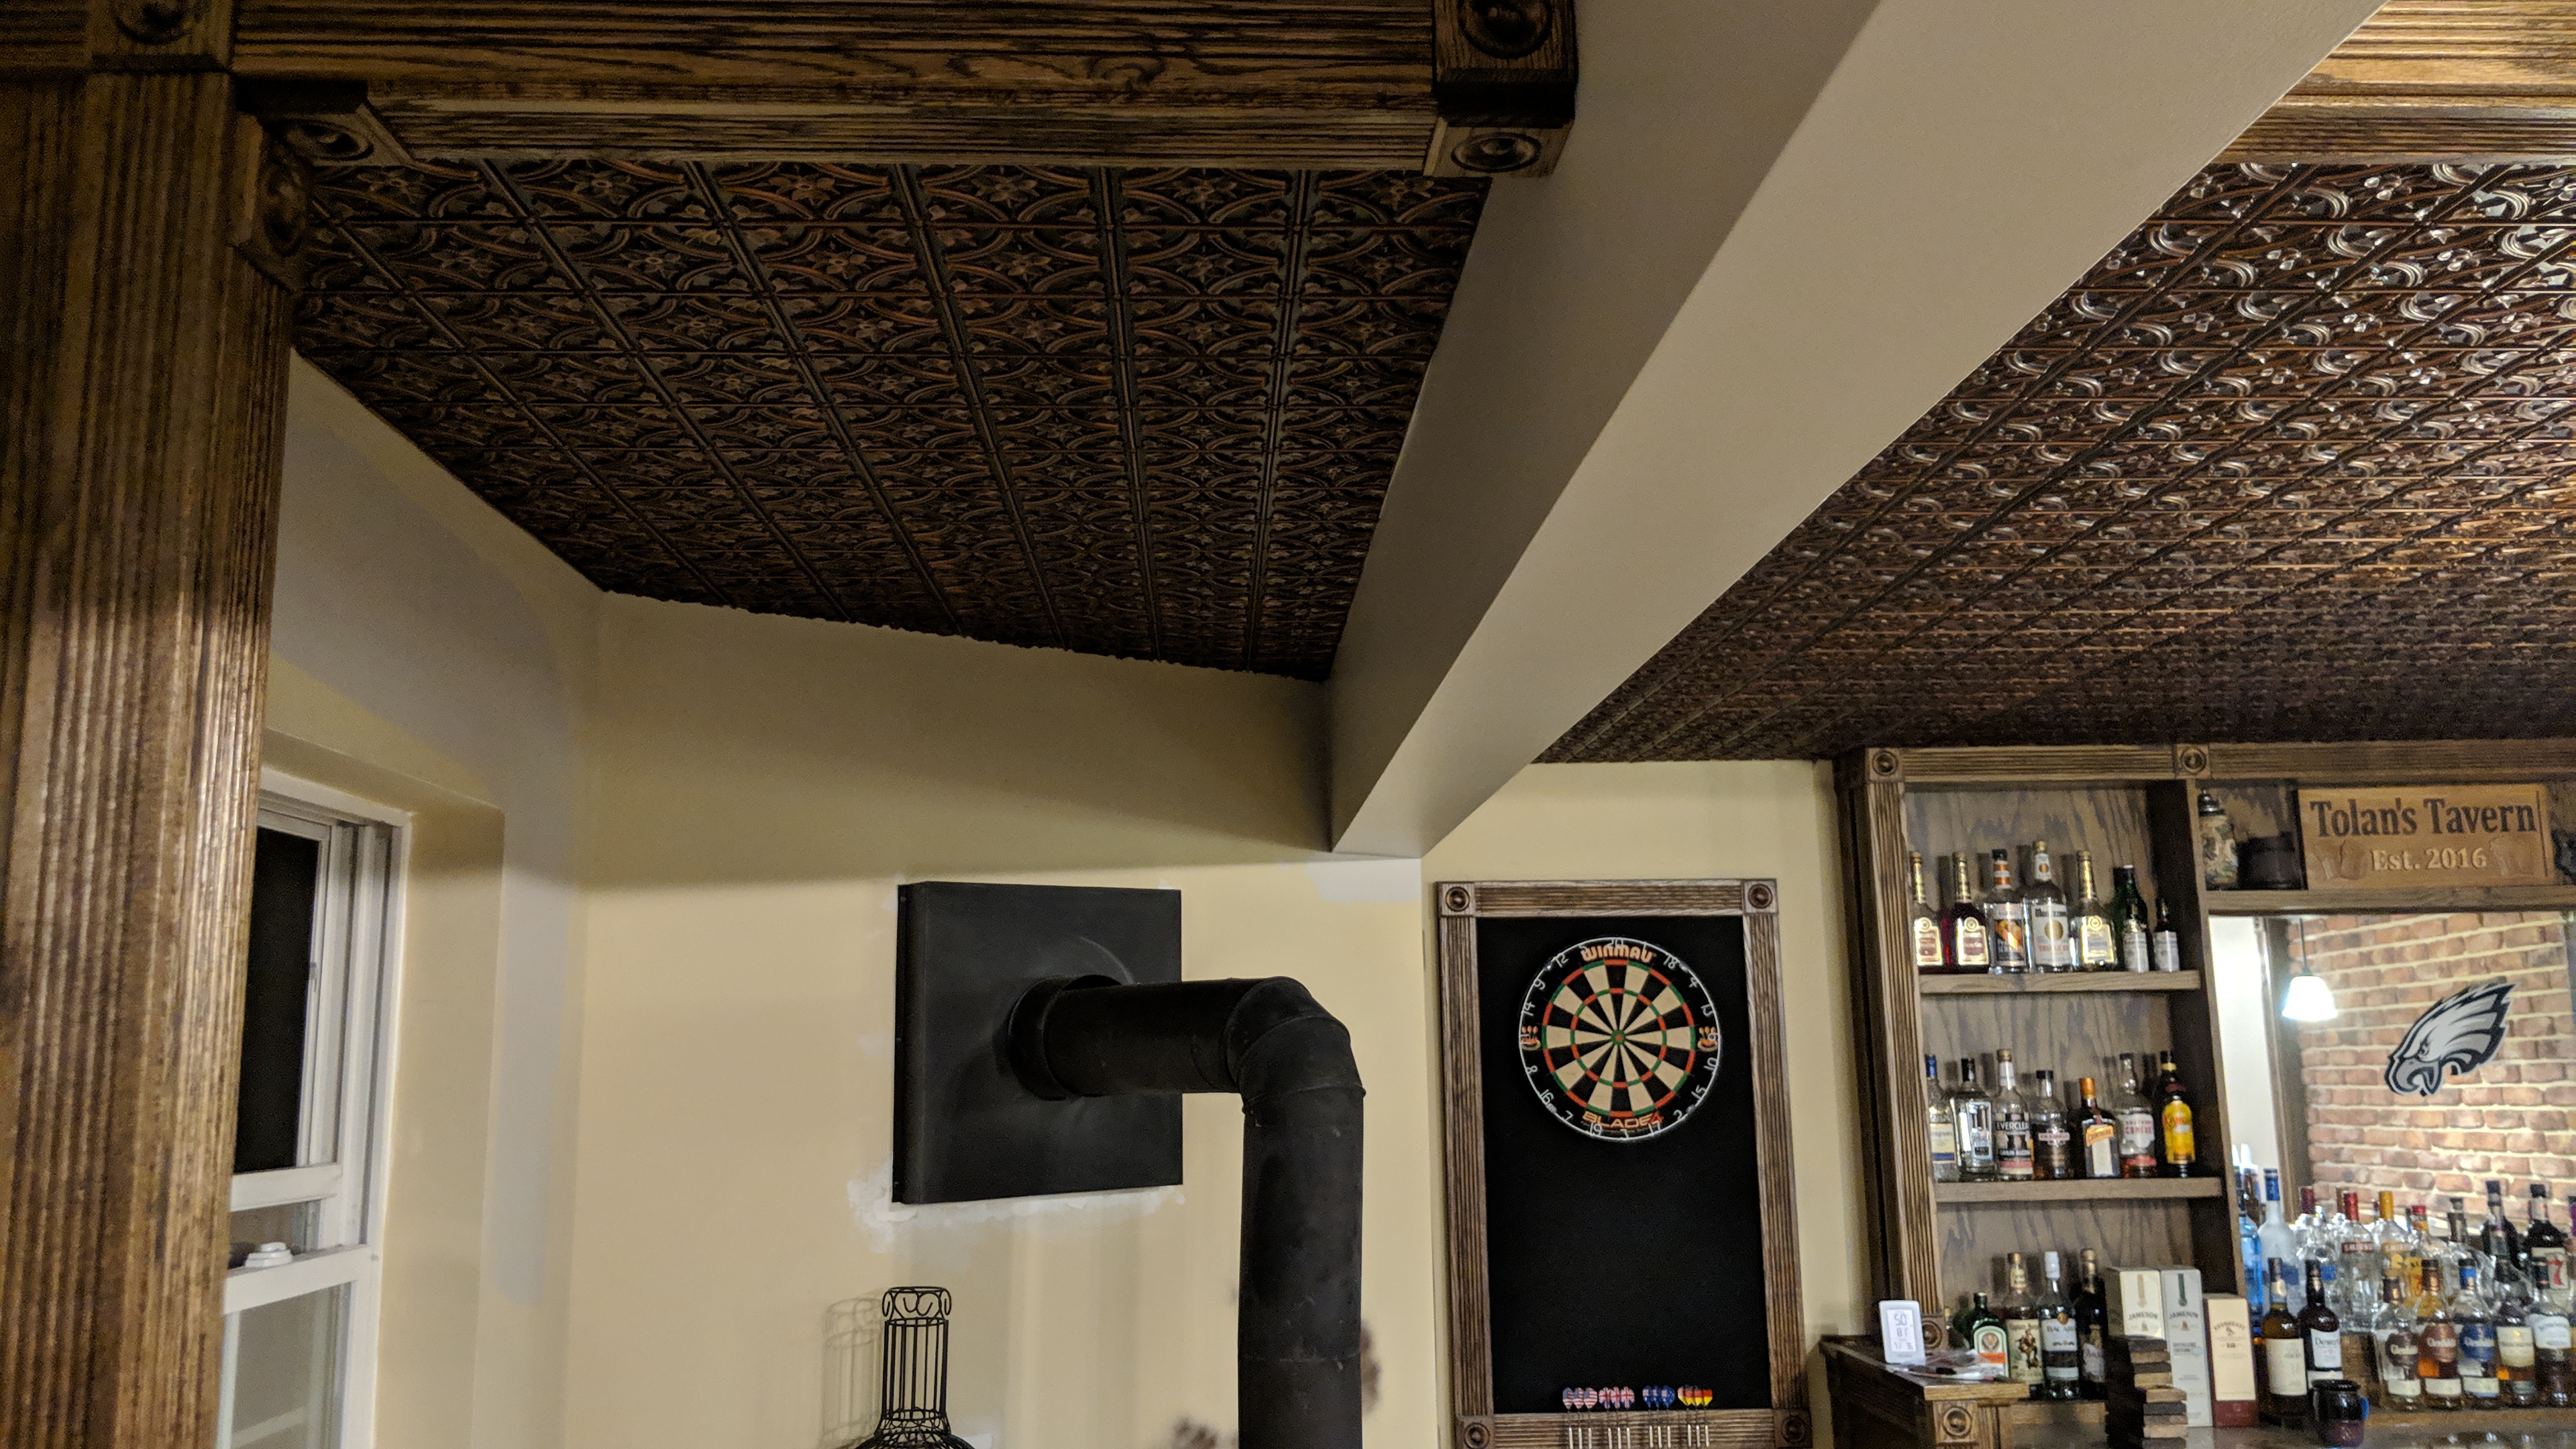
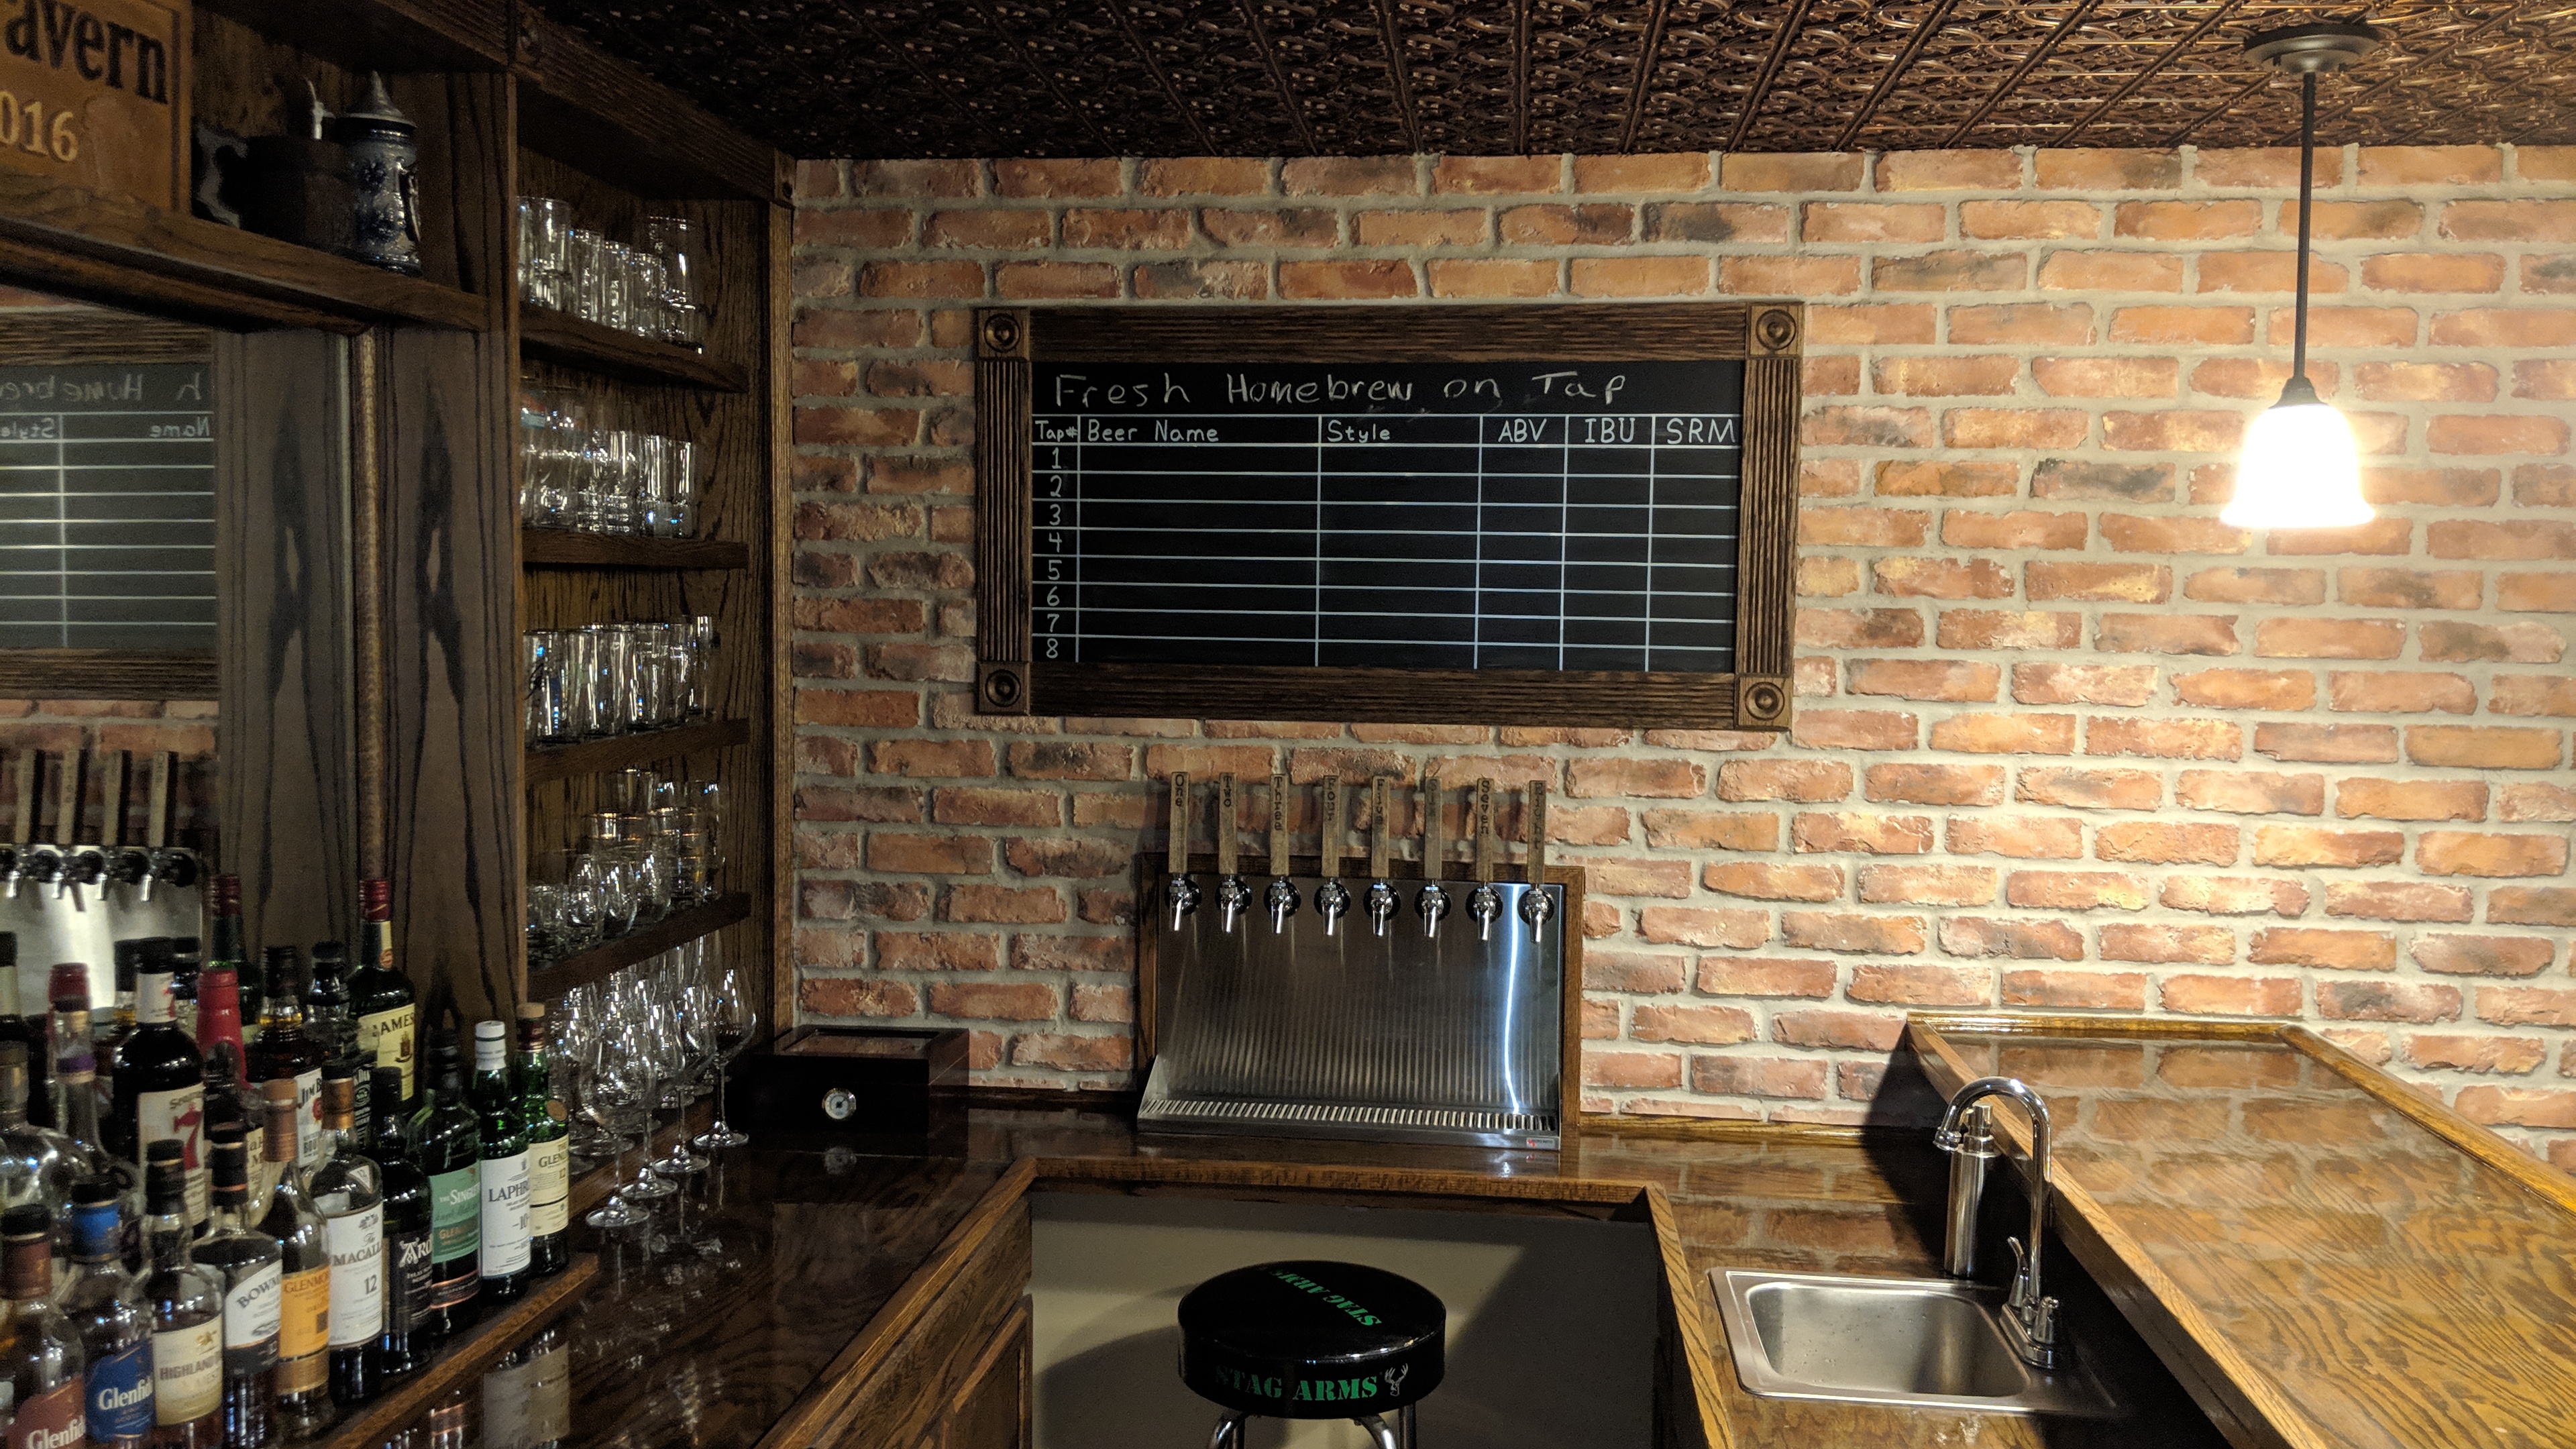
-Installing faux copper ceiling tiles above the bar area
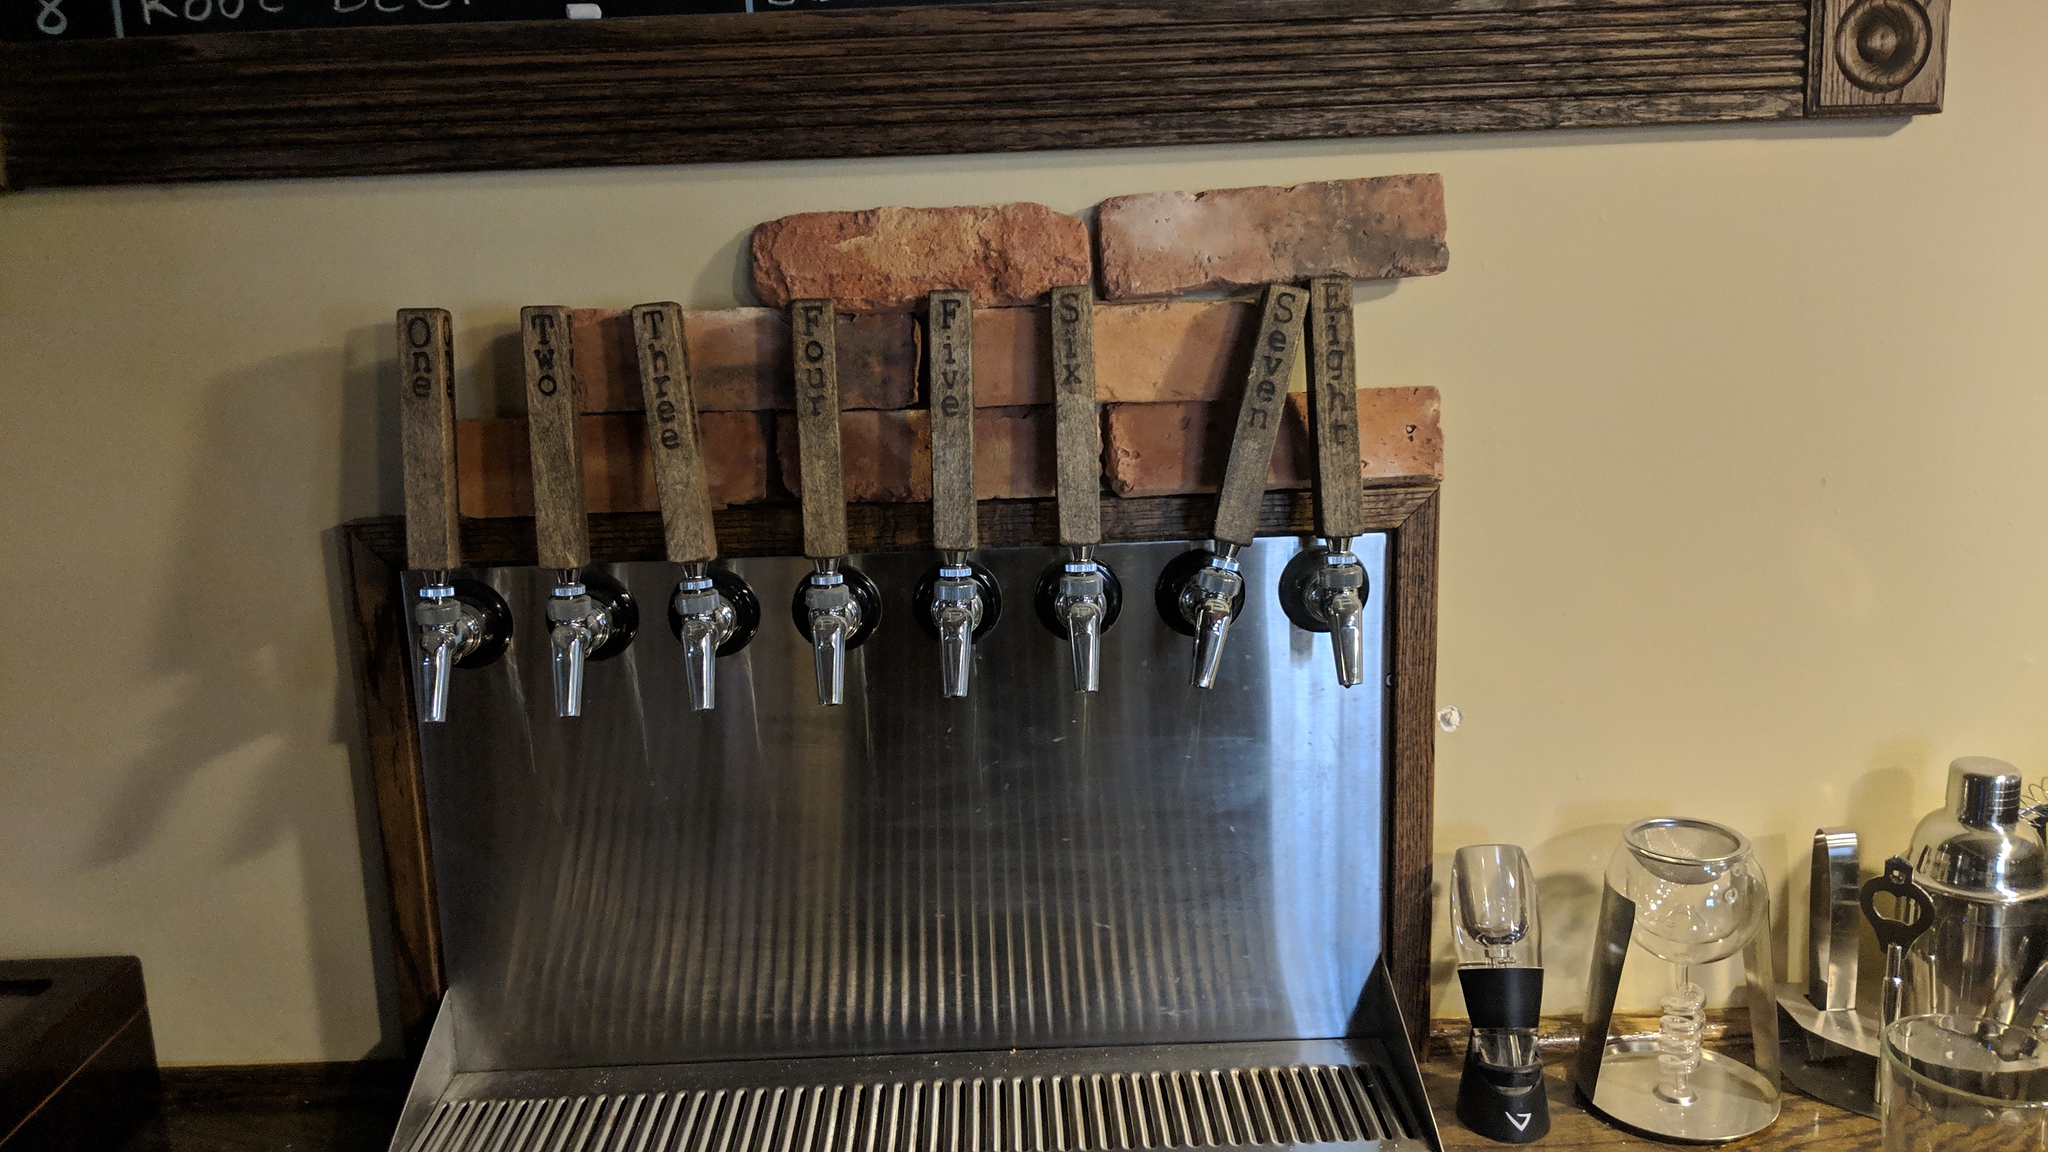
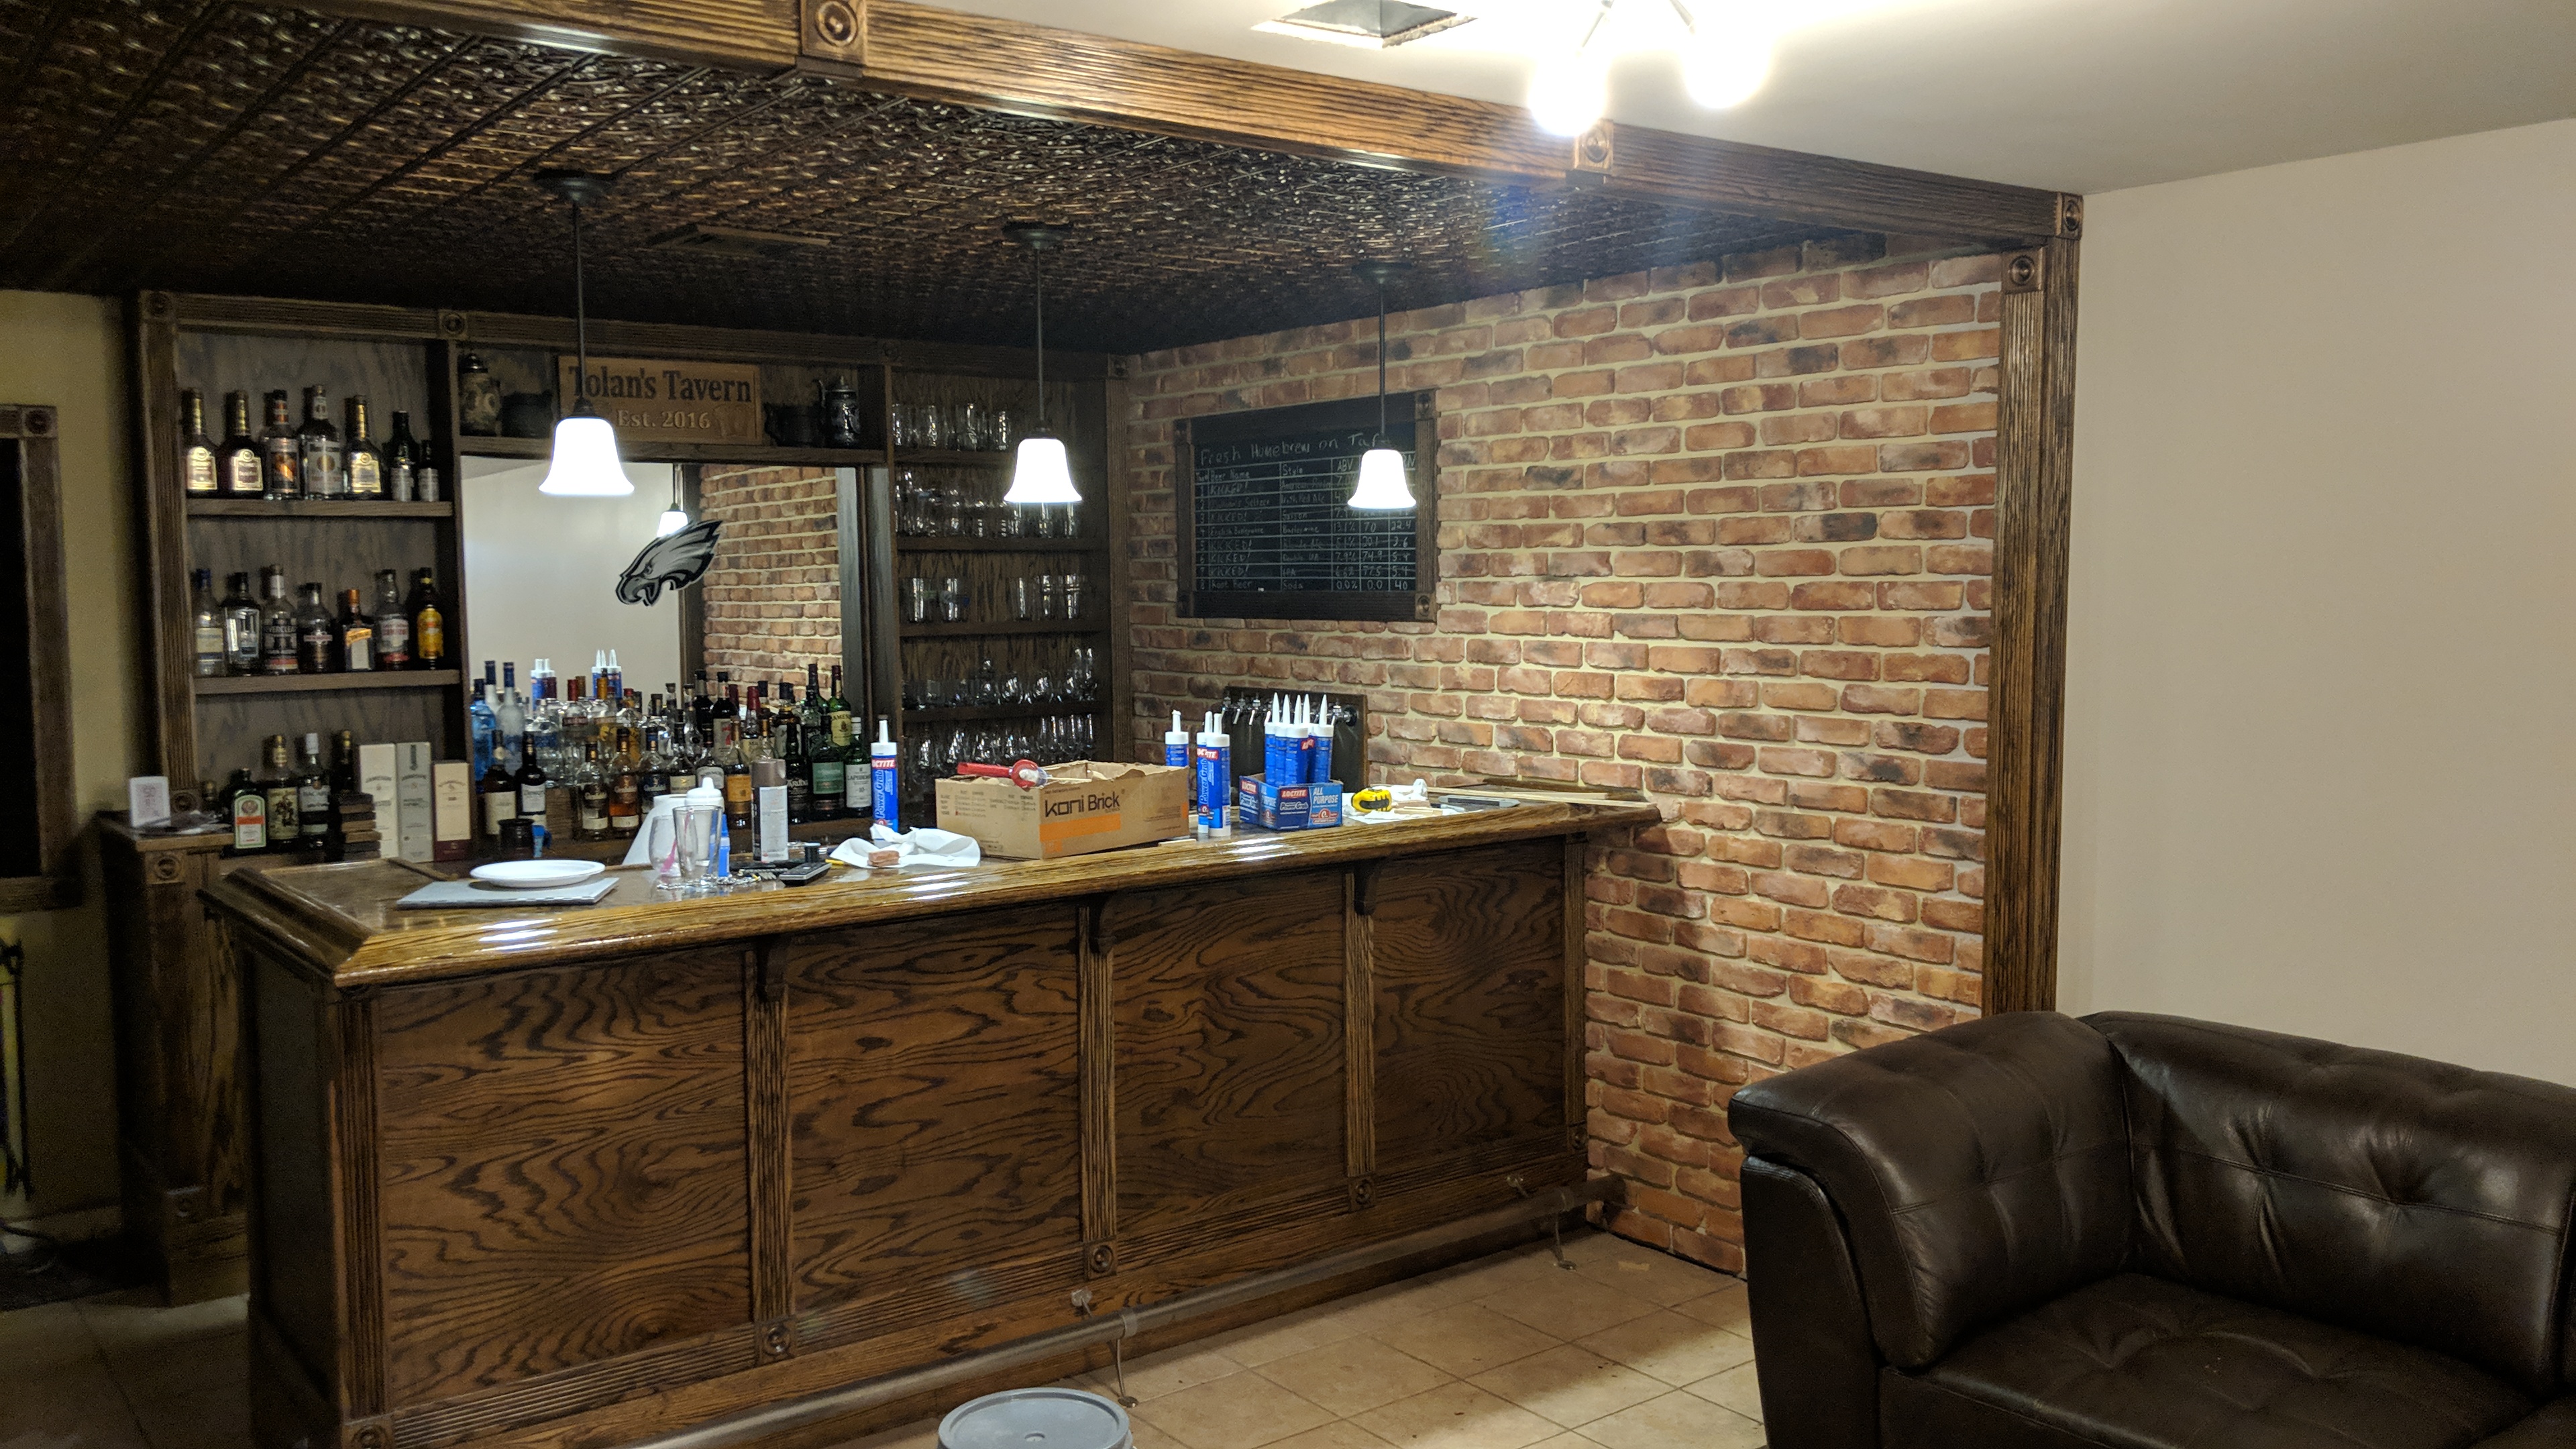
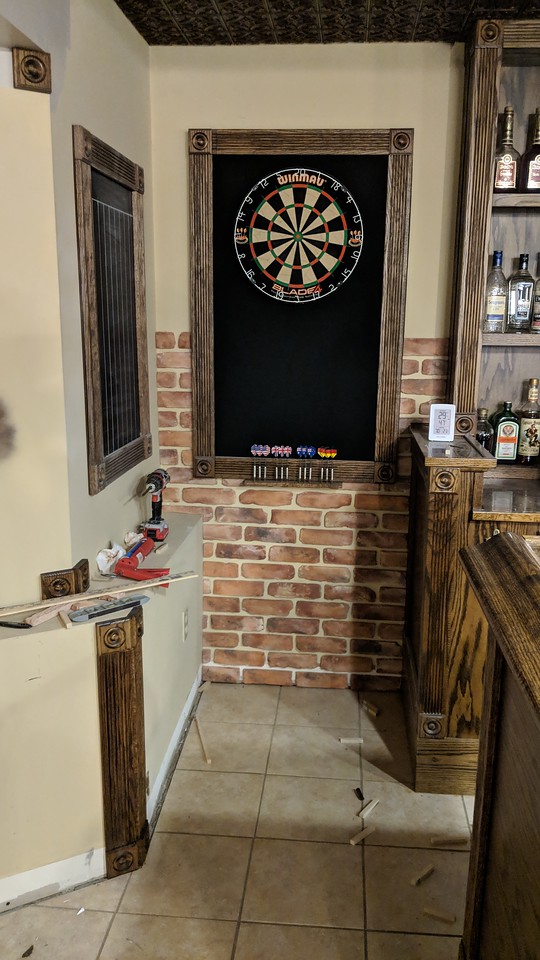
-Putting brick around bar area
-Installing oak pillars around the bar area
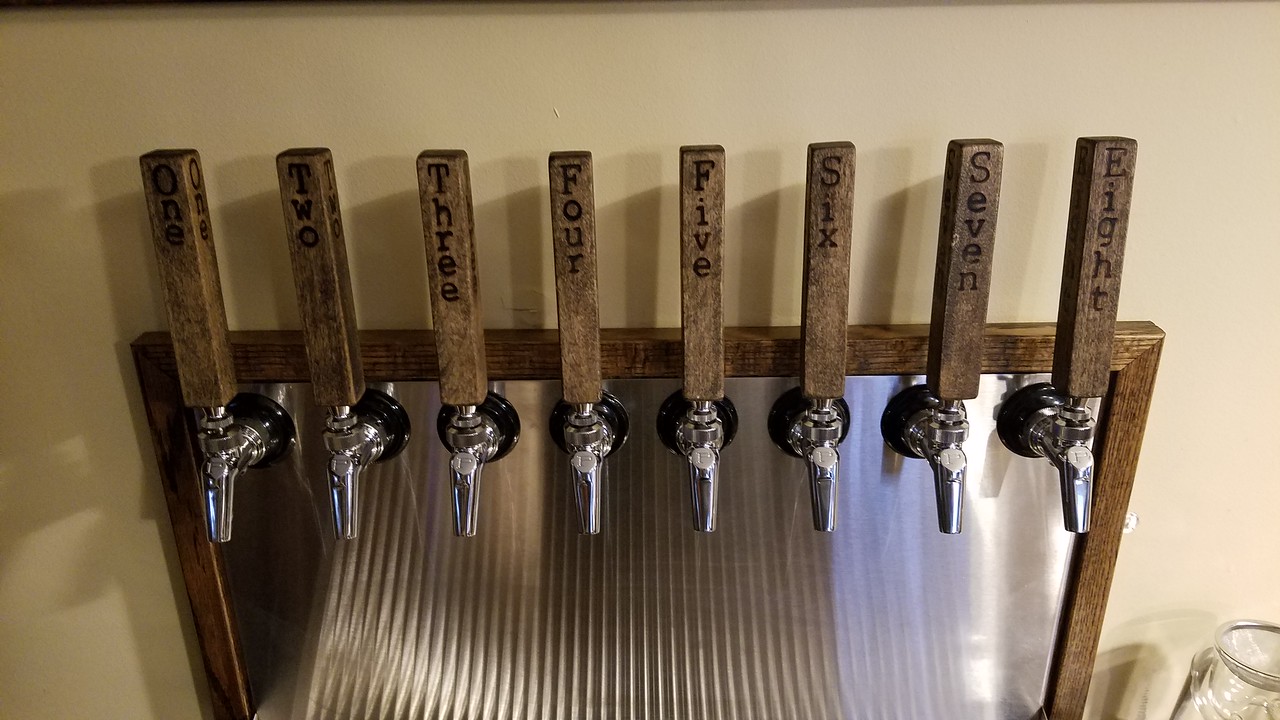
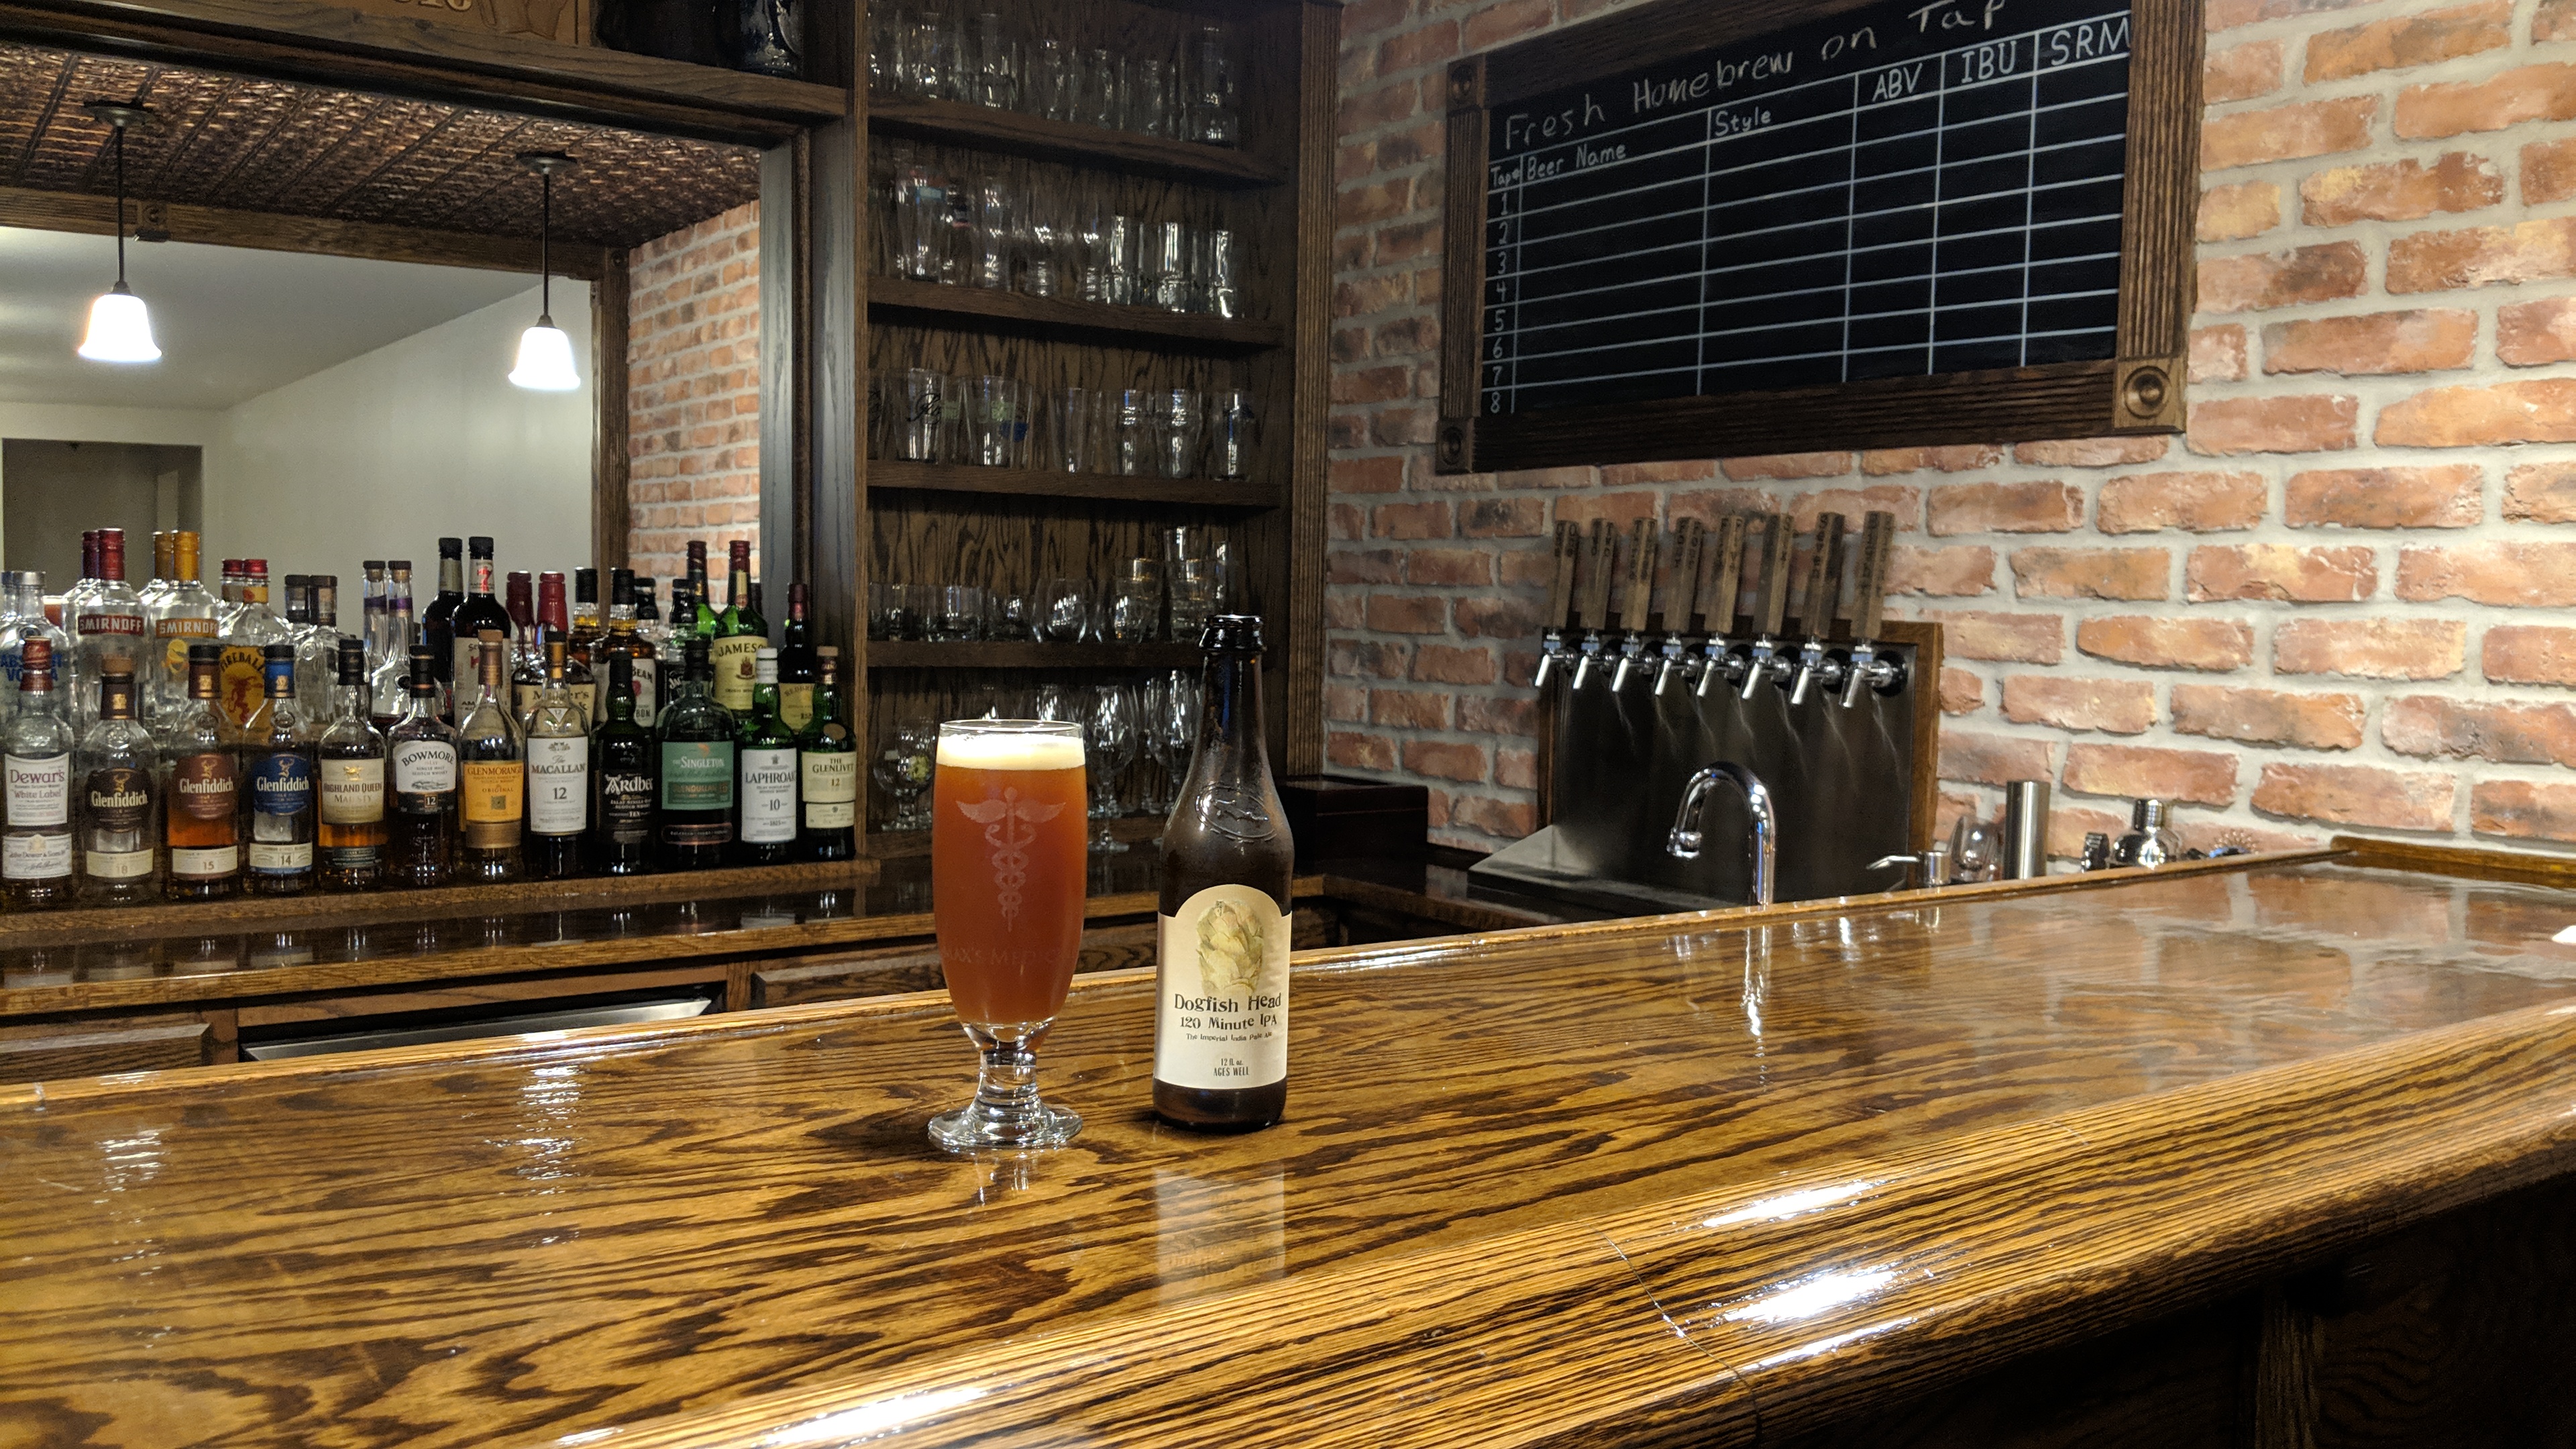
-Adding microwave and additional shelving underneath bar tap system
-Replacing broken keezer

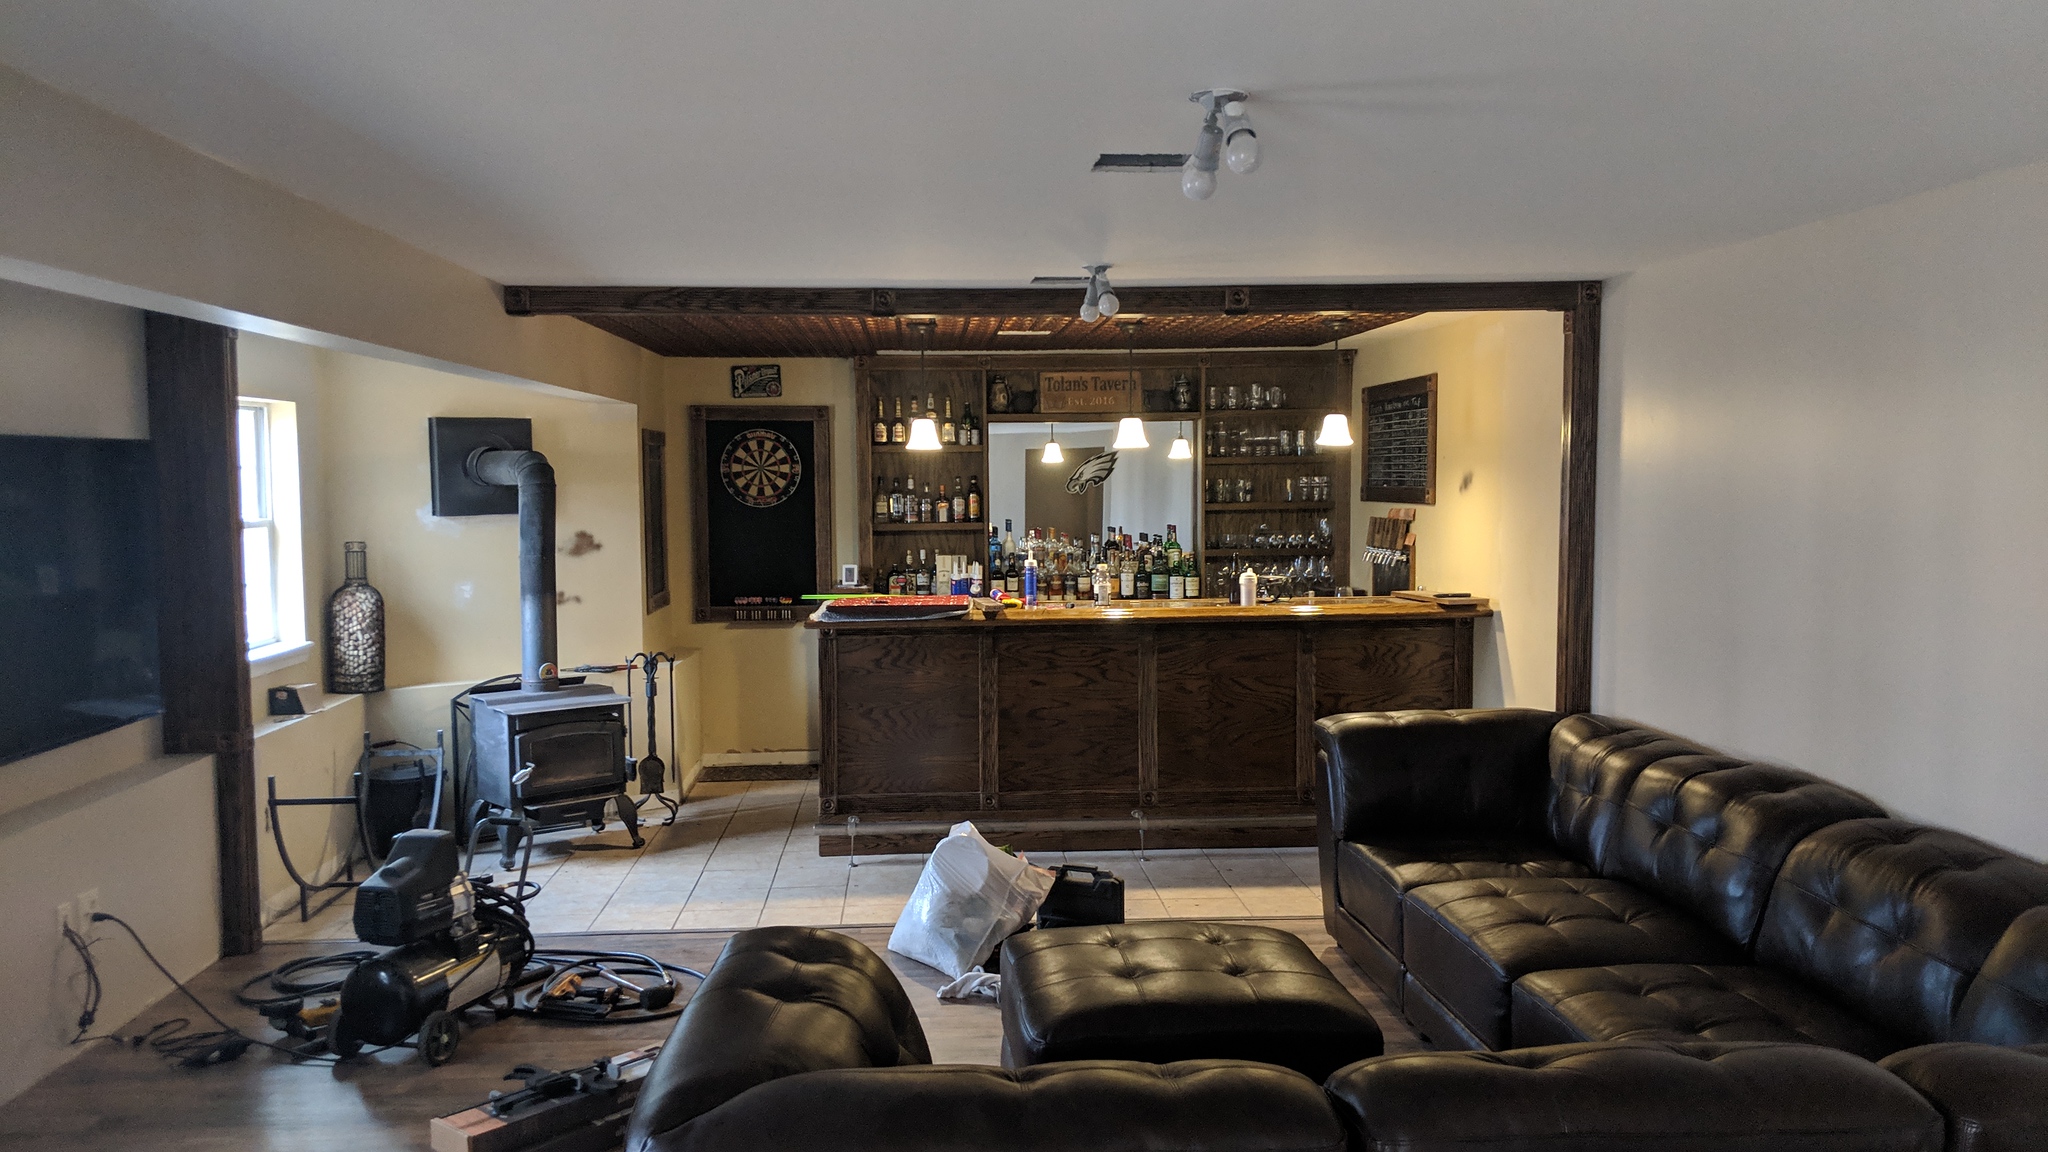
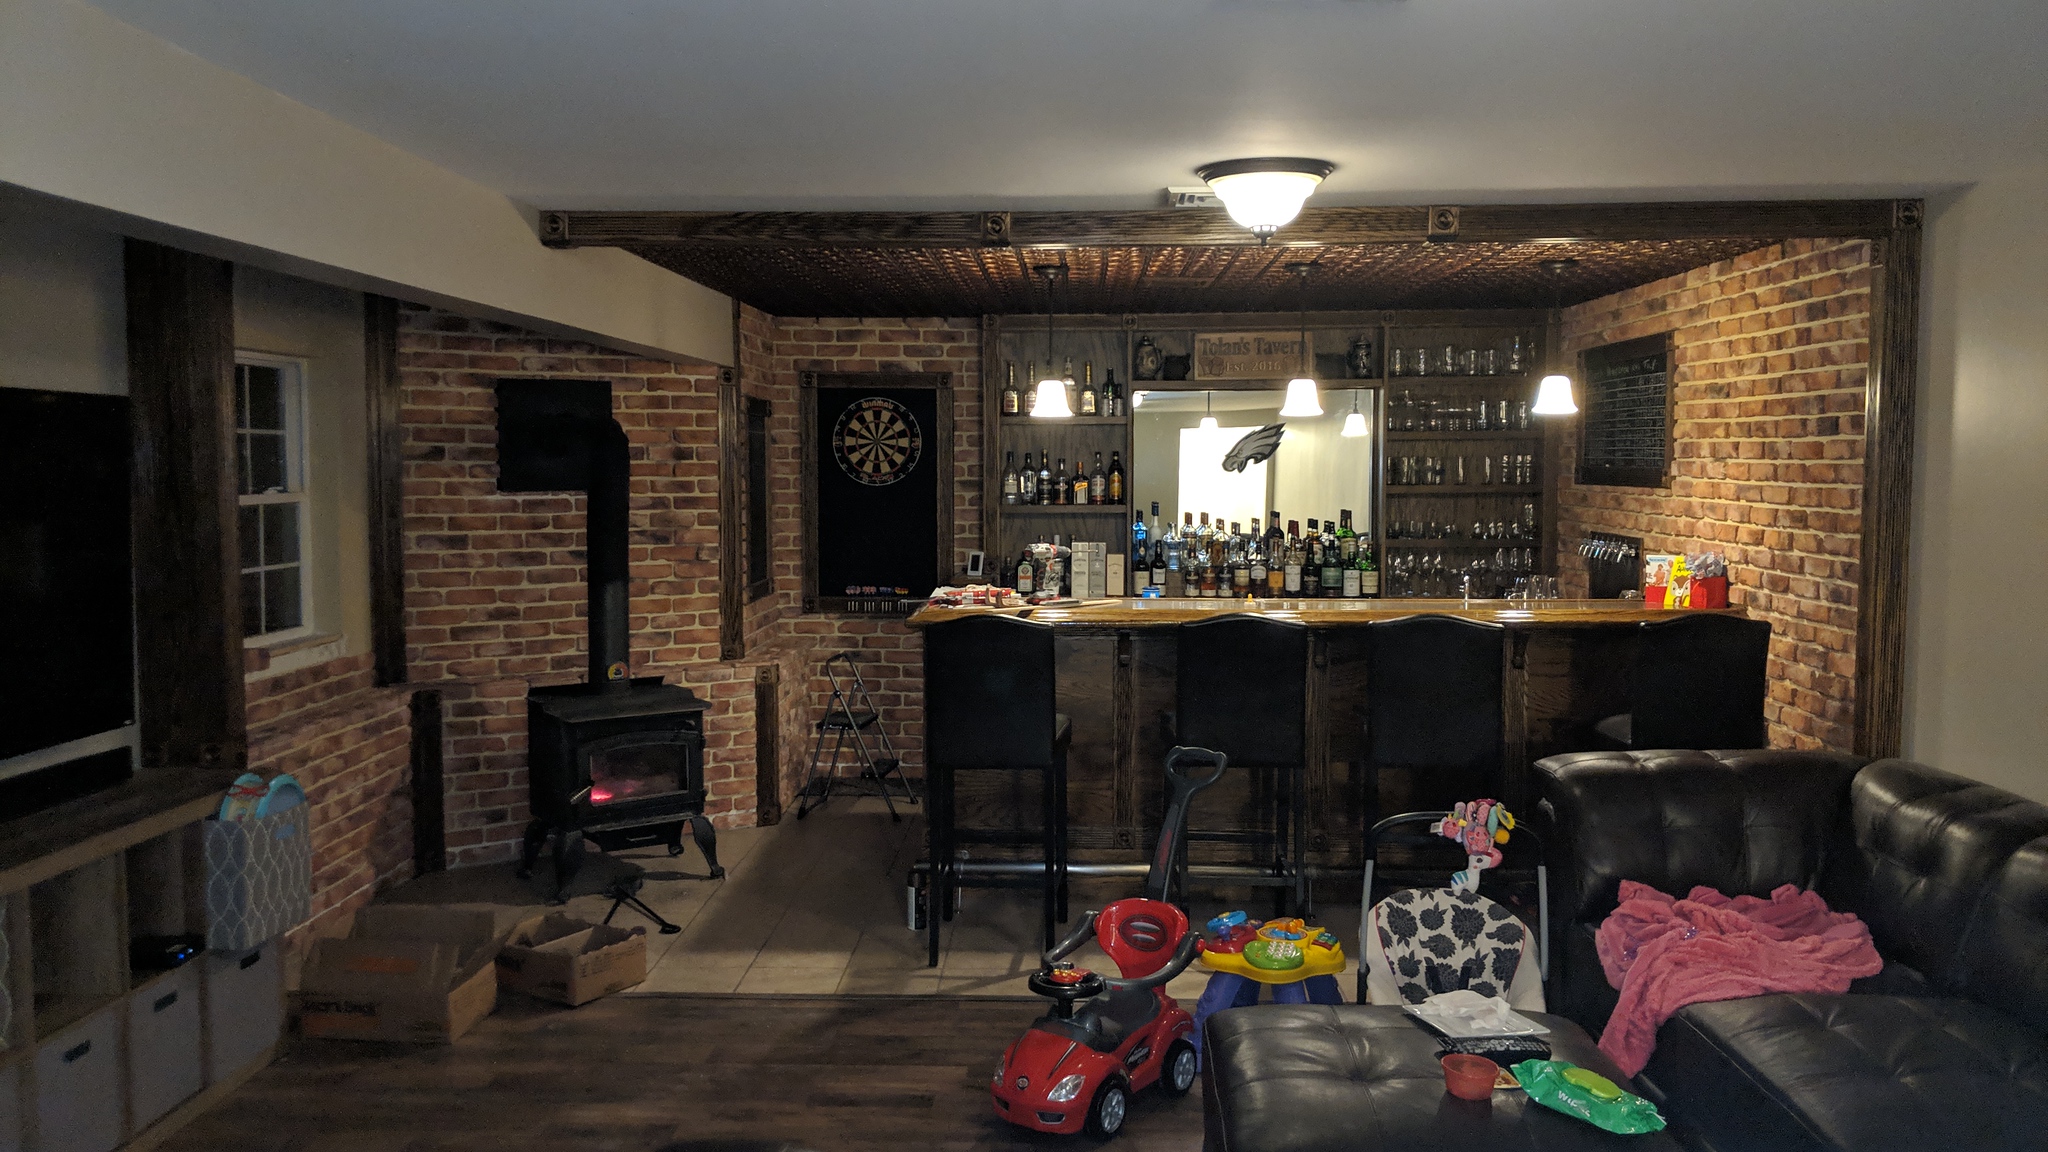
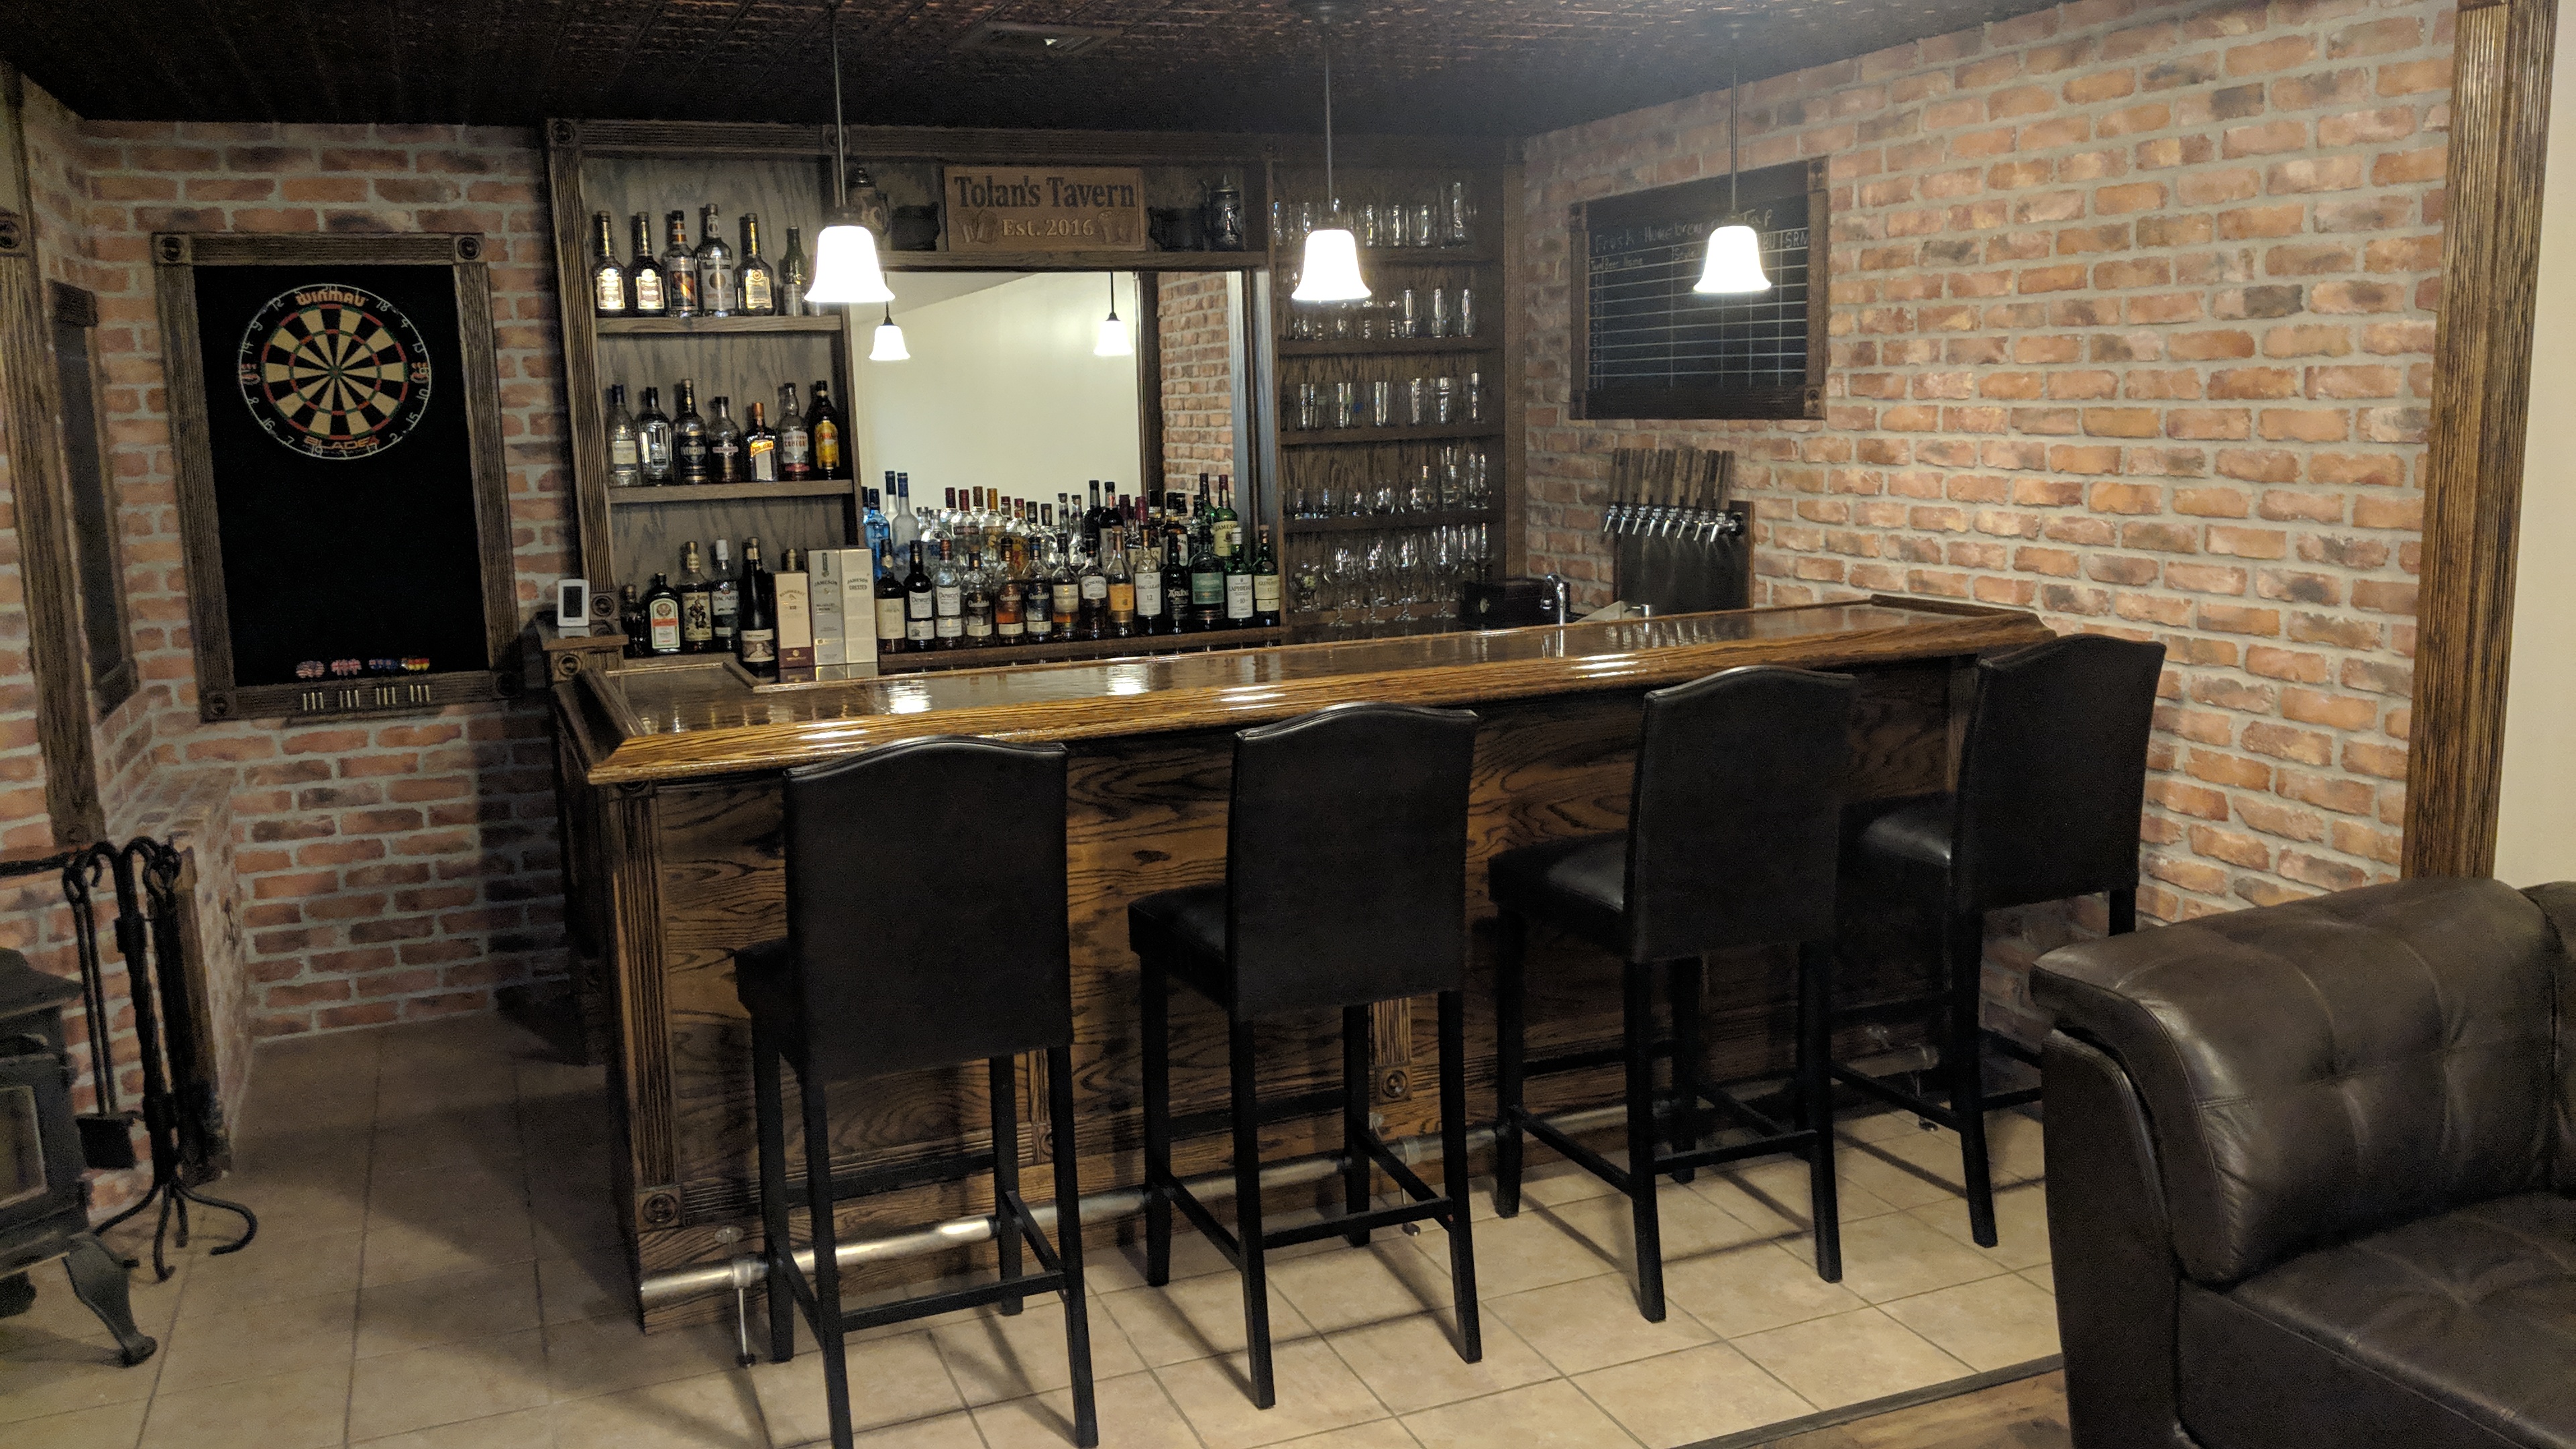
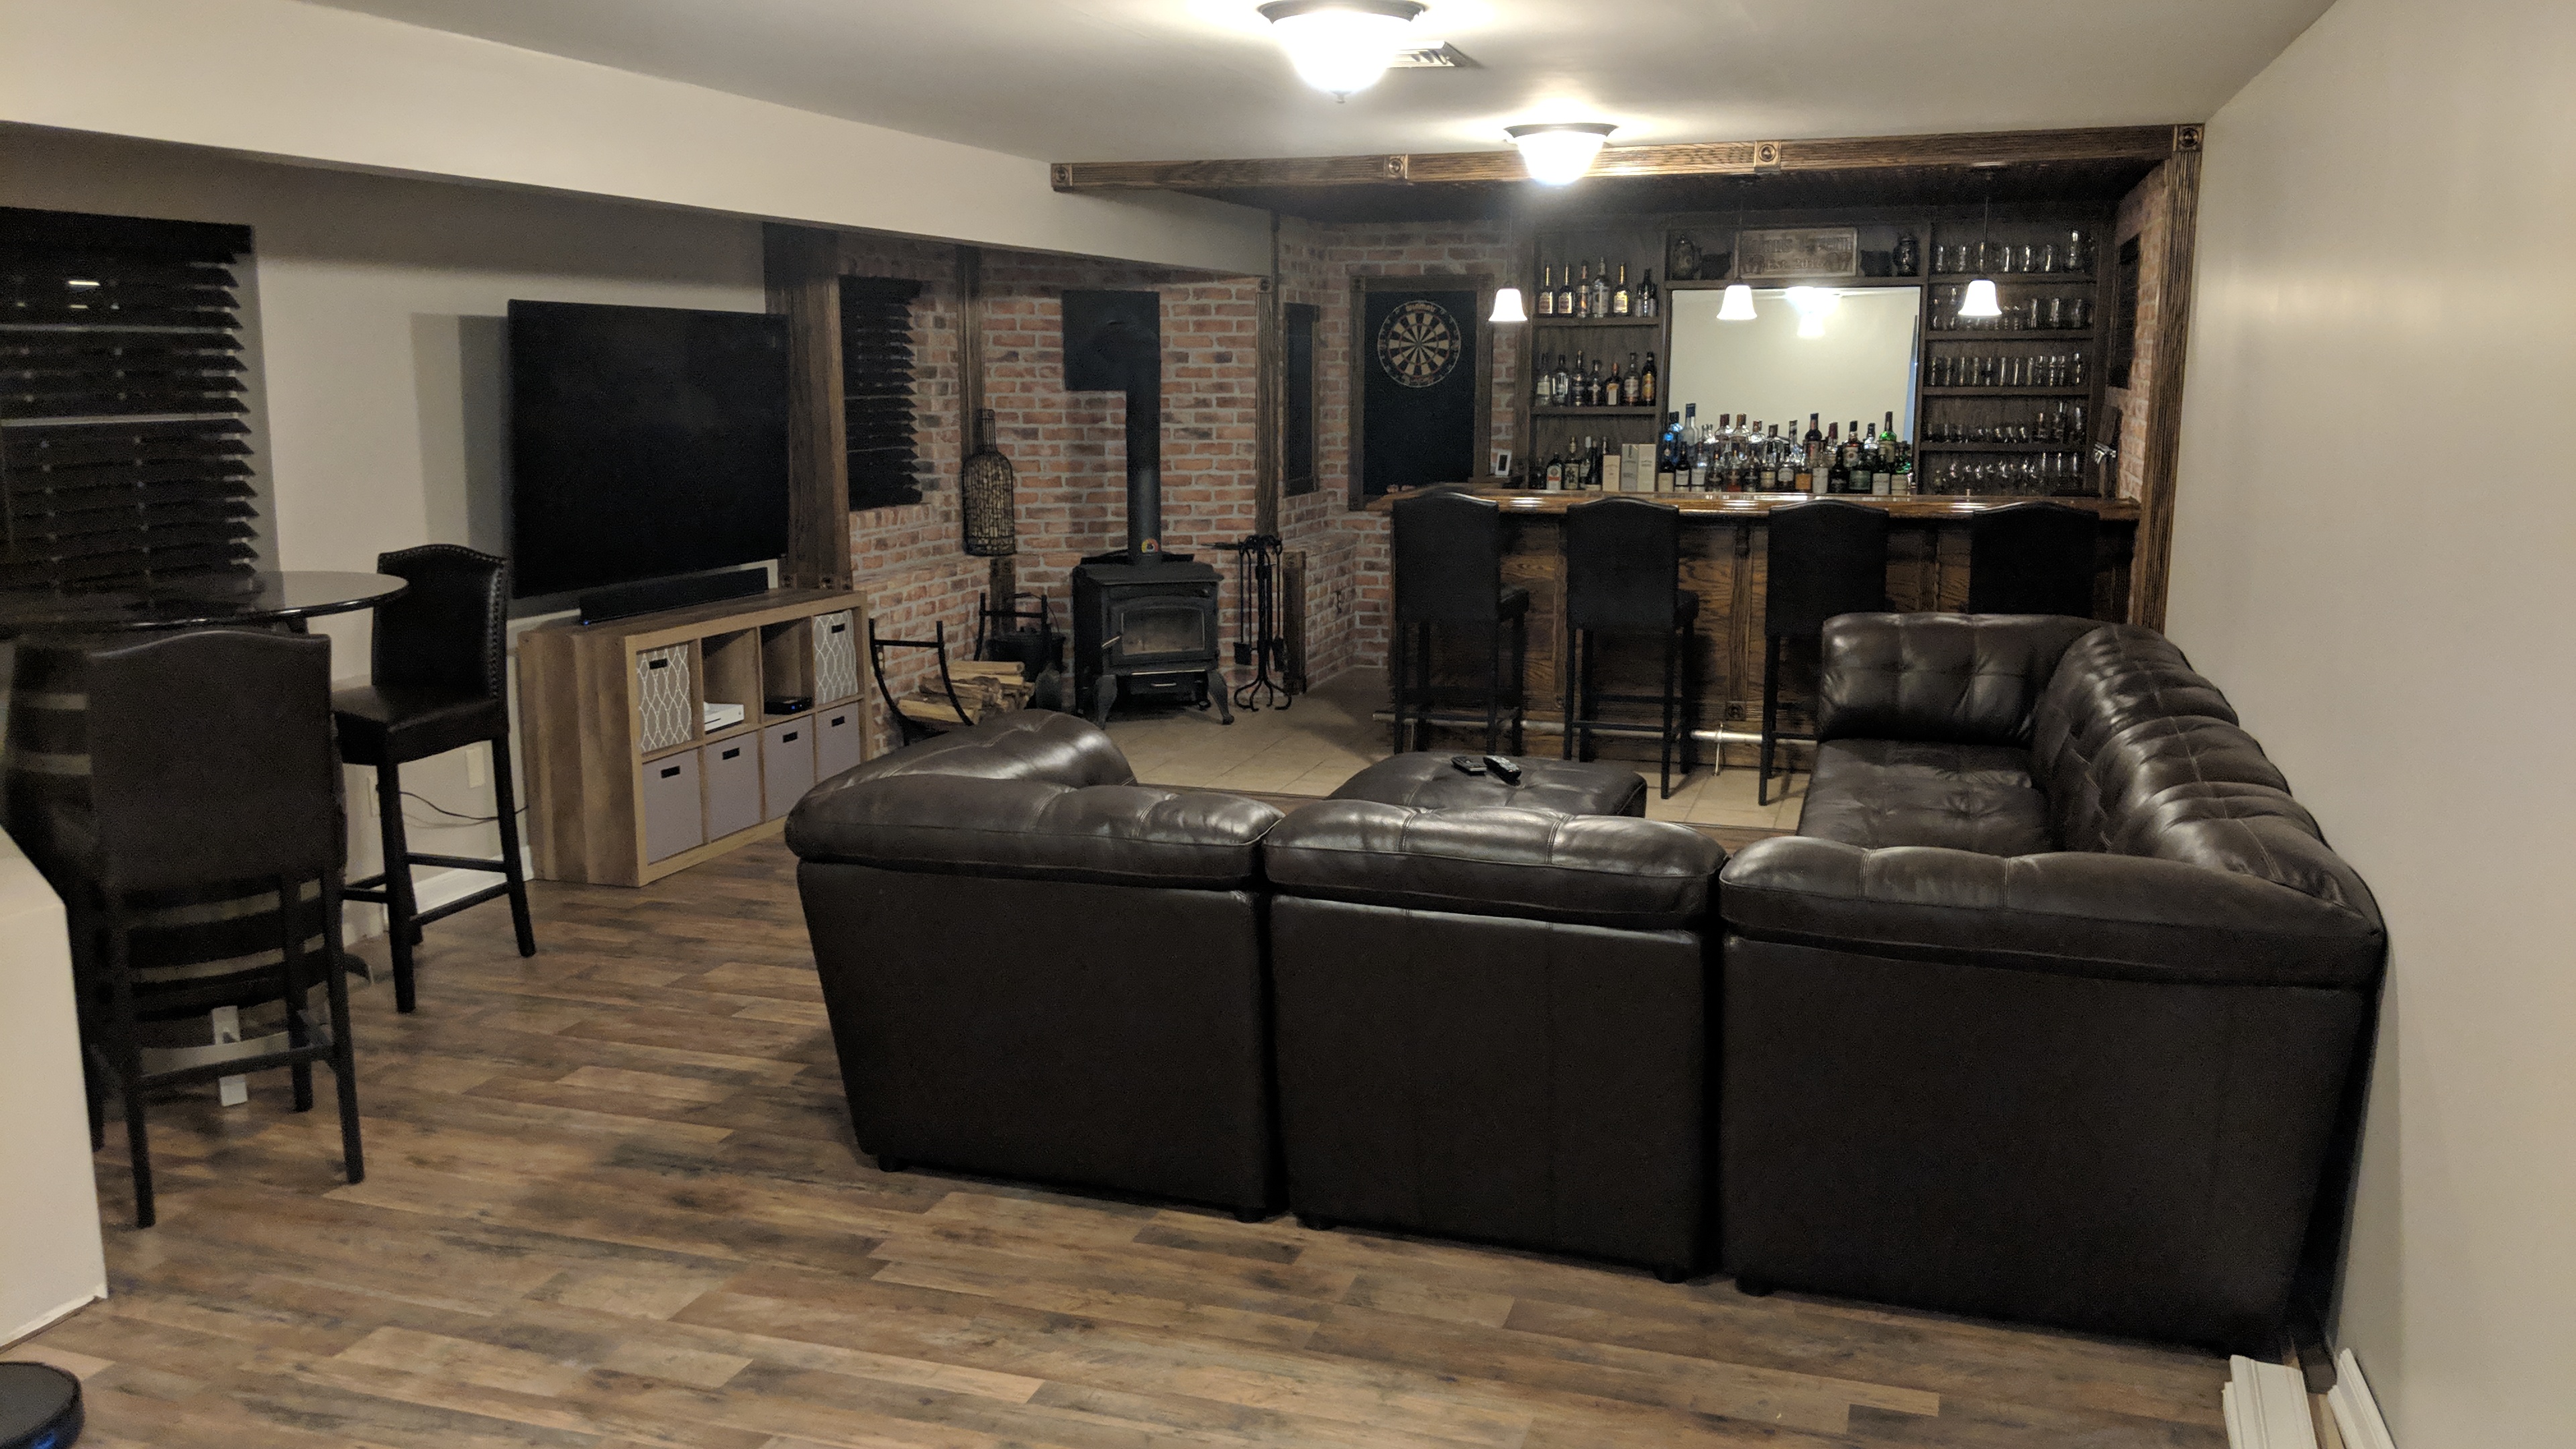
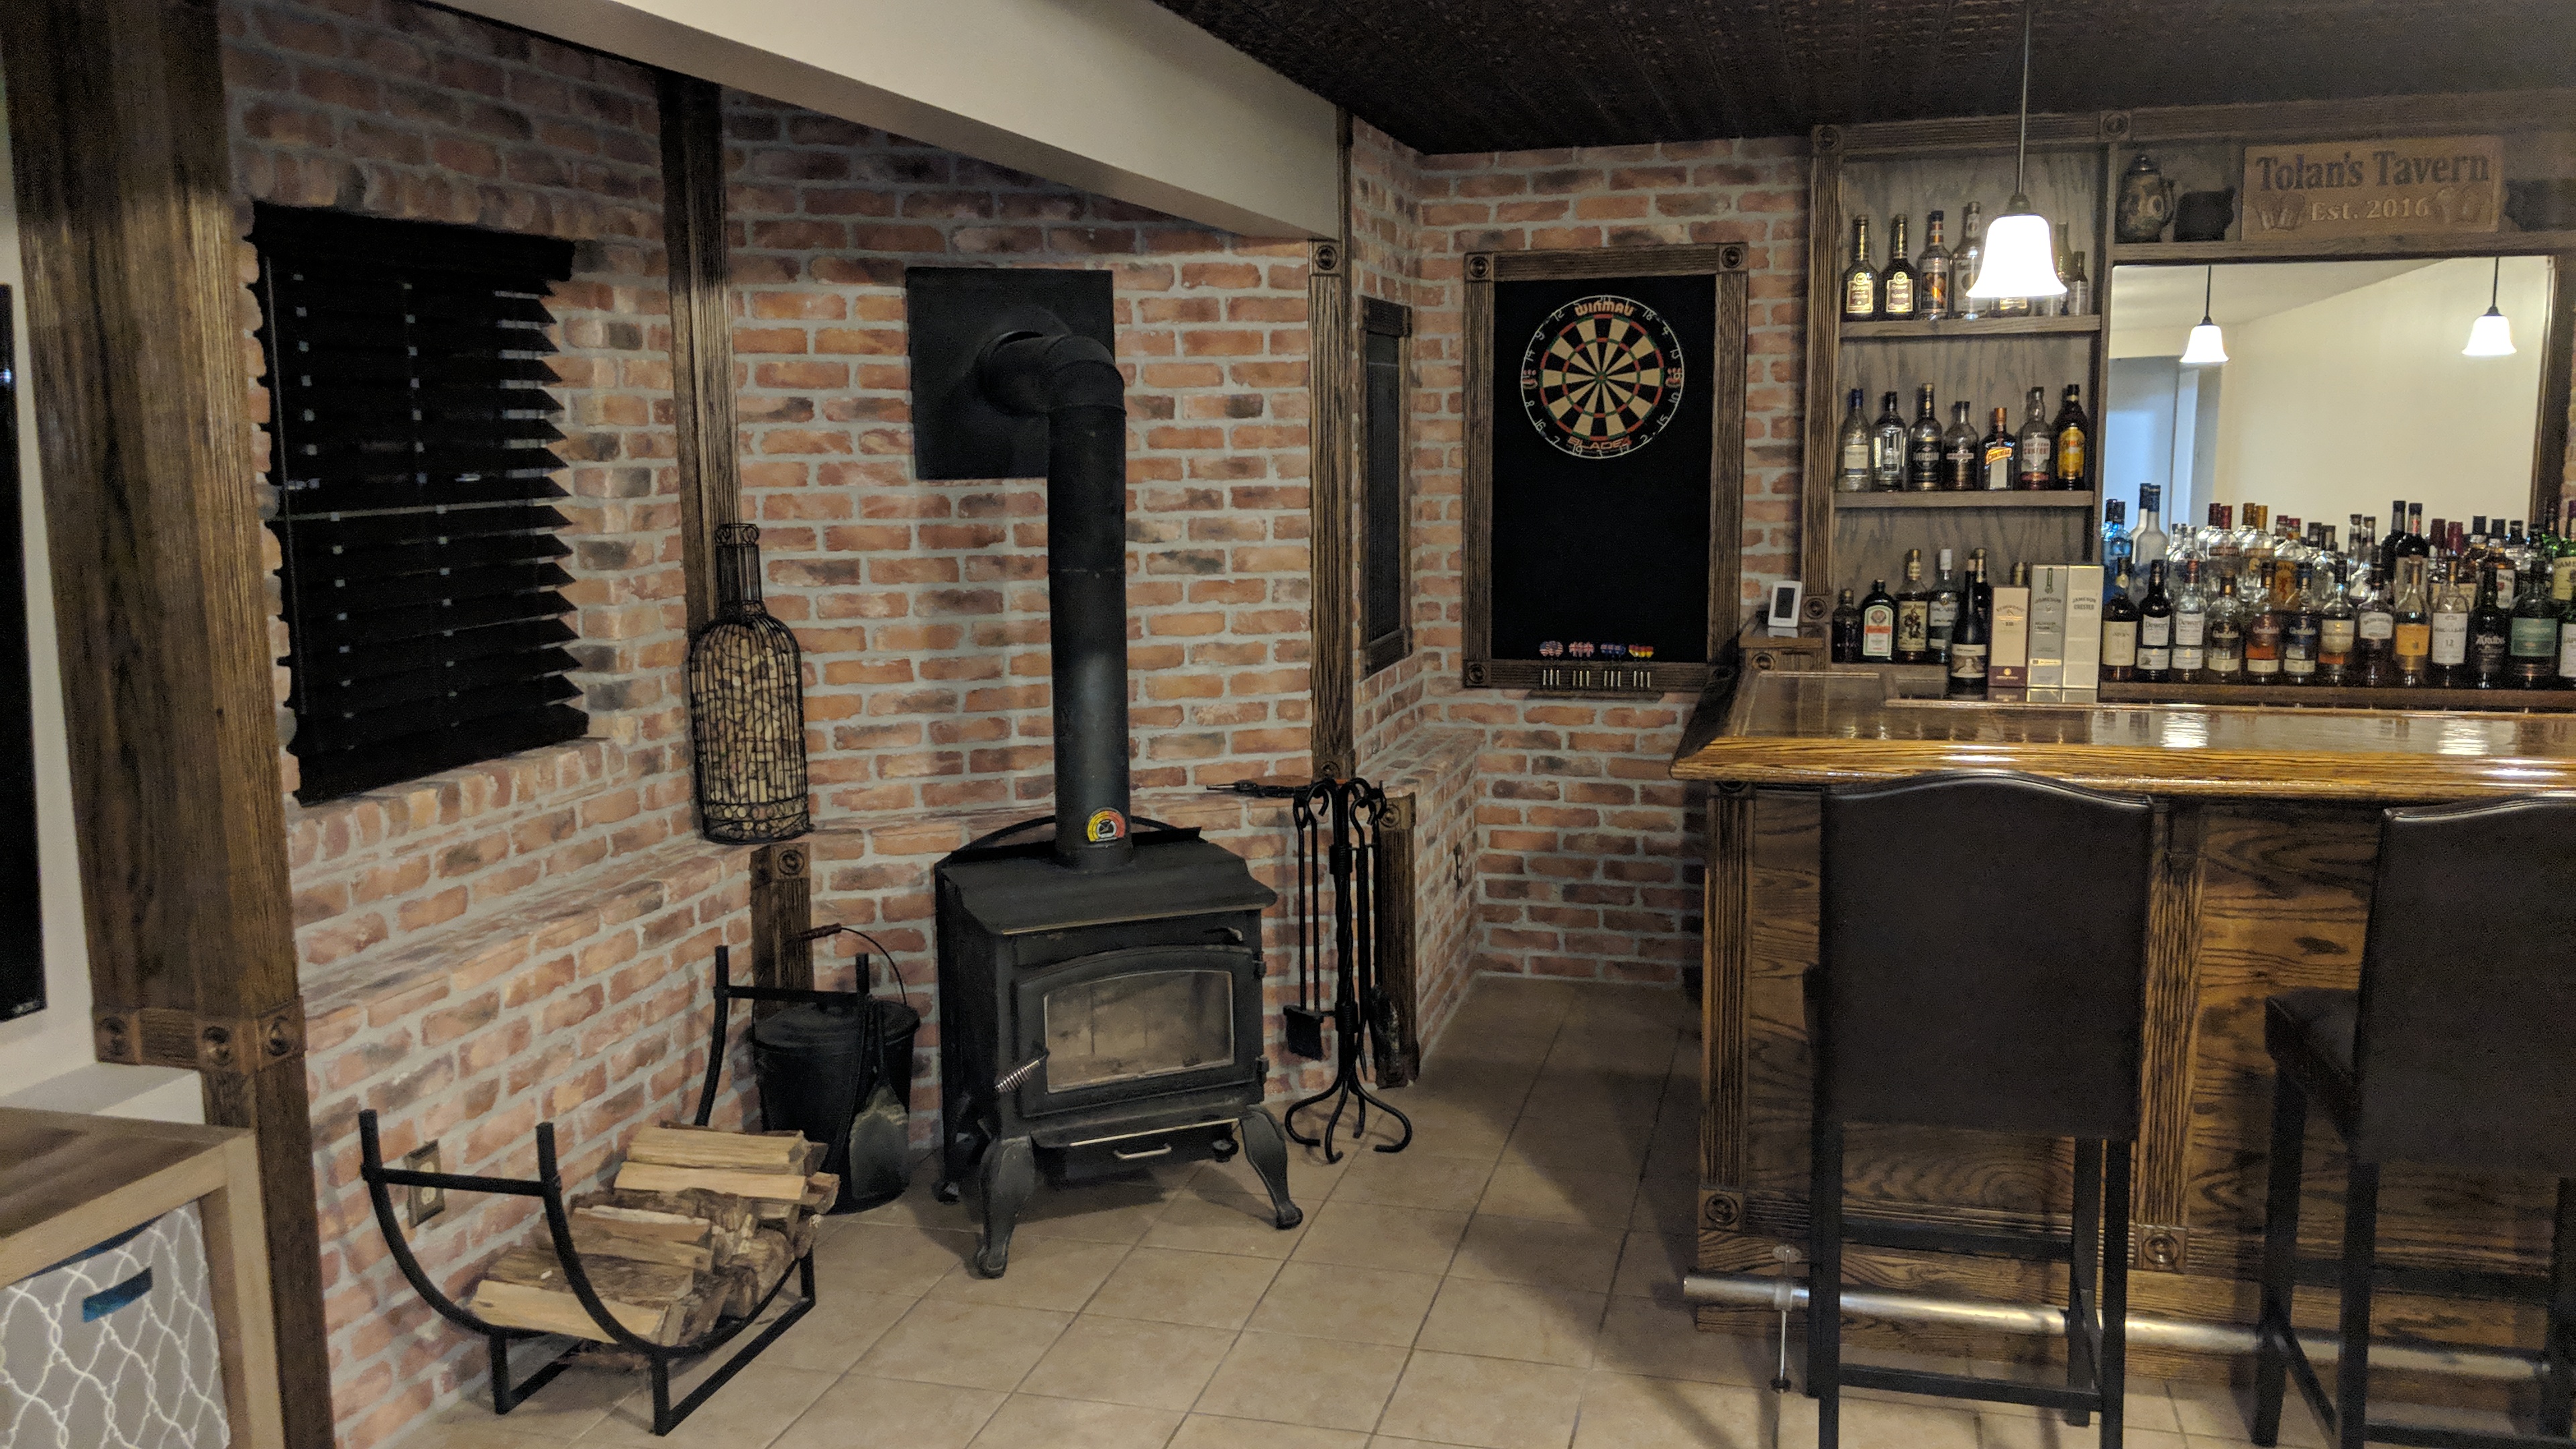
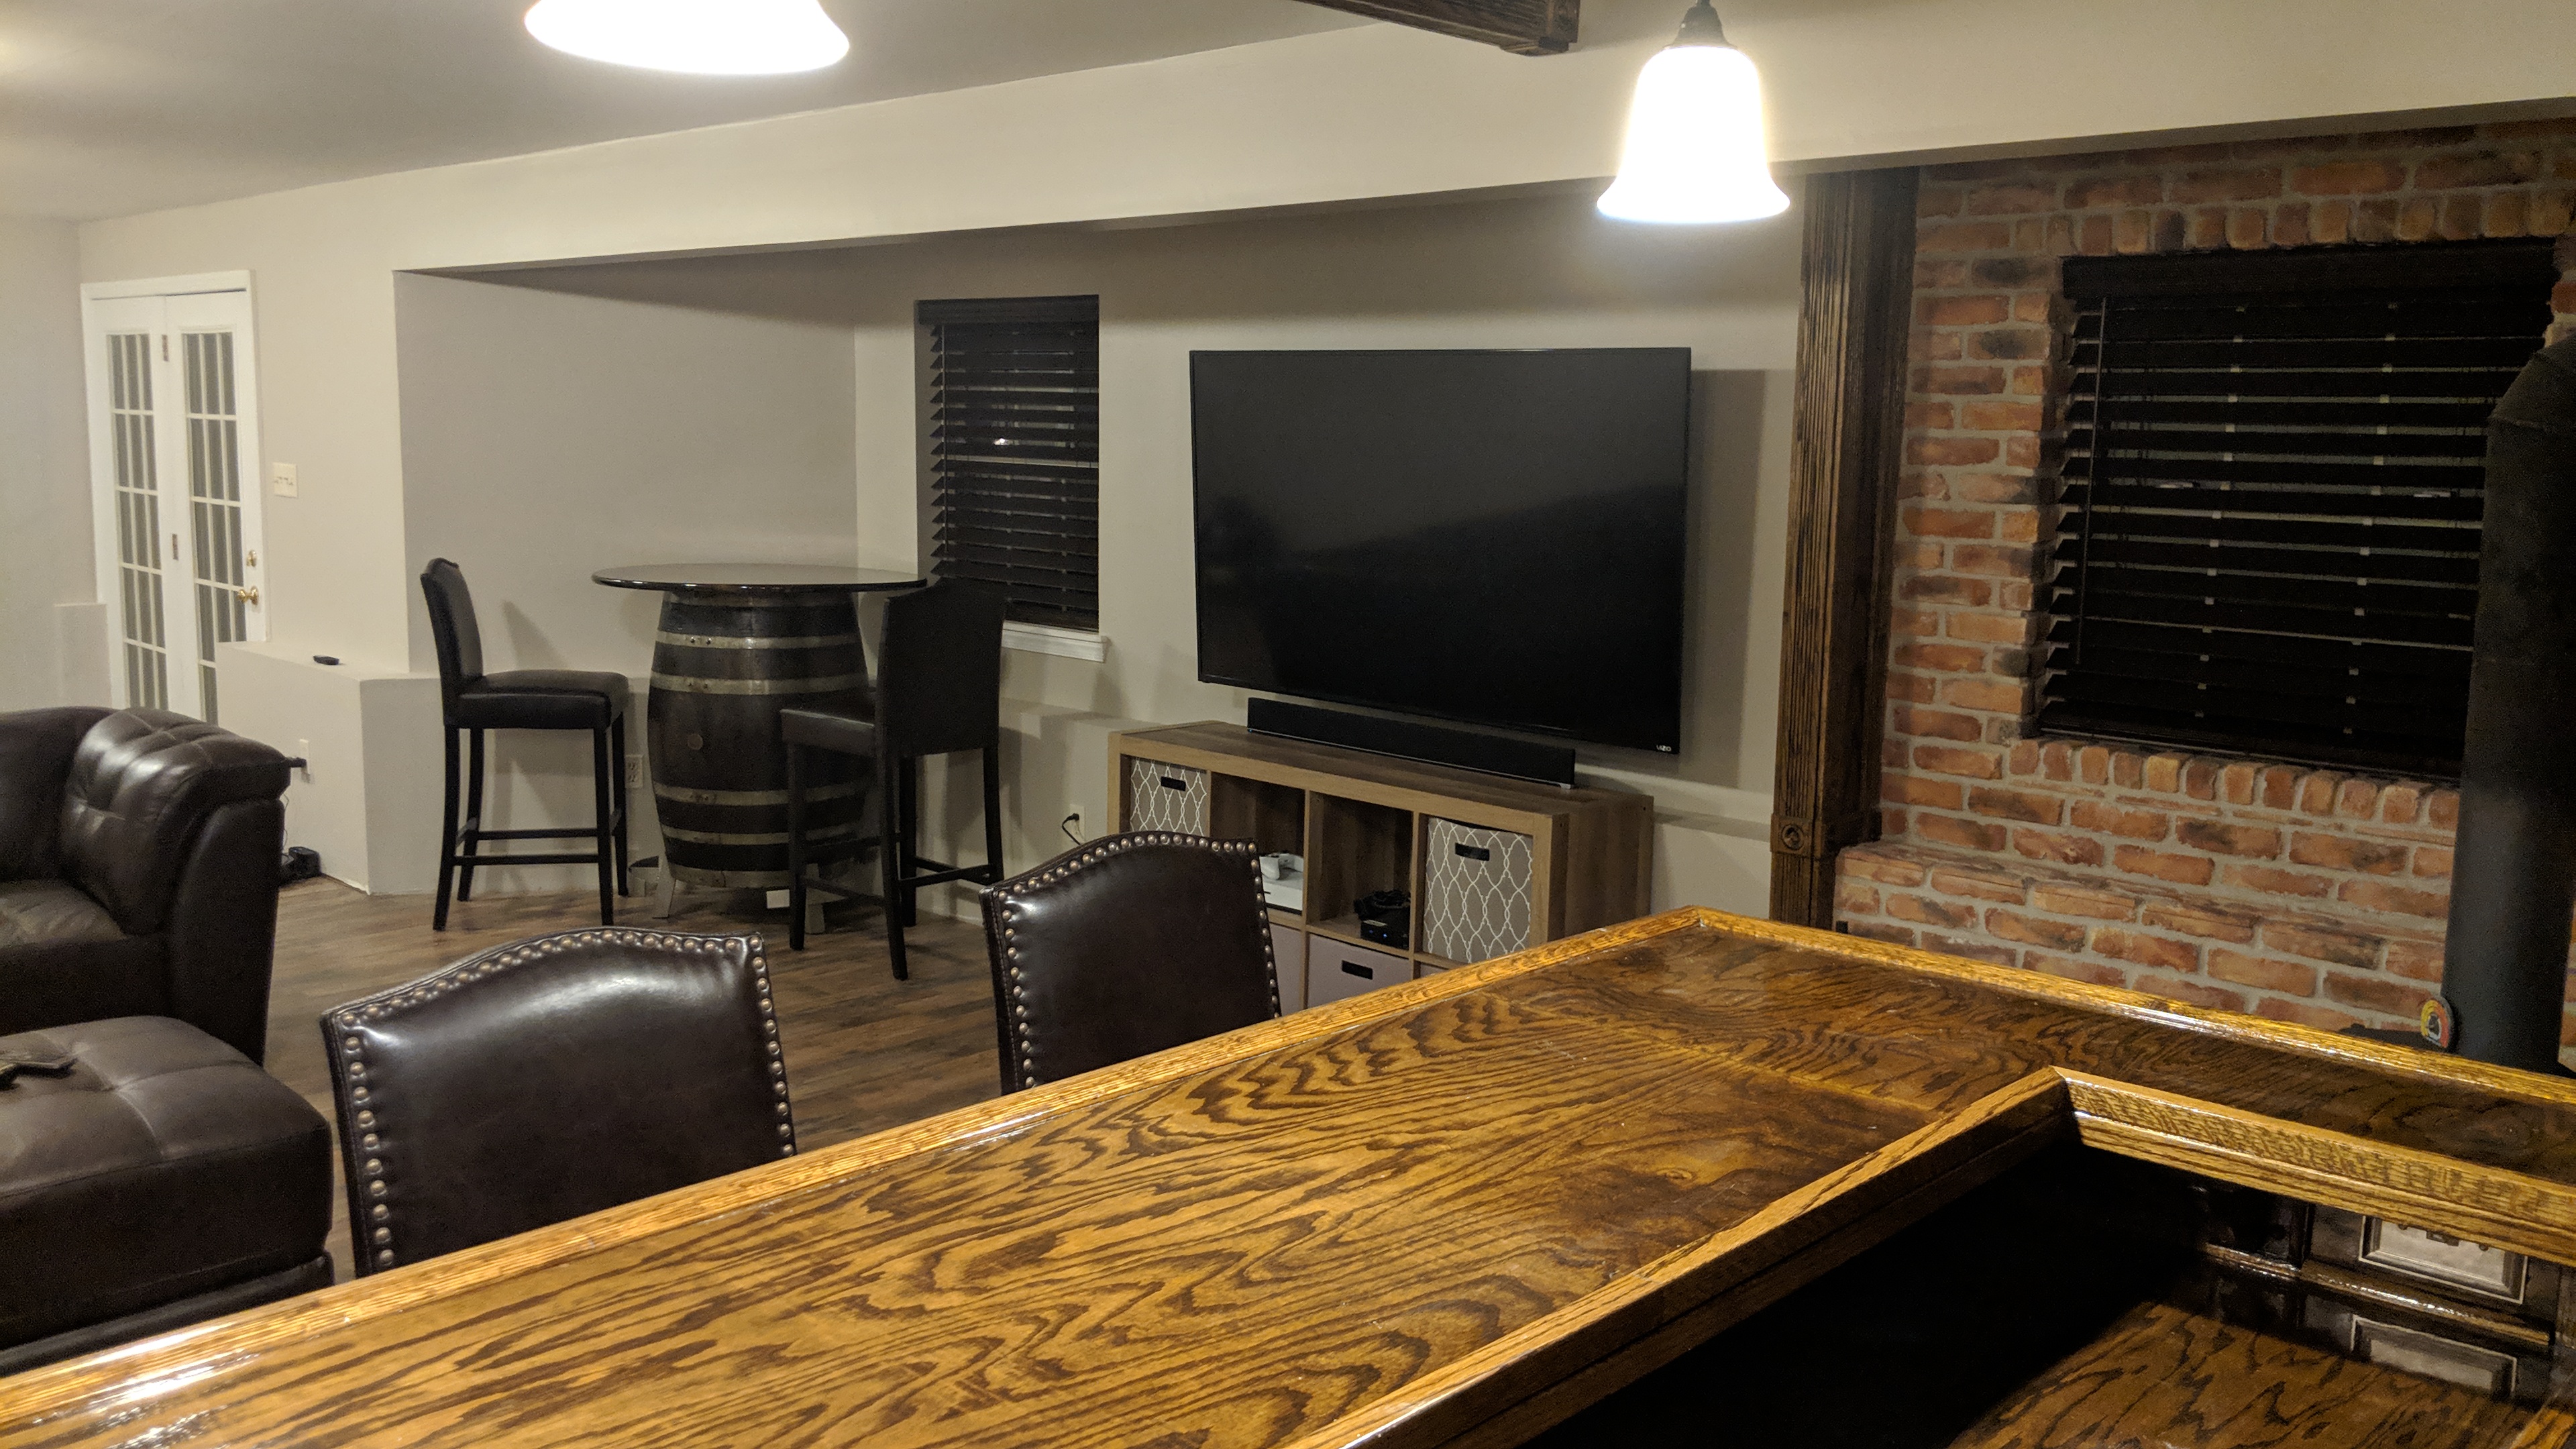
I won't bore you guys with the non-bar stuff, but here are some pictures of what I'm doing with the bar. Priority was on finishing my kids' rooms renovations and adding the new room into the basement. Now that that's done, I'm able to concentrate on sprucing up the bar.

The copper ceiling so far
IMG_20190327_165618-X4.jpg


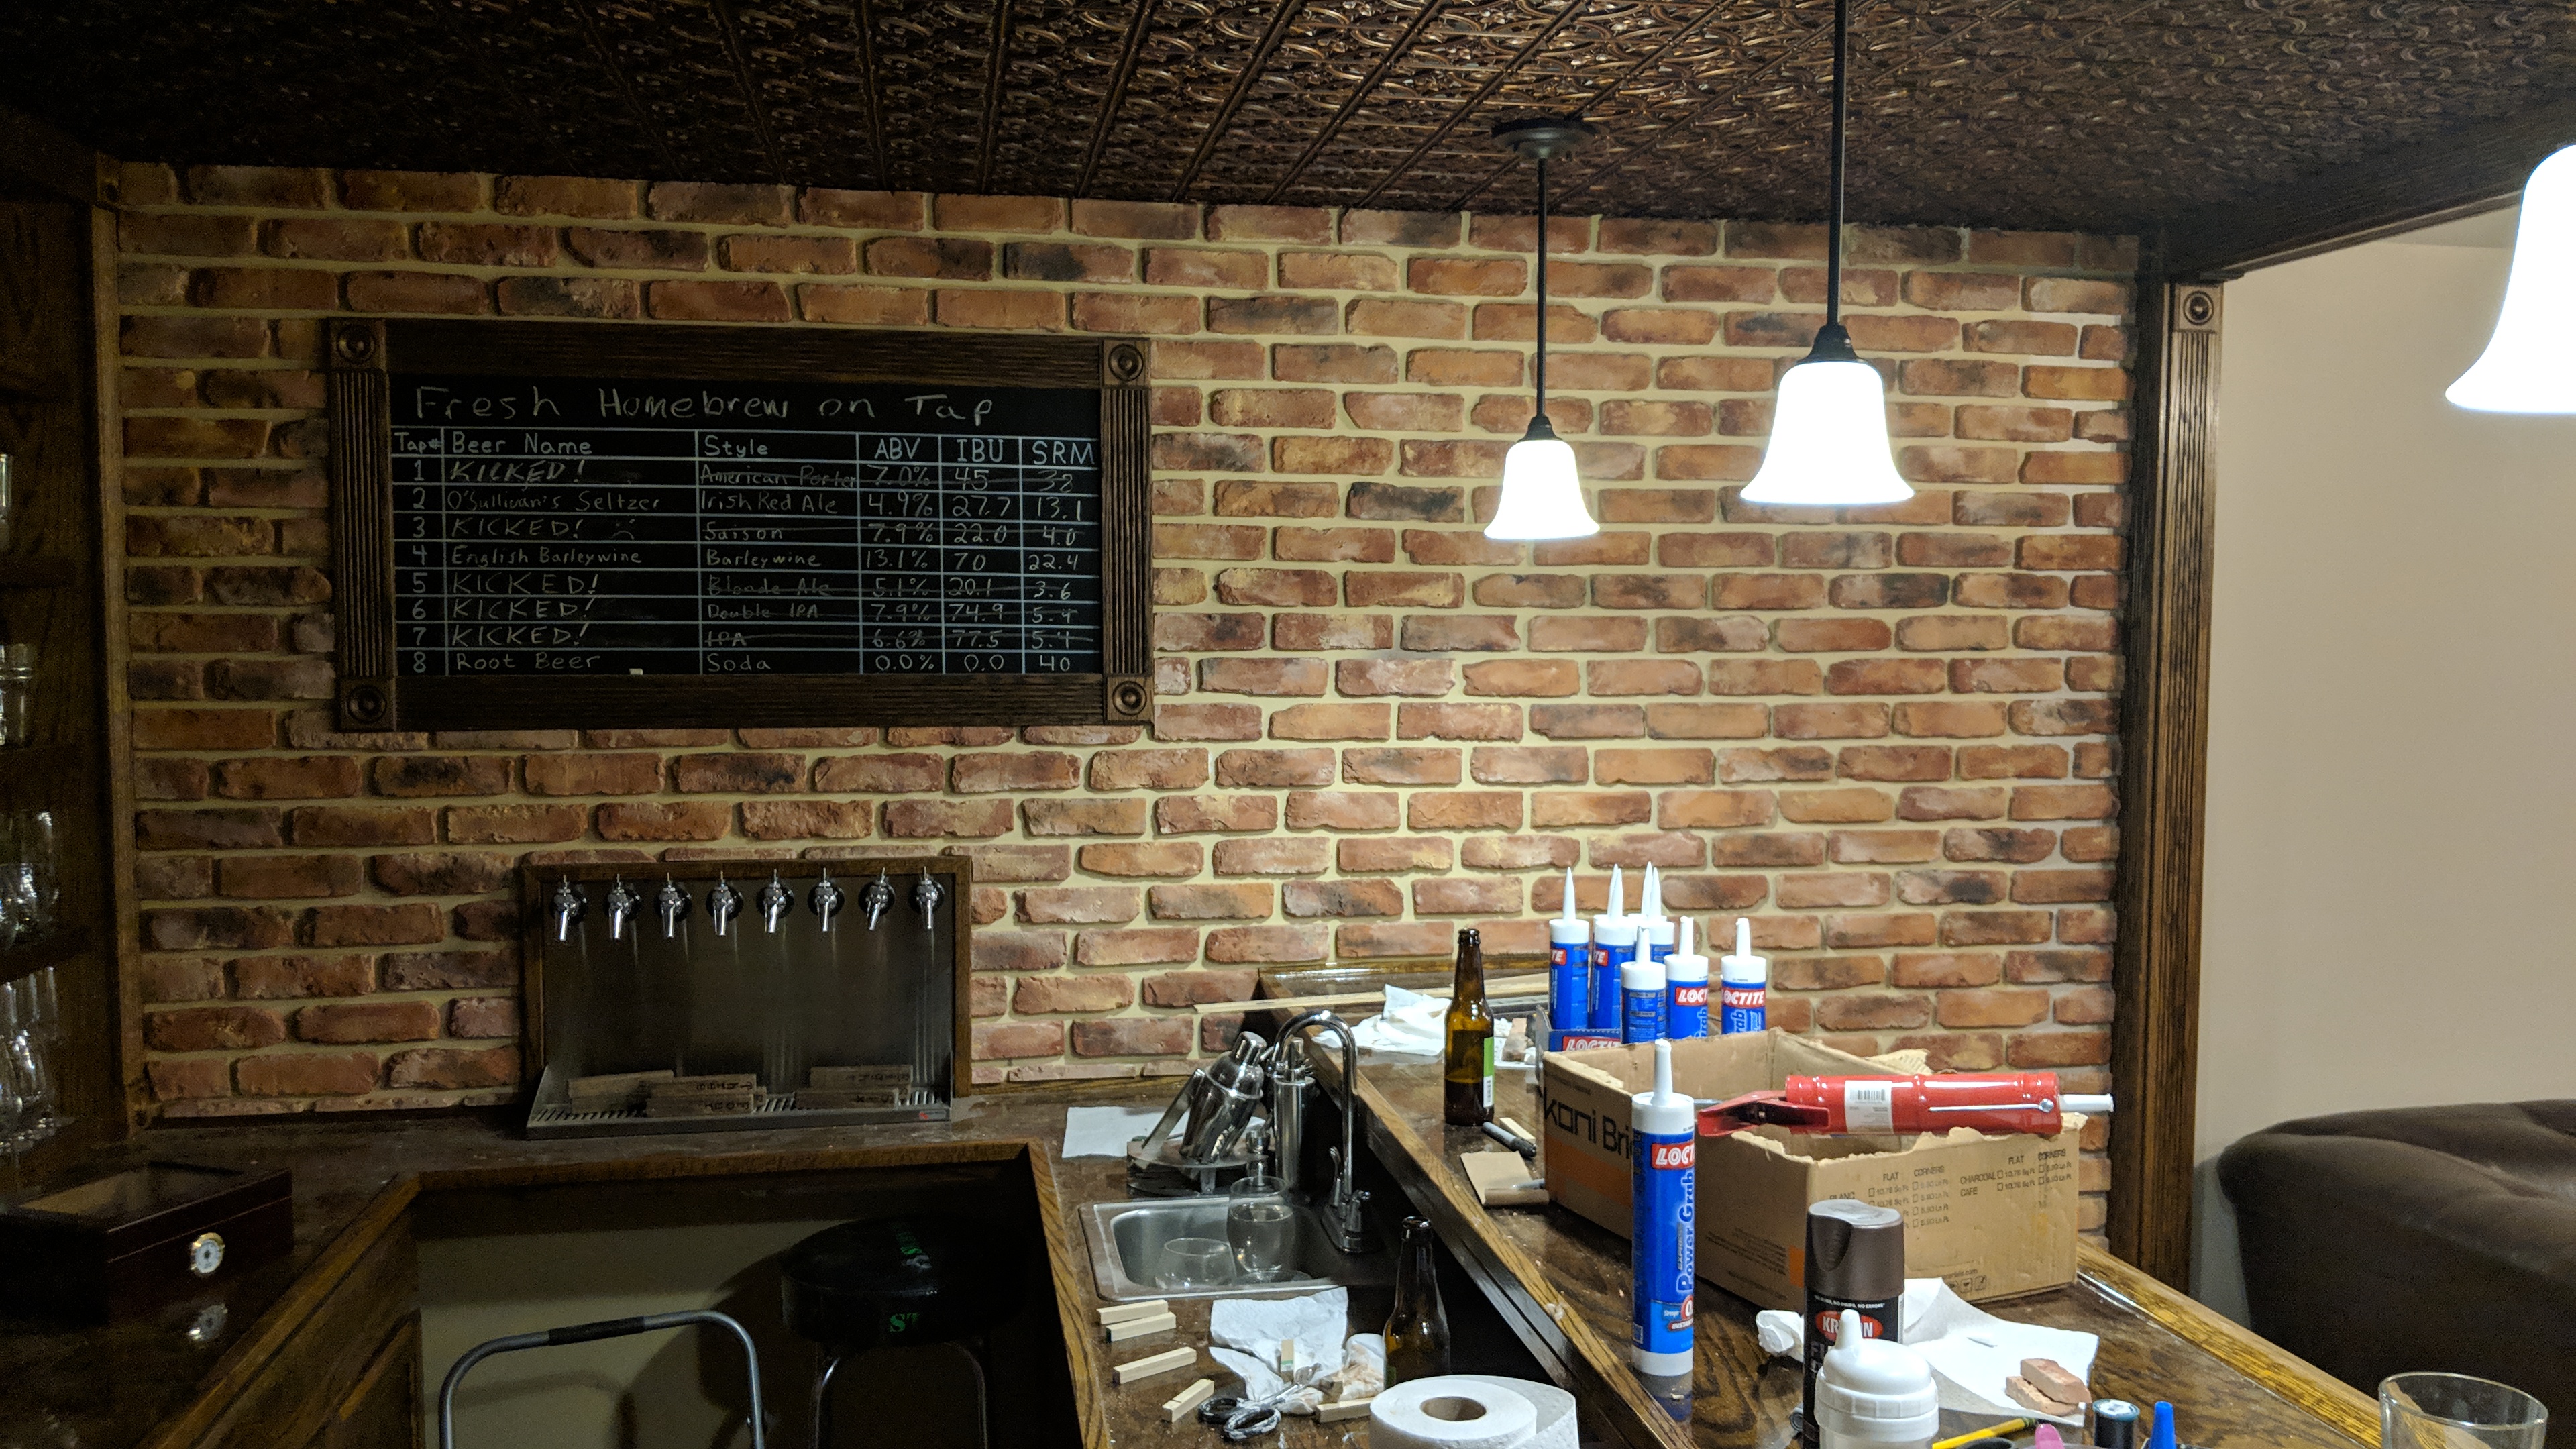
The brick resting behind the taps, just to give an idea of what it will look like
IMG_20190327_165626-X4.jpg


What it looks like right now in the current state of construction
IMG_20190327_165607-X4.jpg


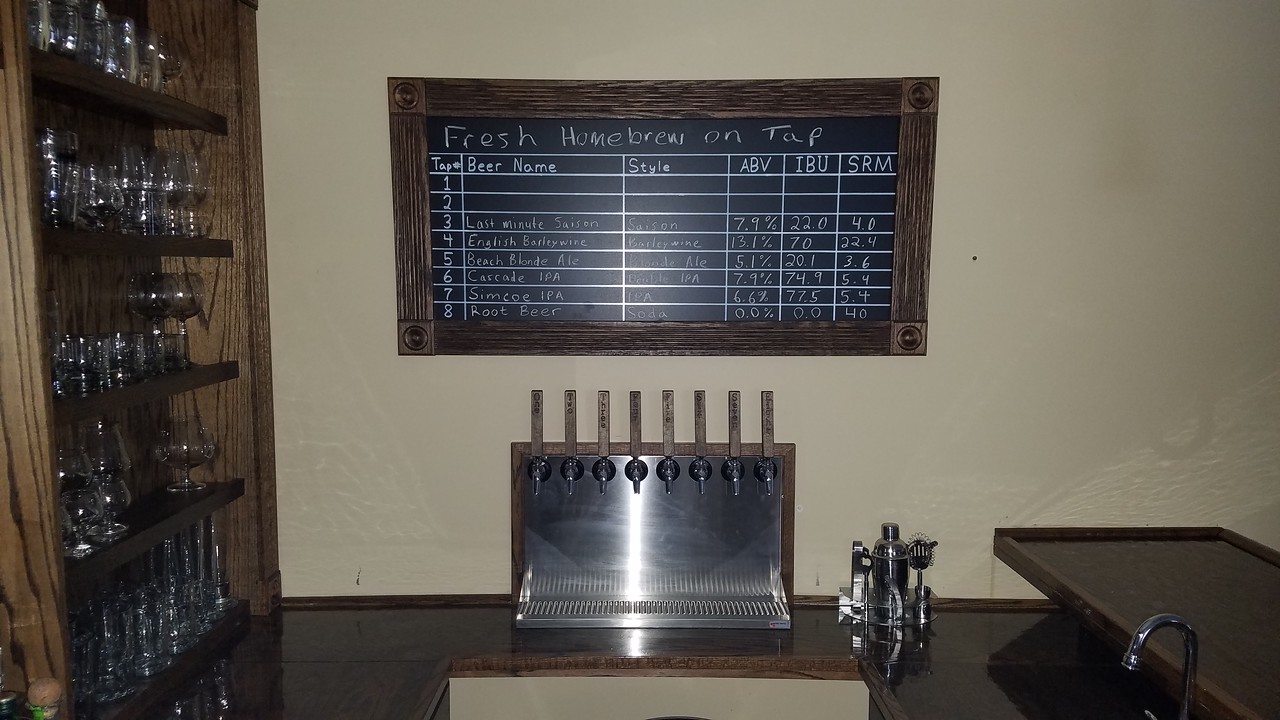
The compressor on my keezer (which is behind the wall of the tap system in the unfinished portion of my basement) quit working last year, and my taps have gone unused for far too long. In fact, I haven't even been brewing in about a year. Once I get the ceiling and brick done in the bar, I'll be getting the tap system up and running. I'm debating between buying another chest freezer and putting a collar on it, or buying a compressor and building a small refrigerated room...

With the baby due any time, I'm not sure how quickly my build pace will be, but I'll try to post updates as I make progress.
 
Where did you get the ceiling tiles?
I got them from Amazon. Here's the link: https://www.amazon.com/gp/product/B00Z6JCRRO/ref=ppx_yo_dt_b_asin_title_o00_s00?ie=UTF8&psc=1 They come in packs of 25 tiles, each 4 sq ft.

They also sell them in smaller quantities elsewhere, but you can't beat quick Prime shipping!

I'm REALLY happy with how they look. I was originally going to get real copper tiles, but these are a fraction of the cost of real copper, and a lot easier to put up, so I took a chance. I was nervous they would look fake, but I can't tell they're not the real thing. Maybe someone with a better eye would tell, but for me, I'm more than happy with them.

I'm not sure if I'm going to have enough to finish the other part of the ceiling. It's going to be real close. I screwed up cuts on two of the tiles, which has me sweating the end. lol
 
Congratulations! and the bar looks amazing! Nice work

Congrats on the new addition.

Bar looks awesome!

Wow that looks awsome and congrats on the new one

Thank you all! We brought her home on Sunday morning. She was 9 lbs 11.6 oz 21.5" long. This is our fourth (and last! lol), and so far, she's been the easiest and most laid back of all my kids at this age. She's already sleeping 3 hours at a stretch at night, which is amazing. We're hoping she keeps this up. And my wife is recovering amazingly.

Not too much to report on the bar, but I was actually able to get a little bit done, on account of having the last couple days off of work. I removed the temporary construction lights in the living area next to the bar and installed the permanent fixtures, reinstalled the ceiling heating/AC vent covers, and put up a few more bricks.

IMG_20190401_224725-X2.jpg


I also picked out some grout for between the bricks, and I did a test on a few bricks on a piece of plywood to see if we like the color, but it was way too dark. We're leaning toward a lighter grout color, as we actually like the look of the lighter color between the bricks now before grouting.
 
Progress has been slow with the new baby, but I did get some more brick up (excuse the mess from my daughter!):

IMG_20190413_010915-X4.jpg


I still need to brick around the window and that last wall around the window, and then do all of the grouting. Then all I'll have to do to finish the bar will be to put in some shelves below the tap system for additional bottle and glass storage, and a slot for a microwave, which the bar is sorely lacking right now. Oh, and I'm still going to be putting in a walk-in cooler behind the taps so that they can be functional again.
 
That's the stuff dreams are made out of, outstanding!

I'm planning a conversion myself but it won't be for a couple of years, I'll definitely be using this as inspiration.
 
That's the stuff dreams are made out of, outstanding!

I'm planning a conversion myself but it won't be for a couple of years, I'll definitely be using this as inspiration.

Bar looks amazing and your single malt collection is on point.

yes it is!

Thank you all! Pretty much all I drink (booze-wise) is beer. But, occasionally I'll enjoy a good single malt. Especially on a cool evening with a cigar. Mmmm.
 
love that brick look...but kinda pricey....but stealing as much as i can!

It definitely is pricey, but if you shop around you can find good brick at reasonable prices. What kills the cost of these bricks is shipping due to their heavy weight. I ordered the Koni brick from Home Depot and picked up in the store. It was roughly half the final cost of the initial brick I was looking at. I didn't like the brick quite as much, but it was a very close second, and at half the cost, it was a good buy. And now that I have it installed, I love it, and don't regret not getting the other one in the least bit. In fact, I would worry that the other brick I was looking at would have been too dark.

Macallen 12 sherry cask...omfg!! its awesome

Yes it is! My favorite is Glenfiddich 14, which is finished in honey bourbon barrels. I also enjoy Redbreast 12 year. It's actually an Irish whiskey produced by Jameson, but it tastes like a Scotch... They just can't call it a Scotch since it wasn't produced in Scotland. It's low smoke/peat and very smooth. Similar to a highlands single malt.
 
It sure looks stunning thats for sure!! I will shop around for it. I need to get in gear and finish up the rest of the drywall so i can finish the bar HT area...thank god for flat boxes!

It definitely is pricey, but if you shop around you can find good brick at reasonable prices. What kills the cost of these bricks is shipping due to their heavy weight. I ordered the Koni brick from Home Depot and picked up in the store. It was roughly half the final cost of the initial brick I was looking at. I didn't like the brick quite as much, but it was a very close second, and at half the cost, it was a good buy. And now that I have it installed, I love it, and don't regret not getting the other one in the least bit. In fact, I would worry that the other brick I was looking at would have been too dark.


Yes it is! My favorite is Glenfiddich 14, which is finished in honey bourbon barrels. I also enjoy Redbreast 12 year. It's actually an Irish whiskey produced by Jameson, but it tastes like a Scotch... They just can't call it a Scotch since it wasn't produced in Scotland. It's low smoke/peat and very smooth. Similar to a highlands single malt.
 
The Brick is Koni thin brick. It's real brick made of the same stuff as regular brick, only made thinner. I used Loctite Power Grab caulking to put up the bricks, then used type S grout for grouting.

Here are some pictures of the finished brick work:

IMG_20190503_225625.jpg


IMG_20190503_225530.jpg


IMG_20190503_225610.jpg


IMG_20190503_230132.jpg


IMG_20190503_230101.jpg


Enjoying a beer

IMG_20190504_201614.jpg
Great looking room. The only problem I see is the temp indicator on the exhaust pipe is too close to the stove. [emoji6]
 
Back
Top