treacheroustexan
Well-Known Member
So heres all of my wires. I'm just confused on what wires I wire to the power jack. My 3d printed parts should be here tomorrow!
View attachment 1472499086895.jpg
View attachment 1472499086895.jpg

So heres all of my wires. I'm just confused on what wires I wire to the power jack. My 3d printed parts should be here tomorrow!
Its been a while since I wired mine up.
boasist since you just did yours, do you recall the wiring?
He helped me a little bit via pm. I'l have to run the yellow and black from the fan to the controller. Just not sure what wires I solder to the power jack. I figured posting pictures of what I'm working with might help me figure it out.

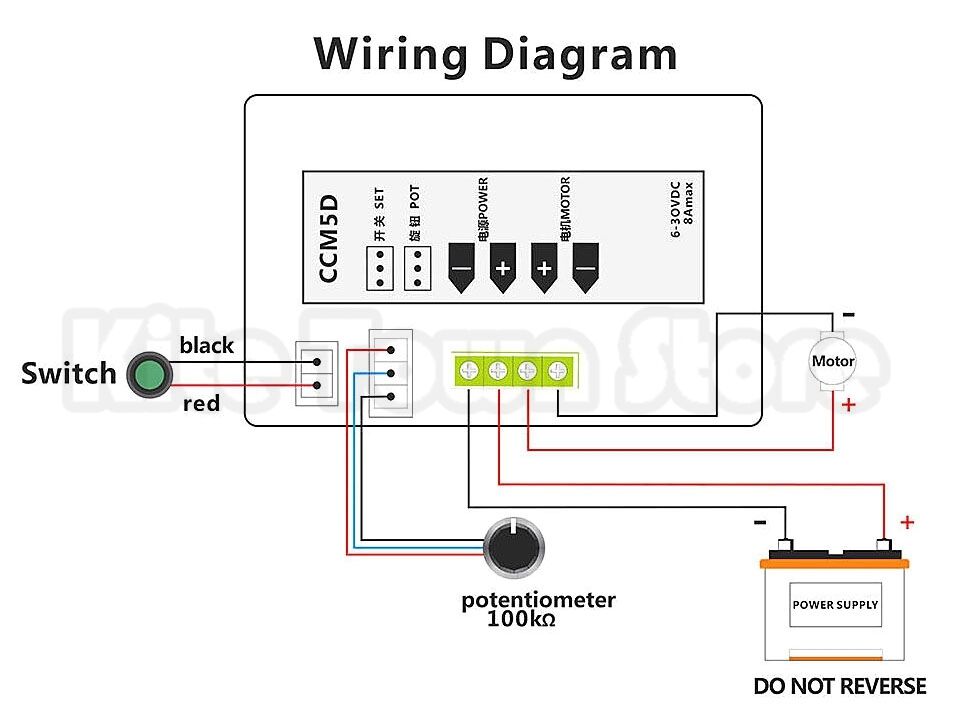
What color are the wires on your fan? I believe you should be able to google "(your colors here) pc fan wiring". I bleieve there are 3 wires but you only use 2 of them, one is + and one is -. You wire those to 2 screw terminals on the controll box. Then you have to run power from the 12v plug to the controller box, using what I said above.
There's 4 wires. Black yellow green and blue. So I would run the black and yellow to the motor part of the controller. (Black is ground and yellow is 12v) Then, instead of using the power jack I bought (just so i dont have to solder) can i just cut the end off of the power supply and wire it directly to the power portion of the controller?

The jack makes for a clean box. I just snipped the end and put a grommet in the backplate. I had already snipped the end from another project. And it worked for me.
You'll see the black and red on the supply you bought. You're right on the black and yellow for the fan.
I'm calibrating my filament with you're tower now and then it's on to the drawer box!


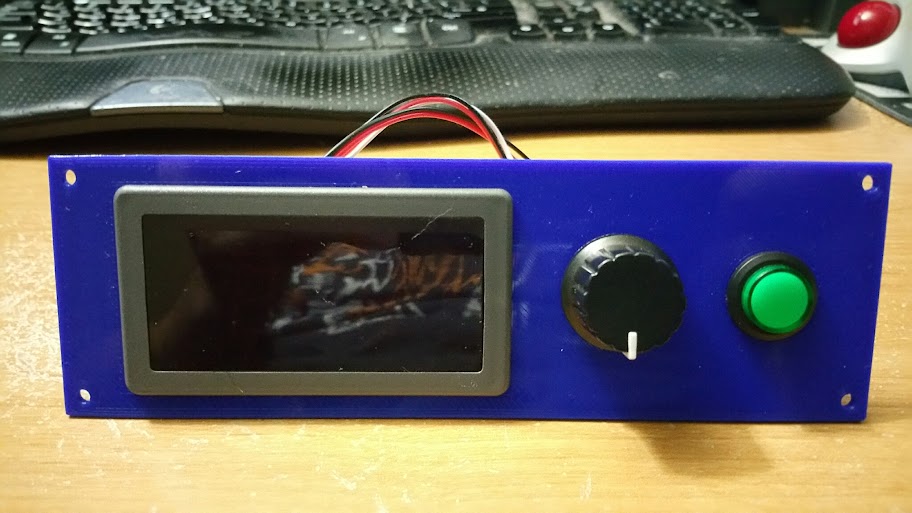
That's effin' brilliant.If you suck at soldering, here is a little soldering station I built that definitely helps.
https://docs.google.com/spreadsheets/d/1fhpgjM3PwTrQkClhdmI36V-eI2kTw2rwzFnfe1AiHEg/pubhtml
Again, thanks for the inspiration. Finally got around to making a box for my temp controller. Decided to use a mill instead of my 3d printer. Gonna make the stir plate in the next week.
No paint, wires or glue yet.
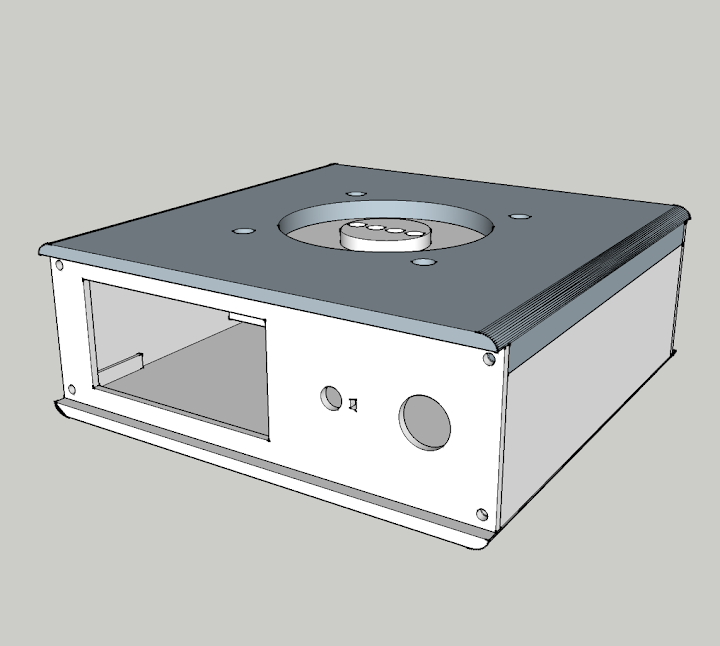
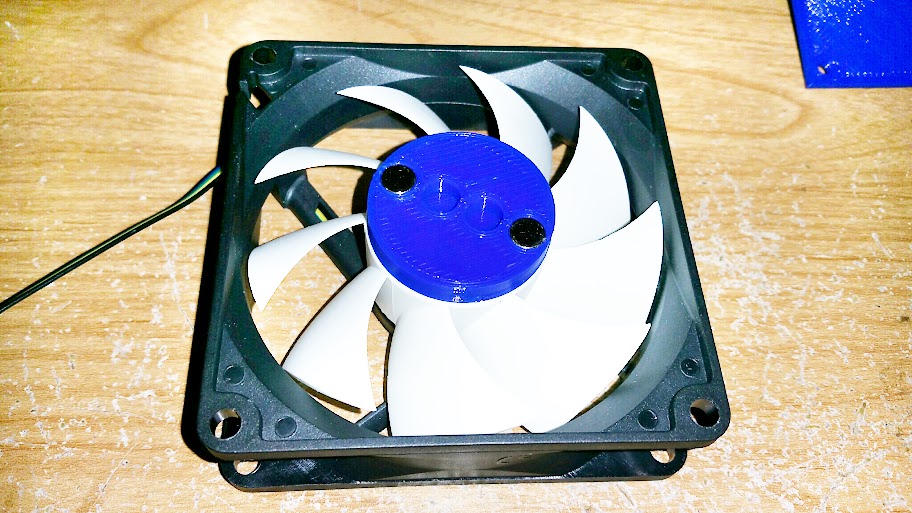
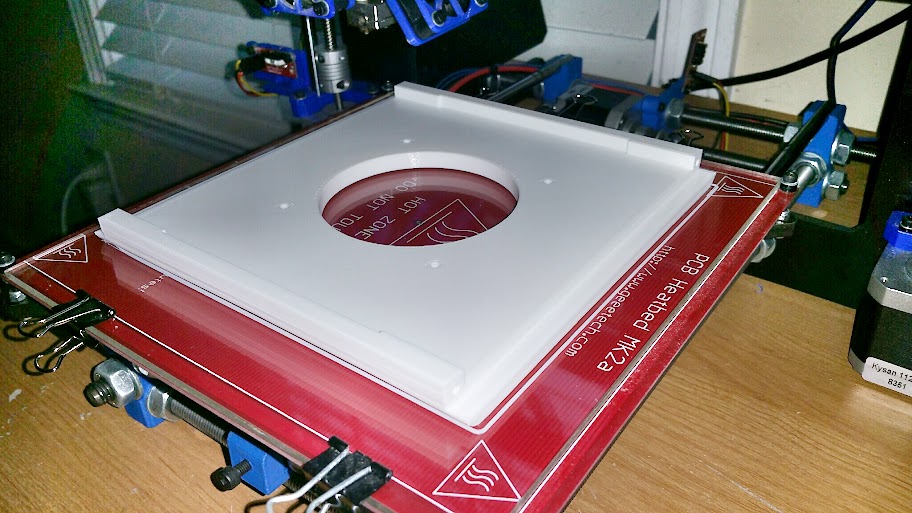
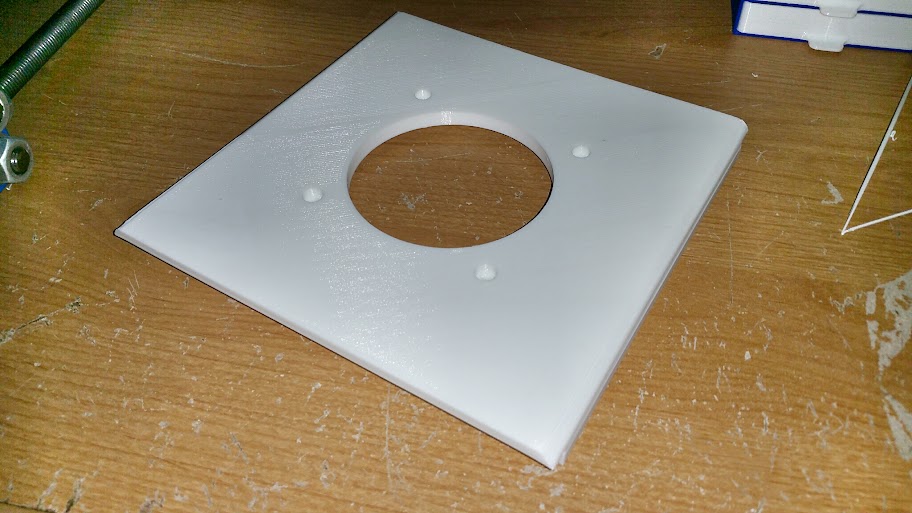
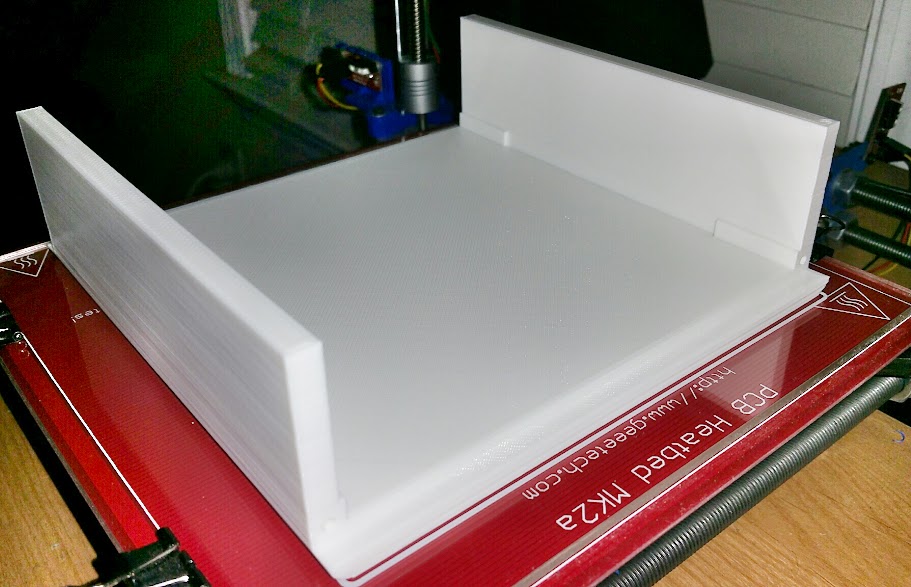
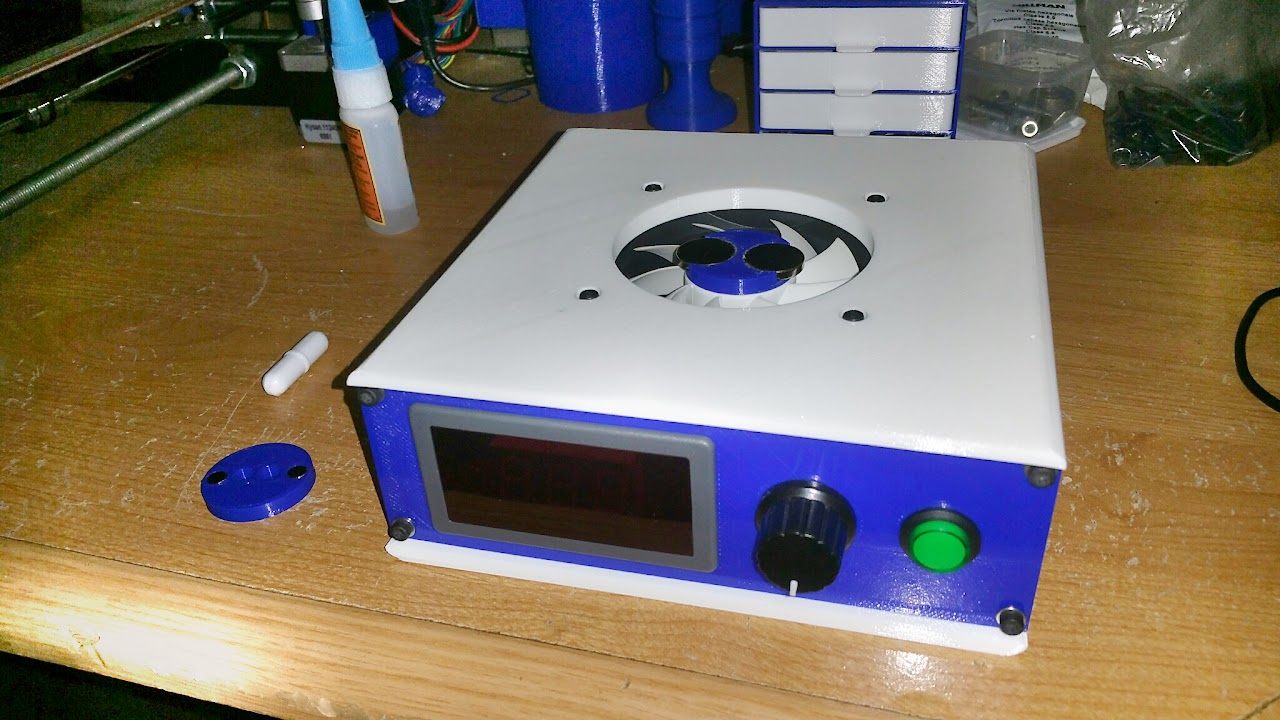
I have seen some 3d printed stir plates floating around so I figured I would make my own rendition by remixing my stc1000 enclosure.
I used an 80mm fan, pwm speed controller, and some little .7" x .11" neo magnets.

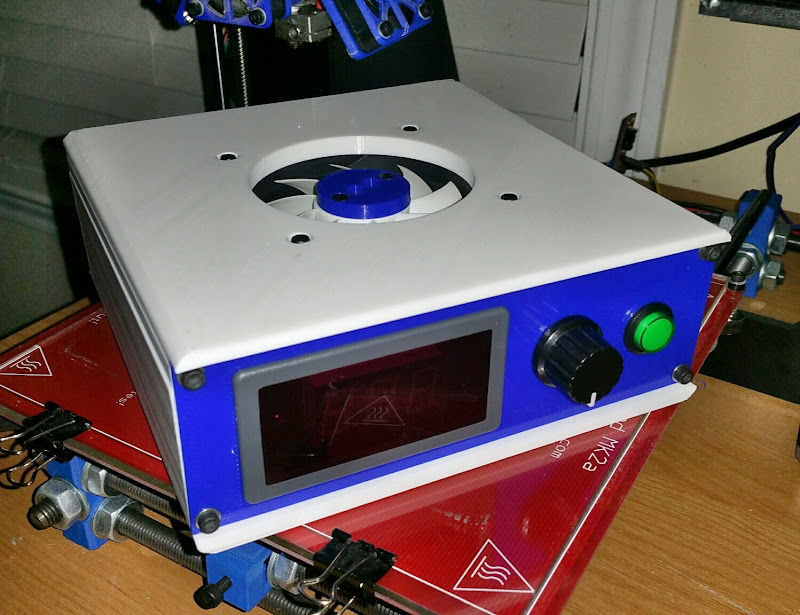
Upgraded magnets
And I shall call it... R2...
Test Video:
https://www.youtube.com/watch?v=ZQPAgM_KiDU
--------------------------------
Files: http://www.thingiverse.com/thing:1413550
Fan: http://www.amazon.com/gp/product/B00H3SWJ24/?tag=skimlinks_replacement-20
Controller: http://www.ebay.com/itm/141645156384
Magnets: http://www.homedepot.com/p/MASTER-M...rth-Magnet-Discs-3-per-Pack-07047HD/202526369
Stir Bar Kit: http://www.amazon.com/gp/product/B01A60XJBU/?tag=skimlinks_replacement-20
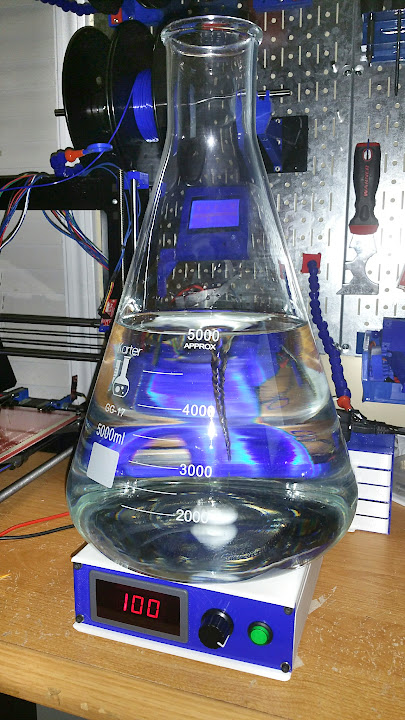
5L Flask: http://www.amazon.com/gp/product/B006UKI9X4/?tag=skimlinks_replacement-20
I used M3 x 40mm socket cap machine screws, nuts, and washer for the fan, and M3 x 22 socket cap machine screws and washers to mount the front and rear plates.
I personally used binding posts in the rear plate to connect some little banana plug leads to my bench top PSU. Feel free to request any kind of changes to the rear plate for various power options, or the front plate for different types of controllers and displays.
--------------------------------
CHANGELOG:
3/12/2016 - The stir plate is complete and I have tested to make sure the fan works, etc... but I have not tested it out with a erlenmeyer flask, stir bar, and liquids yet. My flask should arrive weds., and I will upload video of the test (and more pics) when complete.
3/17/2016 - I got my 5L flask in today and tested the stir plate. The magnets I was using were too small, at least for my biggest stir bar. It kept throwing the bar to the outside. I ran to home depot and bought some .7" DIA x .11" thick rare earth super magnets and remixed my magnet puck. I still had issues with the biggest stir bar, but then I tried the second largest stir bar and it worked extremely well. I got a decent vortext at 25% on the PWM controller, and it just got better all the way up to 100%. I also added some little rubber feet to the bottom of the stir plate for vibration dampening. I would also like to note that I didnt even glue the magnet puck to the fan. The magnets are strong enough to stick to the fan magnetically.
I don't suppose you have a DXF you would be willing to share? Should be a lot cheaper in cut acrylic.Nice. I am using the same controller.
I laser cut acrylic and made an enclosure.
I don't suppose you have a DXF you would be willing to share? Should be a lot cheaper in cut acrylic.
Very cool, thanks for sharing that!
I'm cheating. I have Haas vf3's at work at my disposal. I really want to make a mill out of a drill press, but one project at a time. And I still need to get my prusa i3 working again before I even think about that. Haven't reassembled it after I moved 3 months ago.

Cool, yea I made a manual mill out of a cheap harbor freight x-y vise on my drill press. Its pretty limited on what it can do though.

That's an interesting idea. What's lacking? Range of motion and rigidity?
Anyone need anything printed? PM MEBuilt a new printer
Build thread: http://forums.reprap.org/read.php?178,714397
Awesome thehebs, I just picked up the prusa i3 mk2 kit, it arrives on Friday!
Really, really cool build thread, I would be printing the cosmowenman statues all day on that bad boy!
I have a Ultimaker 2 + and a Stratasys (older model) at work that I have access to.
I see that I can pick up a pursa i3 for under $200, may grab one for the house.
I wish there was a "3D Printers for Dummies" capable printer that was in my price range. I don't want to engineer a printer, I want to print parts. I think the "price of entry" WRT learning the technology is still a little too steep for me. Maybe I'm just not reading the right information.
I wish there was a "3D Printers for Dummies" capable printer that was in my price range. I don't want to engineer a printer, I want to print parts. I think the "price of entry" WRT learning the technology is still a little too steep for me. Maybe I'm just not reading the right information.
Look at the 101hero. It's a $100 printer that just started shipping. It's a smaller print bed but it comes mostly assembled. I think it would be good to get started. I will be purchasing one.
, Base Print Area: φ150mm (5.9″Can;t seem to figure out what size it will print.
Couldn't help myself, I just bought one of these....Look at the 101hero. It's a $100 printer that just started shipping. It's a smaller print bed but it comes mostly assembled. I think it would be good to get started. I will be purchasing one.

Enter your email address to join: