Zeus's rebirth. Non typical, all steam brew stand.

Homebrew Talk - Beer, Wine, Mead, & Cider Brewing Discussion Forum

Help Support Homebrew Talk - Beer, Wine, Mead, & Cider Brewing Discussion Forum:

This site may earn a commission from merchant affiliate links, including eBay, Amazon, and others.
I keep forgetting that my steam powered vessels aren't going to need a burner. Its a real mind shift for me to not have to worry about the burner.

Thus the vessels can sit on any flat surface, if I don't put a bottom drain in them, like I was thinking of doing with the mash tun. If I don't do that, a simple stainless steel table will work fine for the brewstand. I just happen to have one.

The vessels will all be light enough that I could easily set them up however I want prior to brewing.

The other thing about using a plain table for the brewstand is that I don't need a long steam hose anymore.

Having said all that, it might still be nice to have them on their own stand someday. For now I'll just use a table.
 
I bought a Whirlpool 28 gallon "low boy" duel element electric hot water heater like this one.

http://www.lowes.com/Plumbing/Water.../N-1z11qhf/pl?Ns=p_product_qty_sales_dollar|1

Mine is a bit different in that it has the inlet and outlet on the side instead of the top.

I'll start taking it apart and rewiring it while I wait for the pressure relief valve to arrive.

I also need to start cleaning out the area I am going to (temporarily) use for brewing.

I bought the "low boy" hot water heater because

- its smaller, so I won't waste so much water when I brew (versus a 40 gallon model)
- its shorter, so it has the potential to fit under a bench and not take up any floor space
- its larger in diameter, so the big, 6,000 watt elements will fit in it.

Now that I am actually doing something, I'll start taking pictures and posting them.
 
Hydrostatic Testing

It is common practice to pressure test boilers to twice their working pressure with cold water initially and on a periodic basis as part of their certification process. Its not a coincidence that water heaters are rated to a working pressure of 150 PSI and failed during the Mythbuster episodes at pressures over 300 PSI.

Most domestic water supplies have a pressure of greater than 50-60 PSI. That means one can use the common tap pressure to test a boiler system with a working pressure of up to 25-30 PSI.

Relief Valve Selection

I will be using a 30 PSI pressure relief valve in my boiler. It is necesary to replace the stock pressure relief valve because modern hot water heater relief valves are of the temperature and pressure variety. They are commonly rated at 210F and 150 PSI, meaning that it would open when the water reached 210F, regardless of what the pressure is.

Water boils at ~212F at 0 PSIG.
Water boils at ~250F at 15 PSIG.
Water boils at ~275F at 30 PSIG.

I will be using a 30 PSI pressure relief valve. I do not plan to run my boiler much over 250F. The reason I am using a 30 PSI relief valve and not a 15 PSI relief valve is that I don't want the valve opening if the temperature accidently creeps a bit over 250F.

One of the advantages of using a PID controller is that I can dial in the boiler temp as needed. At the start of a brew session I can dial it up to 270F so that there is lots of stored energy ready to go. Near the end of the brew session I can turn it down to 215F so that as much of the energy from the boiler is used by the end of the boil as possible.

I will be using a PID controller (and SSR) to control the elements in my boiler.

Cost

The cost of my entire heating system (hot water heater, relief valve, PID controller(s), ball valves, solenoid valves, hose, 6 Kw elements, etc) will be a small fraction of the cost of what the fancy electric brewing panels seem to be costing these days, especially when you consider that my system will be 12 Kw (50A).

A 50A kit capable of running 2 elements per vessel is priced at $1900 alone, without elements and power cord.

http://www.theelectricbrewery.com/control-panel
 
Performance

Saturated water at 275F holds 243 BTU per pound.
Saturated water at 212F holds 180 BTU per pound.

Lets say my boiler has 20 gallons of water in it and the remainder is steam. Lets neglect the energy in the steam. The water in it weighs about 160 pounds.

The amount of energy stored in the boiler available to run through a heating coil is 160 pounds x (243 - 180) = 10,000 BTU.

The amount of heat necessary to heat 8 gallons of wort from 170F to 212F is 8 x 8.33 x 42F = 2800 BTU.

The amount of heat necessary to heat 16 gallons of wort from 170F to 212F is 5600 BTU.

The amount of heat necessary to boil off a pound of wort is 970 BTU.

Neglecting heat loss in the hose and off the vessel, the energy stored in the boiler at 275F is enough to heat 16 gallons from 170F to 212F and boil off about 4 pounds of wort, before the heating elements are ever turned on.

The rate of heating when the boiler is hot will be limited by the ability of the steam coil to tranfer the heat to the wort. With a large enough steam coil the heating rate will be very fast.

The boil off rate will be limited by the heat output of the elements. 12 KW = 41,000 BTU per hour. Neglecting heat loss the boil off rate will be 41,000/970 = 41 pounds per hour or about 5 gallons per hour. This will allow conentrating wort for even a 20 gallon batch within an hour long boil. No more needing to boil 20 gallon batches for hours on end.

The other advantages of this system over an electric element system or direct fired system include

- no elements protruding into the vessels. Vessels will have steam coils, but they can be just about any shape and be located where they don't interfere with things

- large surface area for gentle heat transfer. No risk of carmelizing or burning.

- heat can be added directly to the grain in the mash tun. No recirculation required, if you don't want there to be.

- minimal heating up of the brewing area

- no need for CO/CO2 ventilation, fully suitable for use indoors

- the elements can be running full power heating the water in the boiler even when the processes are using less than full power. Ie even when the mash is needing little to no power the boiler elements can be running at full power storing energy in anticipation of the energy needed for the boil.

- no risk of running out of propane in the middle of brewing session !

- the brewstand can be a simple table versus a dedicated sculpture needed for a burner setup.

- works with just about any "pot", including Gotts and coolers, though some testing will be needed to see how plastic vessels would stand up to 275F.

- very simple power control via a ball valve. During mash steps heat can be added rapidly. Power can be dialed back when just keeping the mash tun warm between steps. In the boil kettle steam can be supplied at full rate during pre boil to get the wort up to temp and then throttled back once it comes to a boil.

- the easiest heat source to automate. One only needs to turn a small solenoid valve on and off with the controller. No gas valves, no pilot lights, no GFCIs.

- one boiler will run multiple vessels without the need for fancy logic to make sure that too much heat is being asked for at once. ie, with eBrewing you can't have too many elements on at once and the elements are either on at full power or they are off.

With steam brewing you can run as many steam coils as you want as long as the steam pressure stays up. You can run 2 mashes at once or 2 boils and a mash or whatever, as long as you aren't using more heat than what the elements can keep up with. And you can easily throttle each steam coil to ration the steam as necessary.

- extremely efficient heat transfer in the HLT and the mash tun. There is no faster way to heat water in the HLT. Recirculation not necessary for efficent heat transfer in these vessels. Only for temperature uniformity.

- vessels can be fully insulated on the sides and underneath with minimal effort.

FYI, the Sabco Nano Magic system uses a 60 KW boiler for 80 gallon uninsulated vessels, or 0.75 Kw/gallon. My system will be 12 KW for 20 gallons or 0.60 Kw/ gallon. Its just a tad lower on power for the volume I want to use it with.

Its interesting to note that while Sabco says their boiler is 60Kw, they also way its output is 104 lbs of steam per hour or 101,000 BTU per hour. Both of these are much less than 60 Kw. 101,000 BTU per hour is less than 30 Kw.
 
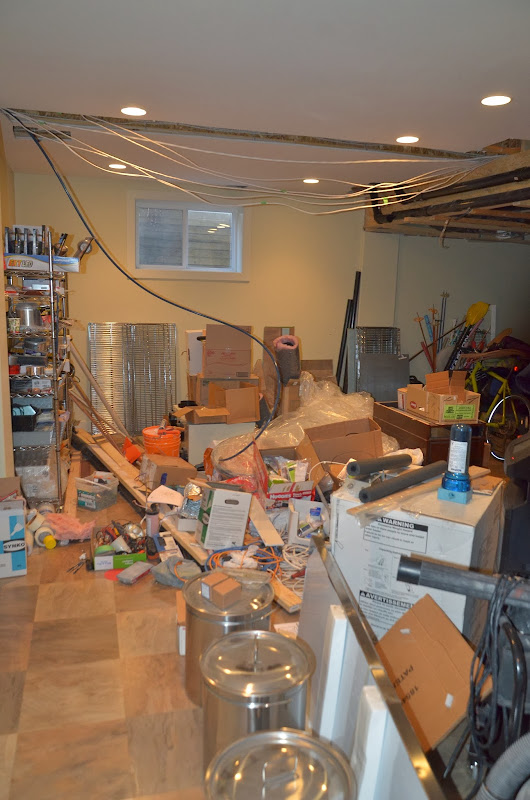
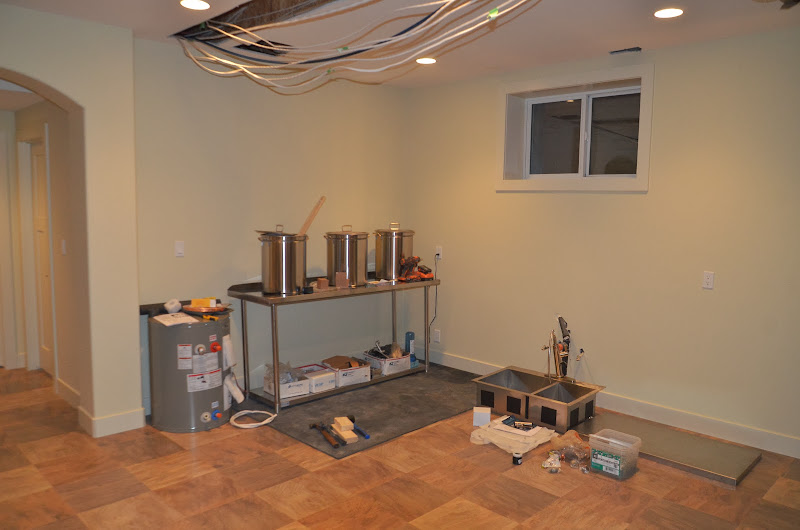
Here is what is standing between me and getting to work on this thing !

DSC_1954.JPG


We renovated the house but have not completed this portion of the basement. My brewery is going to temporarily sit in the corner of this space. Eventually it will have its own space, but until we figure out a few things about how we want to use the basement, its going to sit there.

This was the storage area for materials and such while the renovation was going on.

The hot water heater/boiler is in the box in the foreground to the right. The pressure relief valve has also arrived.

The wires hanging out of the ceiling are for new electrical services that were run to the kitchen, which is directly above this location. I'm going to run an 8/3 in the same route for the boiler this weekend.
 
I know you're a bit into this but I would highly recommend you return the condensate to the boiler. You won't need a condensate return pump for such a simple/small system. Especially if you purge the air from the system at startup, you will be fine without stainless lines. I'm recommending this because you seem like an efficiency junkie, and it will help noticeably.
 
There isn't that much energy lost in the condensate.

Water at 212F has 218 BTU/lb. Water at 70 has about 70 BTU/lb. The difference is 140 BTU per pound. A typical brew session is going to use about 30,000 BTU = 30 pounds of condensate. 30 x 140 BTU/lb = 4200 BTU. 1 KWHr = 3412 BTU. So its a bit more than 1 KWHr (10 cents) per brewing session. For that cost I won't implement a condensate capture and pump system.

Furthermore, that hot water could be put to good use cleaning, rinsing or flushing or it could be added to the HLT for the next batch.
 
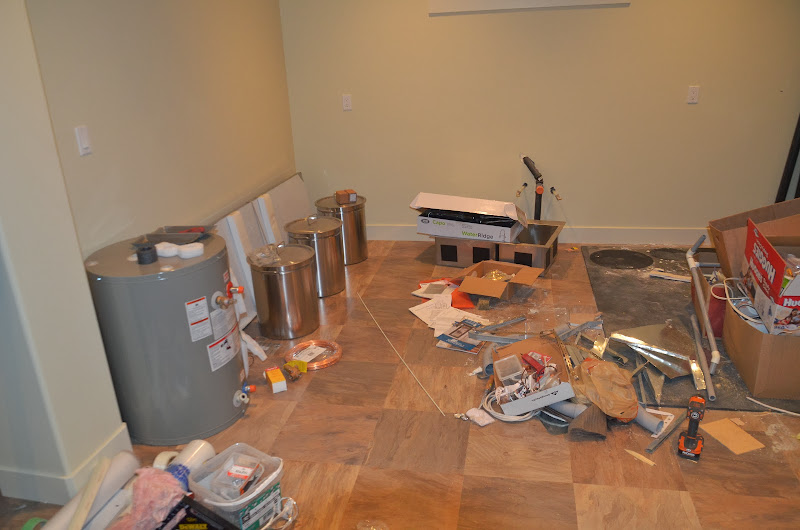
Progress !

DSC_1960.JPG


The kettles are 44 quart (11 gallon) Bayou Classics. I have 82 quart kettles as well. They are in storage right now.

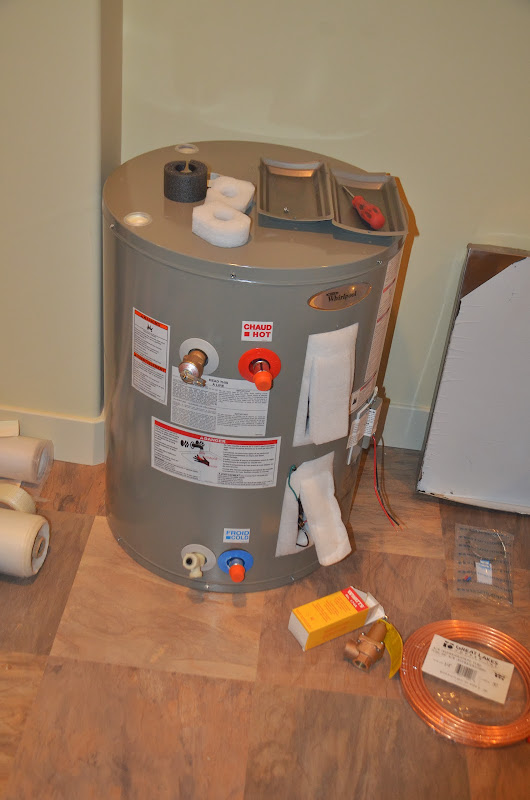
Meet Mr. Boiler.

DSC_1961.JPG


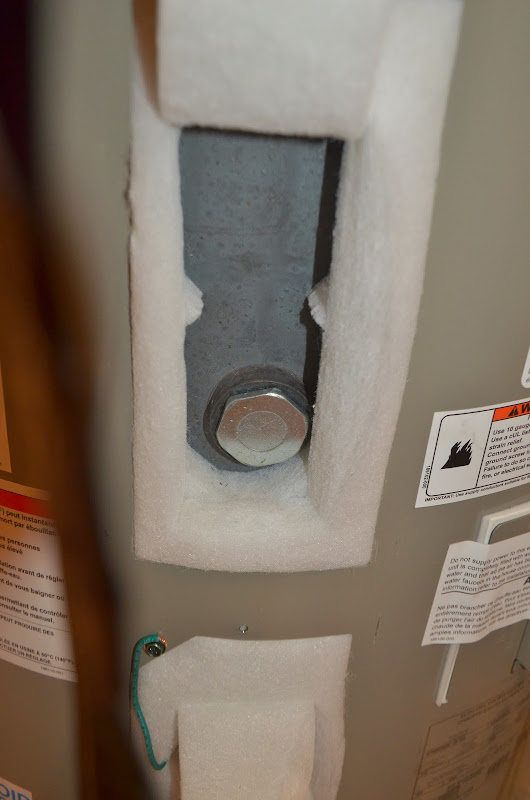
The water heater is rated at 3,000 watts. I has 2 ports for elements. The bottom port has a 3,000 watt element. The top port doesn't have an element in it. Just a plug. Fine by me. I need to rewire it and replace both elements with 6,000 watters anyway.

DSC_1964.JPG


One good thing about this hot water heater is that the top element is relatively low in the tank. That means the boiler can be run for a long time before it would uncover (and burn out) the top element.

This hot water heater has side ports and an anode going in from the top. I'll make the anode port my steam outlet and I probably won't use the anode. FYI, anode ports are 3/4" NPT just like the rest of the ports on the heater.

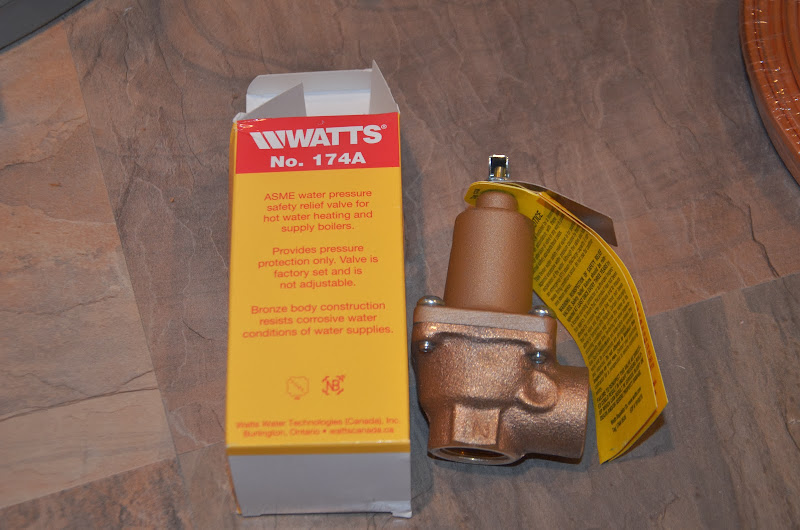
Here is the valve that keeps things safe. Its factory set and non adjustable at 30 PSI. It cost $50.

DSC_1966.JPG


I hope to get a lot more done this weekend.

I am very happy to be brewing in the basement. So much more comfortable than the garage and much better than the kitchen too.

Remember that this is all just a temporary set up. This equipment won't be installed permanently until the brewery room gets built.

The wall behind the brew kettles is slated for some sort of a renovation, so I am not too worried about damaging it. It was put in by the builder. A bar of sorts is supposed to reside there when we are done renovating the basement. The area where I am setting up the brewery is supposed to be a games area, with a pool table and such. I'm telling everyone this so I don't get questions about why I am not building things permanently right where it sits.

The other thing going through my head is how much this brew setup has changed since the Zeus I design. There was no way to get 50-100A into my old garage and the basement in our old house had no room for brewing without a really major reno, so I had no choice but to use gas. Luckily I have none of those problems with the new house. Even if I do end up brewing in the garage in this house, I still prefer steam over natgas, provided it works OK.
 
For the love of all that is good in this world, use metric units! :p These English units are sooooo much harder to work with.

Also, I noted a slight thermo mistake; you are using gauge pressure when you should be using absolute pressure.

250ºF~=121.1ºC
30 PSI~=2 bar (gauge) or ~=200kPA (gauge) or (3 and 300 absolute)
Real temperature more like: 133ºC = 271 ºF
Enthalpy ~= 561kJ/kg

condensate water:
100ºC
1 bar
419kJ/kg

Energy available in 1 kg condensate: 561-461=~100 kJ/kg

Specific heat of water: approx 4.2 kJ/kg/ºC

1kg water raises 16 gallons (60.6L and/or kg) 100/(60.6*4.2)= 0.39ºC

170ºF = 76.7ºC....therefore need to raise 100-76.6=23.4ºC--> 60kg->60L->15.85 gal of pressured water in the tank.

If you have 20 gallons, you then get the heat capacity to boil (100kJ/kg available energy) *15kG condensate / (2257kJ/kg boiled to steam) = 1500/2257 kg boiled to steam....or a measly .66L of water boiled off. Before your heating elements kick in.

I personally think that you have really constrained yourself with the low pressure of 30 PSIg. Your overall boiling efficiency would skyrocket; remember that all the energy you put into the water to get it to 100ºC goes right down the drain. You are only 'using' the energy of the water from its 133º steam state to its 100ºC steam state....I'm not sure you can count on the boiling temperature of the wort being less than the condensing temp of the steam, so you may well not get that energy of condensation. A condensate return line would help to mitigate these energy losses...somewhat. But I do believe that you'd need a return pump, or you'd be relying on natural circulation, which is a fickle beast.

Feel free to poke holes in my maths. I'm an electrical engineer, not a mechanical! But I did enjoy the mental exercise :).
 
Progress !

DSC_1976.JPG


It took a long time to sort through and organize that pile ! Now the real work can begin.
 
For the love of all that is good in this world, use metric units! :p These English units are sooooo much harder to work with.

I agree, but its the same math either way.

I'm using imperial because most people here talk about burners in BTUs and strike and mashing temps in F and grain bills in pounds and boil sizes in gallons.

If you work in metric you are continually going back and forth, or at least I find I do. So I stay in imperial units.

Also, I noted a slight thermo mistake; you are using gauge pressure when you should be using absolute pressure.

250ºF~=121.1ºC
30 PSI~=2 bar (gauge) or ~=200kPA (gauge) or (3 and 300 absolute)
Real temperature more like: 133ºC = 271 ºF

I agree with everything to this point.

I went back and forth between running at 15 PSIG (~250F) and 30 PSIG (~275F). That is probably why you thought I got PSIA and PSIG mixed up. I don't think I did, but lets move on.

Enthalpy ~= 561kJ/kg

condensate water:
100ºC
1 bar
419kJ/kg

Energy available in 1 kg condensate: 561-461=~100 kJ/kg

Mistake here... 561-419 = 142 KJ/Kg.

Specific heat of water: approx 4.2 kJ/kg/ºC

1kg water raises 16 gallons (60.6L and/or kg) 100/(60.6*4.2)= 0.39ºC

1 KG of saturated water raises 16 gallons (60.6L or Kg) 142 /(60.6 & 4.2) = 0.558 C.

170ºF = 76.7ºC....therefore need to raise 100-76.6=23.4ºC--> 60kg->60L->15.85 gal of pressured water in the tank.

Yes. So 23.4C/ 0.558 C/Kg = ~42 Kg of water = 42 litres of water = 11 gallons.

My boiler is 26 gallons, about which 20 gallons will be water and the remainder steam.

So the energy stored in a fully charged boiler (133C) will easily heat the 16 gallons from strike to the point of boiling.

If you have 20 gallons, you then get the heat capacity to boil (100kJ/kg available energy) *15kG condensate / (2257kJ/kg boiled to steam) = 1500/2257 kg boiled to steam....or a measly .66L of water boiled off. Before your heating elements kick in.

I'm not following your math here. Here is mine in metric.

20 gallons of saturated water = 75.7 litres = 75.7 Kg.

We previously agreed that saturated water going from 133C @ 3bar to 100C @ 1 bar will give up 142 KJ/Kg.

Thus the water in the boiler will release 75.7 Kg x 142Kj/Kg = 10,750 KJ as saturated steam vapour. If this steam has an enthalpy of 2257 KJ/Kg then it will be 4.76 Kg of saturated steam.

If the heat transfer between the boiler and the kettle is efficient, basically 1 Kg of steam released from the boiler is going to boil off 1 Kg of water from the wort.

I personally think that you have really constrained yourself with the low pressure of 30 PSIg. Your overall boiling efficiency would skyrocket; remember that all the energy you put into the water to get it to 100ºC goes right down the drain. You are only 'using' the energy of the water from its 133º steam state to its 100ºC steam state....I'm not sure you can count on the boiling temperature of the wort being less than the condensing temp of the steam, so you may well not get that energy of condensation. A condensate return line would help to mitigate these energy losses...somewhat. But I do believe that you'd need a return pump, or you'd be relying on natural circulation, which is a fickle beast.

You ensure that the steam condenses in the steam coil by running it at a very slight pressure higher than atmosphere. Maybe its at 1.2 bar absolute. As long as the steam condenses before exiting the steam coil, all the steam energy is released into the kettle.

Every steam kettle system works on the principal that the steam condenses in the kettle. If it doesn't, then you are right, it doesn't release very much energy. 80% or more of the energy in 133C saturated steam is stored in the phase change. If you don't capture the energy of the phase change, then you don't get much.

You do lose the enthalpy of the saturated water at 100C, but as I've shown before, that isn't a whole lot. In this case its 4.76 Kg of steam condensate x 419 KJ/Kg = 1995 KJ.

Total heat delivered from the boiler was 10,750 KJ.

Total energy lost as condensate = 1995 KJ

Efficiency is (10,750 - 1995) KJ / 10,750 KJ = 81.4%.

And the boil is the poorest efficiency. If steam is injected directly in the HLT and mash tun, the efficiency is 100%.

And the condensate is only wasted if its dumped. If its used for washing or strike water for the next batch, its not wasted at all. What brewery doesn't need hot water ?

Furthermore, I've researched a number of commercial steam breweries. Almost all of them operate at less than 50 PSIG and most operate at around 30 PSIG.
 
From the Sabco Nano Magic brochure:

Mash and Boil Kettles
80 Gallon ( 375 liters ) capacity
Quad-Leg, 304 Stainless, #4 finish, 47"W x 39"D x 43"T
Full 95 deg.Tilting mechanism (worm drive ) makes cleaning easy.
2/3 steam jacket with 50psi rating
50 psi chrome plated Safety Valve
High capacity pouring lip
Condensate drain Valve with insulated handle
NSF and ASME approvals
SS lift off covers ( Boil & Mash )
2" Tri-Clamp end, center drain outlet plumbing
Stainless, false bottom with drain support in Mash kettle
Mash & Boil are temp. monitored / controlled via PLC touchcreen.
Each vessel utilizes a Class A, RTD sensor for accurate temp. target acquisition
Variable stand pipes in boil for effective trub separation.

The kettles have a 50 PSI safety valve, so they will be operated at a pressure lower than that. Say 40 PSI.

Also note the condensate drain valve.

The efficiency of operating at 40 or 50 PSIG will be better as the steam will carry more energy but the condensate loss will stay the same. But, as I have shown, 30 PSIG is better than 80% for boiling purposes the way it is. How much difference is another 5% efficiency going to make ?

Furthermore, the Sabco system uses SS kettles, which have a lower heat conductivity. They need a higher temperature to get high energy transfer. I'll be using copper coils in my kettles.

My hot water heater is rated for 150 PSIG. I wouldn't be afraid to run it at 40 or 50 PSIG. However, it gets hard to find valves that are rated for those temps and pressures, and at some point the insulation on the hot water heater will start melting.
 
Ahhhhhh, so I did make a few mistakes, most notably the transposed 6 and 1 :p. That does shift the enthalpy numbers somewhat favorably.

The slightly elevated pressure is an 'oh duh' thing; do you have a plan for that yet? I vaguely recollect you talking about an outlet valve, but I don't know what sort of valve would be good for producing that desired effect, especially since you probably want to keep it at a given pressure, not just at a constant position.

But I do think my math (as corrected to 416 vs 461) is still valid for the amount you could boil off with the energy in the water in the tank. As noted, the metric you had used earlier was 'raise 16 gallons from 170 to 212 and boil off x amount'. So you need to subtract out the energy you're sending out for the temp raising, which means you really only have (20-11) = 9 gallons of energy equivalent to drive boiling of the water. So instead of driving off 4.76kg, you'll drive off 2.6kg with the remaining energy. Of course, by then the elements would have kicked in and be generating more steam for you, so not a big deal :p.
 
I don't disagree with anything you said above.

I have couple of ideas for maintaining pressure in the steam coils and dealing with the condensate. Stay tuned.

I purposely did not combine the calcs for heating up the sparge water and boiling off wart for reasons of clarity.

You are correct to say that less stored energy is going to be available for the boil off after the wort has been heated from 170 to 212. The discussion was hypothetical in the first place as 12 Kw of elements are going to kick in as soon as the temp in the boiler drops.

The reason I discussed it in the first place was to illustrate that temperature steps will be able to be accomplished very quickly, assuming the steam coil is suitably sized, because the system won't be relying soley on the power of the elements, but rather it can use the power from the stored steam in addition to the power supplied by the elements.

Edit: The steam hose arrived. I got the sink and worktop mounted. I'll post pictures in a bit. I'm going to be swamped for the next few days, but I'll pick away at things as time allows.

I can't wait to get this thing running !
 
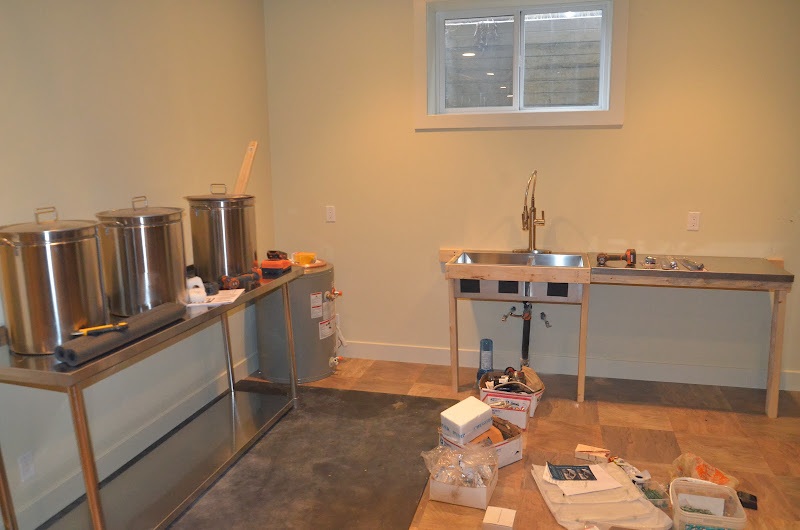
I moved the boiler into the corner and mounted the sink and a SS work table top I picked up at a metal recycler. Those following the Zeus I design will recognize it as the fold down extension on the brew stand.

I put the boiler in the corner because I thought it made better use of the space in the corner between the sink and the brewing table. Basically, I didn't like having a kettle in that area.

Remember, this is a temporary installation. I'll build a permanent brewery once we figure out some of the other changes we are making to the basement. Nevertheless, I think it will be a worthwhile exercise to assemble everything prior to that and use it, as one inevitably learns a few things along the way that affect the plans. That was certainly the case for other renos done to the house.

DSC_1983.JPG


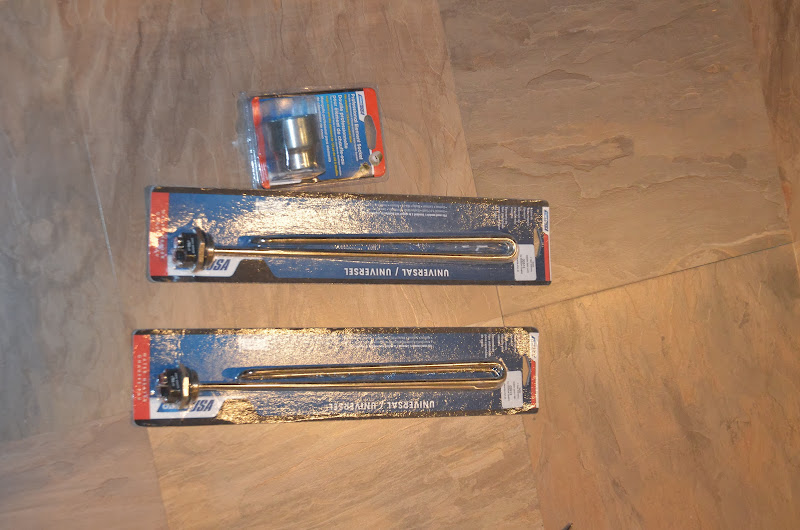
The elements arrived. I bought the socket for them too. The elements were $18 each and the socket was $14. Plus shipping. They are 6,000 watts each @ 240VAC. It will take a 50A breaker to run the boiler alone. Camco part #02613. They extend about 13.5" into the vessel. The package DOES NOT say "Ultra low watt density" anywhere, though the advertisement for them said "Low watt density". It will be interesting to see how long they last with the water being 275F instead of less than 175F.

DSC_1985.JPG


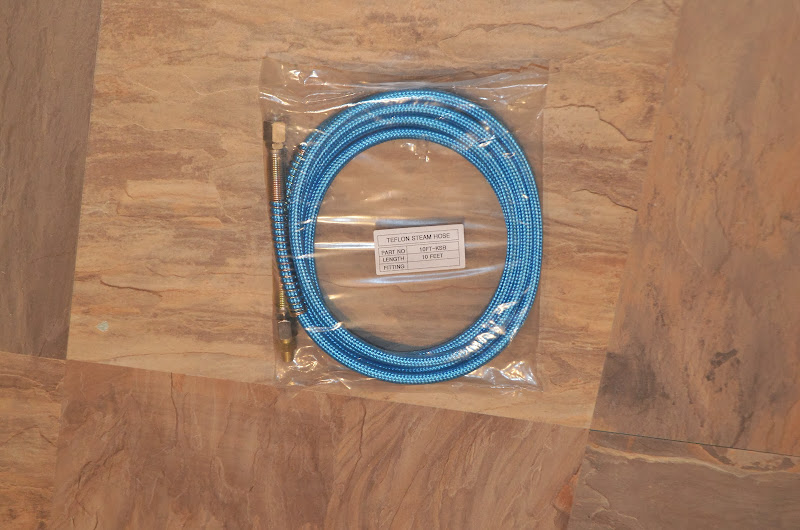
Here is the steam hose. It was $20, plus shipping. With the change in design I no longer need a hose 10 feet long, but it will still work. Its used on commercial steam irons.

I'll replace it with a shorter one some day. I have use for a longer one in another brewing application we'll talk about later... LOL.

DSC_1986.JPG


Next up: plumbing and wiring.

PS: As you may have noticed, I edit my posts about 10X after the initial post. If you have a question or are going to reply, you may want to wait 15 minutes after I post for me to finish my dribble.
 
hmmmm, what it that socket part #? Seems like a much cheaper alternative to some of the other brewing specific sockets!
 
Its Camco 09953.

$12 here:
http://www.amazon.com/dp/B003B40APC/?tag=skimlinks_replacement-20

I bought mine at the same place as the elements, thus paid a bit more, but saved having a separate shipment.

The heater elements are a standard 1 1/2 hex. However, these sockets are 6 point and have a very nice fit. I didn't want to chance rounding an element nut off using a poor fitting 12 point socket.
 
Last edited by a moderator:
I'm working on this again, on and off.

I still haven't found a good motorized ball valve that is rated for steam. Its easy to buy a steam rated valve at HD for less than $15. So I bought one of these motorized ball valves with the hope of being able to remove the motor and use it with a steam rated valve.

http://www.ebay.com/itm/271229940396

Watts has a steam rated motorized ball valve (0431101). Its over $600.

KLD has a picture of one, but no information. Note the long stand off between the valve and the motor.
http://www.electric-valve.com/ngw.html#

The generic non steam ball valves have EDPM seals, which are only rated for 230F, max.
 
I've been doing some work on the electrical feed to the boiler.

The boiler has 2 6KW elements. Each element will pull 25A. (6,000 watts/240V = 25A)

25A x 2 = 50A total.

Local electrical code says that electric water heaters are heater devices and heater devices need breakers that are at least 25% larger than the load current so that they don't pop the breaker under normal operation. 50A x 125% = 62.5A.

I will NOT be installing a GFCI. As long as my boiler is hard wired there is no need for one. Furthermore, there will be no manual controls on my "control box".

The boiler is supplied by 240VAC alone. Thus one can use 2 conductor wire (red, black + bonding wire, no neutral).

NMD90 in 8/2 (and 8/3) is only rated for 45A. I'll need to use 6/2 or 6/3. Its rated for 65A. I need about 50 feet of it.
https://www.ecswire.com/products/specs/nmd90

Local building code also states that one needs to use armored cable (BX) for the section between the boiler and the wall. Not sure where I am going to find 6/2 BX ! Hopefully I can find empty cable armor and insert my 6/2 wires into it.

I have an open electrical permit on my house. Not sure how I am going to explain all this to the electrical inspector... LOL.

FYI, I looked at several eBrewery projects prior to designing mine. Most use 10/3 wire on a 30A fuse. Those systems can run 1 element (usually 5500 watts) at a time.

5500 watts x 3412 btu/KwHr = 18,766 BTU/hr. 15 gallons = 125 lbs of water. 18,766 / 125 = 150F per hour. It would take an hour to heat 15 gallons of 60F tap water to the point of boiling.
 
I'll run the boiler with a PID for testing. Eventually it and the steam valves will be controlled by a Raspberry Pi.

Nothing against the eBrewery design and PIDs, but I want to be able to monitor my system from another room via a browser.

Furthermore, a steam system is going to need an adaptive control algorithm for the steam valves. The amount of energy a steam line delivers will depend on the temperature of the boiler, which will probably not be constant during a brew session.
 
this is some real great info gives some new light to my "shed" project of a one barrle size system My main dely was the fact of needing two heater element to power the boil kettel great work so far looking fwd to updates
 
I have a decision to make, should I pull 6/2 or 6/3 to the brew kettle ?

6/3 is necessary to run a stove or dryer. It has a conductor to run the neutral feed, allowing the device to use 120V as well as 240VAC. 6/2 has no neutral, thus it can only supply 240VAC.

The 6/2 wire will cost about $150. The 6/3 will cost about $195. I need 72 feet, mostly because of the long, indirect path it needs to take to get to the boiler. I could go shorter, but I would have to pull down the drywalled ceiling in the basement to route it.

Keep in mind that this is all temporary.
 
this is some real great info gives some new light to my "shed" project of a one barrle size system My main dely was the fact of needing two heater element to power the boil kettel great work so far looking fwd to updates

Thanks ! Happy to hear that someone finds my rambling dribble worthwhile ! LOL.
 
Would be cool to use one of these little packages. I have not tried to find the cost, I'm sure it's high.. would be awsome though... looking forward to see your project running.
http://www.chromalox.com/resource-center/design-guide-pages/dg-steamboilers.aspx

Lots of 4 to 10 Kw boilers on eBay for less than $2000.

http://www.ebay.com/itm/Steam-Gener...902?pt=LH_DefaultDomain_0&hash=item2a33604e1e

Most of them are a lot higher pressure, like 100 PSI. Anything industrial is apt to be 3 phase. Nothing that a rewire couldn't probably fix.
 
my first idea was to use a instant hot adj for steam with direct injection but did not want to keep adding water to my kettle or mash tun I was afraid of the close loop systems due to the explosive potential what is your view on using a boiler that has been set up for steam heat for a house add a zone off the existing system just an idea not sure how well it will recover and keep the steam up might help me with my build and keep it in the house and led to less impact from the wife
 
If there's even a possibility of putting an appliance there or reusing the cable in a later project that would need it then I would spend the extra $45 ... Given everything you have into this what's $45 more? I mean it's not my money I'm talking about but for that little a difference I'd rather have it than wish I did later.


Sent from my iPhone using Home Brew
 
my first idea was to use a instant hot adj for steam with direct injection but did not want to keep adding water to my kettle or mash tun I was afraid of the close loop systems due to the explosive potential what is your view on using a boiler that has been set up for steam heat for a house add a zone off the existing system just an idea not sure how well it will recover and keep the steam up might help me with my build and keep it in the house and led to less impact from the wife

I deliberately stayed away from anything with a heat exchanger and a flame.

I did this because the heat exchangers in most on demand and regular hot water heaters are small and efficient with thin walls and I couldn't predict what would happen to the temperatures in the heat exchanger component when the water went from 140F in a normal hot water heater to 270F in a boiler application. All it takes is one hot spot and you've got a failure on your hands.

In an electric hot water heater, if the element burns out from being too hot due to the hotter water its no big deal. It stops working and that is about the end of it. In a gas fired device if the heat exchanger gets too hot it can weaken or burn through and then fail structurally, releasing steam into the room. I would not take a gamble on that.

My house has hydronic heat and has a NTN Trinity compact natural gas boiler. The maximum temperature setpoint is 190F. Most hydronic "boilers" are set up like this these days. They no longer generate steam, but rather hot water. The ones that do generate steam are pretty expensive.

I did give some thought to running an on demand or regular hot water heater as a water heater with a 270F set point and using a pump to circulate hot water (270F) through the heating coils. I abandoned that effort when I realized that the heat transfer from steam/ copper/water is 3x+ what it is for water/copper/water. Instead of needing 30 feet of copper tubing in a vessel, I'd need 90 feet.

The other issue is finding an inexpensive pump that will handle 270F water. Most hydronic pumps are rated for 15PSI and 230F, which means you need even larger heat coils.
 
If there's even a possibility of putting an appliance there or reusing the cable in a later project that would need it then I would spend the extra $45 ... Given everything you have into this what's $45 more? I mean it's not my money I'm talking about but for that little a difference I'd rather have it than wish I did later.

I begrudgingly agree. I'm cheap, so the thought of saving $45 is appealing.

BTW, I'm not into this set up for a whole lot.

Thus far
- hot water heater $300.
- boiler wire $150 or $200, depending
- 65A breaker $45
- 2x 6,000 watt elements, $18 each
- element socket, $14
- copper coil, $30
- SS table $145
- SS sink $135
- faucet $120
- Bayou Classic pots, $75 each

Obviously, I need a few more things to get going, but the total bill is going to be a lot less than the $6-8K that the eBrewery people are spending.

It seems a bit silly to spend $300 on a water heater and another $200 to wire it in. But it was the only way I could brew inside with electricity and have a fast heating system. I'd rather spend an extra $500 on a steam system that works than drop $400 plus for Blichman pots.

I was all set to build the brewstand outlined in the Zeus I thread, until I realized how much I didn't want to brew in my cold garage, which doesn't have running water right now. Traditionally I do 80% of my brewing in winter.

One benefit I haven't mentioned is that I hope to use steam from the boiler to sanitize my fermentation vessels and racking equipment.
 
I have a decision to make, should I pull 6/2 or 6/3 to the brew kettle ?
It's pretty easy to imagine a boiler unit with 120V controls. I'd pull the 6/3, it is more versatile and also gives you the option of feeding a sub-panel which might make wiring future improvements in that part of your basement simpler.
 
Yeah - it's easy for me to spend your money ;)

How much do you estimate the controller will cost you to build?


Sent from my iPhone using Home Brew
 
Yeah - it's easy for me to spend your money ;)

How much do you estimate the controller will cost you to build?

Controller parts list

1 12VDC power supply
1 RPi board
1 USB Wifi adapter
1 8 channel relay board
1 100A SSR
4 or 5 DS18BS20 temperature probes
1 enclosure box
4 or 5 indicator lights
1 key switch

The big cost on the control system is the steam valves, which is why I keep talking about them. I hope they are about $50 each and I will want 3 or 4 of them. 4 would allow me to have 1 HLT, 1 mash tun and 2 boil kettles. I want 2 boil kettles for doing split batches or doing 2 brews in 1 session.

The 12VDC power supply will provide power for the 100A SSR that turns the boiler elements on and off as well as the steam valves.

If I want to get fancy, I'll add a touchscreen LCD and keyboard at the brewing station. If not, I'll run the RPi from my laptop.
 
FYI, the testing of the boiler and heating coil is held up by the lack of a 100A SSR. Its on its way via a slow boat from China. Literally ! I ordered it a while back. It should be here soon.

I'm reluctant to go gung ho on building everything else until I am sure that the steam heating system works. I plan to jimmy rig a heating coil in a vessel and then fire up the boiler and and double check that it heats as well as I think it will.
 
Why not run two 50A SSRs - one for each element?

What would it gain ?

Cons:
- have to mount 2 SSRs in the control box
- 2 50A SSRs are more expensive than 1 100A SSR
- have to run 2 armored cables between the control box and the boiler
- PID/ controller only has 1 output anyway. The only way to make "use" of a 2nd SSR is to run 2 temperature set points with 2 control PIDs/ loops. Not sure what that gains.
 
Most PID's can control 5+ SSR's simultaneously. Well, at least the Auber PIDs can.

Did you order an extra 100A SSR?
 
Back
Top