STC-1000+ PI (the mash control firmware)

Homebrew Talk - Beer, Wine, Mead, & Cider Brewing Discussion Forum

Help Support Homebrew Talk - Beer, Wine, Mead, & Cider Brewing Discussion Forum:

This site may earn a commission from merchant affiliate links, including eBay, Amazon, and others.
Yes, my confusion from an earlier post in this thread, should have read your notes first. Thanks for the info, will get an enclosure for this and test it out hopefully v. soon.
 
So the first wet test was performed today!

Set up was just a Burco connected to the heater relay, all percentages set to 100%.

I used Mats' circuit to break out a LED to monitor the pump switching (would just replace LED with SSR when I wire up the grain-father). See Mats' latest Read.me file.

All worked as expected

Excellent project just waiting for a grain-father to hack about!
 
Hi,

had a brewday with the single vessel release on my new diy single vessel recirc setup. I can report only great things with terrific results:

strike temp reached with constant power OK
mashing steps (simple infusion) timing OK
temperature maintained during mash OK with thermostatic output Po
Pulsed output worked OK
boilup alarm and constant OP boil fine
all user input to pause/continue program OK

So brewday was a success :) marvelous work Mats See here
https://wizbrewery.wordpress.com/

Now for minor comments
hop alarms were untested will do that next time.
I think there is a problem when hot break temp is detected. I set it to 98 deg C and it correctly detected . However once detected, the output was set to HO ok but the temp went up to 100 oC & was maintained at 100 oC for Hd.
My pump o/p from the stc is showing 0V, even when the pump should be on. I used an independant pump controller during brewday

Many thanks for your hard work


idea:

Love the countdown for boil time. Could the same be implemented for mash steps, maybe flashing with temp reading? Be really nice to see some indication of progress of the mash steps

cheers Waldy
 
Hi,

had a brewday with the single vessel release on my new diy single vessel recirc setup. I can report only great things with terrific results:

strike temp reached with constant power OK
mashing steps (simple infusion) timing OK
temperature maintained during mash OK with thermostatic output Po
Pulsed output worked OK
boilup alarm and constant OP boil fine
all user input to pause/continue program OK

So brewday was a success :) marvelous work Mats See here
https://wizbrewery.wordpress.com/

Hi and thanks! Glad you enjoyed it!
I checked the blog, but there was not a whole lot of reading material :)
Nice pics though!


Now for minor comments
hop alarms were untested will do that next time.
I think there is a problem when hot break temp is detected. I set it to 98 deg C and it correctly detected . However once detected, the output was set to HO ok but the temp went up to 100 oC & was maintained at 100 oC for Hd.
My pump o/p from the stc is showing 0V, even when the pump should be on. I used an independant pump controller during brewday

Many thanks for your hard work


idea:

Love the countdown for boil time. Could the same be implemented for mash steps, maybe flashing with temp reading? Be really nice to see some indication of progress of the mash steps

cheers Waldy

No, that would be the expected behaviour of hot break. You want it to switch to a lower output just before boiling, to prevent boil over. It is fine if it simmers, it should just not make a mess :) Once the proteins are broken down (i.e. hot break) then switch to normal boil output.

Regarding the pump output. For it to work with a LED dimmer (that I'm using myself), the output is either 0V or high impedance, that is either connected to ground or *disconnected*. So, reading a 0V with a multimeter would be fine. If you add a pullup resistor (that is a resistor connected between the output and +5V), then you would see the signal change. It is pretty clever actually, as that makes the output even *more* useful. With a pull up you can drive a solid state relay. Without you can drive a LED dimmer.

I think you still can see countdown time during the mash by pressing either up or down button (I forget which does what...). Having it alternate might be a good idea, but I think it could potentially be confusing when using Fahrenheit. But I don't know... If this is something that more people would like to see, then I don't have a problem with it.

Cheers!
//mats
 
Hi,

Of course, taming the boil over was successful, I can see with your explanation that the behaviour at the hot break forms works well.

I had chance to try a pull up resister after work today, and yes, as you suggested I can now see the signal change.. thanks. Will try to connect the pump for the next brew.

My blogs paint is still wet. I hope to add some words in a day or two.��

Next step is to bolt the new controller onto the burco ..

With thanks.
 
Hi Mats, Grainfather should be shipped today!

Now some Wyermans All-grain kits that need step mashing have more than 4 mash steps.

Is there room to add a couple more steps 2 more would probably do it?

So next test will be with the GF running like a Burco. Then it will be time for some re-wiring.

For people reluctant to hack the electrics of their new GF:

If you just keep the GF in Boil Mode with both elements selected then you can just plug it into the stc heater circuit (Set power to 100%)and either use the GF sensor or just put in the STC sensor. You manually control the pump and you can manually switch off one of the elements if needed at hot break time!

Getting closer to a new brew!

Cheers

Will
 
Replacing the controller in the grainfather *should* be pretty straightforward. I know there is a guy in our swedish forum that has done it and he seems pretty happy about it.

As for the mash steps... Sure, it would be possible to add more steps, but I really would not want to do that.
Why? The main reason being trying not to over complicate things. That would mean more options in the menu the user needs to traverse.
Secondly, with modern highly modified malts, single infusion is *really* all you need. And even with under modified malts, would you really need more than an acid rest, protein rest, starch conversion rest and mash out?
The thing is, mashing is probably the 'simplest' task in brewing. Malt 'wants' to become wort and as long as you haven't denatured the enzymes, things will happen (at a slower rate perhaps), but still.
Also, measuring temperature is not ideal, it will differ at different locations in the mash, heating will not be completely uniform and so on...

It is just that there are a *lot* of things that go into making a good beer. Cleaning/sanitization, yeast selection, yeast health, pitch rate, malt selection, hop selection, recipe formulation, fermentation temperature, pH levels, salts, et.c., et.c.
Of all these things, I won't say mashing temperature is irrelevant, of course it is important, but it is sort of a red herring...

So IMHO, there are a lot of things to tweak before what would make the beer better is 6 mash steps instead of 4 :)
 
Wired the pump and the dimmer as shown but getting 0v across the pump when it should be on. Perhaps I've got the wiring wrong?

wpid-wp-1431803795752.jpg


ps I've talked out the dimmer case so that it fits in my enclosure
 
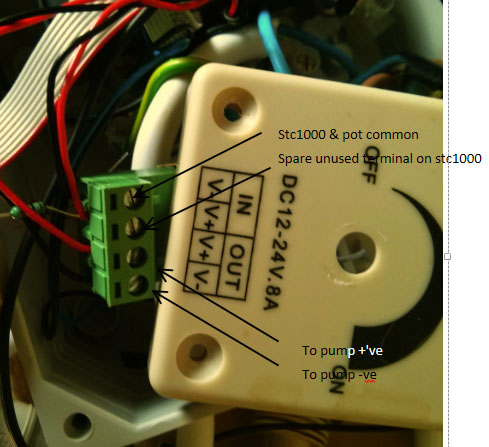
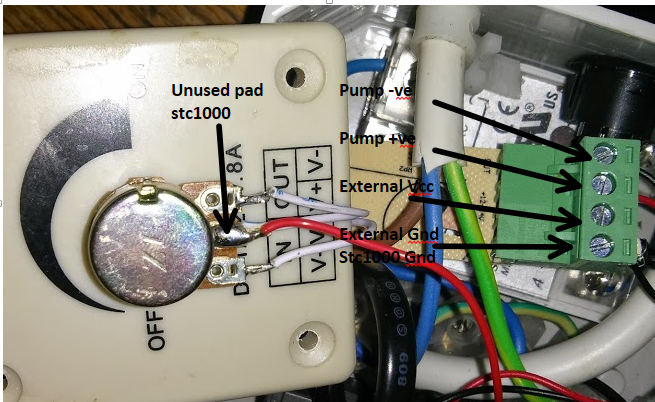
Yeah.... So, yes you need to have common ground, but the pump output (or unused pole on the STC) should be connected to the center pin of the potentiometer in the led dimmer.
 
It is just that there are a *lot* of things that go into making a good beer. Cleaning/sanitization, yeast selection, yeast health, pitch rate, malt selection, hop selection, recipe formulation, fermentation temperature, pH levels, salts, et.c., et.c.

So IMHO, there are a lot of things to tweak before what would make the beer better is 6 mash steps instead of 4 :)
Hi Mats,
I quite agree with you that great beers require a lot of attention to a lot of things not just the mash profile.

Its just that if a recipe (particularly the German recipes) specify 5 or 6 steps it would be nice to have the facility to use them. Its only another 4 menu items! There are already 28 steps!

Pretty Please:mug:
 
OK, I've moved the STC output spare pad to centre pin of the dimmer, pump is still not working (0V at pump o/p on both pot. extremes)

Two thoughts:

I've blown the dimmer? I'll check tonight by wiring the input to a 12v source & the pump across the o/p, see if it still works

the stc o/p is the problem? wired it with a 220R resister to 5v and led across the resistor. The led lights correctly on constant o/p so assume this is ok
 
Ha, looks like I've found a third option. Think I missed the obvious, but once I added an external supply to the dimmer input terminal (12v dc for my pump), all is working.

ps. I wasn't aware of the countdown option on the mash stages (down arrow). That will suffice for me.

pps. I would find useful a 'skip to next stage option'. Would be useful in the case where you have to restart the program from the begining if say the power is cut

here's my wiring:

wpid-wp-1431986371913.png
 
Hi!
I have pushed some changes to the one vessel brew controller firmware:
* Added two more mash steps (this one's for you @Will_D )
* Added a parameter to enable/disable specific alarms and pauses
* Added a parameter to control during which parts of the program pump should be active
* Added possibility to choose which element is the primary one for each power setting

Check it out here.
I have (as always) done ZERO testing. So, please report bugs when found.

Cheers!
 
Alpha,
Glad you brought this one to the top again. I was checking it out a while back and got distracted. I'm thinking this might need further attention on my part. It could fit well swapping out my omega pid.
Your stuff is amazing.
John
 
Hi!
I have pushed some changes to the one vessel brew controller firmware:
* Added two more mash steps (this one's for you @Will_D )
* Added a parameter to enable/disable specific alarms and pauses
* Added a parameter to control during which parts of the program pump should be active
* Added possibility to choose which element is the primary one for each power setting

I also had lost track of this - many thanks for the update Must get testing it and using it on the grainfather!

Once again thanks for your great work

Will
 
Hi!
I have pushed some changes to the one vessel brew controller firmware:
* Added two more mash steps (this one's for you @Will_D )
* Added a parameter to enable/disable specific alarms and pauses
* Added a parameter to control during which parts of the program pump should be active
* Added possibility to choose which element is the primary one for each power setting

Check it out here.
I have (as always) done ZERO testing. So, please report bugs when found.

Cheers!

Love your work! The control parameters are pure genius, very intelligent way to incorporate them. Just gotta wait for my new Arduino Pro Mini to arrive so that I can flash it.
 
Love your work! The control parameters are pure genius, very intelligent way to incorporate them. Just gotta wait for my new Arduino Pro Mini to arrive so that I can flash it.

Thanks a lot!
The control parameters are just bit fields. It would probably be easier for the user to have a binary parameter for each of them, but that would make for more parameters than I'd like, so this was the trade off.
Anyway, I don't think those are parameters that you'd change frequently, so I think it is ok.
I completely agree, and not only does it reduce the number of required parameters, but makes it extensible as well!
 
Looping this thread in for anyone not subscribed to both:

Actually it was more to ensure I didn't request anything that had already been requested and I have to commend your patience throughout this project as I can see it did happen to you on several occasions


So here is the STC-1000p ready to go back into the Grainfather:


(on the dual probe unit I just used a stereo 3.5mm socket instead of a mono like this one)

This is the cable with the resistor, etc for the pump controller:


Then I connected an outlet to the cooling relay (1) and hooked up the in built heater element to that, which I have set to the mash setting (Normal = 2000w, Mash = 500w), and then knocked a hole in the side of it and fitted a 2200w immersion element (2) which I connected to the heating relay:


I created a lookup table for the Grainfather thermistor using a 4000 step multimeter and with the STC-1000's thermistor connected to the controller and a brand new Thermopen to keep it honest:


So as for feedback, firstly it's AWESOME!!! I could happily use it as is without any further development required.

Some observations though:

Mash out temp is hard to maintain at the same output level as other mash steps, this is easily overcome on the Grainfather by switching from Mash back to Normal but for other setups might not be as easy. A possible solution would be a new output setting the utilises existing outputs for the final mash set eg. P6o has a value of 0 = SO, 1 = PO, 2 = HO, 3 = BO with a default value of 1 so that if someone does not change it then it will be the same as other mash steps.

A flame out alarm would be really cool for flame out hop additions, allowing negative values for the alarms might be an elegant solution here eg. -10 would be an alarm 10 mins after the boil has finished?

The other observation is more of a "nice to have" rather than valid feedback and that is that the profile editor page would be awesome if you could add the lut output if you are using a non-standard thermistor.

So the low hanging fruit would be a couple of free text areas where you could paste in your lut output and it would replace the corresponding lines in the page0.c file:

Code:
const int ad_lookup[] = { 0, -552, -312, -158, -40, 58, 143, 220, 291, 358, 421, 483, 543, 602, 660, 719, 778, 839, 901, 965, 1033, 1104, 1180, 1263, 1353, 1455, 1571, 1709, 1880, 2105, 2439, 3073 };

Code:
const int ad_lookup[] = { 0, -484, -351, -266, -200, -146, -98, -55, -16, 21, 56, 90, 124, 156, 189, 222, 255, 288, 323, 359, 396, 436, 478, 524, 574, 630, 695, 772, 867, 992, 1177, 1529 };

This does still require the user to be able to make the lut so the ultimate solution would be a table with two columns and 32 rows to enter the temperatures and resistance values into?

Anyway, sorry for the picture heavy post but I feel t makes it a lot easier to describe.

Cheers!

:mug:
 
Quick question.

I want to use a 240v Urn to make a 1 vessel system.

I don't want to control the element directly.

If I use the STC minute time base only and want to use a 12V pump can I still use the spare spot on the STC board or is this only driven by the single vessle version firmware? Manually driven of course.

Is it easier to wire a seperate 240v socket into the box that is switched manually and powered straight from mains. And run a mains powered pump from that? The only problem with this is that I'll be getting close to a 10A draw when heating, then the pump turns on.

Yes there are other solutions.... but.
 
@mattrox: Pump output is ovbsc only. I don't see the upside of using minute based version over ovbsc for a single vessel system.
If you want to manually conteol the pump, then there is no meed to hook up to the stc at all. The 'pump output' in ivbsc can't drive the pump, it is only a control signal, you still need a driver (like the 8A LED dimmer).

Thanks for that.

The only reason for using minute time base is on a new hot water urn, I don't want to drive the element directly. I didn't want to have a situation, through user error, that a pulsing current passed through the urn's mains lead and possibly damage something like a switch.

After the warranty runs out, I'd be happy to get a ssr and drive the element directly.

In the meantime, I might get used to the idea of making sure the output is 100% and not messing with it.
 
Hi Alpha,

Love the firmware!
I Have a quick question, would it be possible to flash presets directly to the controller?
I regularly change recipe's but brew the same recipe's frequently, while my brew days are easier then ever, it would be nice to be able to flash a profile to the device without having to manually change the settings on the controller.
 
I scanned through the 15 pages, and don't see that anyone has tried the F version of the PI yet. Has anyone?
I'm hoping to pop out my Omega PID this weekend and do a 'wet run' with it and see how it goes.

The #1 thing I don't like about the current PID is that it takes FOREVER to get the last few degrees up to the final set point. I have a 120/240 switch on my RIMS tube and run it on 240 until I reach strike temp, then switch to 120 for mashing. I waited 15 minutes the last time for the last few degrees, and finally gave up and set the temp up 20F and then backed it off once it reached strike temp. I did the auto tune on 120 as that is the primary use, but I would image that on 240 it would be overly aggressive, but apparently not.

I've been using PID controllers on an industrial oven at my business for years, but have only a vague understanding of their detailed PID operation. 95% of the time it's set to hit 2000F, as fast as it can, and then stop. The other 5% is an 8 step ramp and soak.

I've tried to use it on 120 for the mashout rise, but it's just too slow. It's a 4000w at 240, 1000 at 120, but I'm concerned about scorching the wort if I use it on 240 to get the needed rise. I don't recall if the same 'last few degrees' problem was part of the issue, it's been so long since I last tried. The RIMS is 75% insulated, 10 gal cooler for a MT, and SS chugger pump. I added expanding foam to fill in the lid of the cooler.

So given my lack of PID knowledge, are some of the settings in the STC1000PI able to influence the rise rate? I got kinda lost in some of the settings discussions. And, any settings to keep in mind for the 240 rise to strike, then 120 for mashing, and Mashout?

Thanks!
 
Hi Alpha,


Love the firmware!

I Have a quick question, would it be possible to flash presets directly to the controller?

I regularly change recipe's but brew the same recipe's frequently, while my brew days are easier then ever, it would be nice to be able to flash a profile to the device without having to manually change the settings on the controller.


I'd download a different version of the .ino file with the profiles you use and give them all different names. It's easy enough to flash, just flash the one you want prior to brew day.
 
I'd download a different version of the .ino file with the profiles you use and give them all different names. It's easy enough to flash, just flash the one you want prior to brew day.

Yea didnt think of actually searching through the code and replacing the variable in there, good idea.
Edit: Looked at the .ino code anyone know which hex's change what :)

On a side note, anyone know how many writes the memory of the STC would be able to take before it fails?
 
Yea didnt think of actually searching through the code and replacing the variable in there, good idea.
Edit: Looked at the .ino code anyone know which hex's change what :)

On a side note, anyone know how many writes the memory of the STC would be able to take before it fails?


https://04377c9983bdba740a8b0c997fe...t/0B7OSUyUx3xJzUVlLdkFyQ1lMLTg/hextabbed.html

Just use that page to generate the different sketches with the different profiles. Just make sure you rename the file to match the profile you want so you know which one is what.
 
I scanned through the 15 pages, and don't see that anyone has tried the F version of the PI yet. Has anyone?
I'm hoping to pop out my Omega PID this weekend and do a 'wet run' with it and see how it goes.

The #1 thing I don't like about the current PID is that it takes FOREVER to get the last few degrees up to the final set point. I have a 120/240 switch on my RIMS tube and run it on 240 until I reach strike temp, then switch to 120 for mashing. I waited 15 minutes the last time for the last few degrees, and finally gave up and set the temp up 20F and then backed it off once it reached strike temp. I did the auto tune on 120 as that is the primary use, but I would image that on 240 it would be overly aggressive, but apparently not.

I've been using PID controllers on an industrial oven at my business for years, but have only a vague understanding of their detailed PID operation. 95% of the time it's set to hit 2000F, as fast as it can, and then stop. The other 5% is an 8 step ramp and soak.

I've tried to use it on 120 for the mashout rise, but it's just too slow. It's a 4000w at 240, 1000 at 120, but I'm concerned about scorching the wort if I use it on 240 to get the needed rise. I don't recall if the same 'last few degrees' problem was part of the issue, it's been so long since I last tried. The RIMS is 75% insulated, 10 gal cooler for a MT, and SS chugger pump. I added expanding foam to fill in the lid of the cooler.

So given my lack of PID knowledge, are some of the settings in the STC1000PI able to influence the rise rate? I got kinda lost in some of the settings discussions. And, any settings to keep in mind for the 240 rise to strike, then 120 for mashing, and Mashout?

Thanks!

You are welcome to try it out if you want to, but just know I have pretty much abandoned the project (in favor of OVBSC, which is more targeted and simpler). It's been a while, but I think I got the PID sort of working, but it is not without limitations.
There is no floating point, so I think there's a limit to how slow/fast you can make it and also to how it can be tuned. There is definately no benefit to using this over a 'proper' PID.
Tuning a PID is a science and an art form. Increasing P and I will make it rise faster. But also pushes it further towards instability. Also the P, I and D are co-dependent, so finding the optimum settings is difficult.
Auto tuning can work, but generally does not produce very good results.
 
You are welcome to try it out if you want to, but just know I have pretty much abandoned the project (in favor of OVBSC, which is more targeted and simpler). It's been a while, but I think I got the PID sort of working, but it is not without limitations.

Bummer, thanks.
 
Does anyone have a good config for ovbsc usage on a GrainFather.
Also, there where som pages earlier on explaning the % stuff and so on. I can not find these files anymore.

On page 12 alphaomega posted a link, this does not work anymore. I guess this is the page I read a while ago. (explaning + and - values of % setting and such)
 
Hi, I was after the same info for a Grainfather, I have been through the manual and understand most items required but was after an explanation on the following items on included markup? Also how easy is it to connect the GF pump to the STC for someone with minimal technical ability such as myself and do I leave bottom switch of GF on full from now on?? Thanks in advance and must say, great piece of kit! Cheers Callum

View attachment GF STC 1000 Questions.pdf
 
I haven't even seen a grainfather IRL, so hopefully someone else can contribute some useful info to you (like @kaljade perhaps?).
The pump is probably easies to hook up with an SSR, just like kaljade shows a few pages back in this thread.
Regarding the parameters, I can't really help with the power output parameters. You'd probably want 200% for bO. Ht, HO and Hd are a matter of preference as well.
PF depends on wether you use pump control as well or if you want to handle that manually.
cO, cP and cSP are only used when run mode (rUn) is set to Co or Ct (that is, the manual modes).

Hi Mats, happy to contribute back where I can!

So, first of all I don't use the config page as I load my own LUT, I also have a 2200W immersion heater element in the side of mine to utilise the dual element feature of the OVBSC firmware, therefore my output settings will differ from a single element setup.

I can't exactly remember what all my settings are off hand but I brew every weekend so I can confirm on Sunday. What I do know is bO = 200%, PO = -100% (I have the Grainfather element selector permanently on 'Mash' and connected to the 'Cooling' output of STC-1000+), SO and HO I think are both set to 150% (but will confirm), Hd I have set to 15 mins, Ht I have set a little lower than normal due to our altitude here but just set it a few degrees below your boiling point as recommended, Pd I have set to 2.0 seconds, and cP = 0.

I have no idea what my APF and PF flags are off hand but these are definitely personal preferences so for you to decide.

For anyone that is interested here's my Grainfather Setup and I'm happy to supply my .ino file(s) if anyone wants them.

@alphaomega with the continued popularity of the STC-1000+ on the Grainfather perhaps a single element version that uses the 'Cooling' relay for pump control might be a good intro version for people reluctant to modify their expensive new toy (unlike myself :) )?

Cheers,

Kal
 
Hi Mats,

Here's my new custom control box for my Grainfather:


I'll finally get around to posting a video on YouTube of it in action, now that life has settled down a bit (moved town, getting kids into new schools, etc), but here's an action shot to give you a sneak preview:


Cheers,

Kal
 
anyone know where to get one of the stc a400 p controllers need for this just paid $20 @ ucontrol and they sent a clone ( OR "UPDATED" version). this project looks so promising too. I would prefer a 230 volt version but can adapt a 110 after all the transformer out of the clone must be good for something lol
 
So, I also thought I'd have a go at this sweet thingy.

Flashed the firmware and then stumbled upon the wiki article on how to get the terminals to feed 12V instead of 240V, by desoldering the relays and bridge the connections as shown in the illustration photo.

To test it, I wired it up and connected a 12V pump to the cooler output terminals. **** lit up and I think it's safe to say that the terminals 7&8 will no longer function. Hopefully, the same won't happen when I try connecting the SSR to the heating terminals.

It's safe to say that I'm not exactly The Master Solderer ...

Luckily, I bought two of the A400_P. So, maybe I just should put a 12V Switching PSU adapter in between the STC-1000 and the SSR in stead of short circuiting in my poor attempts to solder the PCB board ...
 
Hei @bjarneo !

Maybe you shorted it, but even if not, I really don't think the STC can handle the current draw from a pump directly.
 
Hei @bjarneo !

Maybe you shorted it, but even if not, I really don't think the STC can handle the current draw from a pump directly.

Aha! Oh well, I'll check it out when those long awaited Swithing PSU adapters arrives from China.

So a 12V 8W pump is too hot to handle? Hehe, I'm not exactly an electrician, but I thought that it could do that, given the current to the terminals are about 14V.

Cheers for great work, alpha!
 

Latest posts

Back
Top