HOWTO - Make a BrewPi Fermentation Controller For Cheap

Homebrew Talk - Beer, Wine, Mead, & Cider Brewing Discussion Forum

Help Support Homebrew Talk - Beer, Wine, Mead, & Cider Brewing Discussion Forum:

This site may earn a commission from merchant affiliate links, including eBay, Amazon, and others.
Status
Not open for further replies.
Can someone make this thread sticky to the part where it says to install arduino or is every person that tries to install brewpi gonna come here and post the same question 5 times a day. It should be noted that this is just an example of how to build a brewpi and that there is an entire website with its own forum and installation instructions that start with a full set of installation documentation and even though there is an install script, some work is involved before you actually run it.
 
Can someone make this thread sticky to the part where it says to install arduino or is every person that tries to install brewpi gonna come here and post the same question 5 times a day. It should be noted that this is just an example of how to build a brewpi and that there is an entire website with its own forum and installation instructions that start with a full set of installation documentation and even though there is an install script, some work is involved before you actually run it.

Well mine was running fine till I made the mistake of updating it. I did try the Brewpi forums and went through all the documents before coming here to post.

I got it somewhat working again by reverting back to my backup SD card. Thank goodness I made a backup,
 
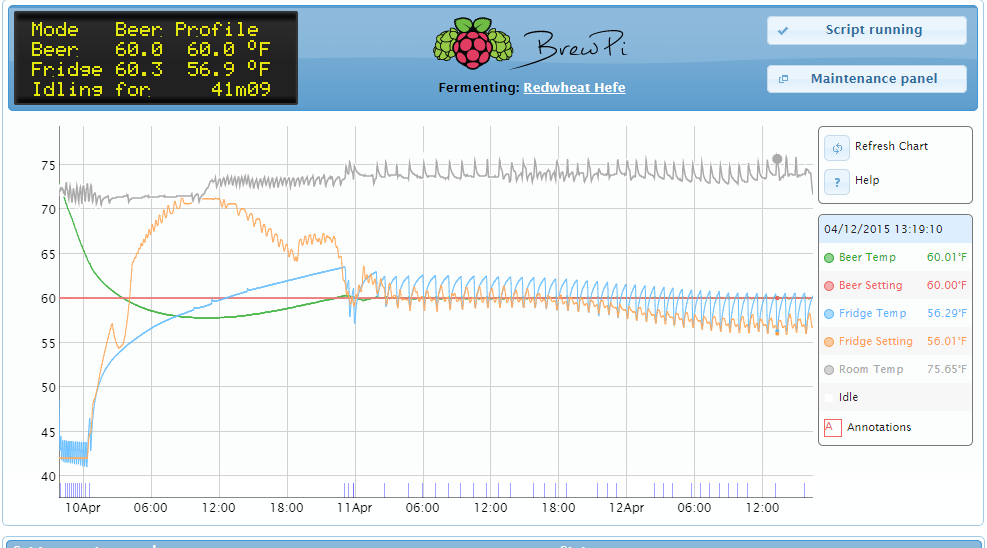
Just want to thank everyone for posting in this thread and helping make my fermenter a reality!

I had only 1 issue using the equipment that was posted in the first post. Installed Raspian fine, but when it came to the audrino, had to purge its memory a few times, as well as use the "Leonardo" update even though I had an uno.

Everything else was fine! Attached an image of the first brew in there, a Hefewiesen.

Capture.PNG
 
If you do get a new USB cord get one with ferrites built in, its quite easy for noise to get on the USB line and screw things up if you keep the cord anywhere near your AC power lines or your fridge/freezer condenser when it cycles.


Got myself a new usb cord with the ferrites built in. Going on 3 days now without issue so it looks like that solved it. Thanks again!
 
Hey guys,

I lost track of this thread a bit and I am sorry to read some of the frustrated posts above.
We just released our new firmware (https://community.brewpi.com/t/firmware-0-2-8-fermentation-gui-is-out/418/).

With this version, we can compile the latest firmware for the Arduino again, so you are back on board on 0.2.8. I have also completely refactored the update process, which should be a lot smoother now.

The latest hotfix was inspired by the posts above and warns when arduino has not been installed when you try to update an Arduino:

Loading programming settings from board.txt
Could not read boards.txt from Arduino, probably because Arduino has not been installed
Please install it with: sudo apt-get install arduino-core

We stopped installing arduino-core by default because new customers will not be using an Arduino and existing users already have it installed. The updater now prints a warning and instructions to install.

The need to reset EEPROM was caused by the installer crashing before EEPROM reset was executed. This will hopefully not happen anymore.

If there is anything else, the quickest way to reach us is at community.brewpi.com.

Cheers,

Elco
 
That's outstanding news Elkoe! I am glad to see that the Arduino BrewPi's will still be supported.

Thanks again for the update.
 
It will probably work. But it doesn't appear to be optically isolated like the sainsmart types are. Or you could use an ssr if you absolutely need a higher amperage. I personally haven't found a fridge yet that maxes out the sainsmart type of relays. And there are cheaper options other than sainsmart that are also optically isolated.

https://www.amazon.com/dp/B00DIMGFHY/?tag=skimlinks_replacement-20
 
Last edited by a moderator:
It will probably work. But it doesn't appear to be optically isolated like the sainsmart types are. Or you could use an ssr if you absolutely need a higher amperage. I personally haven't found a fridge yet that maxes out the sainsmart type of relays. And there are cheaper options other than sainsmart that are also optically isolated.

https://www.amazon.com/dp/B00DIMGFHY/?tag=skimlinks_replacement-20

Thanks. I am using a SSR for my freezer since it draws 11 amps at start up. Was looking for a smaller package for when I finally put it all in a nice case/project box.
 
Last edited by a moderator:
*smacks self in face*

Pay attention, ubermick, and read the damn errors - no such file in the Arduino directory. Then use google. Seems a few people had the same issue (even reported in this thread) in that the Arduino core wasn't getting downloaded.

So did another fresh install, this time adding a quick sudo apt-get install arduino-core after the sudo apt-get update, and that did the trick.

All up and running now.

Moving this to the last page as it also solved my issues.
 
The update script now checks whether boards.txt exists and if it doesnt it tells the user to run: sudo apt-get install arduino-core

Only since yesterday though.
 
So stoked to have mine up and running. Need to get jumpers that allow me to go to my relay from the Arduino, but I'm looking forward to testing it with my fridge and heater - need to figure out where my temperature probes and heater power cord pass through will be.
 
Just pick a spot at random and drill away - I mean, what's the worst that can happen?? :D


Honestly that probably would work- the cooling components all feed to one plate that runs up the back of the inside since it's a mini fridge. :D

Honestly through I'll probably modify the tower pass through to run the wires. I'm just wishing I had gone with something slightly more attractive than the tool box I selected since it will probably have to sit right behind the tower. Oh well, it's in the garage anyway and the fermentation hardware will come off/out if I put it into kegerator duty
 
Just pick a spot at random and drill away - I mean, what's the worst that can happen?? :D


You do like I'd did. Spend hours looking at it measuring looking more. Then When you do it get it all set up. You step back look at it and thank to yourself dang I should of done it the other way lol
 
Here is an alternative Schematic that the awesome 100Amps here on HBT made up that he has given me permission to post here. Gives a good setup using the block connectors to hook everything together rather than twist caps. The only other real difference is a few extra ground connections to the outlet. Technically the relays are grounded through the Arduino to the RPI's ground which would be the same as the wall outlet, but if it makes you feel better its a good idea.
218025d1408159304-howto-make-brewpi-fermentation-controller-cheap-arduino.gif

I just got all the parts to do this build and when I came back to reference the schematic using the block connectors I noticed the link to the image is now broken.

Does anyone happen to have a copy of this image?

Thanks.
 
Hi all,

I'm in the process of building my brewpi. Just wanted to put this out there if it can help anyone else. I was able to successfully build the latest 0.2.8 firmware with support for I2C displays. The following links were of great help:

http://forum.brewpi.com/discussion/1146/i2c-lcd-display-again

https://doomlab.wordpress.com/2015/03/03/brewpi-i2c-version/

I'm not very familiar with Git and I don't want to take credit away from others. I'd be happy to provide the source and hex file if anyone wants to point me towards the best place to put it on the interwebs.

Cheers!

EDIT: Added HEX file, though I had to give it a .xml file extension to upload it. If the device address of your I2C display is not 0x27, this file will not work for you. I can compile a version for 0x3F if anyone needs it.

View attachment brewpi-avr.xml
 
Last edited:
Just finishing up my pwm/ temp control box for my "micro rims" system and stumbled across this tread. I already have a raspberry pi I was using a XBMC box and just acquired an Arizona Green Tea display refrigerator for next to nothing.

It's meant to be.

Excited about building this project!
 
Hi Guys!

I have got one question about the brewpi. It seems like the perfect device for my needs, especially since I have most of the hardware to build it already at home. The only thing I couldn't figure out yet is, if I can use the brewpi with my fridge without a heater. Is this possible or is a heater inside the fridge absolutly nessesary for the brewpi to work?
I would be glad if someone could answer this question for me.
By the way, sorry for my bad english, I have not talked or written much till school.

Stephan
 
Hiya Stephan,

The brewpi will still be able to control the fridge, it'll "learn" slowly that there's no way to heat it up other than switching it off early. But you really should use some method of heating, to keep your beer at a consistent temperature.
 
Hi ubermick,

thanks for the answer. I will keep in mind that a heater i the best option. I think I will try it without first and look if it will work for me or not. The thing is that I qould have to put a hole in my fridge to get the power cable of the heater in there and I would rather not do that.
When the BrewPi "learns" that there is no heater, will it "remember that for the next batch, or will it have to "learn" it again every time?
 
@trisman if the fridge has a built in light. You can use that as your heating source. Brewpi actually has support for this so it isn't even a hack.
 
You can also just run the wire under the door seal. Putting it through the hinge side has worked well for me while I figure out if I want to run wires through the drain hole.
 
Can anyone shed any light on this.

it's a new Pi a new knock off ardunio, fresh install of everything ran the Arduino Core update, then ran brewpi set up, everything appears fine.

go into to install the Hex for Uno and initially got the following

Code:
ser = util.setupSerial(config, time_out=0)
File "/home/brewpi/BrewPiUtil.py", line 119, in setupSerial
except (IOError, OSError, ser.SerialException) as e:
AttributeError: 'NoneType' object has no attribute 'SerialException'
Traceback (most recent call last):
File "/home/brewpi/brewpi.py", line 335, in 
ser = util.setupSerial(config, time_out=0)

Having seen 2keggers post https://www.homebrewtalk.com/showpost.php?p=6815471&postcount=3312

and thinking it was a similar problem I replaced the files in home/brewpi/ with the ones from github brewpi.py, brewpiVersion.py, and programArduino.py.

i figured no harm in swapping them all

but now get the error referring to line 4.

As far as i can see line 4 of the brew.py file is blank

Code:
^
SyntaxError: invalid syntax
BrewPi: wifiChecker: Cannot find gateway IP. Restarting wlan0 interface... (Wed Apr 22 09:40:01 BST 2015)
File "/home/brewpi/brewpi.py", line 4

^
SyntaxError: invalid syntax
File "/home/brewpi/brewpi.py", line 4

Anyone have any thoughts?

just as an addition - as the web interface is running i thought i'd try and reset using python /home/brewpi/brewpi.py --kill

and get the same error

pi@raspberrypi ~ $ python /home/brewpi/brewpi.py --kill
File "/home/brewpi/brewpi.py", line 4
<!DOCTYPE html>
^
SyntaxError: invalid syntax
 
Did you just click and save the files? If so, out saves an html version. I did that the first time. I had to open them, copy it and paste it in to a document and save it with the name of the file. Right click save didn't work.
 
Did you just click and save the files? If so, out saves an html version. I did that the first time. I had to open them, copy it and paste it in to a document and save it with the name of the file. Right click save didn't work.

I'm on a mac so i was able to right click and save then rename then delete the appended .html

i'll try cutting and pasting to see if that works - Made no difference, also remembered i actually updated them through the RPI and iceweasal and they downloaded fine through as .py

think it's a duff Uno as when i plug it into my mac it doesn't show up as a serial port...
 
Last edited:
Mikmonken, sorry that didn't work for you. Borisfa, check the setting. You can set the max and min. My guess is the min is set at 18.4. I'm not in front of it right now, so I can't tell you which tab it is.
 
@thekraken, I have 2 Brewpi and both of them when set to control beer temperature (Beer Profile) to 18,0°C the lowest beer temperature achieved is 18,4°C, and looking to settings I could not find what change to do to fix it.
 
Status
Not open for further replies.
Back
Top