Easy & Cheap Stainless Vent Hood

Homebrew Talk - Beer, Wine, Mead, & Cider Brewing Discussion Forum

Help Support Homebrew Talk - Beer, Wine, Mead, & Cider Brewing Discussion Forum:

This site may earn a commission from merchant affiliate links, including eBay, Amazon, and others.
I followed this thread

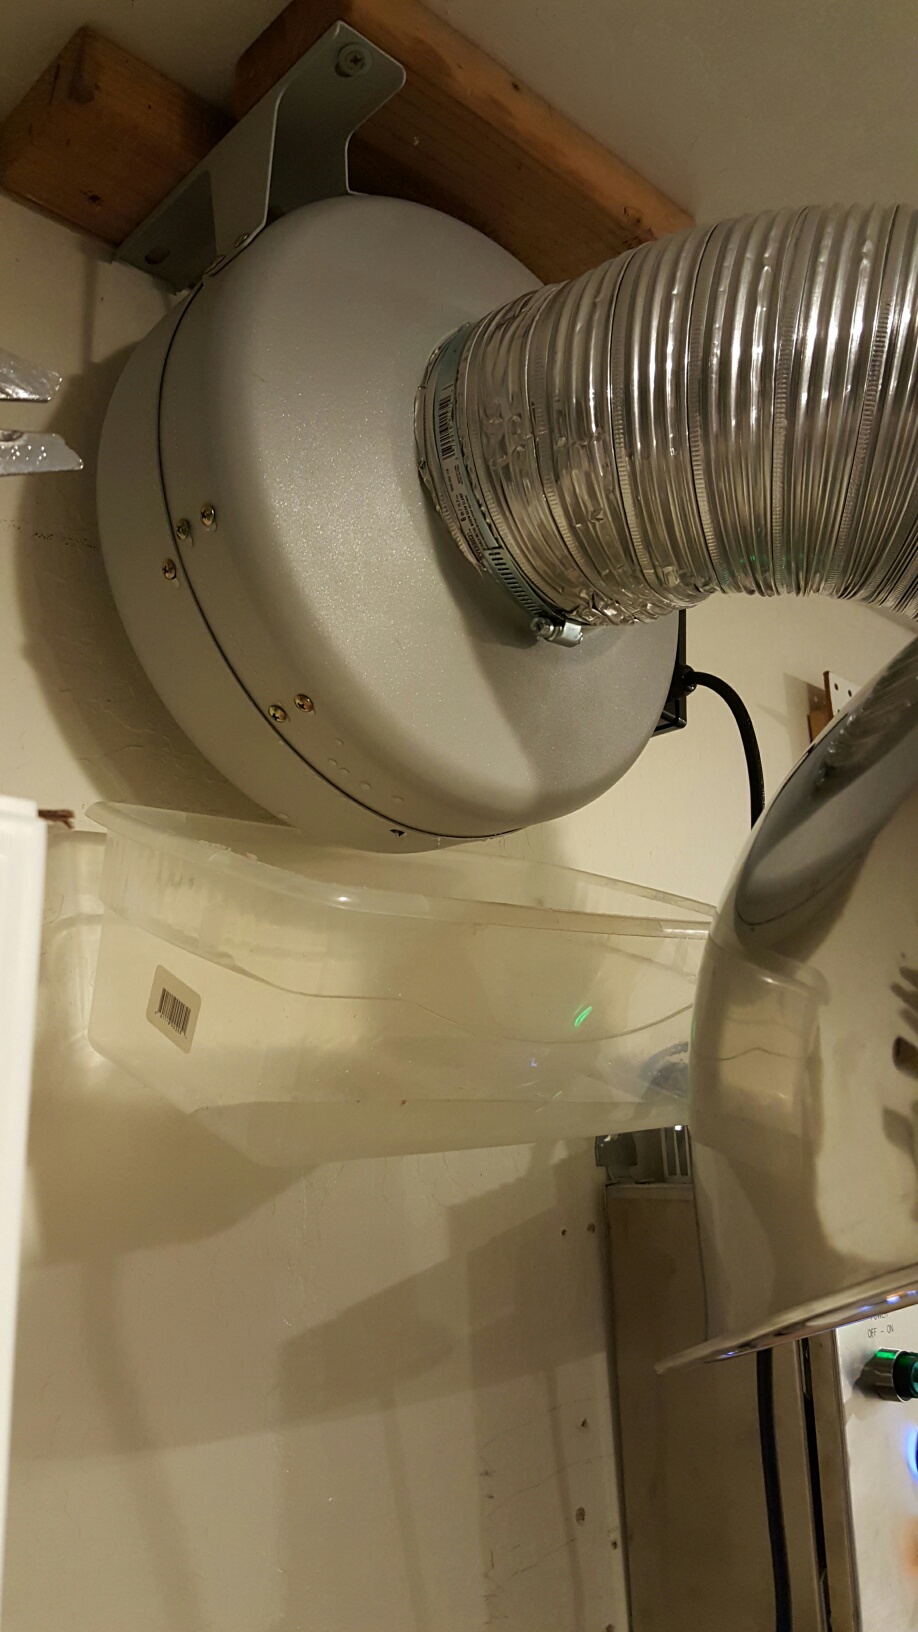
Built my own Easy & Cheap vent Hood
And i had tons of dripage - leaks - too much water

I moved up to a 6 inch fan, and it was a HUGE improvement !

I am not sure how so many of yous guys are getting away with a 4 inch fan?
More power to ya !

here is my thread - i hope it helps anyone who had the same problems

https://www.homebrewtalk.com/showthread.php?t=570312&page=4

my 2 cents, just trying to help

Steve
 
I went all out and got an 8 inch fan with a variable speed controller, I would highly recommend going that route. I've had no condensation and little water(less than an ounce) in the duct line but that was mostly on really cold days outside.
 
Thanks for the inspiration:mug:
Finally got around to doing mine. Still need to add the vent to outside & do a test but it is much better aesthetically pleasing to look at now!

Old Setup (that blocked the whole window):
imag06371-67044.jpg


New (With a View!), all polished Stainless :):
imag0784-67040.jpg


imag0786-67042.jpg


imag0787-67043.jpg
 
I built a similar hood setup with 440CFM fan & 6" aluminum foil style flexible duct. I've only ran on 1 boil so far but noticed a bit of condensation. Are you all replacing duct work periodically? Most of the steam was blowing out of the vent, but i'm concerned about mold with residual condensation.
 
I built a similar hood setup with 440CFM fan & 6" aluminum foil style flexible duct. I've only ran on 1 boil so far but noticed a bit of condensation. Are you all replacing duct work periodically? Most of the steam was blowing out of the vent, but i'm concerned about mold with residual condensation.


Just run your blower for an hour after you finish. It'll dry out the vent.
 

Note to anyone using 90° elbows, you will need to silicone the joints. I had so much condensation coming out it wasn't funny. I used clear silicone and no more condensation :ban: And it isn't that noticeable against a polished surface either.

Also, people may want to add an intake screen. I had used some paper towel to absorb some of the moisture while brewing/cleaning up. I must have forgotten about it because the next brew day may fan would no longer suck. It even tripped out from over heating. Low and behold I found that paper towel tangled in the impeller of the fan:smack:

I used the exhaust silver tape you find in the same aisle with the pipes. Stuff is great.
 
There's plenty of CFM to move out the moisture if you design a low impedance path (minimize elbows) use straight pipe over corrugated and minimize air leaks.

I use electric.

Good luck.
 
There's plenty of CFM to move out the moisture if you design a low impedance path (minimize elbows) use straight pipe over corrugated and minimize air leaks.

I use electric.

Good luck.

hmm, i was reading on my setup and everything points towards almost 2k CFM required for the heat and moisture id be producing(3x 100k BTU gas burners). thats why i was curious with your fan. Thanks for the response.
 
hmm, i was reading on my setup and everything points towards almost 2k CFM required for the heat and moisture id be producing(3x 100k BTU gas burners). thats why i was curious with your fan. Thanks for the response.

I think you need to address each of these heat sources independently:
1) Moisture: as described throughout the blog
2) Heat from burners: exhaust ventilation required as high up in your cooking area as possible to remove the heated air
3) Make-up air: fresh air in to balance the oxygen used in using those 100k burners

All the best,

Just on burner heat alone I need almost 2k. Im using 3x 100k btu jet wok burners. I'm generally using one at a time
 
OK i just binge read all 34 pages of this post. I'm about to pull the trigger on this fan.

iPower GLFANXINLINE6 High CFM Inline Ducting Fan, Hydroponic Air Blower Heat Air Conditioning Vent Exhaust, 6-Inch, 442 CFM; Pre-wired 5-feet UL Listed Power Cord https://www.amazon.com/dp/B009LCEUEK/?tag=skimlinks_replacement-20

How has everyone been attaching the fan to the bowl?
 
Last edited by a moderator:
OK i just binge read all 34 pages of this post. I'm about to pull the trigger on this fan.

iPower GLFANXINLINE6 High CFM Inline Ducting Fan, Hydroponic Air Blower Heat Air Conditioning Vent Exhaust, 6-Inch, 442 CFM; Pre-wired 5-feet UL Listed Power Cord https://www.amazon.com/dp/B009LCEUEK/?tag=skimlinks_replacement-20

How has everyone been attaching the fan to the bowl?

Shtank

I started with the fan attached to the Bowl - but "Dripage" was too much - alot ~!
I moved the fan 5 ft away, and no more drips

all the steam condescendances in side the fan, more dripping......
moving the fan further away helped - some guys have them mounted right to the bowl ??

My experiences - your mileage may vary.
this is the fan i use - 460 CFM - not much more than your selection

https://www.amazon.com/dp/B005XNNYMU/?tag=skimlinks_replacement-20


Oh, yeah - and I CUALKED the HELL outta that fan - to keep the water inside the fan
and put a small hole in the bottom of the fan - a wheep hole - for the water to come out - in one spot
otherwise water will get EVERYWHERE - it will make it into the "electrical box"

hope that helps

my 2 cents.
S
 
Last edited by a moderator:
OK i just binge read all 34 pages of this post. I'm about to pull the trigger on this fan.

iPower GLFANXINLINE6 High CFM Inline Ducting Fan, Hydroponic Air Blower Heat Air Conditioning Vent Exhaust, 6-Inch, 442 CFM; Pre-wired 5-feet UL Listed Power Cord https://www.amazon.com/dp/B009LCEUEK/?tag=skimlinks_replacement-20

How has everyone been attaching the fan to the bowl?


I got one of these at Lowes in the duct section. works well

http://images.lowes.com/product/converted/687384/687384831279.jpg
 
Last edited by a moderator:
Thanks for the fast response guy's. My run is only about one foot to a crawl space vent so I could just mount the fan there and use stand out sticky fingers linked. Nice collaboration. Cheers
 
Is there any consensus as to whether it is better to attach the fan to the bowl or closer to the exhaust side?

This is a great thread!
 
Is there any consensus as to whether it is better to attach the fan to the bowl or closer to the exhaust side?


This is a great thread!


Closer to the bowl. These types of blowers don't generate much suction so you don't want to restrict the inlet.

If it's not too long a run, it practically won't matter much.
 
Just finished up my adjustable height vent hood. Uses a 8" inline fan and duct. http://www.goo.gl/k3r6N9
I also used one of these to go from the bowl to the flex duct. http://www.goo.gl/augJp8
Flex Duct: http://www.goo.gl/W3ljZ0
Outside Vent Cap: http://www.goo.gl/UkkuGr
Best Price on mixing bowl at Staples?!! LOL: http://www.goo.gl/sP7DVK
Welded up my own angle brackets out of some left over bed frame angle iron to mount the bowl. Ball bearing drawer slides to adjust the height are between the 2x4 and the wall mounted 2x6's.

I bought the fan from a "Grower" on Craigslist so sand blasted all the "tar" out of it and repainted it red. :)

0403170641.jpg


0403170641a.jpg


0403170641b.jpg
 
Nice! Very clever setup with the drawer glides.


Just finished up my adjustable height vent hood. Uses a 8" inline fan and duct. http://www.goo.gl/k3r6N9
I also used one of these to go from the bowl to the flex duct.

Welded up my own angle brackets out of some left over bed frame angle iron to mount the bowl. Ball bearing drawer slides to adjust the height.

I bought the fan from a "Grower" on Craigslist so sand blasted all the "tar" out of it and repainted it red. :)
Welded up my own angle brackets out of some left over bed frame angle iron to mount the bowl. Ball bearing drawer slides to adjust the height.
 
I may try this. Do you think I could just hook into this PVC line? It goes from my HVAC, across my basement, and through an exterior wall. My kettle would be right under the part where it goes through the wall.
20180126_082948.jpg
20180126_082957.jpg
 
You could try that, but it is pretty huge restriction as that pipe is pretty small. It's a very short run though. You might want to ask an HVAC friend or ask online if there is some danger in doing that that we don't know about.

If you don't want to cut another hole, you could try going out a window. I replaced one of my basement windows with a homemade acrylic one that I just cut a hole in and sealed with caulk.

Thanks for the response. I'm reluctant to put another hole through the brick exterior, since my family is starting to outgrow this house and we're likely to move in a year or two. Unfortunately the only window is a good 15' feet away.

There is a screen door to the left, and I could put the BK right next to it (but not directly in front). But going through the door would mean I can't go outside. Perhaps I could build a little removable square that would hold the door open 6" and hold the vent in place. Its certainly not ideal to leave the door open even that much for an hour or two when its 20 degrees out (or 95!), but I'm running out of options!

Ventilation is my only impediment to going all electric right now.
 
I may try this. Do you think I could just hook into this PVC line? It goes from my HVAC, across my basement, and through an exterior wall. My kettle would be right under the part where it goes through the wall. View attachment 555133View attachment 555134

Please be very careful here. I have the same furnace PVC configuration as you do, one pipe is for intake the other for exhaust, and they terminate in a through wall concentric Vent unit.
1) The pipe is much higher impedance (smaller diameter) than the typical 4" or 6" ducting recommended for fan exhaust
2) Moving air rapidly through PVC pipe in winter generates static, which may be dangerous.
3) If you did tap into the exhaust line how would you stop the furnace exhaust gasses going into your ventilation bowl or the ventilated moisture going into your furnace?
4) Operating your Kettle Ventilation fan while the furnace is in operation may cause a backflow of Carbon Monoxide into your home
5) Even if you run a separate ventilation line for the kettle hood you may find that local code specifies a minimum distance between intake and exhaust lines

Gotta be a way to use that screen door and still have access through it.
Good Luck
 
yah definitely don't tie into those furnace lines. that's a really bad idea for many reasons so consider it no further.

have you looked into the boil condenser thread? or perhaps just running a long flex duct over to the window? cool thing about flex duct is you can put it up and take it down as needed too. it's not ideal, but better than nothing.

2nd this, do not tie into your furnace exhaust no matter the size
 
Hey murphyslaw - as schematix recommended, you really out to take a look at BrunDog's boil kettle condenser build in this thread. It's relatively inexpensive and seems to work well for those who've tried it - and it completely eliminates the need for an external vent hood. For ~ $130 in parts, you could avoid any need to cut another hole in your brick wall!
 
Hey murphyslaw - as schematix recommended, you really out to take a look at BrunDog's boil kettle condenser build in this thread. It's relatively inexpensive and seems to work well for those who've tried it - and it completely eliminates the need for an external vent hood. For ~ $130 in parts, you could avoid any need to cut another hole in your brick wall!

I have been following that thread also. I might go that way, but I'd prefer to find a way to make the hood work and avoid the unintended consequences of the condenser method--i.e., no boil off, dms, etc. I know the boil off takes a math correction and people have reported no issues with DMS, but I prefer simplicity, if possible.

But like I said, if I can't make this work, I may go that route. Thanks for your advice. :mug:
 
This is a better picture of the space. The plan is to brew on top of the work bench. It's not the leave in place solution I'd like, but it's the space I've got. View attachment 555354

Maybe you could fashion a temporary panel to replace the glass in the storm door, it would be awkward having a flex hose attached but at least the door would be partially operable while you brewed

Maybe like a piece of luan board? It’s pretty thin, depends on how the glass is held in the door, if it’s designed to slide probably won’t hold the board just a thought though
 
While not an elegant solution, you could put a window fan in an open window and open the screen door a little bit ventilating the entire room. Ime you just need a means to get some air moving through and out of the room, it’s only steam not toxic gas. Jmo
 
Can't you just move the position of the mounting brackets? Think they can move to any of those 2 bolt holes.
 
Can't you just move the position of the mounting brackets? Think they can move to any of those 2 bolt holes.
No. Mine only has 4 holes for each of the mounting brackets, I guess he could have drilled extra holes, for the bracket on the other side, but I'd rather not do that if I don't have to..
 
I’m in the process of designing and laying out my basement brewery. Venting is the current issue to resolve.

I like the idea and he design here but I have some questions.

The OP addresses this and his design seems solid but some of the others have the bowl attached the duct work. I’m wondering if any of those have a problem with condensation dripping back in.

My concern on those systems is that galvanized sheet metal duct. Typically it’s zinc coated or at times contains other contaminates.

Condensation returning is one issue, returning with zinc, chromates, or some other additive is something different.

I’ve read and seen brews with standard 30” hoods (maybe 36) and then just positioning the mash and boil kettles under it.

I know I’ll need about 320cfm (I’m buying a 400) and will be venting through 6” duct.

I’ve found some kitchen hoods that I think fit this purpose, but the issue is the length. I’d like something that covers both kettles comfortably.

I’ve also looked into coroplast with a wood frame and coroplast on the inside. With channel and drain tube.
 

Latest posts

Back
Top