plinythebadass
Well-Known Member
If I wanted to do stepped mashes? Wouldn't i need a beefier heating element to do temperature ramps quickly? What about wort scorch!!!!!! HELP IM BUYING STUFF THIS WEEKEND!!!

Ok So I'm planning a RIMS build at the beginning of the year....maybe a little earlier, so I'm trying to get an idea of what I might need to put it together myself or just buy one. I took all the part numbers from the 1st post at Murray Equipment and entered them into the cart to get a total and this is what I've got. Mind you, none of the electrical panel stuff is in there of course and I've put the SS valve in the cart, but honestly I could just use 1 of the brass ones I've got laying around to save $20.
S4N2X10 $21.18 (2"x10" SS Nipple)
S4B2X1/2 (x3) $28.11 (2" x 1/2 SS HEX bushing)
S4T2 (x2) $36.16 (2" SS Tee)
S4B2X1 $9.37 (2" x 1" SS HEX bushing)
INL1/2SSLL $17.40 (1/2" SS Ball Valve)
Total $112.22
Has there been anyone else out there that has gone this route and can comment or give advice of some nuances about building this? Tricks learned? While the bought RIMS tube runs almost $40 more expensive than this, can I expect any issues going the DIY route? I do love a good home made brew toy.
Thank
I see you chose the 2" pipe size. I've used the 1 1/2" pipe and had good success. I think the parts are cheaper as well.
Though I purchased back in 2010 and I'm sure there's price creep. Here's my purchase from then:
Item Number Description Qty Price Extension
-------------- ------------------------------ ------- ------- ----------
S4C ROS11/2 11/2 CROSS 304SS 1 15.00 .00
S4T 11/2 11/2 TEE 304SS 1 10.55 15.00
S4B 1X1/4 1 X 1/4 HEX BUSHING 304SS 1 2.15 10.55
S4B 11/2X1/2 11/2 X 1/2 HEX BUSHING 304SS 3 4.60 2.15
S4B 11/2X1 11/2 X 1 HEX BUSHING 304SS 2 4.60 13.80
S4N 11/2X8 1 1/2 X 8 SCH40 NIP 304SS 1 14.48 9.20
DIX TN34 NYLON 3/8"HOSE X 1/2"NPT 2 .50 14.48
MEI WEBDISC ONLINE ORDER DISCOUNT 1- 1.32 1.00
Order Totals 64.86
I also used a cross on one end instead of a tee so I could easily dump the contents.

Hi all. I'm looking for some help wiring my basic basic RIMS tube cooler MLT. I believe I have all the correct parts but I'm looking for some opinions on how to wire up the system. Here is a list and pic of my parts:
Cooler MLT w/false bottom
SS Chugger pump w/SS ball valve
1.5" SS tri-clover RIMS tube
Camco 1500W 120v heating element
4" temp probe
Auber 2352 PID
Auber 25A SSR
Heat sink to be mounted outside box
2 120V lighted switches (pump & element)
2 outlets for pump and element
1 LED indicator for element power
I plan on running the system off a standard 110 GFCI. Any direction/criticism will help. I'm just beginning. Thanks.View attachment 170935
Did you get everything set up and working? Curious about the heatsink being mounted on the outside of the panel.
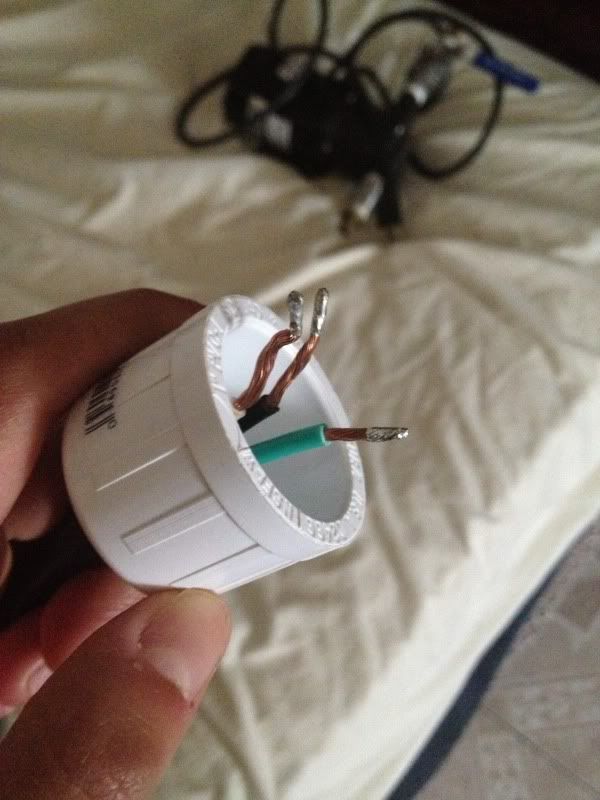
What is the consensus for capping the heating element side of the RIMS tube? I have seen PVC suggested, but is that the best option? If PVC, what is the best way to affix the cap to the tube? This is the last portion of my build before I am able to fire the RIMS tube up.
I've tried to find in this thread the answer to the question, but had no luck on the search. thanks in advance for the help.
You could always go to brewhardare.com and get the no tri clover weldess version at the bottom of the page. It's only $24.
http://brewhardware.com/rimsherms-parts-93/176-elementparts
")
Thanks - I just ordered the $24 piece you mentioned, this is exactly what I was looking for.
Sometimes coming up with the right google keywords to search is a challenge
You could always go to brewhardare.com and get the no tri clover weldess version at the bottom of the page. It's only $24.
http://brewhardware.com/rimsherms-parts-93/176-elementparts
PVC Cap picture:

well after spending the last 5 days reading all 1299 posts. i'm sold on rims. just ordered the stout tank tube. ( glacier was out of 3 of the parts) this also will allow me to upgrade my brew system in the future, with out having to worry if the rims will handle the bigger volume.. now to try and hide the cc bill from SWMBO
i do have one question.. how well would the little solar pumps work on this?
is it possible for you to post a video ? to see better picture of how the assembly works out
I am beginning to put together my own RIMS build and I had a question about the best way to prevent rust on the heating element base. I've seen some recommend food-grade silicone on the base. How thick should this be? Will the element burn this material? What about silver solder?
I run my sparge water through the RIMS tube and pump the MLT output directly into the boil kettle. That way the RIMS tube has only water in it when finished, and is partially cleaned out.
Make a ULWD element by using a 5500 watt 240 volt ULWD element at 120 volts, you get 1375 watts with an almost negligible watt density. Requires a longer RIMS tube, but so what?
Enter your email address to join:
