You are using an out of date browser. It may not display this or other websites correctly.
You should upgrade or use an alternative browser.
You should upgrade or use an alternative browser.
"polishing your keg" is more than a clever euphemism
- Thread starter Bobby_M
- Start date

Help Support Homebrew Talk - Beer, Wine, Mead, & Cider Brewing Discussion Forum:
This site may earn a commission from merchant affiliate
links, including eBay, Amazon, and others.
2B_Brewing
Active Member
I didn't think it was possible for something to look newer than brand new. Nice kegs. I wanna try it now.
val214
Well-Known Member
Good stuff nc17. Those look awesome.
I know this thread has been dormant for a few months but I have to vent...I have been cleaning up my Keggles and had good results with the Gator Medium and Fine pads. Although I did end up with a lot of swirl marks, I figured this was just the nature of the beast b/c of the scotchbrite like pad and it would polish out nicely at the end..
I hit the keg today with the #5 compound and polishing disk and it seems that I just took three steps backwards with the appearance. Pretty much instantly the surface just looked dark and cloudy. First I thought I hadn't put enough compound on the disk so I added some but was afraid to use too much...I did one section and it really doesn't look any better than the rest after the Fine disk and the polishing pad looks trashed.
I don't know, I may just end up with clean kegs sporting the 'distressed look'...Anybody else have trouble tackling this project?
OP
OP
I often hear about people having trouble but I haven't been able to troubleshoot. How much pressure are you using? You should push hard enough that the grinder slows down a bit. Keep in mind that the coarse polish is used to remove the light scratches from the finishing pad. It's not going to be shiny. If you skipped to the fine polish, you'd be there forever making the cut. Trust the process.


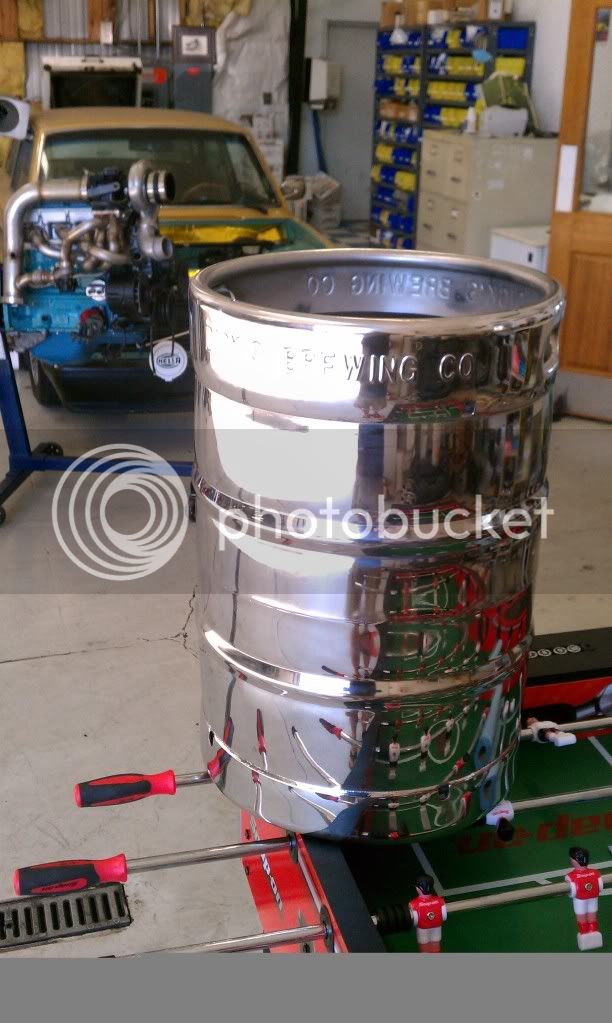
damn! that keg is awesome looking! Fine job there Matt! well worth the work, I would say!
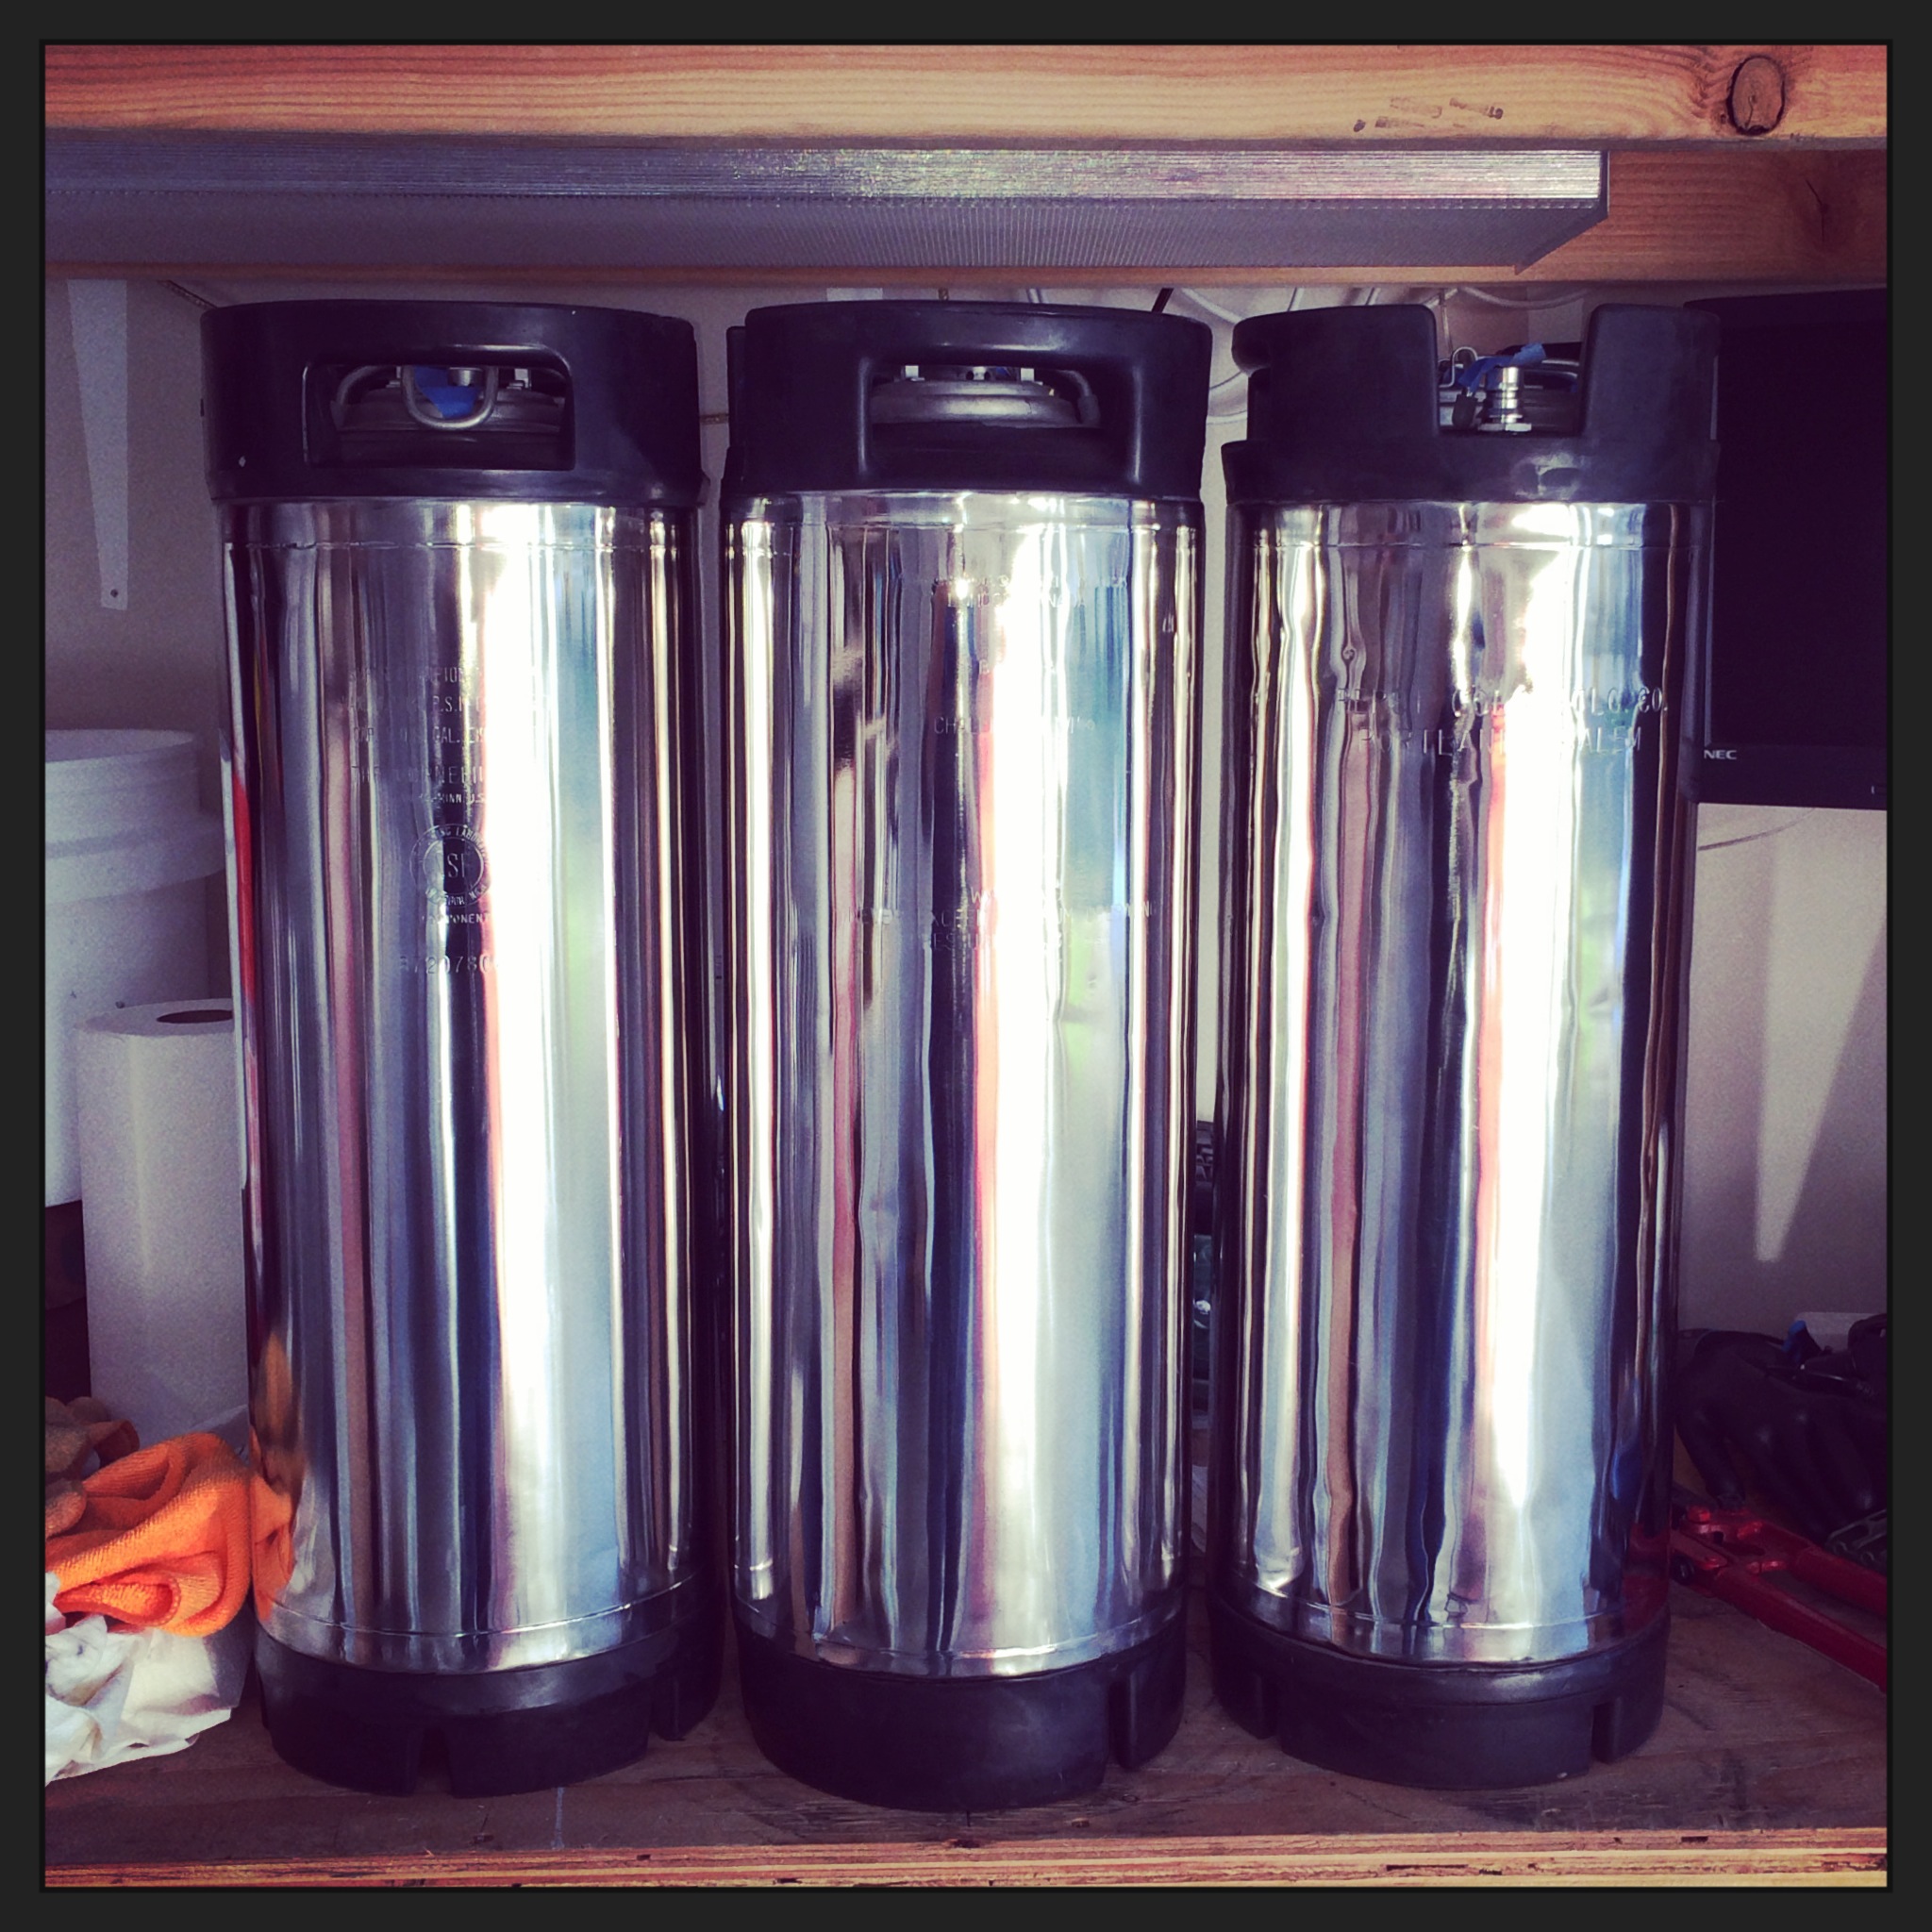
I would recommend wiping down the keg with acetone in between each stage. This helps remove a lot of the excess gunk still on the keg. This helped a lot with mine and I followed Bobby's instructions View attachment 186493View attachment 186494View attachment 186495View attachment 186496View attachment 186497
Man that's some shiny metal you've got there... and now i want to go home and polish my keg... OH WAIT... that doesn't sound right...
")
Thanks! I've got two more to do so I'm sure they will come out better than the first one did.
Want to polish the chrome on my caddy?
I often hear about people having trouble but I haven't been able to troubleshoot. How much pressure are you using? You should push hard enough that the grinder slows down a bit. Keep in mind that the coarse polish is used to remove the light scratches from the finishing pad. It's not going to be shiny. If you skipped to the fine polish, you'd be there forever making the cut. Trust the process.
I followed the steps laid out w/ Med -> Fine -> Polish pads and def put some pressure on to slow down the grinder a bit. I was out of town for a few days so its been a week since I last messed with it. Could/Prob be that I hadn't wiped it down w/ paint thinner since I last hit it with the fine pad & their was still some residue on it?
Since I was frustrated yesterday, I decided to take a break from the keg resto & hit my brew table with a coat of poly and then cleaned out the gutters to keep SWMBO happy.
I'll get back at them this week...Then I need to get at them inside with some BKF. Oh & gotta get my valve/sightglass/thermo kits ordered from Bobby to complete the conversion. What I need time-wise is for my kids to be in school but I get a 'snow day'!

FuzzeWuzze
I Love DIY
Sorry if this has been asked before, but bobby_m's website doesnt load anymore, are there instructions somewhere else without reading the 50+ pages? I will if i have too though!
I got a grinder, back plate, and the gator fine pads, but no one here stocks the polishing pads and i cant even find them on amazon or anywhere really...they are still on Gators site but nothing..
Checked Home Depot and Lowes...lowes only had some other 4" and 8" polishing wheels by another company...
I also dont know what polishing compound to get, a lot of people seem to use the Mibro stuff but again no one here sells it and neither does amazon...since a lot of these articles were written many years ago i wonder if its even still around?
I will if i have too though!I got a grinder, back plate, and the gator fine pads, but no one here stocks the polishing pads and i cant even find them on amazon or anywhere really...they are still on Gators site but nothing..
Checked Home Depot and Lowes...lowes only had some other 4" and 8" polishing wheels by another company...
I also dont know what polishing compound to get, a lot of people seem to use the Mibro stuff but again no one here sells it and neither does amazon...since a lot of these articles were written many years ago i wonder if its even still around?
Sorry if this has been asked before, but bobby_m's website doesnt load anymore, are there instructions somewhere else without reading the 50+ pages?
I got a grinder, back plate, and the gator fine pads, but no one here stocks the polishing pads and i cant even find them on amazon or anywhere really...they are still on Gators site but nothing..
Checked Home Depot and Lowes...lowes only had some other 4" and 8" polishing wheels by another company...
I also dont know what polishing compound to get, a lot of people seem to use the Mibro stuff but again no one here sells it and neither does amazon...since a lot of these articles were written many years ago i wonder if its even still around?
Got my polish at lowes, I got extra finishing pads here http://www.farmandfleet.com/m/products/742013-gator-4-1-2-finishing-discs-2-pack.html
FuzzeWuzze
I Love DIY
What finish though? Are they all equal or are there better brands thats what im curious about there were some Ryobi ones at Home Depot and Lowes had i think Porter Cable or something like that...
OP
OP
Hey, I finally moved all the pictures and article over to my current site:
http://brewhardware.com/polishing-stainless
http://brewhardware.com/polishing-stainless
FuzzeWuzze
I Love DIY
So quick question for Bobby or others
My Lowes and HD really suck and stock nothing it seems, they had the fine pads but nothing else.
I ended up getting a backing plate from Diablo(cheaper) and it came with a few 50 grit pads, so i figured what the hell the keg i got off CL was damn scuffed and had seen a few UPS transits as it had tape and glue all over it, so i ran over it with the 50 grit and some water/goo gone for lube and it came out looking way better, quite a few tiny scratches but i figure thats expected with 50 grit.

You can see the scratches obviously but heres a closer look

After running over a bit of it with the Gator fine pads, im still seeing some of these scratches...they arent entirely obvious looking straight on but they are there and you can catch them in the light.


My question is, because i started with such coarse paper, should i get some more medium grit paper over it to bring these scratches down further before i move onto the fine gator pads? I'd hate to waste my time and gator pads. Or is it expected to still see a bit of marking after using the fine?
My Lowes and HD really suck and stock nothing it seems, they had the fine pads but nothing else.
I ended up getting a backing plate from Diablo(cheaper) and it came with a few 50 grit pads, so i figured what the hell the keg i got off CL was damn scuffed and had seen a few UPS transits as it had tape and glue all over it, so i ran over it with the 50 grit and some water/goo gone for lube and it came out looking way better, quite a few tiny scratches but i figure thats expected with 50 grit.
You can see the scratches obviously but heres a closer look
After running over a bit of it with the Gator fine pads, im still seeing some of these scratches...they arent entirely obvious looking straight on but they are there and you can catch them in the light.
My question is, because i started with such coarse paper, should i get some more medium grit paper over it to bring these scratches down further before i move onto the fine gator pads? I'd hate to waste my time and gator pads. Or is it expected to still see a bit of marking after using the fine?
OP
OP
I think a once over with gator mediums would be a good choice then fine. You can try the fine pad on a scratched area and see how long it takes to erase the scratches from a 2" x 2" area. If it's more than 5 seconds, back out to the medium.
FuzzeWuzze
I Love DIY
I think a once over with gator mediums would be a good choice then fine. You can try the fine pad on a scratched area and see how long it takes to erase the t.v scratches from a 2" x 2" area. If it's more than 5 seconds, back out to the medium.
Any idea what a similar sand paper to the gator medium would be? Not sure anyone stocks it here...I just put in an order the polishing pads with faster delivery so don't want have pay for shipping again
...so i ran over it with the 50 grit and some water/goo gone for lube and it came out looking way better, quite a few tiny scratches but i figure thats expected with 50 grit.
After running over a bit of it with the Gator fine pads, im still seeing some of these scratches...they aren't entirely obvious looking straight on but they are there and you can catch them in the light.
My question is, because i started with such coarse paper, should i get some more medium grit paper over it to bring these scratches down further before i move onto the fine gator pads? I'd hate to waste my time and gator pads. Or is it expected to still see a bit of marking after using the fine?
This looks to me like you're moving over the area too quickly. It takes a quite a while to get the pads to polish, rather than scratch. I found that moving too quickly left similar marks, and that the whole process took over an hour per corny keg to get them looking good.
Also, I found some metal polish "sticks" at Lowes that work for me. They are in the tool section near the welding supplies as I recall.
FuzzeWuzze
I Love DIY
This looks to me like you're moving over the area too quickly. It takes a quite a while to get the pads to polish, rather than scratch. I found that moving too quickly left similar marks, and that the whole process took over an hour per corny keg to get them looking good.
Also, I found some metal polish "sticks" at Lowes that work for me. They are in the tool section near the welding supplies as I recall.
Ah, well my Lowes did have Medium pad's so ill go over it with those to see how it comes out...i think the 50 grit sandpaper i used was what caused a lot of the scratching, its some pretty course stuff.
.i think the 50 grit sandpaper i used was what caused a lot of the scratching, its some pretty course stuff.
You might be right on with the 50 grit causing the issues. Using your grinder at high speeds should help a lot. And you can get the pads from Blaine's Farm and Fleet. I've ordered from them a couple of times and their response time is pretty good. And you don't have to make another trip to the store. - http://www.farmandfleet.com/products/742010-gator-4-1-2-finishing-discs-2-pack.html#.UznW_KhdWHc
I use the medium, fine, and polishing pads.
Best of Luck!
FuzzeWuzze
I Love DIY
Yea luckily my Lowes has everything but the polishing pads, so i ordered 3 sets from Blaine...i figure ill do more keggles down the line so i'd rather just pay for extra's now to keep shipping costs down since they are so hard to obtain it seems.
FuzzeWuzze
I Love DIY
Got it done with the Medium and fine pads, think i got most of the dings out of it..there's a few deep ones that are quite small so im not going to bother trying to grind them out....not looking for absolute perfection if its even possible

Got some Porter Cable #2 and #5, waiting for my Gator polishing pads to show up Friday....then get it welded Sunday...not sure who the keg is from, its not stamped anywhere that i can see.
In hindesight using that 50 grit really made more work for me
Got some Porter Cable #2 and #5, waiting for my Gator polishing pads to show up Friday....then get it welded Sunday...not sure who the keg is from, its not stamped anywhere that i can see.
In hindesight using that 50 grit really made more work for me
damuthrl50
New Member
Just wanted to add that I found everything in my Lowe's, the polishing stuff was on aisle 65 and the finishing pads were near aisle 72 where the hook and loop pads are
Sent from my SPH-L900 using Home Brew mobile app
Sent from my SPH-L900 using Home Brew mobile app
FuzzeWuzze
I Love DIY
Finally finished, well mostly..theres a few spots that need a touch up but overall it came out good following various instructions. Because i did so many earlier passes I followed another guide similar to bobby_M's except it had you apply your rough polish with the fine gator pad and then the smooth polish with the buffing pad.
There are still some scratches from the initial 50 grit sand paper that you can see if you get up close, but honestly at this point i dont care..its too hard to see them when sanding and they dont even really pop out until i start polishing so getting them all would take forever...lesson learned not to do that on the next one if there is ever one
Its amazing how the polish makes the other areas that i thought look good look like crap.

Finished polish

I used the same gator pads, but had to used Porter Cable #2 and #5 polish because thats all my Lowes has.
There are still some scratches from the initial 50 grit sand paper that you can see if you get up close, but honestly at this point i dont care..its too hard to see them when sanding and they dont even really pop out until i start polishing so getting them all would take forever...lesson learned not to do that on the next one if there is ever one
Its amazing how the polish makes the other areas that i thought look good look like crap.
Finished polish
I used the same gator pads, but had to used Porter Cable #2 and #5 polish because thats all my Lowes has.
OP
OP
It looks pretty good to me. One reason you wouldn't want to put any of the polishing compounds on the fine finishing pad is that the pad itself has embedded grit that is much coarser than the grit in the polish. I suppose if that pad is sufficiently warn out, the primary abrasive is the polishing compound so it's a way to save a little money in felt polishing pads. However, we're already spending premium money on something unnecessary so what's another $5?


FuzzeWuzze
I Love DIY
It looks pretty good to me. One reason you wouldn't want to put any of the polishing compounds on the fine finishing pad is that the pad itself has embedded grit that is much coarser than the grit in the polish. I suppose if that pad is sufficiently warn out, the primary abrasive is the polishing compound so it's a way to save a little money in felt polishing pads. However, we're already spending premium money on something unnecessary so what's another $5?
Its hard to make anything look shiny in Oregon's flat light from constant cloud cover, it kept raining while i was trying to get a picture
Its actually much shinier than the picture makes it look lolI kind of used a split between your instructions and these because of what's locally accessible. The gator polishing pad's arent cheap, the only way i can get them is to buy a pack and pay $5 in shipping from Wisconsin so anything i can do make the 3 packs i have last longer i am all for...no one sells them anywhere near me..amazon, ebay, nothing...
http://beersyndicate.com/learning_resources/beer_tutorials_view.asp?id=17
Finally finished my last keg I needed for my E-Herms build. I posted pic's of the first two a little over a year ago. I forgot or maybe blocked it out of my memory of how much work this was. I don't think I will be doing this again in the near future. Thanks again Bobby for the original post and instructions.
That's a rather large turbo on top of that rather blue redblock you have there...
Im_Lars
Well-Known Member
That's a rather large turbo on top of that rather blue redblock you have there...
It's a RSI built B230 with a Holset HX35. It belongs to a guy I work with, it made a little over 400 pony's.
Finally finished, well mostly..theres a few spots that need a touch up but overall it came out good following various instructions. Because i did so many earlier passes I followed another guide similar to bobby_M's except it had you apply your rough polish with the fine gator pad and then the smooth polish with the buffing pad.
There are still some scratches from the initial 50 grit sand paper that you can see if you get up close, but honestly at this point i dont care..its too hard to see them when sanding and they dont even really pop out until i start polishing so getting them all would take forever...lesson learned not to do that on the next one if there is ever one
Its amazing how the polish makes the other areas that i thought look good look like crap.
Finished polish
I used the same gator pads, but had to used Porter Cable #2 and #5 polish because thats all my Lowes has.
Great job - these look awesome and a tremendous improvement over your first attempts. You should be pretty happy with the outcome.
brew2enjoy
Well-Known Member
In general, how many polishing pads should one sanke keg take? I just started the first polishing phase with the #2 polish and the first pad was gone after about 1/3 of the way through. Looks like I'll have to order more pads, I still have to do the #5 polish after this.
OP
OP
I used two pads per keg, one for each grit level.
brew2enjoy
Well-Known Member
Hmmm, maybe I'm hitting it to hard with the #2? No biggie, only bad thing is I have to pay shipping to get more pads. Nobody has them around here
brew2enjoy
Well-Known Member
 here's what I have so far. Still need to do the final polish with the #2 compound. Heck I'd be happy leaving it like this but I've come this far, gotta finish it!
Thedutchtouch
Well-Known Member
Apologies for re-asking this question, but the link in the first post is down, and this thread is way too long to scan every page... I get that it's coarse/medium/fine/polish, but am wondering as to exactly which pads/polish etc. to use? thanks in advance.
Edit:found it two pages back. Should have started going backwards instead OD foreword from page 1! http://brewhardware.com/polishing-stainless
Edit:found it two pages back. Should have started going backwards instead OD foreword from page 1! http://brewhardware.com/polishing-stainless
Hastein
Well-Known Member
- Joined
- Apr 15, 2013
- Messages
- 68
- Reaction score
- 2
How will polishing look with a keggle that has this "stamping" effect on it to remove/cover the old branding? I'm at work so I can't post a pic of my keg, but this pic I found on google sort of shows what it looks like...I'm sure you guys have seen this before.
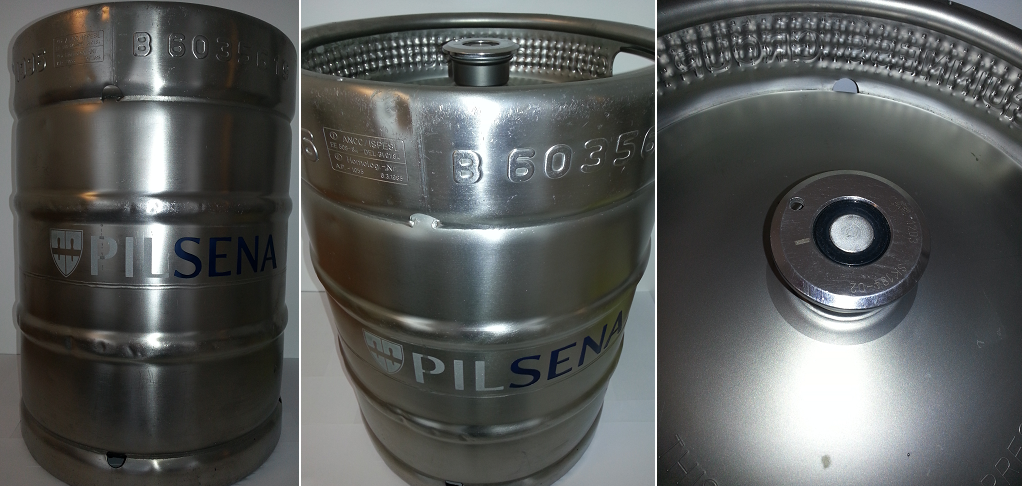
How will polishing look with a keggle that has this "stamping" effect on it to remove/cover the old branding? I'm at work so I can't post a pic of my keg, but this pic I found on google sort of shows what it looks like...I'm sure you guys have seen this before.
I was wondering the same thing as I have one that is like this on the top and bottom. All my kegs came from the local distributor as scrap so they were in pretty bad shape. I've worked the dents out for the most part but there's nothing I can do about that obfuscation crimping. If I ever get around to polishing that keg I'll post a pic. My guess is that it will still look better than it did originally, but it might be worth picking up another keg instead of investing all that time in a maimed one.
Similar threads
- Replies
- 2
- Views
- 1K
- Replies
- 5
- Views
- 1K
