Go home spammer.
Exactly my thoughts!
I have received the opener, lovejoy connectors, but I'm still lacking the time to assemble everything
 Moving is just no fun...
Go home spammer.
Moving is just no fun...I may have missed it, but to the "Garage Door Guru"...........If I post up the make and model # of my opener, would you post up a simple wiring diagram to eliminate all the crap I saw in side the drive unit?
Something simple, with a not too fancy 3 position switch, ( Fwd. / Off / Rev.).
Ok I give up. Would someone please post a picture of the wiring? I do not understand how to wire the DPDT switch into the circuit. I feel so stupid.

Sounds sweet, John. Post some pics once you've got that setup put together!

Are you looking for the garage door opener wiring? That is simple:
SPDT center off switch - Center terminal is Line (hot) Black wire
The red and blue connect to the other 2 terminals, but how you mount/drive the mill determines which is fwd and rev.
For any other motor, it varies. You need to know the motor wire details. Most will work like above, but not all.

Like jleiii said, connect the line (hot) to the center of the switch and the two sides of the capacitor to the outer posts on the switch. An SPDT is all you need to accomplish this, but I used a DPDT because I had it laying around (you just use one side of the DPDT switch, and leave the other side open. ie if you bought a DPDT, you should go ahead and use it.
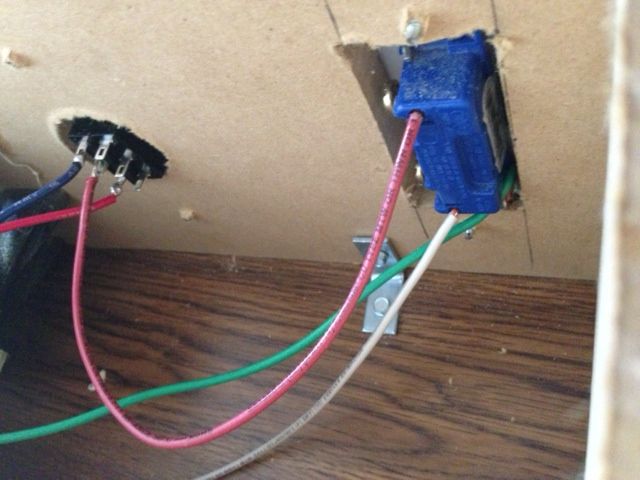
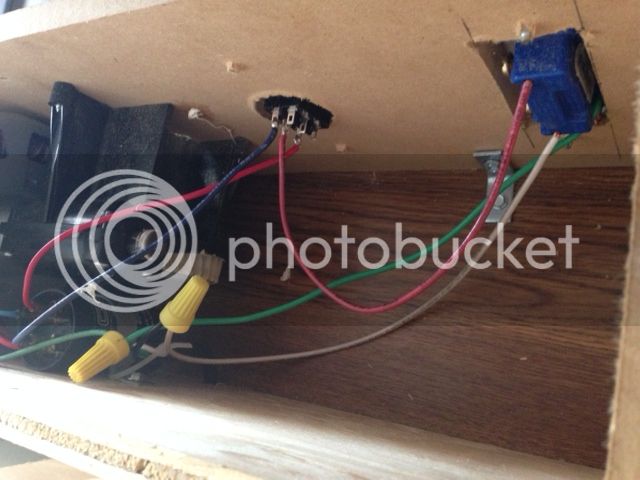
Here's how mine's wired up, the white wire is hot coming in from the wall, the blue box is the on/off switch, the red carries hot over to the Fwd/Rev switch, the red & blue wires on the outer contacts of the DPDT switch are energized for fwd & reverse, respectively:
And here's what the top of the capacitor looks like (switching wires will switch the direction of the mill, if you care about which direction on the switch is fwd):
I'd also mention that I'm not sure the fwd/rev switch was really necessary. I added it because I thought I had jammed the mill once, but now that I've used it quite a bit since then, I realized that it wasn't a jam, but a hi-temp shutdown. If you mill more than about 18lbs of grain with this thing, it gets warm and shuts off to protect itself. Let it cool for about 2 mins and it'll go again.
When I first experienced this, I thought I'd jammed it, so I messed around manually reversing the motor. This gave it enough time to cool down, so it started running again.
Long story short: add the fwd/rev function if you like (it's not much extra work), but I don' think it's necessary. This thing just doesn't jam, it has no problems cranking through grain, it just get's a little warm if you do a big batch.
PPS: rather than adding a fwd/rev switch, I'd add a small computer case fan to keep the motor cool. If you're planning to do big batches, or you'd like to mill multiple batches for friends, etc, a fan would be a great add.

THANK YOU!!!! I might have a fan somewhere for cooling. How would you get it to 12V though? I will also use aluminum as a cover with a vent so it can cool more easily.
I'd use a 115V case fan, like this
Or you could put a small transformer in there to drop it down to 12V, but that's more complicated than it's worth imo.
PPS: rather than adding a fwd/rev switch, I'd add a small computer case fan to keep the motor cool. If you're planning to do big batches, or you'd like to mill multiple batches for friends, etc, a fan would be a great add.[
My Crush-Master also auto shuts down after about 20 lbs of grain, due to a built in overheat circuit. Since the motor is only designed for short duration work, it doesn't have an internal fan. Adding a 12v computer fan via a transformer wouldn't be a bad idea.
I just let it overheat, wait 5 minutes and fire it back up and finish. Would be interesting to see how much the fan increases the batch capacity. Wonder if it would bring it to 100% duty. The reversing switch is not necessary, a box of rocks wouldn't slow this thing down.
I was originally going to leave the electronics so i could run it off a remote control but thanks to UL safety built into the circuit board, it auto shut down after 30 seconds.
 With a move halfway across the country this summer into an apartment, and just moved into a house before Christmas, the timeline for me has pushed... but here's my $0.02.
Fans - I was wondering how much grain you would be able to crush before overheating.
Any concerns about a fan drawing in grain dust and catching fire or exploding?
Any concerns about a fan drawing in grain dust and catching fire or exploding?
Yes, an important point. With my setup, the dust is pretty well contained within the stereo cabinet base, but if dust is an issue with your arrangement, a fan would be an unwise addition. (Although steps should be taken to contain the dust, regardless)
Yeah I like your setup a lot. I haven't motorized yet and was considering using my dewalt drill but it sparks when it turns on and off so I'm not even comfortable using it with a mill sitting on top of a bucket. Maybe I'm being paranoid.
The drill sparking at startup ....
Just ordered the Cereal Killer from Homebrewing.org and was looking to snag a motor from Surplus Center, but they look to be out. Did anyone snag a few of those motors that might be willing to part with one?? Shoot me a PM if you got a an extra or two.
Just a quick update, Surplus Center replied and said they were out of stock with no re-order option. If anyone has an extra shoot me a message!
[*]This motor will stall. I set the gap to 0.36 and could not get the mill to grind my CaraPils; it would always stall. I had to adjust the gap to 0.40 and throw in the grain whilst the rollers were spinning.
[/LIST]


Enter your email address to join:
