HOWTO - Make a BrewPi Fermentation Controller For Cheap

Homebrew Talk - Beer, Wine, Mead, & Cider Brewing Discussion Forum

Help Support Homebrew Talk - Beer, Wine, Mead, & Cider Brewing Discussion Forum:

This site may earn a commission from merchant affiliate links, including eBay, Amazon, and others.
Status
Not open for further replies.
Here is Elco's explanation in the 0.4.2 Release Announcement:

Elco said:
Don't think of this as the PWM you are used to, like 100Hz. This is slow PWM, 1/4 Hz and 1/1200 Hz.

The compressor will just turn on every 20 minutes, for a period of value/100 * 20 minutes. If you think that is still too often, you can increase the period.
On top of that, the PWM actuator drives a time limited actuator which:

When the compressor is running, won't turn it OFF until the minimum ON time has passed
When the compressor is not running, won't turn in ON until the minim OFF time has passed.

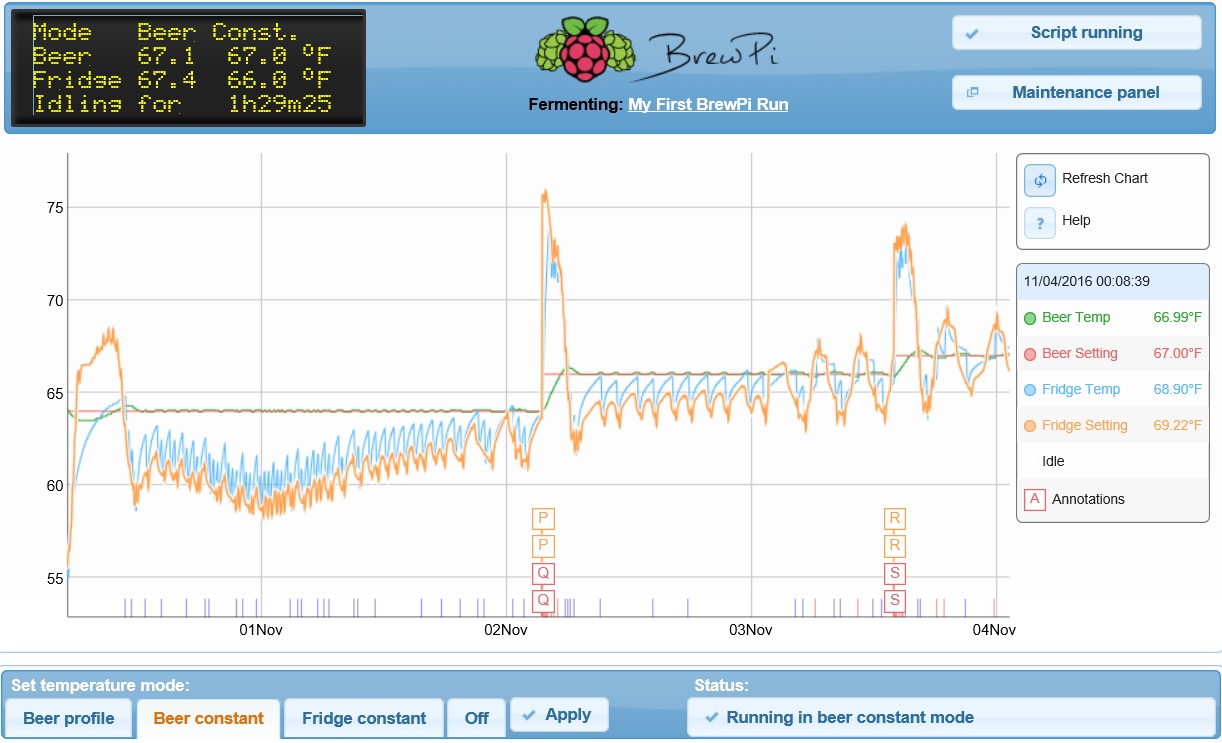
When you are running a fridge at 20 degrees, it will only need short bursts of cooling. Using a regular pulse, like 3 minutes every 20 minutes will give a smoother result then our old algorithm. This is because there is a lot of slowness in the fridge: before you are measuring the result of running the compressor, you have likely have been running it for too long.
 
PWM means "pulse-width modulation". It says nothing about the period, which could be microseconds or weeks.

With respect, you would be laughed out of a room filled with hardware design engineers if you said that out loud.

There are three basic types of PWM control. Best as I can discern, BrewPi uses none of them...

Cheers!
 
With respect, you would be laughed out of a room filled with hardware design engineers if you said that out loud.

There are three basic types of PWM control. Best as I can discern, BrewPi uses none of them...

Cheers!

So, PWM is not "Pulse Width Modulation" or PWM does in fact specify the period. Which part of my definition is wrong?
 
Here is Elco's explanation in the 0.4.2 Release Announcement:

This confuses me, how is that better than the pid loop he was using, honestly it performs so well I don't see how it could bee more accurate, unless there are fridges and freezers that behave vastly different than mine. But then again I've never heard of anyone in the years people have been making them that this is ever the case. Are they trying to just solve every problem with one algorithm? A modified pwm works for both mash and ferment I guess.
 
I feel the same way. I'm not sure I understand the benefits.
I've actually bought most of the components to try to build the diy spark, but haven't because there is no major motivation to do so.
 
I think the deal is you need PWM for control of mash/boil so a "modified" PWM (let's just call it that for the sake of argument) makes the control algorithm/software easier to manage. There's only one set of calculations regardless of what is being controlled.

I agree, calling it PWM for temp control of a device with a compressor cycle is a stretch to put it mildly, but I think we can agree he's found a way to use the same loop for both applications.
 
Great! Thanks! Now I just have to figure out where to plug the pins in without jumping into the LCD portion.
 
Right... now to build the second one so I can thin out the design and implement the encoder
 
Hey guys,

I hit a snag while installing BrewPi. I'm not using a Raspberry Pi, I've installed Debian Wheezy on a PC and everything is running fine.

I got up to this point:

Run sudo ~/home/pi/brewpi-tools/install.sh this may take some time depending on what version of RPI you have and how fast your internet connection is.
It will ask you if the time is correct hit Y.
It will ask you what directory to install into, press enter to accept the default /home/brewpi
It will ask you where you want the web files installed(by default /var/www, it wiill say the folder is not empty do you wish to still use it, select Y for Yes. IMPORTANT NOTE: If you are using a version newer than Wheezy(7.9) such as Jessie(8.0) then you need to ensure this path is /var/www/html or else brewpi wont install the files to the right location.


Except I received this error:

"Creating and configuring user accounts...
Enter new UNIX password: retype new UNIX password: password updated successfully
usermod: user 'pi' does not exist"

I'm stuck, I'm new to Linux and I'm not sure what action to take. I feel like the Debian Wheezy install needs its own section in the WIKI page.

Any help would be greatly appreciated.
 
Figured it out.

I created the user pi password raspberry using the terminal.
Just wonder if this is going to affect anything else down the line.

It shouldn't do. The user account 'pi' is present by default on the Pi, and therefore it is assumed to be present when you follow the instructions. It is this account that will do all the work to install the brewpi software. However, the installation process creates a new user account called 'brewpi', and it is this account that will actually run the brewpi software.
 
Yes, you can do that, just need to change the config.cfg to point to the serial device.
I did this once using an Alamode just to prove it worked...

Cheers!
 
Awesome! I'm assuming that speed won't be an issue. Will probably attempt this on my next build. Would it be worth trying to create a shield that encompasses all the stuff from the cadibrewer shield as well as an interface and buck for pi?

Do I need the voltage divider or can I use resistors to drop voltage or can i follow this guide:

https://mycontraption.com/raspberry-pi-and-arduino-serial-communication/
 
Hello. Have built 2 BrewPis both with Arduino. I'm going to help a brew buddy build one in the next few weeks. I know Arduino is no longer supported officially but based on reading the last 10 pages on this thread it sounds like Arduino Uno will work assuming I use the legacy branch. Are the instructions on page 1 of this thread up to date and will work if we go arduino route? Thanks so much!
 
Hello. Have built 2 BrewPis both with Arduino. I'm going to help a brew buddy build one in the next few weeks. I know Arduino is no longer supported officially but based on reading the last 10 pages on this thread it sounds like Arduino Uno will work assuming I use the legacy branch. Are the instructions on page 1 of this thread up to date and will work if we go arduino route? Thanks so much!

I would go to the DIY brewpi wikia diybrewpi.wikia.com and follow the instructions there. They are the most current and are based on the legacy branch of the software.

Post any questions here and you'll get plenty of help from the smart guys.
 
Thanks! I wouldn't have been able to build the other 2 without this group for sure.
 
Hi guys.

After having reinstalled my Raspberry Pi, I am using BrewPi legacy with the BrewPi legacy_script. As far as I understand, this is the newest software that is supported on the Arduino platform.

I actually made my setup in the early summer and made two beers during the summer before reinstalling the Raspberry Pi. As far as I remember, there were options to set "minimum on time" and "minimum off time" in the web interface, but now these are nowhere to be found. Am I wrong?

I would really like to lower the minimum off time from its current setting, which appear to be 3 minutes. I am using a conical/FTS setup with cold water and the temperature drops far below the set point in 3 minutes.

EDIT:
I may have found the answer myself - I merely updated the installation to use the "master" branch for the web interface. Is that OK or will it cause me problems?

EDIT 2:
Did not work. Get this in the log:

Nov 03 2016 22:34:44 Controller debug message: INFO MESSAGE 12: Received new setting: minCoolTime = 1
Nov 03 2016 22:34:44 Controller debug message: WARNING 0: Could not process setting

So apparently the Arduino does not understand the setting.
 
Last edited:
Thanks for the great guide. Control is much improved over what I had been using (stc-1000)
FKd9XmO.jpg
 
[...]Would it be worth trying to create a shield that encompasses all the stuff from the cadibrewer shield as well as an interface and buck for pi?

Cadibrewer's shield supports serial communication already and has a resistor divider to level-shift the TX output down.
The feature is there to support Bluetooth/Serial and Wifi/Serial bridges.

Bandwidth is not an issue as the dialog between host and Arduino is terse...

Cheers!
 
I think the deal is you need PWM for control of mash/boil so a "modified" PWM (let's just call it that for the sake of argument) makes the control algorithm/software easier to manage. There's only one set of calculations regardless of what is being controlled.

I agree, calling it PWM for temp control of a device with a compressor cycle is a stretch to put it mildly, but I think we can agree he's found a way to use the same loop for both applications.


^This. I imagine he would prefer to operate a single control algorithm to handle all functions. sounds kinda like he wants to mitigate support tickets down to a handful of potential troubleshooting methods. I don't really see how it's any different, functionally, than the old system. other than it can be used for brewing functions as well.
 
Hey guys,

I hit a snag while installing BrewPi. I'm not using a Raspberry Pi, I've installed Debian Wheezy on a PC and everything is running fine.

I got up to this point:

Run sudo ~/home/pi/brewpi-tools/install.sh this may take some time depending on what version of RPI you have and how fast your internet connection is.
It will ask you if the time is correct hit Y.
It will ask you what directory to install into, press enter to accept the default /home/brewpi
It will ask you where you want the web files installed(by default /var/www, it wiill say the folder is not empty do you wish to still use it, select Y for Yes. IMPORTANT NOTE: If you are using a version newer than Wheezy(7.9) such as Jessie(8.0) then you need to ensure this path is /var/www/html or else brewpi wont install the files to the right location.


Except I received this error:

"Creating and configuring user accounts...
Enter new UNIX password: retype new UNIX password: password updated successfully
usermod: user 'pi' does not exist"

I'm stuck, I'm new to Linux and I'm not sure what action to take. I feel like the Debian Wheezy install needs its own section in the WIKI page.

Any help would be greatly appreciated.


It's important if you want to forgo an potential errors going forward that anytime you use a pc that you set it up from the beginning with the default user pi. once you get that part down you will have very few issues with the setup process. I setup my virtual machines this way when I was testing out different tweaks early on.
 
Is there a way to eleminate the USB cable and go pin to pin for the raspi/arduino interface?

Yes, you can do that, just need to change the config.cfg to point to the serial device.
I did this once using an Alamode just to prove it worked...
So .... Pi + Alamode + Shield = nice form factor for a complete setup?

It's a bit more expensive, but the OCD (CDO) person hiding inside me likes the neatness. :)

The only incompatibility with the current shield (in the LCD thread) is the ICSP header. I guess that could be left off?

If you wanted to get crazy, we could even run two chambers from that setup with Fuscus.
 
still haven't been able to get fuscus running... womp womp... I built a small circuit on a separate breadboard with the appropriate pins and spacing and put everything I needed on there so i wouldn't have a ton of wires. can post picture if interested.
 
So, I got the Arduino flashed (via usb) and the raspi up and running and it's all hooked up but i'm at the point where when i go into device manager it gives me the dreaded

"Error while receiving device configuration: SyntaxError: JSON Parse error: Unexpected identifier "Couldn"


in the config.cfg file I added "port = /dev/ttyAMA0"

stumped. again.
 
still haven't been able to get fuscus running... womp womp... I built a small circuit on a separate breadboard with the appropriate pins and spacing and put everything I needed on there so i wouldn't have a ton of wires. can post picture if interested.

I've had Fuscus running at home for the past few months - I'll log into the device & post my configuration here later tonight.
 
So, I got the Arduino flashed (via usb) and the raspi up and running and it's all hooked up but i'm at the point where when i go into device manager it gives me the dreaded


"Error while receiving device configuration: SyntaxError: JSON Parse error: Unexpected identifier "Couldn"


in the config.cfg file I added "port = /dev/ttyAMA0"


stumped. again.


You sure you don't have a ch340 USB chip? you might have to use ttyUSB0
 
sainsmart uno r3 uses the 16u2. I'm trying to access serial via pins 1 and 2 of the uno vs. usb...
 
sainsmart uno r3 uses the 16u2. I'm trying to access serial via pins 1 and 2 of the uno vs. usb...

I do the same. Sorry just jumping in here with out context but did you step down the arduino tx 5v to 3.3v before going to pi's rx?

(I apologize in advance if this doesn't apply to you)
 
Perhaps not enough, couldn't find the right resistor combo so put a 4.7K in place... now doing my math again it looks like I may need another 10K... getting a little in the weeds here.
 
Are you using a pi3? because that port would be for the uart that is now attached to the onboard bluetooth. maybe try ttys0 or ttyserial0
 
I am using a pi3, did an ls /dev/ttys* and didn't get anything so didn't think that existed. I'll try those
 
Status
Not open for further replies.
Back
Top