Got a welder, now the fun begins...

Homebrew Talk - Beer, Wine, Mead, & Cider Brewing Discussion Forum

Help Support Homebrew Talk - Beer, Wine, Mead, & Cider Brewing Discussion Forum:

This site may earn a commission from merchant affiliate links, including eBay, Amazon, and others.
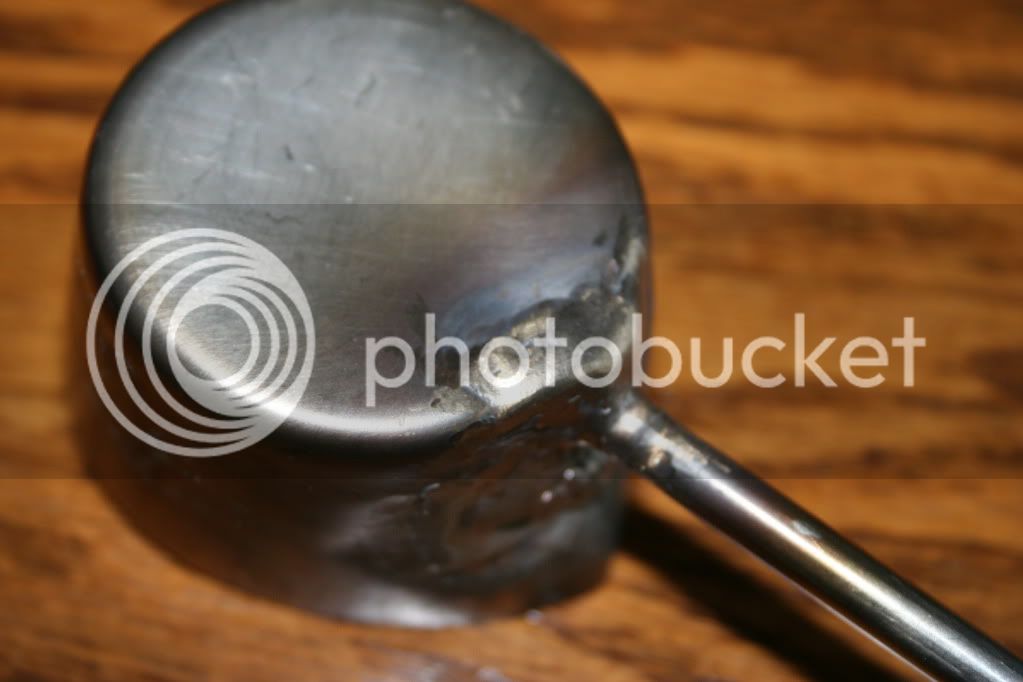
Don't bother on something .006" that's too thin. .015" is doable if you have everything just right.
On something that thin though you would need to shield the back-side of the weld just as if your were welding in a coupling to a keg.
The oxides will float right through the weld puddle and ruin your work.
When welding thin walled pipe I can tell if I'm getting a good purge just by how the weld puddle behaves. If I'm having trouble it's the shielding on the root side.
The fit would also have to be very tight because on something that thin the instant your arc heats the edge it's gonna burn away.
.015 is pretty thin! I applaud your efforts.
What may help you and I'll try to explain this the best way I know how.
So here it goes...
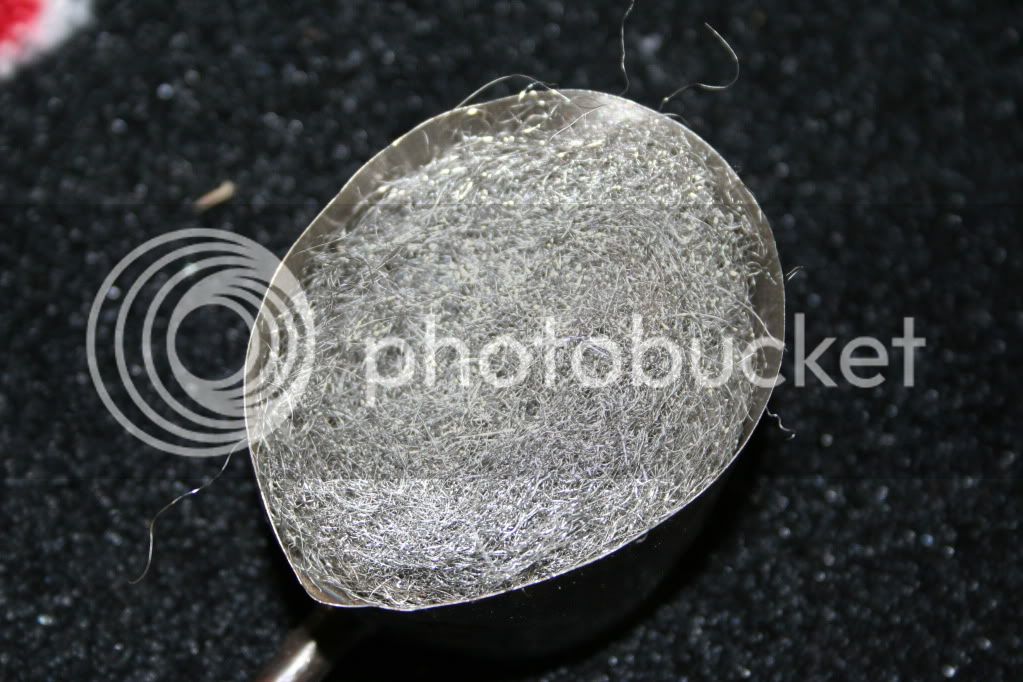
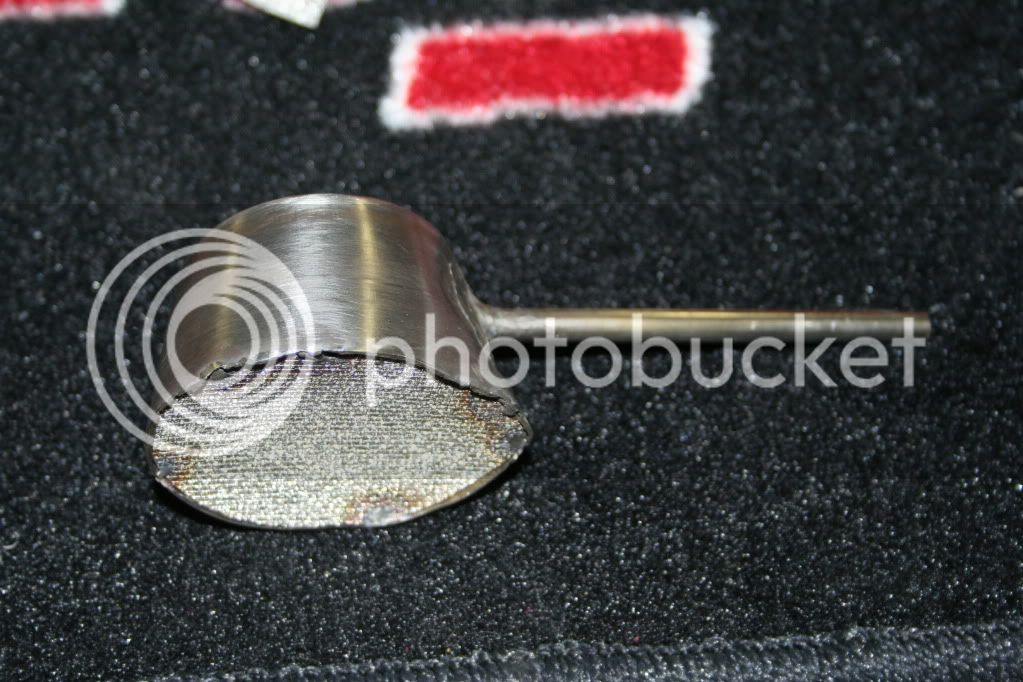
Tape off the open end of the cup, make a small ball of steel wool and tape it over the end of your purge hose. This will diffuse the argon shielding gas as it fills the inside of the cup. Take a knife and make slit in the tape and push the end of the purge hose with the steel wool on the end through the slit in the tape. Now tape around the gaps in the tape to seal where the hose passes through the taped end of the cup. Now make a small hole in the tape so that the argon can push out the oxygen. Wait a few minutes to purge all the oxygen from the cup.
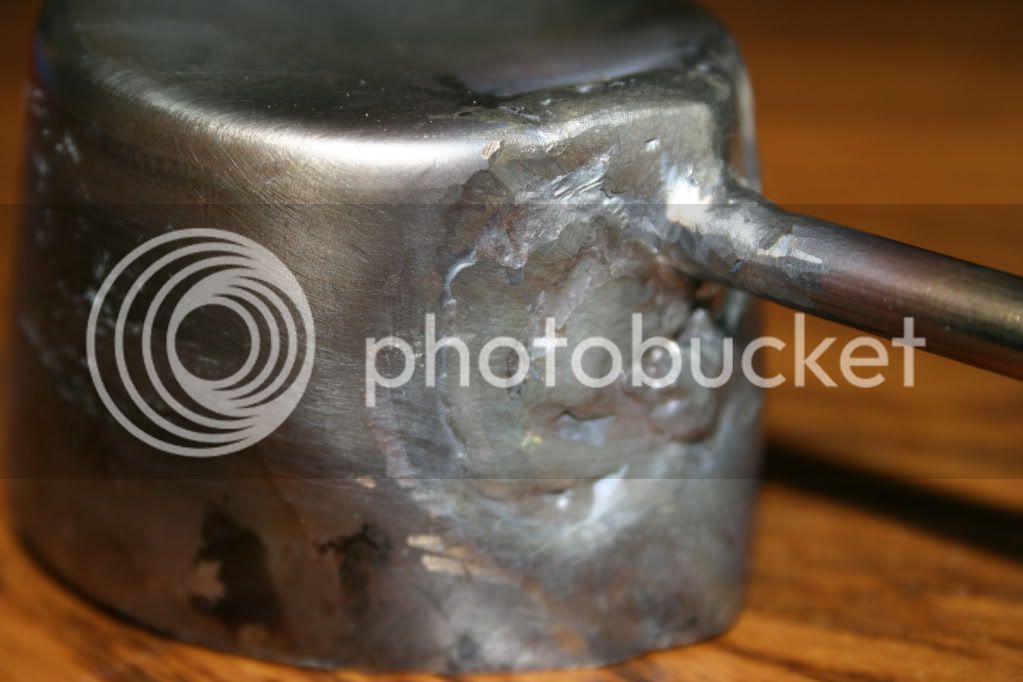
When it comes time to weld place tip of your filler rod on the joint where your going to make your tack weld. Use the smallest diameter rod you've got.
What your going to do is strike your arc on the filler rod to create a small ball and deposit it where you intend to make your tack weld. Work the pedal very gently start the arc as low as you can and maintain it.
This little ball of filler is going to act somewhat as a heat sink. Once you've made a little ball on the end of your filler rod. Apply just enough foot pedal to severe it from the filler rod. Now concentrate your arc on the ball and gradually increase the heat until it flows into the tubing and your cup. Your going to want to direct your arc more towards the tubing and let the puddle flow to the cup.
Wait for the tack to cool and repeat.
I hope you follow me. I use this technique whenever I'm welding something extremely thin.
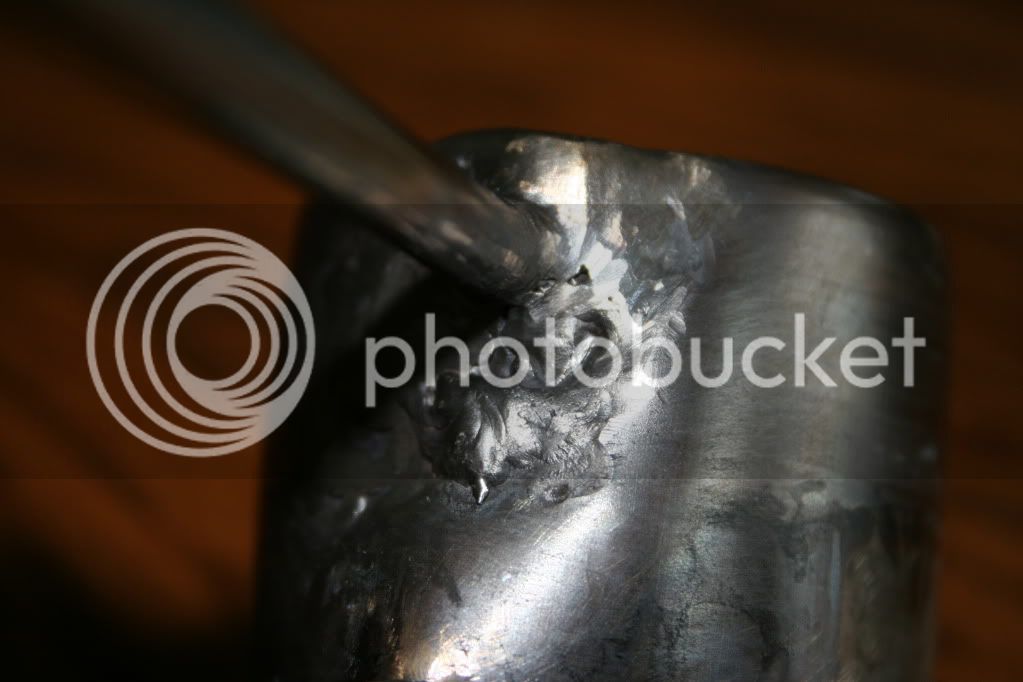
Use the smallest diameter Tungsten you've got, ans sharpen it to a sharp point
I hope you invested in the cheater lens cause being able to see exactly what's going on is what's gonna make this possible.

I think I understand everything you said and it makes sense to me. In burning up this project, I kind of tried some of what you said without really knowing what I was doing...

I tried to use the rod to "protect" the thin material. I tried starting the arc on the tube, melting an dropping some filler on the joint then trying to get it to melt in. I was able to do it occasionally, but my consistency wasn't there so often I'd over heat and burn a hole.

I think because the filler I have is so big, the "drops" were too large and it took too much heat to get them to flow into the thin material.

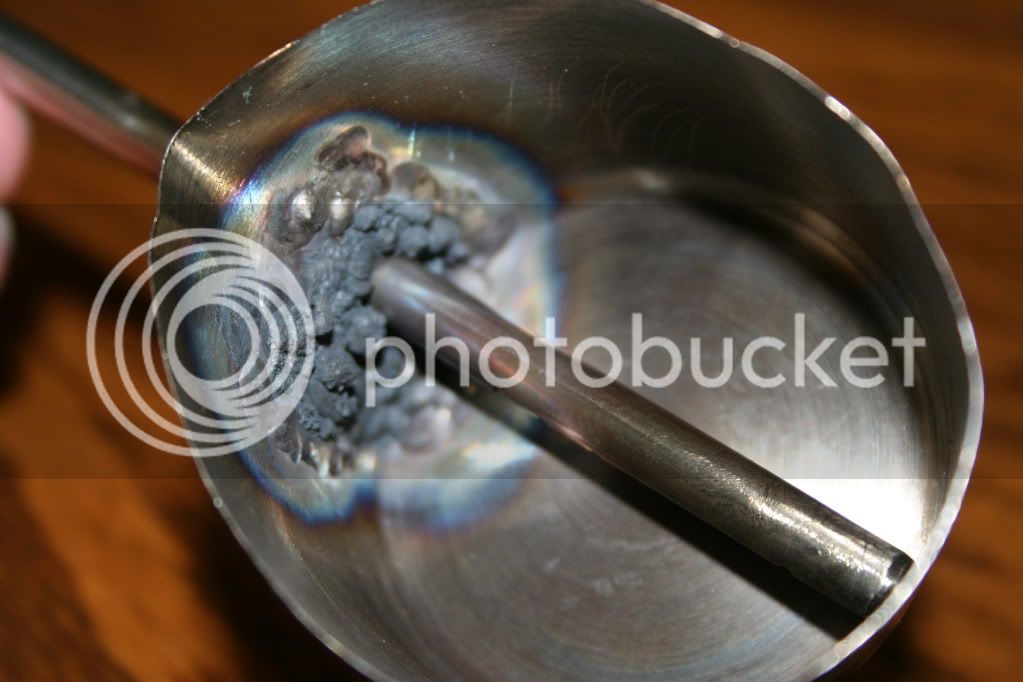
Because this is suppose to be a purge, toward the end of my efforts, I decided to try to use it so I just connected the purge hose to the tube, turned the cup upside down on the table and turned the gas on. It wasn't tight enough to seal against the table so there should not have been any pressure build up. I didn't really give it much time to purge before I started welding and I don't know how much gas is needed, so I just took a stab.

I did get a cheater lens and gotta say, it is fantastic.

Thanks for the response, it really helps.

Ed
 
1/16 filler is too big, get smaller rod.
Keep trying.
I'll try and get some pictures posted so you have some examples.
I think pics will help you the most aside from me being there to direct you.
 
I keep a 1lb spool of .025 SS304 MIG wire around to use as filler on light gauge stuff, but usually do 16ga and thinner as fusion welds. Tight joints are crucial when it gets that thin.

I don't know that I would have even attempted welding something .006 thick!
 
I keep a 1lb spool of .025 SS304 MIG wire around to use as filler on light gauge stuff, but usually do 16ga and thinner as fusion welds. Tight joints are crucial when it gets that thin.

I don't know that I would have even attempted welding something .006 thick!

Thanks for the input.

I picked up a spool of .030 mig wire today.

Ignorance is bliss... I didn't even measure the thickness until after I tried to weld it. :eek:
 
Hmm, I know its stainless but it seems like safety wire would be a different alloy. It seems much softer than filler rod or even mig wire. C141b Starlifters had A good bit of the stuff in them.
 
Sorry It took me so long to get back.
Here are some photos of 1/2" .020" stainless tube to a stainless coffee mug which was .015" in thickness.
My machine (Dynasty 200 DX) was set at 20 amps with a 3/32 tungsten. My filler was .045"
3/32 tungsten is kind of over sized as well as my filler rod but that's the smallest I had.

DSCN0759.jpg


DSCN0761.jpg


DSCN0762.jpg


DSCN0763.jpg


DSCN0765.jpg
 
Until I figure this out I'm just going to post in separate posts.
A couple of tips while welding is when welding something that takes a lot of concentration and control cutting your tig rod in half helps keep it balanced in your hand.
Another thing you should get in the habit of is cutting the oxidized tip off your rod after you stop welding. That black burned end can give you trouble when restarting a weld. You'll get much better restarts.
The other thing I forgot to mention is that I only make tack welds like that on thin stuff. After tack welds are down I leave my rod in the puddle and walk my torch over the rod never taking it out unless I'm having to regroup and get my weld puddle flowing like I want it.
If I've missed anything or you have any other questions I'll be more than happy to answer any others you may have.
And by the way .015" is equivalent to 28 gauge. I don't normally weld anything this thin so the welding is not my best.

DSCN0767.jpg


DSCN0768.jpg


DSCN0769.jpg


DSCN0773.jpg


DSCN0774.jpg
 
I tend to be a little hard headed, so with some of the ideas I read hear I pressed on with the purge.
Since I had already committed the material and no one but myself would see it (except you folks here), I just kept playing.
Don't get me wrong, no question, it is ugly. I chased holes all over the place and it shows. I think the thin (.035") mig wire and back gassing made a huge difference. It's not pretty but it's air tight... here it is:

IMG_3535.jpg


IMG_3536.jpg


IMG_3538.jpg


IMG_3539.jpg


IMG_3540.jpg


IMG_3545.jpg
 
You're doing great for a beginner.
Welding is a lot tougher than it looks.
It makes me laugh when I hear someone who is not a welder say, "welding is easy" or "I know how to weld".
Practice, practice, practice, and some helpful tips from "welders" will help develop your skills.
When I say welders, I mean as many as you come in contact with. Not all welders weld using the same techniques. You just have to find out what works best for you.
When I was doing weld inspection I could usually tell who's welds they belong to just by their appearance.
I haven't heard anything from greenmonti, or tigmaster lately.
I hope they are still around here somewhere.
They would be very helpful in giving advice too. Those guys are obviously very talented welders.
Don't worry about asking too many questions. I love to share what I know.
Again if you have any questions on how to weld something ask away.
 
Another tip.
When welding something that is a thin part, like the shielding cup you made. What I suggest to you, is waiting until you have finished welding, then cup the cup to size. I see that your cup is severely distorted from the heat.
If you left the cup intact, welded, then cut it down to size, it would not have warped nearly as much.
You lost a lot of the cups rigidity when you cut off the flanged end of the cup.
An example of this is, if we had to add a small section of pipe, in a line, say 3" or 4" piece, we would weld a long piece in and cut it to the 3" to 4" after welding.
If you try to weld a short piece in like that it will be egg shaped by the time your done.
You can see a perfect example of this in my pictures of the 1/2" tube welded in the cup.
 
You're doing great for a beginner.
Welding is a lot tougher than it looks.
It makes me laugh when I hear someone who is not a welder say, "welding is easy" or "I know how to weld".
Practice, practice, practice, and some helpful tips from "welders" will help develop your skills.
When I say welders, I mean as many as you come in contact with. Not all welders weld using the same techniques. You just have to find out what works best for you.
When I was doing weld inspection I could usually tell who's welds they belong to just by their appearance.
I haven't heard anything from greenmonti, or tigmaster lately.
I hope they are still around here somewhere.
They would be very helpful in giving advice too. Those guys are obviously very talented welders.
Don't worry about asking too many questions. I love to share what I know.
Again if you have any questions on how to weld something ask away.

Thanks.
I know I have a long way to go but I'm enjoying the practice.

I've learned that I can do OK, if I have everything positioned just right; moving right to left, a place to rest & steady my hand with the torch, no obstacles, etc. But I find myself in certain situations where it just seems there is no room to work. Working around the tube in this purge was a pain.

All that said, I'm still fascinated by moving the puddle around. As thin as this material was, as soon as the puddle appeared, I had to move the torch.

Ed
 
All that said, I'm still fascinated by moving the puddle around. As thin as this material was, as soon as the puddle appeared, I had to move the torch.
Ed

Join the world of creating black holes or bottom drop outs.

I saved a 72 BSA gas tank chasing many cracks along the hard edges, seventeen inches total when done having the owner over my head trying to look thru my hood while i'm welding.
PITA owner, paper thin metal plus gas fumes to hoot at you the joys.
 
Being comfortable while welding is key to making a good weld.
The moment you start to feel uncomfortable, you need to stop, and reposition yourself or the work.
If your struggling, or you feel uncomfortable don't try to force it. You'll only start screwing up. Stop, and get yourself comfortable, or reposition your work.

Fine and dandy, i've had spinal surgeries gone bad, no comfortable position can be found 24/7. A quick Mig on an emergency repair has to do for now at best. Mr. Miller the tig is a dust collector for a long while. Thank goodness owner owned bottles no lease.

You forgot to mention, do not Tig with a Gin hangover or DT's.
 
BrewBeemer,
Sorry to hear that. I can understand how frustrating that is.
As far as hang-overs, I can recall doing some production welding years ago while severely hung-over. Thank God the bathroom was near our work area or I would have spewed all over over the place!
 
I believe this thread could be the seed of the "Thread Killa"
Zinc fumes from burning plated iron is right up there.

I know a corny is .027" thick and a PITA to weld if you haven't played with SS much.
I did watch one welder at the Livermore Rad Lab while working there, he tigged tin foil as well Coke can butted bodies top half to bottom half not the thicker bottoms without problems. This person was a human machine with pure talent.
After pulling some strings there back in 92 I was able to strike a rock bottom cash deal to purchase a Miller 350 Synchrowave, I had to buy it never looked back.
 
I worked with a guy like that. He could wear a fitter out, and perfect welds consistently.
I think some people are meant to do things, and his definitely was welding.
 
Ed....

I haven't read ALL of this, but I have read a lot of it, and I have only one comment to make.

If your wife ever finds out about JB Weld, you might be in for the beating of your life.
 
Ed....

I haven't read ALL of this, but I have read a lot of it, and I have only one comment to make.

If your wife ever finds out about JB Weld, you might be in for the beating of your life.

And I have just one request... If you ever meet my wife... Don't tell her about JB Weld :D

Truth is, I think she is okay with most any hobby that keeps in the shed and out of her hair.
 
I find that tinfoil and tape works great for a purge chamber plus I can cover more then just one fitting and it saves me time.

Pat
 
I find that tinfoil and tape works great for a purge chamber plus I can cover more then just one fitting and it saves me time.

Pat

When I built the purge in the previous posts, I started without any back gas... I thought, "How do I purge without a purge?" I bought some aluminum tape and finished the purge with it taped up. It's far, far from perfect, but I could definitely tell the difference. I definitely see where tape & foil will be useful. I found the adhesive to be a bit of a pain though when it got hot & sticky.

Ed

You just make the tinfoil a size where the tape stays away from the heat flatten the foil so it has a small volume as not to waste gas and off you go.

Pat
 
So what can you guys say about welding the mesh? I tried soldering it and it was pretty much impossible using propane. Looks like Ed tack welded his; and Monti blended the weld so nicely I can't see anything. This has some great potential on a larger scale for my "brew in a basket" crusade.
 
So what can you guys say about welding the mesh? I tried soldering it and it was pretty much impossible using propane. Looks like Ed tack welded his; and Monti blended the weld so nicely I can't see anything. This has some great potential on a larger scale for my "brew in a basket" crusade.

Not even sure I would even consider mine spot welded. GreenMonti didn't warn me about welding the mesh... In reality, it is a bunch of very small wires that burn REALLY easily AND, because of the mesh, the arc was jumping all over the place. This while trying not to burn the very thin edge of the cup I was welding it to. I laughed out loud at my results, it was way tougher than I expected.

Ed
 
Ed, on another note, I see you have a spot for ammeter/voltmeter on your panel. You can definitely TIG by just watching your puddle, but I hear a digital meter can be handy for exact settings. Is that an easy thing to add to an older unit like this? Maybe it would help with doing the mesh....
 
Ed, on another note, I see you have a spot for ammeter/voltmeter on your panel. You can definitely TIG by just watching your puddle, but I hear a digital meter can be handy for exact settings. Is that an easy thing to add to an older unit like this? Maybe it would help with doing the mesh....

There is a field installable meter kit (analog, not digital). But unless maybe doing completely redundant production work, I can't imagine setting the amperage at the machine and not using the remote (pedal or finger control).

Getting the puddle started, tungsten distance from the work, your travel speed, and any number of other things will pretty much force you to adjust the current on the fly.

Ed
 
What about placing a small piece of filler rod on top of the mesh and starting the arc on that, or putting a small stainless washer on it and rosette welding the inside hole of the washer?
 
What about placing a small piece of filler rod on top of the mesh and starting the arc on that, or putting a small stainless washer on it and rosette welding the inside hole of the washer?

Maybe, I honestly don't know. Part of the problem I had was the "cup" I used is .006" thick... probably less than half the minimum recommended for my welder. I have no doubt there are guys here that could weld it, but as soon as I finally got an arc started, it either burnt the mesh or the edge of the cup.

The real problem is my lack of experience and knowledge ;)

When I get a chance, I'm going to make another. This time, I plan to use the coupling from the top of a sanke keg as the "cup". I also plan to use the sanke's snap ring to hold the mesh in place.

Ed
 
So what can you guys say about welding the mesh? I tried soldering it and it was pretty much impossible using propane. Looks like Ed tack welded his; and Monti blended the weld so nicely I can't see anything. This has some great potential on a larger scale for my "brew in a basket" crusade.

I've followed your build for a little while and, welding that mesh is pretty darned hard. I don't recall, how heavy is your mesh? I was asked by another HBT member about doing a basket similar to your idea. I did a couple test welds for him. I'll check and see if they are still around or if I still have the pics. I doubt it though. Each wire on the mesh I did was .010" thick.

Just imagine, when you get anywhere near the mesh. It just melts and blows away. There isn't any mass to the material to hold up to any kind of heat. I would bet that part of the issues you had during the soldering was over heating the mesh.

Also, the volts on a welder is dictated by the length of the arc. As far as I know anyway. The more close you are the less volts.
 
Maybe, I honestly don't know. Part of the problem I had was the "cup" I used is .006" thick... probably less than half the minimum recommended for my welder. I have no doubt there are guys here that could weld it, but as soon as I finally got an arc started, it either burnt the mesh or the edge of the cup.

The real problem is my lack of experience and knowledge ;)

When I get a chance, I'm going to make another. This time, I plan to use the coupling from the top of a sanke keg as the "cup". I also plan to use the sanke's snap ring to hold the mesh in place.

Ed

I have had some filler for you for a while now. I've been slacking and not got it in the mail to you. I have some .020 and .045 Inco wire and some Ti wire for you.

I think your doing great so far. I think your biggest problem on the purge build was a lack of gas. Like dmfa stated. The impurities will just wreak havoc on your welds. There is no way to get rid of the sugar once it has formed. Other then removing it manually. I do think .006" is a bit on the small side for a beginner but, I also think its really cool you did it. I like your thinking about keep on trying. The more you practice on the thin material, the easier it is to weld all thicknesses IMO.

Yes, foil is a nice and simple method for purging. I don't like it cause of the fact that it melts at such a low temp. If for some reason you don't keep it far enough from the weld zone, its gonna disappear.

I gotta run for now. I have to get the ribs on the grill.;)
 
How do you know when it's time to refill your argon bottle? My pressure gauge is basically bottomed out. I once started welding and forgot to open the valve, so I know it will melt the tungsten without argon... so do you weld till the tungsten melts, or do you go by the gauge?

I tacked up a brew stand this weekend... I'll start a thead when I get a chance to take some pictures.

Ed
 
Ed, when you crack the bottle open the secondary or set 50 psi should come up rather quickly as well the flow meter float, if not this is a signal the end is near. You could remove the regulator from the bottle and crack the valve to get a feel what's left in pressure, you already stated the HP gauge is pinned, your "running on fumes". Big bottle baby saves you on those expensive small bottle refills.
 
Ohio-Ed said:
How do you know when it's time to refill your argon bottle? My pressure gauge is basically bottomed out. I once started welding and forgot to open the valve, so I know it will melt the tungsten without argon... so do you weld till the tungsten melts, or do you go by the gauge?

I tacked up a brew stand this weekend... I'll start a thead when I get a chance to take some pictures.

Ed

Wow you ran through that one pretty fast.
My 120 lasts me a year.
I get nervous when it gets near zero. I worry it will run out in the middle of a project on a Saturday night. I would replace it now.
 
Back
Top