DIY Stainless Steel Fermenters

Homebrew Talk - Beer, Wine, Mead, & Cider Brewing Discussion Forum

Help Support Homebrew Talk - Beer, Wine, Mead, & Cider Brewing Discussion Forum:

This site may earn a commission from merchant affiliate links, including eBay, Amazon, and others.

Brewzologist

Active Member
Joined
Feb 17, 2012
Messages
41
Reaction score
34
Location
Manchester
There are lots of great options for fermentation vessels out there. I recently decided I wanted to upgrade my fermenters, and selected stainless steel as the material I most wanted in my new fermenters. But, the commercial stainless options weren't cheap, and most are conicals, when I really only wanted a stainless bucket (so it would fit in my fermentation chamber). So, I got to thinking about how to make my own.

Here's what I did in case you want to do something similar. I pressure tested to 20PSI with air without the binder clips, and had no leaks. Above 20PSI the lid would pop off from the pressure. I did not test the PSI with the binder clips on, which are just for insurance as far as I'm concerned. It is more than adequate for my 5 gallon batches and works great. Here's my shopping list, all bought from Amazon:

36qt. Bayou Classic pot $70 (primary)
24qt. Bayou Classic pot $46 (secondary)
Food Grade White SiliconeTubing, 3/8"ID, 1/2"OD, 1/16" Wall, 10' Length $15

How to make:
1) I drilled a 1 1/4" hole into the existing vent holes on the lids with a step drill bit, and some oil during the drilling. I deburred with my Dremel and a stone afterward.
2) I cut a slit down the length of the silicone tubing and placed it on the edge of the kettle lip. (Edit: I glued the ends together with silicone aquarium sealant, using techniques described in this thread. See pic.)
3) Gently press lid onto top, install airlock, put binder clips on.

Future Enhancements:
1) I might eventually add a ball valve, so I don't have to use my autosiphon via the 1 1/4" hole to transfer beer. But I'm not sure I want to do that, because the ball valve is just another place for nasties to hide that has the be cleaned and sanitized.
2) I might add a thermowell to the lid for the remote thermometer probe in my temperature controlled fermentation chamber.

Hope you find this idea useful!
Steve

20140906_133417.jpg


20140906_133653.jpg


20140906_133930.jpg


20140906_133939.jpg


20150117_134741.jpg
 
If a ball lock was placed high enough, theoretically you could always just tip the kettle to get more without catching trub. I wish there was an affordable way to have a rotating racking arm.
 
Yeah, like I said I'm pondering the ball valve. But IMHO, I think it's just as much work to clean and operate that as my auto siphon.

(P.S.I took the pic in the nice area of the house.. it's not all that pristine looking! :) )
 
Is the seal good enough to use co2 to start a siphon? Or better yet, to push the beer?


Sent from my iPhone using Home Brew
 
It's good enough to start a siphon using CO2. I haven't used it to push beer through anything, though.
 
I've been thinking about getting a demijohn for 10 gallon batches, but I like being able to push start my auto siphon with CO2, and doing that with a demijohn would concern me. I like the lack of oxygen permeability of stainless fermentors, and like you want to stick with a flat fermentor. I think this could be the answer.
 
I like how clean and pristine-looking your tile and carpet and walls and doors are.

Sincerely,
Guy with kids

Amazing, huh?
And someone is not allowed up the steps...

This is one of the best fermentor inventions I've seen, and it will last forever. About a third the price of a Brew Bucket.
I'd skip the valve too. Probably more effort to clean than the benefit it gives you, although a rotating racking arm would be nice to have and worth considering. Blichmann's small conicals use a simple weldless bulkhead for their racking arms, relying on the silicone o-ring seals to rotate, but pressure should remain under 3 psi (I know they play it way safe).

Here's an idea for a cradle design for tipping the bucket when racking. As long as the slurry doesn't slide and start mixing in.
 
Very nice... I've been looking for a lower cost SS fermenter solution and didnt think about a kettle. I've read about using corny kegs but I like this way better because of the increased capacity and ease of cleaning!
 
Do you boil in the same kettle? Then put the tubing on after cooling? If that's not a multipurpose setup, I don't know what is.
 
Did you do anything to seal the gap between the two ends of the tubing?

I haven't done that yet. It seals well enough without it. But I have some scrap tubing and have been pondering using a simple jig with some aquarium silicone caulk to seal the ends so it's seamless. Will try and post my results when I get time.
 
Do you boil in the same kettle? Then put the tubing on after cooling? If that's not a multipurpose setup, I don't know what is.

I don't, but you certainly could! I don't like the idea of all the trub from the boil being present during fermentation, but suppose that could be removed with a drain. Also, while I like headroom in my fermenter, I like even more in my boil kettle and would wonder if that would be too much during fermentation?
 
Amazing, huh?
And someone is not allowed up the steps...

This is one of the best fermentor inventions I've seen, and it will last forever. About a third the price of a Brew Bucket.
I'd skip the valve too. Probably more effort to clean than the benefit it gives you, although a rotating racking arm would be nice to have and worth considering. Blichmann's small conicals use a simple weldless bulkhead for their racking arms, relying on the silicone o-ring seals to rotate, but pressure should remain under 3 psi (I know they play it way safe).

Here's an idea for a cradle design for tipping the bucket when racking. As long as the slurry doesn't slide and start mixing in.

Thanks for the plug, IslandLizard! As far as racking from a bucket using the cradle, I'd advise putting it in place a few days in advance so the sediment has a chance to settle back down. Be careful of your liquid level, don't want it to slosh over! You could also adjust the angle with some shims so it's not tipped quite so far. RDWHAHB!
 
This would be great as a "no chill container". Ive heard of people putting boiling wort in corneys and then putting it in their ferm chamber. However the negative pressure scares me as they weren't made for that. These are more rigid. It would cut out 20-30 minutes and tons of water usage.

I wonder if theres a more permanent way to hold it down using the handles and something attached to the lid as opposed to using clips.
 
Thanks for the plug, IslandLizard! As far as racking from a bucket using the cradle, I'd advise putting it in place a few days in advance so the sediment has a chance to settle back down. Be careful of your liquid level, don't want it to slosh over! You could also adjust the angle with some shims so it's not tipped quite so far. RDWHAHB!

Anytime! We all know a good idea when we see one and wonder why no-one, including yourself, thought of it before. Desperation must be one of the seeds for innovation.

I don't think we have those few days. I'd say most of us cold crash our fermentors a few days before racking. Then we move them from the fridge to the racking area, and start worrying about keeping the trub out. A carefully controlled tipping action should prevent stirring up the trub or sloshing beer out, but it maybe best to wait until most beer has transferred already.

The problem I always encounter during racking from buckets is not having a 2nd set of hands to do the tipping while the siphon runs its course. I start tipping gradually when there are only a 4-5 inches of beer left.

BTW to interrupt the siphon before moving the bucket/kettle onto the tipping cradle, a tight hose clamp or an inline valve on the exit hose should do fine as long as the whole siphon assembly remains full. Otherwise you got to reprime the siphon.
 
Well, I make more wine/mead than beer, so I tend to have lots of time between rackings. But my advice would be, if you have the space in your fermentation chamber/cold crashing area, is to put the whole shebang, cradle and carboy, in a rectangular milk crate and put that in there.. That way it would let the trub settle out ion the lowest part from the get-go. It's what I've been doing with my meads for the first racking from secondary to tertiary.
 
I haven't done that yet. It seals well enough without it. But I have some scrap tubing and have been pondering using a simple jig with some aquarium silicone caulk to seal the ends so it's seamless. Will try and post my results when I get time.

What if you tried cutting the two ends to have matching angles? So that they overlapped in the middle without adding a bulge? That way you can avoid a butt joint and as long as it was a fairly sharp angle (45-65) the "legs" shouldn't droop.

Or cut a shallow angle and then you have a nice long seam to glue together.

DSC_0009.jpg
 
This would be great as a "no chill container". Ive heard of people putting boiling wort in corneys and then putting it in their ferm chamber. However the negative pressure scares me as they weren't made for that. These are more rigid. It would cut out 20-30 minutes and tons of water usage.

I wonder if theres a more permanent way to hold it down using the handles and something attached to the lid as opposed to using clips.

I thought about ways to hold it down via the handles too at first. The problem is the lid doesn't sit perfectly flat all the way around due to minor manufacturing imperfections in the lid and kettle, so any arrangement I came up with that put pressure on the lid wouldn't create an even seal all the way around. One idea I still like is to use a compression ring similar to what goes around a 55 gallon drum, but I haven't been able to source a size that fits these kettles. If you come up with any ideas, post 'em here!
 
Great idea! I wonder if you could add one of these if you were looking for a racking port?
http://morebeer.com/products/brew-bucket-replacement-valve-racking-arm.html
It would add another $25 to the cost, but might be worth it for some.

I've looked at this exact solution. But then I read people complaining about leaks, and getting more trub than they wanted via the racking arm, and then having to sanitize and clean more, blah, blah, blah... So, for now, my trusty autosiphon is what I'm staying with till I decide otherwise. Thanks for the suggestion though!
 
I think if I were to build this fermenter (and I am seriously considering it) that I would put a ball lock gas post in the lid to help with CO2 aided transfers. One could also even put in a ball lock liquid post and a modified dip tube in the lid. Push with gas and transfer out through the dip tube/liquid post. Although I think at that point the cost of the two posts, dip tube, and pot might come out the same or more as getting a 7.5 gal or larger corny keg. just a thought
 
Love this idea, just bought (2) 4 gallon stock pots for making 5 gallon batches (split) never liked the idea of plastic buckets.

****edit

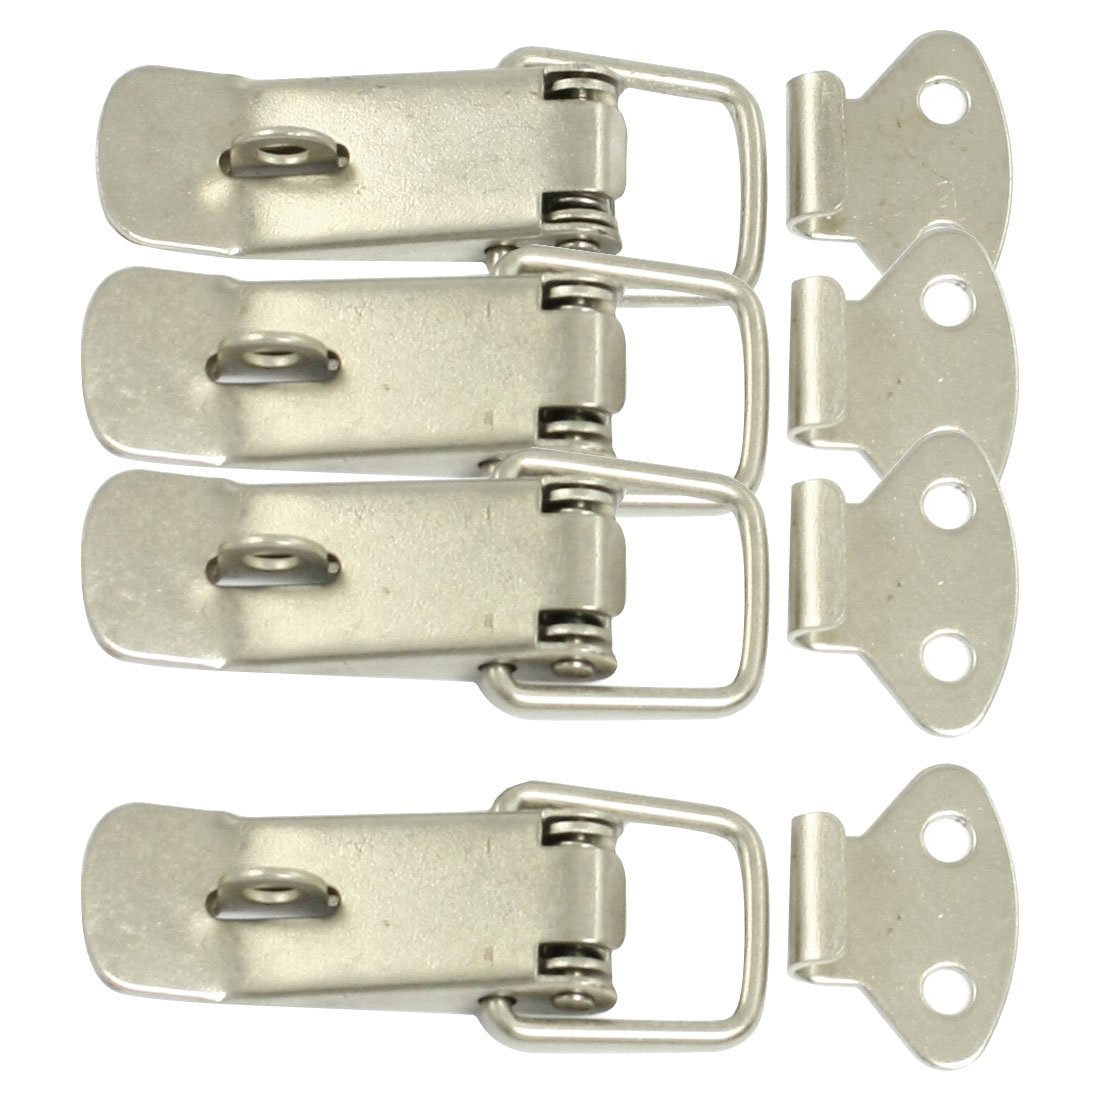
maybe something like this to hold down the lid?

Toggle Latch

61m7rFy-OoL._SL1500_.jpg
 
Last edited by a moderator:
Those would be hard to utilize, Minbari, crossing over a 90 degree turn, and you would have to do some drilling and riveting, or bolting, or welding, and the distortion that would come with the latter.


Something on the order of these should work well, provided the clamping "pads" didn't slip on the stainless surface.

http://www.harborfreight.com/1-34-in-nylon-spring-clamp-69291.html
 
Love this idea, just bought (2) 4 gallon stock pots for making 5 gallon batches (split) never liked the idea of plastic buckets.

****edit

maybe something like this to hold down the lid?

Toggle Latch

61m7rFy-OoL._SL1500_.jpg


You could try to bend the latch part and eliminate the screw on catch. Hopefully it would then just catch the lid. It gives a few less holes to make.
 
Last edited by a moderator:
Good guide on gluing the silicone:

Toward the end he makes the o-ring by taping the ends together and using silicone caulk to glue it together.

http://www.instructables.com/id/Homemade-silicone-O-rings-and-tubing/

That's a great guide, thanks!

If you get some thin-wall tubing (maybe latex, not sure how it will interact with the silicone caulk), you can set it on the vessel to cure with the lid or cover clamped down over it so that you get nice molded gasket.
 
I have fermented in stainless kettles for years, just haven't bothered with sealing the kettle with gaskets and clamps. I aerate, pitch yeast and lid the kettle, then before the kruesen falls I seal the lid with with a plastic bag over the top of the kettle, and wrap a piece of cord snugly around the kettle. I get the beer to a sealed keg within around 10 days, or a few days after fermentation is complete. Let the keg sit at cellar temps for a few days to a week, pipeline dependant. I feel the fears of oxidation and contamination are a bit over stated during active fermentation, never had a problem. The fermenting beer is producing CO2 in a reasonably well sealed vessel that is under very slight pressure...this is fine for fermentation, then transfer to a keg for conditioning / serving.

 
Brewzologist, Brilliant! Thank you for sharing this. I strongly considered doing something similar, except, like Wilserbrewer, I wouldn't have bothered to seal the lid. I really like your solution to get a seal, though.

I decided to buy a stainless steel carboy instead, and I now see that this was not a great decision. In case anyone else is weighing these options, here are a few of the items I dislike about my stainless carboy:
1. Unlike a nice pot, it is not completely smooth inside. It has a lot of welds that have been grinded "smooth." In addition, there are deformation ribs for strength/aesthetics, and embossing -- just to annoy me it seems. In comparison, a pot is much easier to clean.
2. Although it was advertised as 10 gal, it is only about 9.25. I really needed the full 10 gal. When you buy a 10 gal pot, you get 10 gal.
3. It is short and squat compared to a 1.2 ratio pot. This is not ideal for racking clear beer off the yeast cake.
4. It is very thin gauge compared to a nice pot.
5. Expensive.
On the plus side, my stainless carboy has a screw-on lid with o-ring gasket that works well. However, if I had it to do over, I would buy a 10 gal pot and convert it to a fermenter.

Regarding the drain valve: I love the valve on my carboy. I find it much easier to drain than it is to use a siphon. The valve is up above the yeast cake, and I just tip the pot at the end to get the last bit. To me, the benefits of the valve greatly outweigh the cleaning/risk of infection. If you are going to ferment in a pot, you can put some water in it and boil! Then use it to heat your strike water. Run Star San through the valve for good measure. Sanitized.

After seeing this thread, I may end up getting a 10 gal pot after all. You can always use another fermenter, right? Thanks again!
 

Latest posts

Back
Top