You are using an out of date browser. It may not display this or other websites correctly.
You should upgrade or use an alternative browser.
You should upgrade or use an alternative browser.
DIY glycol chilled plastic conical fermenters
- Thread starter packet
- Start date

Help Support Homebrew Talk - Beer, Wine, Mead, & Cider Brewing Discussion Forum:
This site may earn a commission from merchant affiliate
links, including eBay, Amazon, and others.
Good to know. I'm planning a dry stout to brew Monday hopefully. I highly doubt I'll have the system finished by then however.
I still haven't finished up my control panel,though I could probably do so in an hour or two at most, nor have I even begun any plumbing or conical modifications or chiller work. Still trying to figure out where exactly to mount the PEX tubing and ball valves. I'm thinking of riveting the plastic PEX mount stand off clips to the diamond plate, or to the "legs" of my stand. It seems I will need to get my chiller apparatus setup first, and then plan the plumbing around that. Also need to figure on where to mount ball valves and routing of the chiller connections from the PEX to the plumbing for the cleanest look. I ended up getting a Coleman party stacker cooler which is a little smaller than the one packet used. Its 33 qt, but will fit better onto my stand, no drain.
TD
Sent from my iPad using Home Brew
Ok. Still have an issue. I can smell the co2 through the top. I may not have enough silicone under the female screw on piece of the top. Really pissed now that I may have 13 gallons of wasted Rye. Hopefully there will be enough of a co2 blanket to protect the beer.
Thinking about this show I was watching in the new Esquire channel Sunday while tending the grill. Ghostbusters. Loved it as a kid but time has treated it poorly.
Anyway saw the infomercials for the stop leak spray stuff. You know the guy in the boat with the screen door for a hull. Yeah. They make clear black or white. Not sure it's food friendly but maybe to use externally on the lid base and screws.....
Sent from my iPhone using Home Brew
Anyway saw the infomercials for the stop leak spray stuff. You know the guy in the boat with the screen door for a hull. Yeah. They make clear black or white. Not sure it's food friendly but maybe to use externally on the lid base and screws.....
Sent from my iPhone using Home Brew
Ok. Still have an issue. I can smell the co2 through the top. I may not have enough silicone under the female screw on piece of the top. Really pissed now that I may have 13 gallons of wasted Rye. Hopefully there will be enough of a co2 blanket to protect the beer.
Honestly, I gave up trying to make it perfectly sealed. The lid hasn't been a problem on mine and I've done at least a dozen batches through it.
I still have a lot of work to do on mine. Finding time (and motivation) has been an issue.
TD
Sent from my iPad using Home Brew
TD
Sent from my iPad using Home Brew
Fantastic build. Great read.
Kind of an off topic question, but has anyone here set up their bcs port forwarding to enable you to view the bcs via the internet when you are out of the house? Thanks.
I don't have mine setup yet, but when I do, yes I will want to be able to do this, as long as it can be done securely ( require a log-in with password ).
I believe port forwarding is done by your router, and not the BCS. You will probably need to log into your router home page by entering its IP address into your browser address bar, then using the ID and password you should have from when you installed and configured your router. Your router manual and often the webpage for the router can walk you through this to some degree. I am by no means a network/IT expert, but have had to wear the amateur version of that hat at home with some success and some failure as well. Depending upon how your internet connection is setup at home, there can be various step needed to accomplish this task. You of course need to know the port numbers that the BCS uses. I've not searched for that yet since mine isn't setup.
TD
- Joined
- Oct 25, 2008
- Messages
- 146
- Reaction score
- 22
Here is a tip we learned a couple of weeks ago. Do not clean the coils with hot water with the coils disconnected. One of the compression fittings popped of because the coil was filled with glycol and had no pressure relief.
- Joined
- Oct 25, 2008
- Messages
- 146
- Reaction score
- 22
If it's not spinning, chances are your pump isn't supplying enough water at a high enough pressure. I use a 1/4 hp pump (http://www.amazon.com/dp/B000X05G1A/?tag=skimlinks_replacement-20) that does 30gpm. So, the 5.5gpm aquatec is probably a bit small.
Packet,
It looks like the temp on this pump is 120F. Are you using it hotter than this for CIP? Any issues?
Last edited by a moderator:
- Joined
- Dec 9, 2008
- Messages
- 555
- Reaction score
- 51
The ball valves themselves are $25 each + shipping. Switching from stainless doesn't really cut the price down.
For the brewbit part, Chilling a conical requires two outputs per conical. You need one output to turn on the pump and another output to activate the ball valve. If you redid the plumbing so each conical is only controlled by a single pump, you'd need 4 pumps total and would get rid of the ball valves. The end result would be a need for a total of 5 outputs (3 for the conicals and 2 for the glycol chiller). So, three brewbits.
If you didn't replumb the system, you'd still need to find a way to turn on the pump (with potentially multiple brewbits turning it on at the same time) and also to step down the 120v to 12v for the ball valves.
This isn't completely true though. If you have a continuous duty pump running the glycol loop the brewbit will not need to control it. Just turn the pump on for the length of fermentation. this is how the pros do it

I've been struck with hopefully temporary laziness. Have all my parts on hand. Have the cart done. Have the control panel 99% done. Haven't plumbed the thing yet. Trying to figure best place to route the tubing and how to mount it to aluminum with the PEX standoffs. Was thinking rivets, but that won't work. Epoxy? Thinking about possibly mounting the plumbing BELOW the tabletop. I think I am going to stick to the plumbing plan that Packet has done. I don't know what this brew it business is all about and sounds like more parts to buy. Using a smaller cooler reservoir so it'll fit better on my brew stand.
That's my update..
Sent from my iPad using Home Brew
That's my update..
Sent from my iPad using Home Brew
- Joined
- Oct 25, 2008
- Messages
- 146
- Reaction score
- 22
This isn't completely true though. If you have a continuous duty pump running the glycol loop the brewbit will not need to control it. Just turn the pump on for the length of fermentation. this is how the pros do it
For smaller fermentors like this, running the pump continuously is really inefficient. The AC unit will cycle on a lot more often to cool down the glycol because the pump will heat it up. In a bigger system, the pump will need to be on more to cool larger/more fermentors, so having it run continuously is less of a concern. So, the tradeoff is upfront costs vs. ongoing power. Also, depending on where your brewery is, it is quieter the less the pump and AC run.
Is it at all critical in selecting the length of the PEX tubing in the system as far as spacing the fermenter inlet and outlet from the supply and return headers? I looked at the prochiller diagram. They have a neat option to connect a plate chiller to the circuit... I guess you can always chill once wort is in the conical and dump the cold break too though. I'll probably immersion chill to below 100° before running into conicals though.
I think I'm going to mount my PEX tubing on the underside of my aluminum cart. I think it will be easiest to screw/bolt some 2x4s onto the square frame, then mount the PEX to the 2x4. Trying to mount the PEX tube clips directly to the aluminum seems like would be more difficult, and would probably be a point of a failure at some time.
Hopefully I'll have time to work on mine this weekend and get it finished if I'm lucky. Would like to use it later this month.
TD
Sent from my iPad using Home Brew
- Joined
- Dec 9, 2008
- Messages
- 555
- Reaction score
- 51
For smaller fermentors like this, running the pump continuously is really inefficient. The AC unit will cycle on a lot more often to cool down the glycol because the pump will heat it up. In a bigger system, the pump will need to be on more to cool larger/more fermentors, so having it run continuously is less of a concern. So, the tradeoff is upfront costs vs. ongoing power. Also, depending on where your brewery is, it is quieter the less the pump and AC run.
I use a rotary vane pump which adds no heat to the system.
- Joined
- Oct 25, 2008
- Messages
- 146
- Reaction score
- 22
What would the purpose of the plate chiller be? I was thinking about how to use the glycol in my plate chiller to cool the wort, but because the wort volume is so much larger than the Glycol volume (30gal to 6 gal for my system), I don't think it will do me much good. I have a 5000 BTU/hr AC unit. With perfect efficiency it could drop 30gals of water about 20F in 1 hour (1 BTU is needed to change 1lb water by 1F). Even if the wort is prechilled to 100F, it would take a long time to get it down to pitching temp.Is it at all critical in selecting the length of the PEX tubing in the system as far as spacing the fermenter inlet and outlet from the supply and return headers? I looked at the prochiller diagram. They have a neat option to connect a plate chiller to the circuit... I guess you can always chill once wort is in the conical and dump the cold break too though. I'll probably immersion chill to below 100° before running into conicals though.
I think I'm going to mount my PEX tubing on the underside of my aluminum cart. I think it will be easiest to screw/bolt some 2x4s onto the square frame, then mount the PEX to the 2x4. Trying to mount the PEX tube clips directly to the aluminum seems like would be more difficult, and would probably be a point of a failure at some time.
Depending on the thickness of your aluminum, using self tapping screws or sheet metal screws wouldn't be too bad. Wood would be easier, so I think it is an ascetics question.
What would the purpose of the plate chiller be? I was thinking about how to use the glycol in my plate chiller to cool the wort, but because the wort volume is so much larger than the Glycol volume (30gal to 6 gal for my system), I don't think it will do me much good. I have a 5000 BTU/hr AC unit. With perfect efficiency it could drop 30gals of water about 20F in 1 hour (1 BTU is needed to change 1lb water by 1F). Even if the wort is prechilled to 100F, it would take a long time to get it down to pitching temp.
Depending on the thickness of your aluminum, using self tapping screws or sheet metal screws wouldn't be too bad. Wood would be easier, so I think it is an ascetics question.
They had a diagram of an intercooler for a storage room connected to the glycol unit in the prochiller diagram. I think its for commercial brewers. They had a dual stage plate chiller with stage one being just tap water and then wort feeds into the glycol (probably massive capacity) stage of the chiller system.
I forget the aluminum thickness, think its 3/16" if I recall correctly. I wanted strength. The other issue is that the square tube frame has only four front-to-back sections spaced at approx 22" and the PEX would most certainly sag without a secondary mounting surface attached to the frame, plus weight of the valves, which may require a mounting point themselves, or placed above the deck.
TD
- Joined
- Oct 25, 2008
- Messages
- 146
- Reaction score
- 22
They had a diagram of an intercooler for a storage room connected to the glycol unit in the prochiller diagram. I think its for commercial brewers. They had a dual stage plate chiller with stage one being just tap water and then wort feeds into the glycol (probably massive capacity) stage of the chiller system.
Dual stage with water first and a large volume of glycol would work great. If only there was more time and money. Once the city water heats up a bit more, I will likely start letting the wort come into the conical a little warmer, like 80-85 so I can transfer faster and then use the glycol to cool to pitching temp.
I had some fun with my system last night. I was sampling and dumping yeast. Finished the first fermentor, moved on the the second one. Obviously wasn't paying enough attention and I went to undo the tri-clamp and mistakenly undid the one above the butterfly valve instead of the one for the cap. Beer starts dumping, the gasket washes off of the valve so I stick my hand over the bottom of the fermentor to stop the flow. It took me two more tries to get the valve seated and clamped while beer is dumping and spraying everywhere. All in all I lost about two gallons and a bit of pride. I stuck a zip tie through the clamp to remind me next time to not do that. Others might want to do something to make sure you don't blindly reach under the conical and do something idiotic like I did. I can almost laugh about it now, but not quite.
I'm thinking about getting mine ready to rock and roll over the this week so I can use it for some beer next week which I'm off work.
Going to do a little bit each night.
I'll try to take some pics as I go, and post them up here once it's all finished.
TD
Sent from my iPad using Home Brew
Going to do a little bit each night.
I'll try to take some pics as I go, and post them up here once it's all finished.
TD
Sent from my iPad using Home Brew
Tonight I tackled the reservoir and the A/C unit. I didn't finish. I ran into some difficulty. I got to the point where I didn't know what to disassemble and what not to take apart.
It looks like the AC unit, if it were left to do its job of cooling a regular room, would have the front condenser assembly be the cold part, across which, there is air flow and it seems, a circular drum type fan unit. It seems that the drum unit could be removed since there is no air flow required of the condenser once it is submerged in coolant. The coils are also tinted blue.
It seems the rear side of the unit also has condenser coils, and the the traditional rotary fan blades cool this off, which probably "sucks" heat from the cold side, and requires the fan. It seems this fan and condenser assembly must remain relatively intact and mounted to the AC frame, which can then rest or bolt to the stand.
I haven't pulled apart the cold half of the condenser assembly yet, nor carved into the cooler to try and fit the cooling coils into the coolant reservoir... yet.
It seems this is a point of no return, and I want to get it right.
Are there any tips or suggestions for doing this from those who've been there and done that before?
My plan is to get the whole coolant reservoir setup and then do the plumbing last. I hope the cooler can hold the condenser and the pump as well..
TD
- Joined
- Oct 25, 2008
- Messages
- 146
- Reaction score
- 22
It sounds like your unit is very similar to mine and you are on the right track. Remove all the outer shell. You can remove the blower on the cold side. There will likely be styrofoam and/or plastic ducting that can be removed also. To make it easier, once you remove all of the sheet metal screws from the cold side, it should lift out of the plastic base. Just be really careful not to crimp the copper tubing connecting it to the condensor. When all is said and done, you should be able to get down to just the plastic base with the condenser mounted to it, the fan and hot side radiator and the detached cold side radiator and the controls. The controls will have a thermocouple attached to it that can be removed also. Good luck.
Eagleburger
Member
- Joined
- Apr 9, 2014
- Messages
- 8
- Reaction score
- 0
What is the purpose of the glycol? Why is it preferred over water?
What is the purpose of the glycol? Why is it preferred over water?
Keeps the water from freezing - the A/C cold-side condenser coil will freeze plain water. Glycol used is food grade non-toxic and tasteless, but should never enter the wort under normal circumstances.
TD
It sounds like your unit is very similar to mine and you are on the right track. Remove all the outer shell. You can remove the blower on the cold side. There will likely be styrofoam and/or plastic ducting that can be removed also. To make it easier, once you remove all of the sheet metal screws from the cold side, it should lift out of the plastic base. Just be really careful not to crimp the copper tubing connecting it to the condensor. When all is said and done, you should be able to get down to just the plastic base with the condenser mounted to it, the fan and hot side radiator and the detached cold side radiator and the controls. The controls will have a thermocouple attached to it that can be removed also. Good luck.
Can't really see how to remove the fan on the cold condenser just yet.
For the hot side fan and condenser, that should all stay mounted on the plastic tray? correct? Does any of the styrofoam remain for the hot side?
The cold side thermocouple is the piece wedged between the condenser fins I am assuming.
I think I had started removing the HOT side last night but realized it before I continued beyond the point of return. Trying to slide the fan out would seem easiest - too bad there isn't enough slack in the wiring in order to do so..
I'll get back at it tonight. Along with probably another step, such as prepping the conicals and mounting all the hardware to them.
I'll try and take some pics of the A/C disassembly tonight for future builders.
TD
parkerhd36
Well-Known Member
Has anyone looked at using something other than the BCS to control all of this? I noticed brewershardware has them backordered right now, then I got to looking at some of the other systems available. Fermtroller to be specific I just read through the description and it sounds like it would also easily give you heating capability
What would you use for heat source, heat wrap? How well would that play with the plastic tanks and the neoprene?
Can the BCS do this as well? I don't have a major need for heat since I can simply heat my entire, small, basement when needed during the relatively mild winters in Florida.
TD
Sent from my iPad using Home Brew
Can the BCS do this as well? I don't have a major need for heat since I can simply heat my entire, small, basement when needed during the relatively mild winters in Florida.
TD
Sent from my iPad using Home Brew
parkerhd36
Well-Known Member
I don't really know anything about the fermtroller. Would there be any major advantage to one system over the other? Would it still be setup the same way as the way as with the bcs? I already have nearly everything here or on order to start building the panel
Thanks
Sent from my iPhone using Home Brew
Thanks
Sent from my iPhone using Home Brew
I'm not sure how you'd heat a plastic conical honestly. I was just confirming that the fermtroller would indeed heat and cool. I believe the BCS can do that as well. I've recently seen someone have a heating and cooling "glycol" loop, but it seemed complicated if I recall.
In regards to a comparison between the two, I suggest searching as it's been discussed at length and I don't want to derail the OP. I can tell you that the sensors for BCS are not compatible with Fermtroller and vice versa.
In regards to a comparison between the two, I suggest searching as it's been discussed at length and I don't want to derail the OP. I can tell you that the sensors for BCS are not compatible with Fermtroller and vice versa.
- Joined
- Oct 25, 2008
- Messages
- 146
- Reaction score
- 22
I built an arduino based controller, but it is a big pain in the ass, so unless you want a good project, I suggest using something off the shelf. I am heating my conicals with flexwatt tape. I use a pulsed output with an on time of 40secs and off time of 10 secs and the flexwatt never gets above 90F. My garage got down around 50F this winter and there was no issue with keeping the fermentor at 72F.
Shockerengr
Well-Known Member
- Joined
- Feb 22, 2007
- Messages
- 469
- Reaction score
- 34
I'm not sure how you'd heat a plastic conical honestly. I was just confirming that the fermtroller would indeed heat and cool. I believe the BCS can do that as well. I've recently seen someone have a heating and cooling "glycol" loop, but it seemed complicated if I recall.
In regards to a comparison between the two, I suggest searching as it's been discussed at length and I don't want to derail the OP. I can tell you that the sensors for BCS are not compatible with Fermtroller and vice versa.
I've dropped a submersible aquarium heater in one in a pinch, as well as taped bucket heaters to the side....however, i've picked up a cartridge heater to try. I'll report back on how well it works.
Update-
spent an hour or so tonight (wasted a couple with kids homework BS on top of that) working on the rig.
Took a few pics (to be posted later) of the AC and the Cooler/reservoir.
Seems will work fine.
couple questions arise. Where in the cooler should supply/return lines be tapped? I'm thinking the lid so as to avoid leaks, but it seems Packet's cooler were on the side, but maybe below the fluid level inside the cooler.
Ditto on the thermometer.
Is it critical the location of the condenser coil inside the cooler? Mine is going to be on a tilt a bit.
Wondering if the 1/6HP pump is overkill. maybe a smaller pump would be fine? this one is rather large.
anyways.. this is taking a bit longer than I thought it would. Hope I can finish it up by Sunday at the latest.
TD
- Joined
- Oct 25, 2008
- Messages
- 146
- Reaction score
- 22
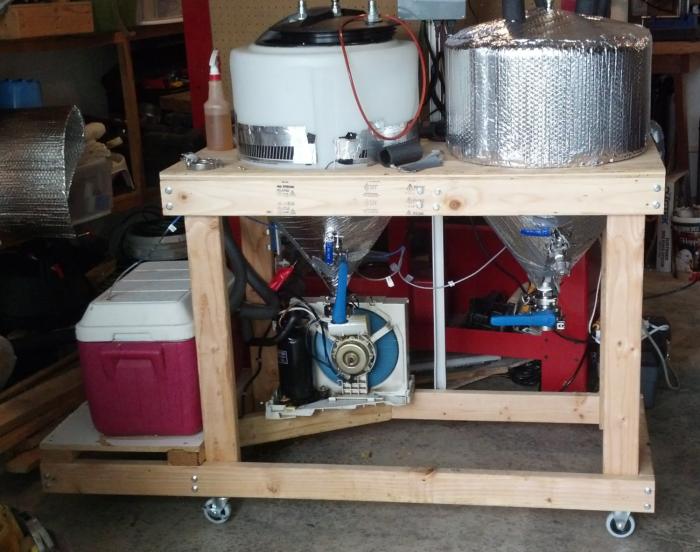
Here are some pics of my AC. My connections are in the side, but I just notched the upper lip of the cooler. It should be ABOVE the coolant level. I did not use quick connects because I don't really plan on disconnecting it, so save some money and potential leaks by taking the tubing directly into the cooler. Placement of the lines, pump and coil should be made to encourage good circulation in the cooler. I have the pump on one side (and it is tilted some, not all of it is submerged), the coil on the other and the return in the corner behind the coil. The thought is that the return will have to flow through the coil to get back to the pump inlet. My thermocouple is in the lid.
I removed everything from the base of the AC unit initially and then realized that the base would work well for my system, so I cut the base to give clearance under the conical and re-installed the components. This may have helped in removing all of the extra plastic and Styrofoam pieces.
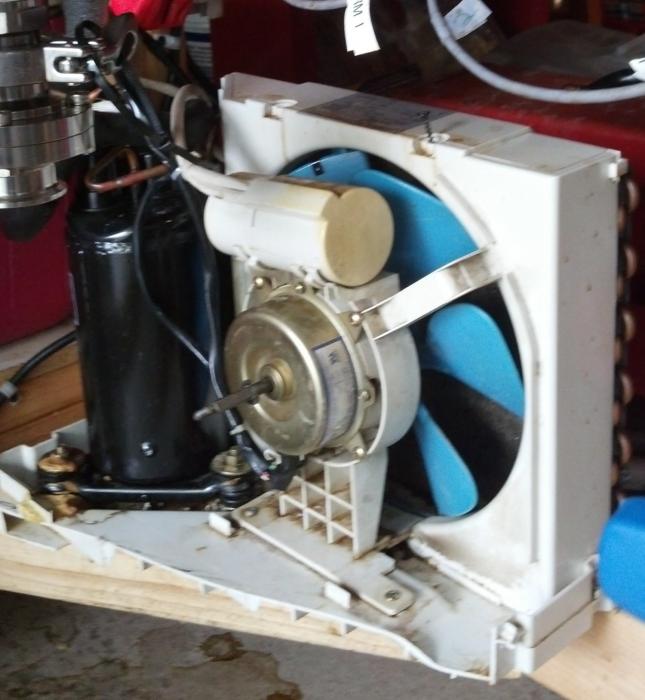
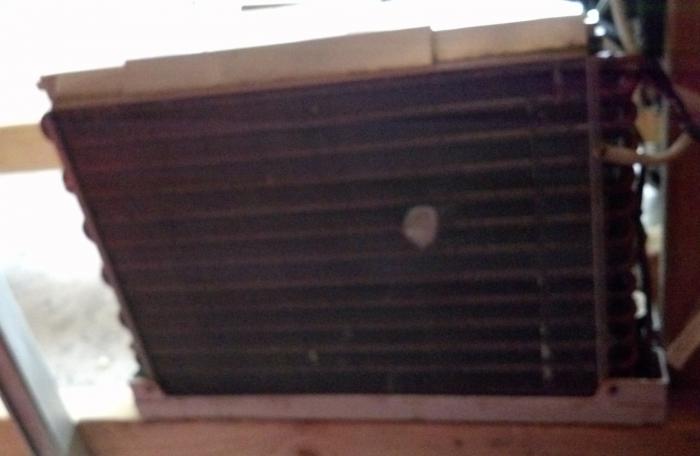
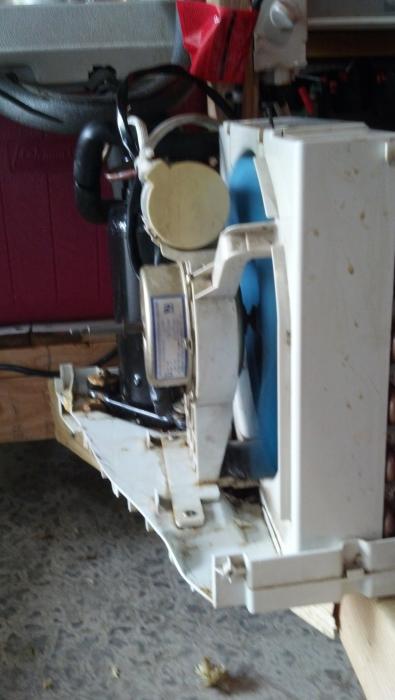
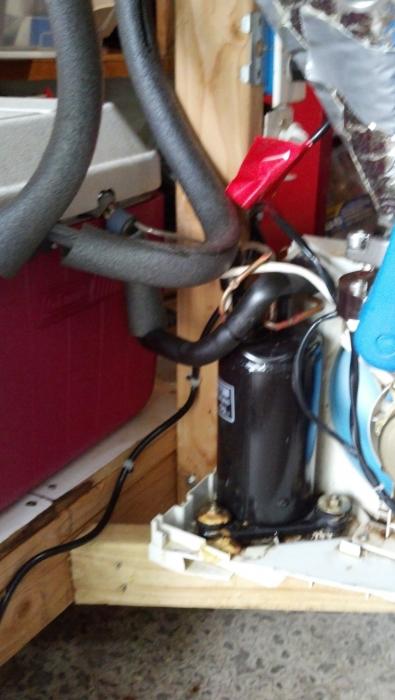
I removed everything from the base of the AC unit initially and then realized that the base would work well for my system, so I cut the base to give clearance under the conical and re-installed the components. This may have helped in removing all of the extra plastic and Styrofoam pieces.


Helpful. Thank you.
Because my stand is metal there are 22" between the posts, I had to use a smaller cooler. I will probably want it to be as full as possible given the smaller volume. I think I'm going to put my holes in the lid of the cooler, and some weatherstripping around the lid edge to keep coolant from sloshing out if/when I move the cart.
I'm going to have cut the plastic base on my AC to get it to fit. I wanted to minimize the manhandling of the copper coils. Once I had it such that it would fit into the cooler I felt that I didn't want to mess with the position much more,
Thanks for the suggestion on placement of the pump and return lines. I think I'll be able to do something like that with mine as well.
Tonight hopefully there we be no homework drama to deal with and I can spend a couple or more hours working on it. Still have a long way to go. Need to plan out my plumbing, drill some holes in the aluminum deck, and finish up the control panel connections. I think I'll probably tackle the conicals last.
Trying to decide where to mount the hydraulic connectors and the mechanized valves. Want to put most of the plumbing below deck as possible.
TD
Sent from my iPad using Home Brew
- Joined
- Oct 25, 2008
- Messages
- 146
- Reaction score
- 22
Here are a few more pics of my system including the Flexwatt heater and Arduino controller. For the Flexwatt, I have the 3" piece that you can see in the picture and two 12" pieces on the cone. If I were to do it over again, I would not use two different widths as they do not heat up to the same temperature. The 3" material I have gets hotter, so I have to use an 80% duty cycle to keep the temperature ~90F. The 12" wide probably only gets up to 80F. I think using vertical strips of the 3" may have worked better, but it is working well, so I am leaving it alone.
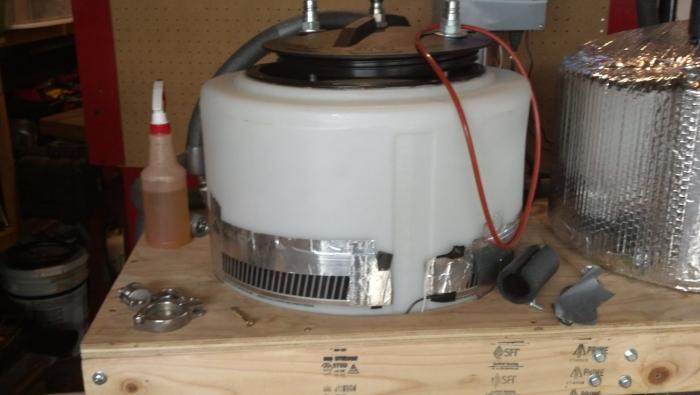
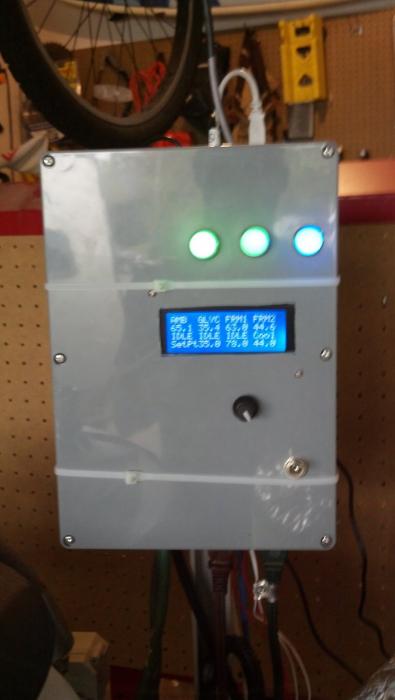


I built an arduino based controller, but it is a big pain in the ass, so unless you want a good project, I suggest using something off the shelf. I am heating my conicals with flexwatt tape. I use a pulsed output with an on time of 40secs and off time of 10 secs and the flexwatt never gets above 90F. My garage got down around 50F this winter and there was no issue with keeping the fermentor at 72F.
May I ask why is it a big pain to use Arduino controller for this? Do you mean that you have to write the software yourself, or there is some other reason? Because even if you have, it gives waaay more flexibility than any off-the-shelf solution. I've seen people often try to hack or even asking manufacturer to change the software for things they just couldn't achieve with fixed functionality software.
- Joined
- Oct 25, 2008
- Messages
- 146
- Reaction score
- 22
Don't get me wrong, I really like the controller. It just takes a lot of time to design and build the circuit and write the software. I first built one for a chest freezer fermentation compartment and this is an expanded version. It is really reliable and like you say, I have the flexibility to do what I want with it.
Taking a LOT longer than I thought it would.
All I was able to get finished last night was drilling the cooler lid and fittings partially installed. Staring to look like something though.
Question about the operation of the AC. I know the BCS controller will activate the AC outlet into which it will be powered from.
What about the switches/dials on the unit? Obviously it needs to be turned to one of the ON positions, but which one? Ditto on the coldness knob. I'm thinking max coldness? For the other I think fan low speed, but AC on the higher of the two settings?
Tonight I try to tackle finishing up the control panel, and maybe doing some of the rest of the plumbing on the reservoir. Maybe I can start on the conicals themselves.
I notice that there is a large lip on the inside of the conical when you remove the lid. It seems that this part should probably be trimmed away?
TD
Sent from my iPad using Home Brew
- Joined
- Oct 25, 2008
- Messages
- 146
- Reaction score
- 22
The difference between the hi AC and low as far as I can tell is the fan speed, so it doesn't really mater. The compressor is either on or off, there is no variable level of cooling in the coils. The coldness doesn't matter at all because it is triggering off of the thermocouple that you removed.
I did not trim away the lip, but if you can do it cleanly, it may not be a bad idea. Its pretty rough on mine.
I did not trim away the lip, but if you can do it cleanly, it may not be a bad idea. Its pretty rough on mine.
Similar threads
- Replies
- 4
- Views
- 651
- Replies
- 2
- Views
- 688

