Yes. I've never used an airlock or blowoff on it. Usually I just covered the camlock (that i use to connect my pump outlet to) with foil.
You are using an out of date browser. It may not display this or other websites correctly.
You should upgrade or use an alternative browser.
You should upgrade or use an alternative browser.
DIY glycol chilled plastic conical fermenters
- Thread starter packet
- Start date

Help Support Homebrew Talk - Beer, Wine, Mead, & Cider Brewing Discussion Forum:
This site may earn a commission from merchant affiliate
links, including eBay, Amazon, and others.
@bemerrit. The glycol chiller builds are found in a few threads. I didn't document mine.....especially since I haven't fully tested it. It was really easy to put together...he says before fully tested.
I ordered the brewhemoths with the internal chiller coil. so there's not much for me to do, expect connect some tubing for chilling and add flex watt and insulation for heating.
I ordered the brewhemoths with the internal chiller coil. so there's not much for me to do, expect connect some tubing for chilling and add flex watt and insulation for heating.

WPStrassburg
Well-Known Member
I made a new lid out of acrylic to replace the original one. Machined an o-ring groove in the lid for a -456 o-ring to allow it to seal up tight. Threaded the poly for some 1" long 1/4"-20 threaded studs and used wing nuts to clamp down the lid. I used a 1" male & female threaded x tri clamp adapter for the center blow off port and spray ball connection. On the mpt x tc adapter I silver soldered a ss washer to allow me to tighten and seal up the connection through the lid. Also have an oring between the washer and lid to make it air tight. Still need to add the 1/2" swageloc bulkheads for the cooling coil connections.
Not sure if all the poly conicals have it but where the black female threaded lid ring sat in the poly body the poly had a lip that extended towards the bottom of the conical which I routered out. This allowed the top to be flush rather than have a step down around the threaded insert.
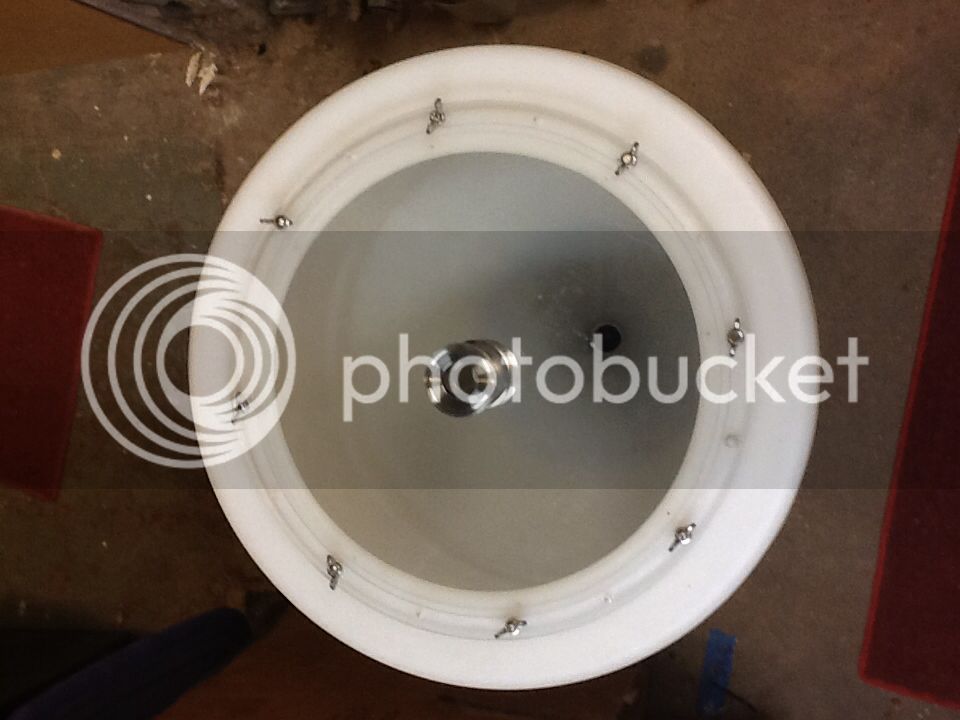
Not sure if all the poly conicals have it but where the black female threaded lid ring sat in the poly body the poly had a lip that extended towards the bottom of the conical which I routered out. This allowed the top to be flush rather than have a step down around the threaded insert.

@bemerrit. The glycol chiller builds are found in a few threads. I didn't document mine.....especially since I haven't fully tested it. It was really easy to put together...he says before fully tested.
I ordered the brewhemoths with the internal chiller coil. so there's not much for me to do, expect connect some tubing for chilling and add flex watt and insulation for heating.
Did you use a window ac unit to do the chilling?
@bemerritt
Heres the pics. I have filled it and made sure it makes water colder.....but now its fully assembled, control panel operational, but have yet to actually plug it all in and see how it performs.
Maybe this weekend.
![IMG_1387[1].jpg](https://cdn.homebrewtalk.com/data/attach/142/142633-IMG-1387-1-.jpg "IMG_1387[1].jpg")
![IMG_1389[1].jpg](https://cdn.homebrewtalk.com/data/attach/142/142634-IMG-1389-1-.jpg "IMG_1389[1].jpg")
![IMG_1392[1].jpg](https://cdn.homebrewtalk.com/data/attach/142/142635-IMG-1392-1-.jpg "IMG_1392[1].jpg")
Heres the pics. I have filled it and made sure it makes water colder.....but now its fully assembled, control panel operational, but have yet to actually plug it all in and see how it performs.
Maybe this weekend.
Thanks. Any suggestion on type of window ac unit? electronic or mechanical make much of a difference? I might forgo craigslist and go pick up a 5,000 BTU unit from home depot for 119 and call it a day. I figure if i don't mangle it too bad, i can return it if it doesn't work as intended.
The wiring is much easier if you find a mechanical one. I was close to buying one, and i just happened to drive by a yard sale in the fall and see this clunker for $15.
Ditto on what he said. The one packet used I believe it is a frigidaire mini window unit 5k btu.
Perfect. Looks like this will be my guy.
http://www.walmart.com/ip/Haier-Min...nditioner-HWF05XCL-L/17477197#Product+Reviews
http://www.walmart.com/ip/Haier-Min...nditioner-HWF05XCL-L/17477197#Product+Reviews
My PEX tool kit arrived. Probably will offer a pay it forward approach once it's all plumbed in and tested with the tool set since I can't imagine ever needing it again.
Getting excited to start building this one! Frame/stand should be done in a week or two.
TD
Getting excited to start building this one! Frame/stand should be done in a week or two.
TD
Getting anxious to build mine as the parts list is nearly 100% complete! Still need AC and cooler/ reservoir but that's it.
Hopefully have some time working nights next week to get some work done.
TD
Hopefully have some time working nights next week to get some work done.
TD
ok guys, i got my conical (20 gallon jacketed) from brewers hardware on friday. All of my parts to make the chiller are on their way. What would you recommend to do since my ambient temps are in the range of 50-75 right now?
My plan is to use an ac for cooling and aquarium heater for heating. Once it gets hotter i will keep the bath around 40 and pump as needed. If it was colder i would keep the bath at 80 and pump as needed.
But since i need both, is it better to keep the bath at 68* and keep the pond pump constantly pumping through the conical?
NatchezBrew
Well-Known Member
- Joined
- Apr 30, 2013
- Messages
- 50
- Reaction score
- 0
Bemerritt,
Were you able to get the coils into the cooler? The AC unit I tried this with the copper tubing came from the bottom so there was a lot of bending and i ended up with a leak. So I'm looking for a different model AC if anyone cares to share.
Were you able to get the coils into the cooler? The AC unit I tried this with the copper tubing came from the bottom so there was a lot of bending and i ended up with a leak. So I'm looking for a different model AC if anyone cares to share.
Bemerritt,
Were you able to get the coils into the cooler? The AC unit I tried this with the copper tubing came from the bottom so there was a lot of bending and i ended up with a leak. So I'm looking for a different model AC if anyone cares to share.
I ended up buying the one packet has on his website off of amazon. I get the unit tomorrow, so i am anxious to take the thing apart and make sure it will work.
http://www.amazon.com/gp/product/B003F4TH6G/?tag=skimlinks_replacement-20
Last edited by a moderator:
Started marking up my enclosure box tonight, and going to start planning the innards of the control panel markups on the insert panel soon.
I notice the BCS460 has an ethernet port, and I assume to achieve WiFi access, that I'll need an ethernet to WiFi adpater?
Is there any suggested model? Would it be better to buy a connector dock to mount the WiFi adapter on the enclosure externally rather than INSIDE the enclosure on the BCS directly for better signal? I think Oscsys.com has a connector for this purpose (male ethernet to female ethernet panel mount).
It seems the answer to the last question is probably a "Yes".
Would LOVE to see more screen shots of the innards of folks control panels.
The Three Din Rails, I have it seems that these mount on the internal removable plate in the enclosure and to that one rail is +12VDC, one is "HOT" 120VAC and the third is ground (for BOTH the 12VDC and 120 VAC?) Seems this is probably not correct, plus the rails can't be live if they are all mounted to same plate. Have not worked with DIN before. Seems the AC and DC will each need 2 conductor paths independent, with a shared ground/3rd conductor so I think my initial assumption is incorrect.
Its late and I just started looking at this stuff. I'm pretty good with electronics so I think I'll be able to get it figures out, but I've not worked with these DIN rails before. On my "Brutus" clone, my enclosure had a three "rails" which are really a terminal block not a rail. I think its 120V Hot / Neutral and Ground. Then there is a transformer for 24VAC but that doesn't have a rail as I recall. The difference here is that we have AC & DC current, but just three rails..
Yawn... getting late.
TD
The stand is being built and hopefully completed on Friday. Hooray!!
I'm going to stop over in the afternoon for a sneak peek.
TD
I'm going to stop over in the afternoon for a sneak peek.
TD

This is the upper and lower half of the frame. So far just half built. Going together fast.
Awesome! That looks great. I have decided to change the route that I am going on so I am selling the pieces that I already have, if anyone is interested. The link to my post is in my signature.
I didn't want to crowd this awesome build thread with my own mundane adventure, so I uploaded all of my pics to my build thread, "My Attempt at a 20 gallon..." also in the diy section.
But here is how far I got thanks to this thread last night

Any thoughts on how to seal up the slit cut in the cooler? I'd like to fill it up past that if possible. Thanks!
But here is how far I got thanks to this thread last night
Any thoughts on how to seal up the slit cut in the cooler? I'd like to fill it up past that if possible. Thanks!
Started marking up my enclosure box tonight, and going to start planning the innards of the control panel markups on the insert panel soon.
I notice the BCS460 has an ethernet port, and I assume to achieve WiFi access, that I'll need an ethernet to WiFi adpater?
I bought a cheap netgear access point and put DD-WRT on it to set up as a bridge. It generally works fine, although I occasionally have to reboot it if it loses connectivity to my AP at home.
Is there any suggested model? Would it be better to buy a connector dock to mount the WiFi adapter on the enclosure externally rather than INSIDE the enclosure on the BCS directly for better signal? I think Oscsys.com has a connector for this purpose (male ethernet to female ethernet panel mount).
It seems the answer to the last question is probably a "Yes".
Theoretically you'd get a slightly better signal. My control panel is next to the brewery though. So I wanted everything waterproof and mounted it internally.
The Three Din Rails, I have it seems that these mount on the internal removable plate in the enclosure and to that one rail is +12VDC, one is "HOT" 120VAC and the third is ground (for BOTH the 12VDC and 120 VAC?) Seems this is probably not correct, plus the rails can't be live if they are all mounted to same plate. Have not worked with DIN before. Seems the AC and DC will each need 2 conductor paths independent, with a shared ground/3rd conductor so I think my initial assumption is incorrect.
Its late and I just started looking at this stuff. I'm pretty good with electronics so I think I'll be able to get it figures out, but I've not worked with these DIN rails before. On my "Brutus" clone, my enclosure had a three "rails" which are really a terminal block not a rail. I think its 120V Hot / Neutral and Ground. Then there is a transformer for 24VAC but that doesn't have a rail as I recall. The difference here is that we have AC & DC current, but just three rails..
TD
The DIN rails are just for mounting your components to. No power runs through them. You use the wiring blocks to run the power.
Any thoughts on how to seal up the slit cut in the cooler? I'd like to fill it up past that if possible. Thanks!
I just used some pipe wrap made for insulating copper water pipes in houses. It's thin black stuff that has adhesive on one side. Put a couple layers on where it goes through the cooler, and you'll stop the bulk of the air movement.
Don't forget to insulate the exposed line of the A/C outside of the cooler though. If you don't, it'll get a couple inches of ice buildup within a couple hours of operation.

Update:
First off, HUGE thanks to Packet!! Totally hooked me up on the PEX stuff. Way to pay it forward. I definitely owe you pal! I asked to pay him back but never saw him send a PP invoice. Maybe I send him some brews once I get operational... Lots of brass fittings PEX connectors and tubing arrived from his leftovers. Thanks a million!
Next up is the frame. It's basically finished. They top it off tomorrow. They are using an aluminum plate to hold the conicals. It'll be welded on. It's got the diamond plate pattern and will look cool. The diamond plate is in place of the butcher block top.
This is the most critical step in my plan. If the plate bows too much I'm screwed. I think it should be fine though. We are using thick stock. I think its 3/16". They're nervous about the diameter cutouts.
Picked up the control panel enclosure tonight for cutting and painting. Got all the innards ready to go.
Thanks on the info for the Ethernet. My brewery is below my network switch. I may just run a cable up to the switch if I get poor connectivity. You say you have the adapter inside your enclosure? I may just try that and see how it works.
Thanks again !!
Hopefully more pics tomorrow.
TD
View attachment 172666
Update:
First off, HUGE thanks to Packet!! Totally hooked me up on the PEX stuff. Way to pay it forward. I definitely owe you pal! I asked to pay him back but never saw him send a PP invoice. Maybe I send him some brews once I get operational... Lots of brass fittings PEX connectors and tubing arrived from his leftovers. Thanks a million!
Glad to help. Don't worry about the shipping.
Next up is the frame. It's basically finished. They top it off tomorrow. They are using an aluminum plate to hold the conicals. It'll be welded on. It's got the diamond plate pattern and will look cool. The diamond plate is in place of the butcher block top.
This is the most critical step in my plan. If the plate bows too much I'm screwed. I think it should be fine though. We are using thick stock. I think its 3/16". They're nervous about the diameter cutouts.
If it bends, just take off the diamond plate and put another layer of sheet metal underneath it. Each conical only weighs 80-90lbs when full.
Thanks on the info for the Ethernet. My brewery is below my network switch. I may just run a cable up to the switch if I get poor connectivity. You say you have the adapter inside your enclosure? I may just try that and see how it works.
TD
If you're able, wired ethernet is going to be more reliable.
Ordered a Ethernet patch cord and kit from open control systems site. Should be easy to hardwire to my switch upstairs.
Did some reading on the din rail stuff.
For my Brutus build, I just did terminal blocks for power bus. This din seems a little slicker. Found a few places to read up on it.
One thing I was a little unclear about is the use of the DIN bridge connectors: the strips of metal. Seems like these are used to create power bus out of a row of adjacent din terminal blocks, rather than just pass-through connections. So you would take a set of several din terminal blocks, connect with the bridge, for as many pieces as needed, then run the 12VDC to one terminal block and then any other conductor you connect will supply 12 VDC. I think this is the correct implementation.
So how many buses did you implement? Positive and negative 12vdc obviously, and probably also live/hot and neutral 120vac. The 120VAC goes to the circuit breaker first I assume, the live/hot wire. The ground probably doesn't deserve a bus, as you can just ground to the chassis easily.
Did you mount the BCS control to a din rail too?
What about the driver board? Where did you mount that?
I think they changed the heat sink since you got yours. Mine are really large. I hope they fit into the enclosure when mounted on the rail, and with door panel closed. The heat sinks don't seem to really lock into place, thus the end block clamps to hold them in place I assume.
My din rail kit came with three rails. Sounded like your write up you only used two? I'm kinda thinking about pre wiring the din rails onto the mounting plate while my enclosure box is being cut and painted.
Anyway, when I get off work tonight, I might piddle around with it a bit. The mounting plate looks pretty beefy though, and step one will be to drill the mounting holes for the rails.
Thanks again.
TD
Ordered a Ethernet patch cord and kit from open control systems site. Should be easy to hardwire to my switch upstairs.
Did some reading on the din rail stuff.
For my Brutus build, I just did terminal blocks for power bus. This din seems a little slicker. Found a few places to read up on it.
One thing I was a little unclear about is the use of the DIN bridge connectors: the strips of metal. Seems like these are used to create power bus out of a row of adjacent din terminal blocks, rather than just pass-through connections. So you would take a set of several din terminal blocks, connect with the bridge, for as many pieces as needed, then run the 12VDC to one terminal block and then any other conductor you connect will supply 12 VDC. I think this is the correct implementation.
So how many buses did you implement? Positive and negative 12vdc obviously, and probably also live/hot and neutral 120vac. The 120VAC goes to the circuit breaker first I assume, the live/hot wire. The ground probably doesn't deserve a bus, as you can just ground to the chassis easily.
Did you mount the BCS control to a din rail too?
What about the driver board? Where did you mount that?
I think they changed the heat sink since you got yours. Mine are really large. I hope they fit into the enclosure when mounted on the rail, and with door panel closed. The heat sinks don't seem to really lock into place, thus the end block clamps to hold them in place I assume.
My din rail kit came with three rails. Sounded like your write up you only used two? I'm kinda thinking about pre wiring the din rails onto the mounting plate while my enclosure box is being cut and painted.
Anyway, when I get off work tonight, I might piddle around with it a bit. The mounting plate looks pretty beefy though, and step one will be to drill the mounting holes for the rails.
Thanks again.
TD
That is exactly how the bridges work, make sure you use caps at the end of each bus. The heat sinks I got with my ssr's were the same way they fit loose on the rail and were pretty tall. I used end block clamps to hold them in place as well. The bcs doesn't have a din rail attachment point on it unless they changed it since I bought mine a year ago.
Cool.
Well, I drilled my mounting plate and attached the DIN rails. I know packet used only two. I installed all three, even if I don't end up using them all.
with only 10 DIN terminal blocks, I'm wondering how many to use for each bus. I did a quick tally on the connections to each bus, but I think it may be better to wait until my enclosure gets back and I can visualize with all the connections going to and from the various outlets and switches on the enclosure.
What is the easiest way to connect all the small 14ga THHN wire to the chassis ground? I'm thinking a big Ring solderless connector to the mounting plate screw and maybe using a few terminal blocks to avoid trying to crimp multiple wires into a single solderless terminal.
TD
I think the fins are aluminum and the coils are copper. I'm not sure what steel/iron based parts are on the condenser that might rust. I think (oddly) that the food grade PPG solution has stuff in it to inhibit rust and mold. I only have 3 gallons of it, but will be getting some more (free again!) in the near future (several months) so I hope that's enough to get started.
TD
TD
Cool.
Well, I drilled my mounting plate and attached the DIN rails. I know packet used only two. I installed all three, even if I don't end up using them all.
with only 10 DIN terminal blocks, I'm wondering how many to use for each bus. I did a quick tally on the connections to each bus, but I think it may be better to wait until my enclosure gets back and I can visualize with all the connections going to and from the various outlets and switches on the enclosure.
What is the easiest way to connect all the small 14ga THHN wire to the chassis ground? I'm thinking a big Ring solderless connector to the mounting plate screw and maybe using a few terminal blocks to avoid trying to crimp multiple wires into a single solderless terminal.
TD
Each terminal block has 2 connections on it but if your using small gauge wire you could probably double up in a connecter in a pinch. As for the ground you could get a small grounding block from home depot and bolt it to your mounting plate. run a single wire to your chassis ground and then make all your ground connections to that.
Here is a pic

What plugs into the outlets? The BCS for one. But what about the second outlet?
I used 3 terminals with bridge for each load and neutral 120 VAC buses and 2 each for the 12 VDC.
I used all three rails. There is room for a chassis ground bus if I wanted but I would need more terminals. Mounted the SSRs.
Could've used more end rail blocks. Also could've used more of the tiny plastic separators and ran all the voltage busses along one rail. Oddly there were no covers aside from the two and therefore I ended up butting up the exposed ends to other components.
Ended up only using one bridge connector.
TD
Is it important to paint the part of the ac that is in the water to prevent rust? I feel as if I read this somewhere but can't find it.
I read somewhere that the ends of the coils are pot metal and will rust. I didn't paint mine and I haven't had any problems with it rusting though.
What plugs into the outlets? The BCS for one. But what about the second outlet?
I used the other outlet for the wireless bridge. If you're hard wiring it, you can leave out the second outlet.
I used 3 terminals with bridge for each load and neutral 120 VAC buses and 2 each for the 12 VDC.
I used all three rails. There is room for a chassis ground bus if I wanted but I would need more terminals. Mounted the SSRs.
Could've used more end rail blocks. Also could've used more of the tiny plastic separators and ran all the voltage busses along one rail. Oddly there were no covers aside from the two and therefore I ended up butting up the exposed ends to other components.
Ended up only using one bridge connector.
TD
Personally I only used 2 rails, and mounted the BCS in the center top with velcro. But, whatever logically works for you is fine.
Cool.
Well, I drilled my mounting plate and attached the DIN rails. I know packet used only two. I installed all three, even if I don't end up using them all.
with only 10 DIN terminal blocks, I'm wondering how many to use for each bus. I did a quick tally on the connections to each bus, but I think it may be better to wait until my enclosure gets back and I can visualize with all the connections going to and from the various outlets and switches on the enclosure.
What is the easiest way to connect all the small 14ga THHN wire to the chassis ground? I'm thinking a big Ring solderless connector to the mounting plate screw and maybe using a few terminal blocks to avoid trying to crimp multiple wires into a single solderless terminal.
TD
The key here is that you don't have to run every wire straight out of the bus. For example, on both 110v outlets, they have input and output terminals. So you daisy chain one outlet to the other. The same thing works with the SSRs. This also saves quite a bit of wire.
For the chassis ground, use one of the ground connections on the chassis (they're threaded studs). Just crimp a ring connector on the end of a wire and put it over the stud. Use a nut to tighten it down when you're done. Be sure only to run the 110v ground through those though. The 5v ground goes through the BCS. The 12v ground goes through the 12v power supply.
I thought two I'd be crowding the rails. My BCS had side mounting brackets, so I figured I'd use them.
I may wire up some more after work. It's not so bad actually, the wiring. The rails work pretty slick. Did you have an issue plugging the BCS power adapter into the outlet and still being able to close the lid? I think I need an outlet adapter to plug in at a 90 angle.
Hopefully I don't have to move anything around once I get the enclosure back and fit the panel inside. I may do up the XLR connectors tonight. Those seem like a a pita to solder up, but will see..
TD
I thought two I'd be crowding the rails. My BCS had side mounting brackets, so I figured I'd use them.
I may wire up some more after work. It's not so bad actually, the wiring. The rails work pretty slick. Did you have an issue plugging the BCS power adapter into the outlet and still being able to close the lid? I think I need an outlet adapter to plug in at a 90 angle.
Hopefully I don't have to move anything around once I get the enclosure back and fit the panel inside. I may do up the XLR connectors tonight. Those seem like a a pita to solder up, but will see..
TD
I used the same chassis I used for my electric brewery. Thankfully it's pretty thick. So, no depth issues there.
Yes, soldering the XLR connectors is a major pain in the ass.
Similar threads
- Replies
- 4
- Views
- 629
- Replies
- 2
- Views
- 677
