Canning Jar Trub/Yeast Harvester for Conical

Homebrew Talk - Beer, Wine, Mead, & Cider Brewing Discussion Forum

Help Support Homebrew Talk - Beer, Wine, Mead, & Cider Brewing Discussion Forum:

This site may earn a commission from merchant affiliate links, including eBay, Amazon, and others.

PlinyTheMiddleAged

Well-Known Member
Joined
Jan 9, 2014
Messages
377
Reaction score
106
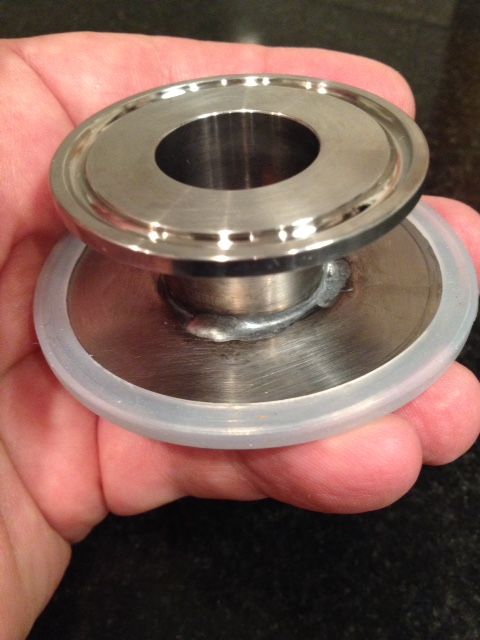
My family bought me a 7 gal SS Brew Tech Chronical Conical for Christmas. As soon as I started playing with it (pretty much instantly), I thought that what I needed was a canning jar with a tri clover fitting on its lid. A couple of searches later and I had ordered some stainless steel lids for canning jars, some Stay-Clean flux, Stay-Brite #8 silver solder, and some fittings from brewer's hardware. Thanks to the thread on stainless steel soldering, this is what I came up with. I haven't used it yet, but I did a pressurized leak check and found no problems at all. Now, in theory, all I have to do is install a jar, let it fill with trub, and then swap in a new jar to catch yeast to reuse in my next batch. Seems simple.

I will say that the stainless steel soldering was a lot easier than I expected. Once I was all set to go, it only took moments with a propane torch.

Tri-Clover Canning Lid.JPG


Capped Lid on Jar.JPG
 
Interested. Would like to hear some more about your process. How do you make the transition from horizontal to vertical while full of yeast?
 
This looks really good! I do essentially the same thing with an inline site glass and it works great... Except for 2 problems; 1st, I only have the one site glass so once it's full, I have to disconnect and transfer yeast to another storage jar so I can put the site glass back on for a second round of harvesting. The 2nd thing that that bothers me is that when I put the emptied site glass back on for round two and open the dump, I'm bubbling air up into mostly fermented wort.
I've been wanting something with more capacity so I can harvest in one pass. This just might be the ticket. Looking forward to hearing how things work out.:mug:
 
Thinking about it. I don't see how you don't oxygenate the wort (glub glub) when you dump into a sealed mason jar. I would think you need a vent in the lid that releases the trapped air as you fill it
 
Thinking about it. I don't see how you don't oxygenate the wort (glub glub) when you dump into a sealed mason jar. I would think you need a vent in the lid that releases the trapped air as you fill it

This would be very easy to do. Metal tube threaded each end, two nuts with washers to seal to lid, acorn nut on outside end to close the tube. Bend tube for clearance from the conical.
 
Thinking about it. I don't see how you don't oxygenate the wort (glub glub) when you dump into a sealed mason jar. I would think you need a vent in the lid that releases the trapped air as you fill it

You just like the fastferment conical setup does? Everyone who uses them seems to believe its a non issue as far as actually effecting anything... one person mentioned he uses distilled water in his "yea
st catcher" though to avoid this...
 
Thanks for the input. A couple of thoughts on the above:

My first thought was to remove the 90° bend at the bottom - just go straight down into the jar. I may have to raise the conical a little bit to make room for the jar. If I keep the 90°, there will be spills; I just have to be quick about removing the jar.

As far as introducing oxygen goes, I see two simple options in addition to venting the lid. Easiest would be to fill the replacement jar with sterilized water before attaching it. Next would be flushing the jar with CO2 before attaching. The second option doesn't eliminate oxygen, but it would significantly reduce it.

I'll report in when I test drive it.
 
I'm thinking of replacing the 90 with a 45.
Assuming you are planning on switching the lid out for a normal lid. I bet you could introduce a small gap in the gasket of the lid to mason jar to act as a vent. Just keep that gap on the high side

Where did you get the stainless lid for the mason jars?
 
Assuming you are planning on switching the lid out for a normal lid.
Yes - once I get yeast in the jar, my plan is to replace the lid that has the tri clover fitting with a regular "factory" lid. And then into the fridge goes the jar of yeast.

Where did you get the stainless lid for the mason jars?

I got the stainless lids from here:
http://www.ecojarz.com/products/3-pack-reusable-stainless-steel-jar-lids/

I did not get the optional bands - just the lids. One issue I've noticed is that the supplied gasket is a bit thick. The thickness makes it tricky to catch enough threads on the jar to sufficiently secure the lid using a "standard" band. Perhaps using one of their available bands this isn't an issue - I can't say for sure. I'm considering making my own thinner gaskets. However, if anyone gets the ecojarz bands, I'd like to hear how good they are in catching threads on the jar. I'm not concerned about what I have; the lid is secure, but one does have to be careful about getting the lid lined up properly before trying to tighten it down.
 
Thinking about it. I don't see how you don't oxygenate the wort (glub glub) when you dump into a sealed mason jar. I would think you need a vent in the lid that releases the trapped air as you fill it

The trick is to have the mason jar already mounted and the dump valve open before you pitch your yeast. It doesn't seem to affect lag time and once fermentation starts, everything is getting stirred up pretty well. When it's time to harvest, close the dump valve and take your winnings. No glub glub at all.

Of course, a largeish jar is important so you can do it in one pass. And you'll have some trub in there that you'll need to deal with but it still seems like a clean process and it's nice to be able to visually confirm when your yeast has mostly settled out.
 
Easiest would be to fill the replacement jar with sterilized water before attaching it.

Or maybe better: keep a quart (or whatever) of your wort in reserve in one of these mason jar contraptions and use that? It might rouse the yeast a bit but not a lot?

This is assuming that the jar you put on the fermenter at pitch time is not big enough to harvest all the yeast and you need to go back for round 2.
 
I don't see how a mason jar filled with water then yeast dumped into will have any liquid transfer. Ok...a tiny amount, but not much
 
I don't see how a mason jar filled with water then yeast dumped into will have any liquid transfer. Ok...a tiny amount, but not much

In most (almost all?) cases, water weighs less than beer. The water would 'float' out of the mason jar just like it would if it was oil and the beer was vinegar... I hope that makes sense (imagine oil and vinegar salad dressing). Even if that were not true in all cases, the yeast would settle into the jar and displace the water pretty quickly because the yeast is definitely heavier than water.
 
Or maybe better: keep a quart (or whatever) of your wort in reserve in one of these mason jar contraptions and use that? It might rouse the yeast a bit but not a lot?


gbarker,

Brilliant! This will be my plan when I try this out. I'll probably get to it next month. I have to prep a fermentation chamber to accommodate the conical.

Thanks!
 
Forgive me if there is is a foolish question but I just got a stout conical for Christmas and I'm wondering ... what is the advantage of the triclover fittings vs just holding a jar under the valve opening when cracking the valve? is it just to prevent splashing? I would think the advantage of being able to apply co2 pressure from above to diplace what comes out the bottom would still be a superior method no?

and like I had mentioned already in a post coincidentally directly before the one here where someone here "thought of it" this is the exact same situation as the yeast collection ball on the fast ferment system and some users do use distilled water in the ball when attaching to prevent oxygenating the beer... so it does work. although wort might work better if you prevent infection.

If i attached a jar like this prior to filling the conical it would just fill with trub...its takes hours for my trub to settle into a compact layer I could remove without wasting a lot of wort.. not sure I want to wait that long to pitch yeast myself.
 
augiedoggy,

What I think is simple about this idea is that it is passive - there is nothing I have to do once the jar is attached to the conical. I'll attach the jar, fill the conical with wort, pitch the yeast, and let beer happen. A day or two later when the trub has settled but the yeast are still busy, I come back and remove the jar full of trub and replace it with a jar of wort that I saved in the refrigerator (or water when I forget to save wort). A couple of weeks later I come back and remove a jar full of settled yeast and store it in the refrigerator for use in another batch.

You can certainly do it the way you propose - hook up CO2, apply a little bit of head pressure, blow trub into a waiting container, remove the CO2 hook up, and replace the airlock. Then do the same a week or so later when the yeast have settled. Whichever way is easier. They both work.

As far as being like the ball shaped catchers used on the FastFerment conicals, you are exactly right. It is the same concept. I just get to choose the size of the jar I want to use, it fits the tri clover fittings on the SsBrewTech conical that I have, and I can see what is collecting in the jars.

Enjoy your conical! I'm looking forward to using mine.
 
I would think the advantage of being able to apply co2 pressure from above to diplace what comes out the bottom would still be a superior method no?

What you're suggesting is not a bad idea but I find that it's very easy to just blow a hole through your trub and yeast cake and leave most of it clinging to the sides (even without adding head pressure). I find that dumping (not harvesting) requires a slow hand and has to be done over several days. You get a lot the first day but then things have to settle for a day or 2 before you can do it again and you get about half of what you got the first day (repeat for 3 or 4 days getting half of the previous dump each time).

The open jar idea is nice because all that settling between dumps happens passively as Pliny says. And you get some visual confirmation that you got it all (or need to keep dumping after harvesting).

augiedoggy,
What I think is simple about this idea is that it is passive - there is nothing I have to do once the jar is attached to the conical. I'll attach the jar, fill the conical with wort, pitch the yeast, and let beer happen. A day or two later when the trub has settled but the yeast are still busy, I come back and remove the jar full of trub and replace it with a jar of wort that I saved in the refrigerator (or water when I forget to save wort). A couple of weeks later I come back and remove a jar full of settled yeast and store it in the refrigerator for use in another batch.

+1 on this except for this observation:
Fermentation creates a lot of convective currents that stir everything up including trub. You may find that it's so swirly, that no trub settles during active fermentation so your timing might be a little tight.

Here's my process (FWIW):
At the end of the boil, I whirlpool for 15 minutes and settle for another 30. Then I oxygenate my wort inline from my plate chiller on the way to the fermenter. I have my site glass (soon to be mason jar) attached to the dump valve and I leave the valve open. 4-8 hours or so later, I close the dump valve and empty my site glass of trub and cold break. Then I clean and sanitize it, reattach it and open the dump (glub glub is OK at this point). Then I pitch my yeast.

After primary, the yeast settles into the siteglass along with a small amount of trub but it seems mostly to be in pretty clear layers. I just pour off any junk and collect the good stuff.

BTW, I don't want to hijack but I have a couple of crappy but brief videos I made for a friend that describes my closed transfer (pressurizing fermenter with co2) kegging process and equipment. It's not on topic but seems somehow related. If interested, PM me and I'll email links. Or if the OP doesn't mind, I can post here.
 
gbarker,

Post 'em, please! I'm very interested.

I based my trub "harvest" timeline on the RIS I have going now - nice compact layer settled in a day or two. I assumed all the "junk" swirling around was yeast but I'm sure you're right - it's trub and yeast. Thanks for sharing your process. I like the quick dump (and ensuing glub glub) to get rid of the cold break prior to yeast pitch. Learning is fun (especially when it's about beer)!
 
OK. Links below but first, there are 2 places where you can really go off the rails in these videos (and there is no guard rail to save you) so here's my disclaimer:
1. Never pressurize your fermenter with more than 3-4 PSI (2 is better). You can ruin it or blow it up (both are bad:drunk:). That's why I have the 1-15 psi gauge mounted on my fermenter gas connection. A 1-60psi guage will not tell you accurately when you have 2-5 psi. Be warned.
2. In my keg prep video, I describe filling a keg to the rim with sanitizer. This means that the gas dip tube is submerged and the risk here is that if there is not positive pressure in the line when you attach it to the keg, there is a risk of sanitizer flowing up into your regulator (also not good).
3. These are quick and dirty one-take videos I did for a friend that I had already discussed this stuff with. They have flaws beyond what I mention above. Take them with a grain of salt.

That said:
Keg Prep: [ame]http://vimeo.com/115661398[/ame]
Closed Transfer: [ame]http://vimeo.com/115670037[/ame]

Cheers,
G
 
Oh, and I also know that I should have a clear line on my connection between racking port and keg (instead of the red). I just didn't have any clear when I put this together.
 
Got any other shots of the lid gasket? Does wrap around the top and bottom of the lid? These look like a nice option compared to cutting a lid and gasket like I did.

https://www.homebrewtalk.com/f258/mason-jar-sight-glass-harvester-423808/

I've had good luck for almost 2 years with mine. One thing that I have done lately is harvest with a pint mason jar and then wash the yeast once by diluting from a pint to a quart with boiled water. This eliminates some of the trub and still gives you a ton of yeast when you transfer back to a pint jar for storage.
 
WP,

Well, I should have guessed that this was already done. I'm happy to know that it's been working out well for you. It seems too simple to not work.

Here's a pic of the gasket that come with the lids. Like I said above, they are thick which makes it a little tricky to get the lid's threads to engage with the threads on the jar.

The gasket does wrap around the top and bottom of the lid.

View attachment ImageUploadedByHome Brew1421293188.805931.jpg
View attachment ImageUploadedByHome Brew1421293308.359438.jpg
 
the thickness of the gasket and the band thread engagement is the one thing I worried about early on and and was why I scrapped using a standard tri clover ferrule since it was too thick even though it fir a mason jar pretty good. even if you took your gasket and cut it in half it would still seal properly since it is really the jar/gasket seal not the band/gasket seal that keeps the jar liquid tight. this would also give you a spare gasket half for future use if you managed to wear it out or damage it. I'm surprised the gasket doesn't pucker as you tighten the band as it squeezes between the band and the lid.
 
Have you decided how you are going to elevate the conical? I was looking into buying some 2 foot long runs of 80/20 extruded aluminum and tapping the center hole, but I'm not sure if it will be large enough to screw into the legs of the conical.

Other thoughts?
 
the thickness of the gasket and the band thread engagement is the one thing I worried about early on and and was why I scrapped using a standard tri clover ferrule since it was too thick even though it fir a mason jar pretty good. even if you took your gasket and cut it in half it would still seal properly since it is really the jar/gasket seal not the band/gasket seal that keeps the jar liquid tight. this would also give you a spare gasket half for future use if you managed to wear it out or damage it. I'm surprised the gasket doesn't pucker as you tighten the band as it squeezes between the band and the lid.


WP,

You bring up another possible design - perhaps one could increase the depth of the band such that it can hold a tri clover fitting directly to a canning jar. Cut apart two bands and solder them together. Probably harder than what you did, but I might try that out.

And you are correct; the gasket can get pinched and distorted when tightening the band. It can stretch quite a bit so it will still seal. However, I try to put the lid in tension while tightening the band - this seems to minimize the distortion.
 
Have you decided how you are going to elevate the conical? I was looking into buying some 2 foot long runs of 80/20 extruded aluminum and tapping the center hole, but I'm not sure if it will be large enough to screw into the legs of the conical.


Other thoughts?


Ultimately, your design is what I'd like to go with - metal extensions to the legs. Initially, I'll probably just use wooden blocks to boost it up.
 
You guys should check these out. A little on the pricey side but are essentially a better option then a mason jar IMHO they range in sizes from .13 gallon to 5 gallon (bit over kill haha) and come with 1.5 inch clamp gasket and lid.

http://www.gwkent.com/stainless-steel-bottles.html

these guys also sell all other tri clamp stuff to dump a bunch of money into :mug:
 
I wanted to get the 1/2 gallon just for a growler lol, never thought to use one like the fast ferment idea
 
I'm now trying to figure out if there's any way to switch this over to mason jars. I like that idea way better. Thoughts?
 
Artifishal,

I don't see any reason why you'd want to change the set up that you have. You have the same functionality as a mason jar without doing any additional work. If I were in your shoes, I'd rig up another Nalgene like you already have. Do you see a big advantage to a mason jar over your Nalgene?
 
SJ,

Exactly. They are (nearly) transparent too. Can you get clear, non-colored Nalgene bottles? Seems like you can use the Nalgene just like a canning jar. They just cost a bit more than canning jars. But, you can always transfer yeast from your Nalgene to a canning jar after you harvest. That's the only advantage that I see with a canning jar - no need to transfer harvested yeast to a new container.
 
You can get the HDPE ones which are a opaque white. They also have one that has a different set of letters but is the same plastic but it has UV inhibitors in it. I think it is stamped UVPE instead. I use these for storing yeast in the fridge. I grow extra in my starter and propagate from there instead of harvesting.
 
It worked, and yes that's why I went through the trouble of milling out the inside of that pvc so I could fit and glue in the nalgene. But it was not quite big enough for a ten gallen batch. I have to dump a bit more yeast out after I detach it. And I can't really store it like that because it has a big pvc thing glued to it. I looked up the ball canning plastic lids last night. I plan to redo my set up with one of those on the end so I can use a 32oz ball jar for five gallon batches and a half gallon ball jar for when I do ten gallon batches.
 
Back
Top