WPStrassburg
Well-Known Member
http://www.ebay.com/itm/2-DN50-Sani...937?pt=LH_DefaultDomain_0&hash=item43b574ce61
Any reason you can't go with 2" tri clover?
Any reason you can't go with 2" tri clover?

-MG- said:I decided to go with the 35 gallon version. For the price and size its hard to beat that it has legs included.
Since it has a 2" bottom, would something like this work to get me to the 1.5" threaded tri-clover fitting I'm getting?
http://www.ebay.com/itm/Bushing-2-Male-x-1-1-2-1-5-Female-Fitting-304-Stainless-Steel-Pipe-Biodiesel-/280818225976#vi-content
http://www.brewershardware.com/1-1.5-Tri-Clover-X-1.5-Male-NPT.html
http://www.ebay.com/itm/2-DN50-Sani...937?pt=LH_DefaultDomain_0&hash=item43b574ce61
Any reason you can't go with 2" tri clover?
How much do you think max you will be able to ferment in it?
-MG- said:Good question. I'll have to find out. I'm wondering if you can get a full 1BBL in there safely with a blow off tube. It sounds to me like most of these vessels have extra room at the top.
Figure up your largest starter on a 1bbl batch. Say a Big Lager... I just plugged it into Mr. Malty and with a 31 gallon batch of 1.080 lager with a volume of 31 gallons and a 95% viability rate on your yeast, you will need around 10 gallons of stir-plate starter. Now, you will more than likely decant most of that so you are not pitching 10 gallons of liquid. I am just throwing that out to give you another point to ponder while making your decision.
(Having never brewed on this large of a scale, maybe I'm totally off...)
I already bought these from another poster:
Brewershardware.com items
SKU / Product Item / price / Quantity / Total
TC15M15 1"/1.5" Tri Clover X 1.5" Male NPT $19.00 2 =$38.00
TC15CAP 1"/1.5" Tri Clover Cap $3.00 2 =$6.00
TC15CLAMP 1"/1.5" Tri Clover Clamp $6.00 4 =$24.00
TC15VBFVPT 1.5" Tri Clover Butterfly Valve - Pull Trigger $51.00 1 =$51.00
TC15GASSIL 1.5" Tri Clover Gasket Silicone $1.25 5 =$6.25
TC15SG 1.5" Tri Clover Sight Glass $54.00 1 =$54.00
So I don't know how big the ferrule's are and if what you linked will match up or not.
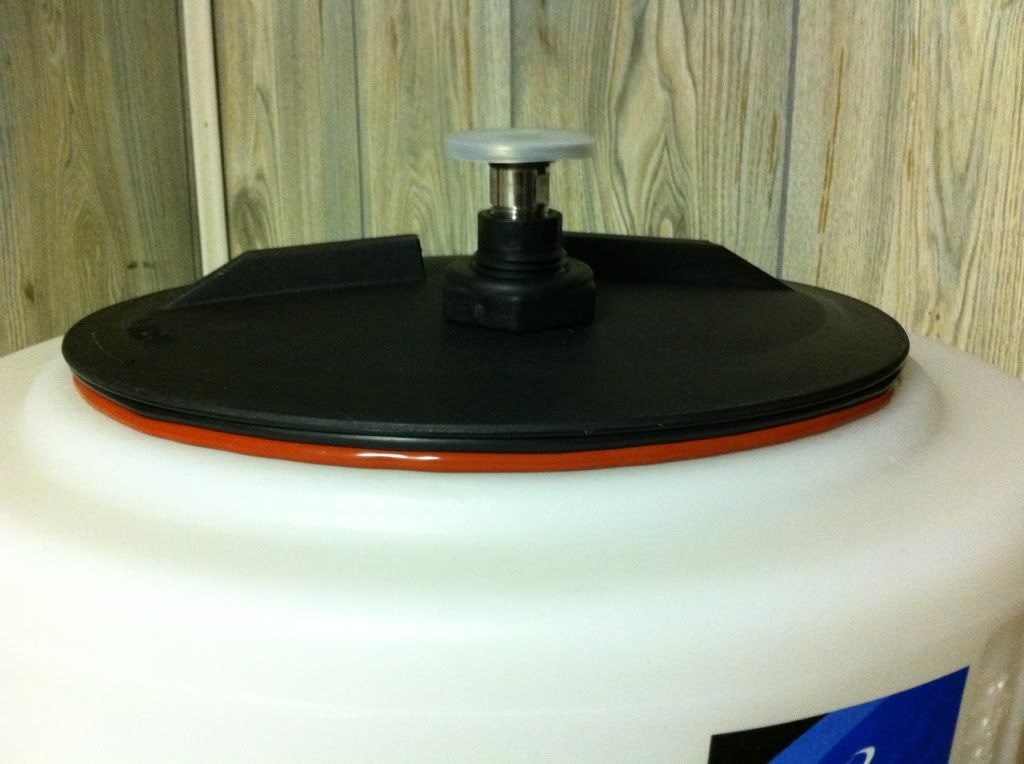
I bought a 13 1/2" inside diameter (-456) red 70 euro FDA silicone o-ring from orings-online.com to fit on the lid assembly. It costs $9.87 each plus shipping. No nasty airborne particles - flying, crawling or otherwise - are going to get inside!. The lid itself seems to tighten on the assembly well enough on its own.
Also what is the compression ring around the bottom drain used for?


Mg can I get you to post a pic of where the 35 gallon line is?

-MG- said:Here you go, sorry the angle isn't the best. But the plastic lettering is impossible to see.
I think I have the lid assembly sealed well enough (we'll find out). One area I'm not certain is how to get two separate weatherstripping on the lid. One practically is the entire lip of the underside of the lid and when I did a pressure test, of course it leaks at that seam and I know the instructions say to offset the seams for a better seal, but not sure if people just are putting two tracks of the stuff on top of one another? If so you can barely get a quarter turn of the lid to tighten it.
You have two of the "D" shaped pieces of weatherstrip on there. Take one off and offset the seam. I know they come on the role together like that but you have to split the two apart and offset the seems. They peal apart pretty easy.
I bought a 13 1/2" inside diameter (-456) red 70 euro FDA silicone o-ring from orings-online.com to fit on the lid assembly. It costs $9.87 each plus shipping. No nasty airborne particles - flying, crawling or otherwise - are going to get inside!. The lid itself seems to tighten on the assembly well enough on its own.
Which conical? Something seems wrong, my entire order was about $80 shipped I believe, and that's to CA
If you're ordering the 30gal, only the one with te built in stand qualifies for free shipping I believe.
I just clicked your exact links added it to cart, put in my zip and state and typed in the promo code and it gave me the free ship option. What's your zip?
")

Enter your email address to join:

