You are using an out of date browser. It may not display this or other websites correctly.
You should upgrade or use an alternative browser.
You should upgrade or use an alternative browser.
Super Simple 15G Plastic Conical
- Thread starter Squeeky
- Start date

Help Support Homebrew Talk - Beer, Wine, Mead, & Cider Brewing Discussion Forum:
This site may earn a commission from merchant affiliate
links, including eBay, Amazon, and others.
Hey guys, so this is what I used
You think it will hold the weight?
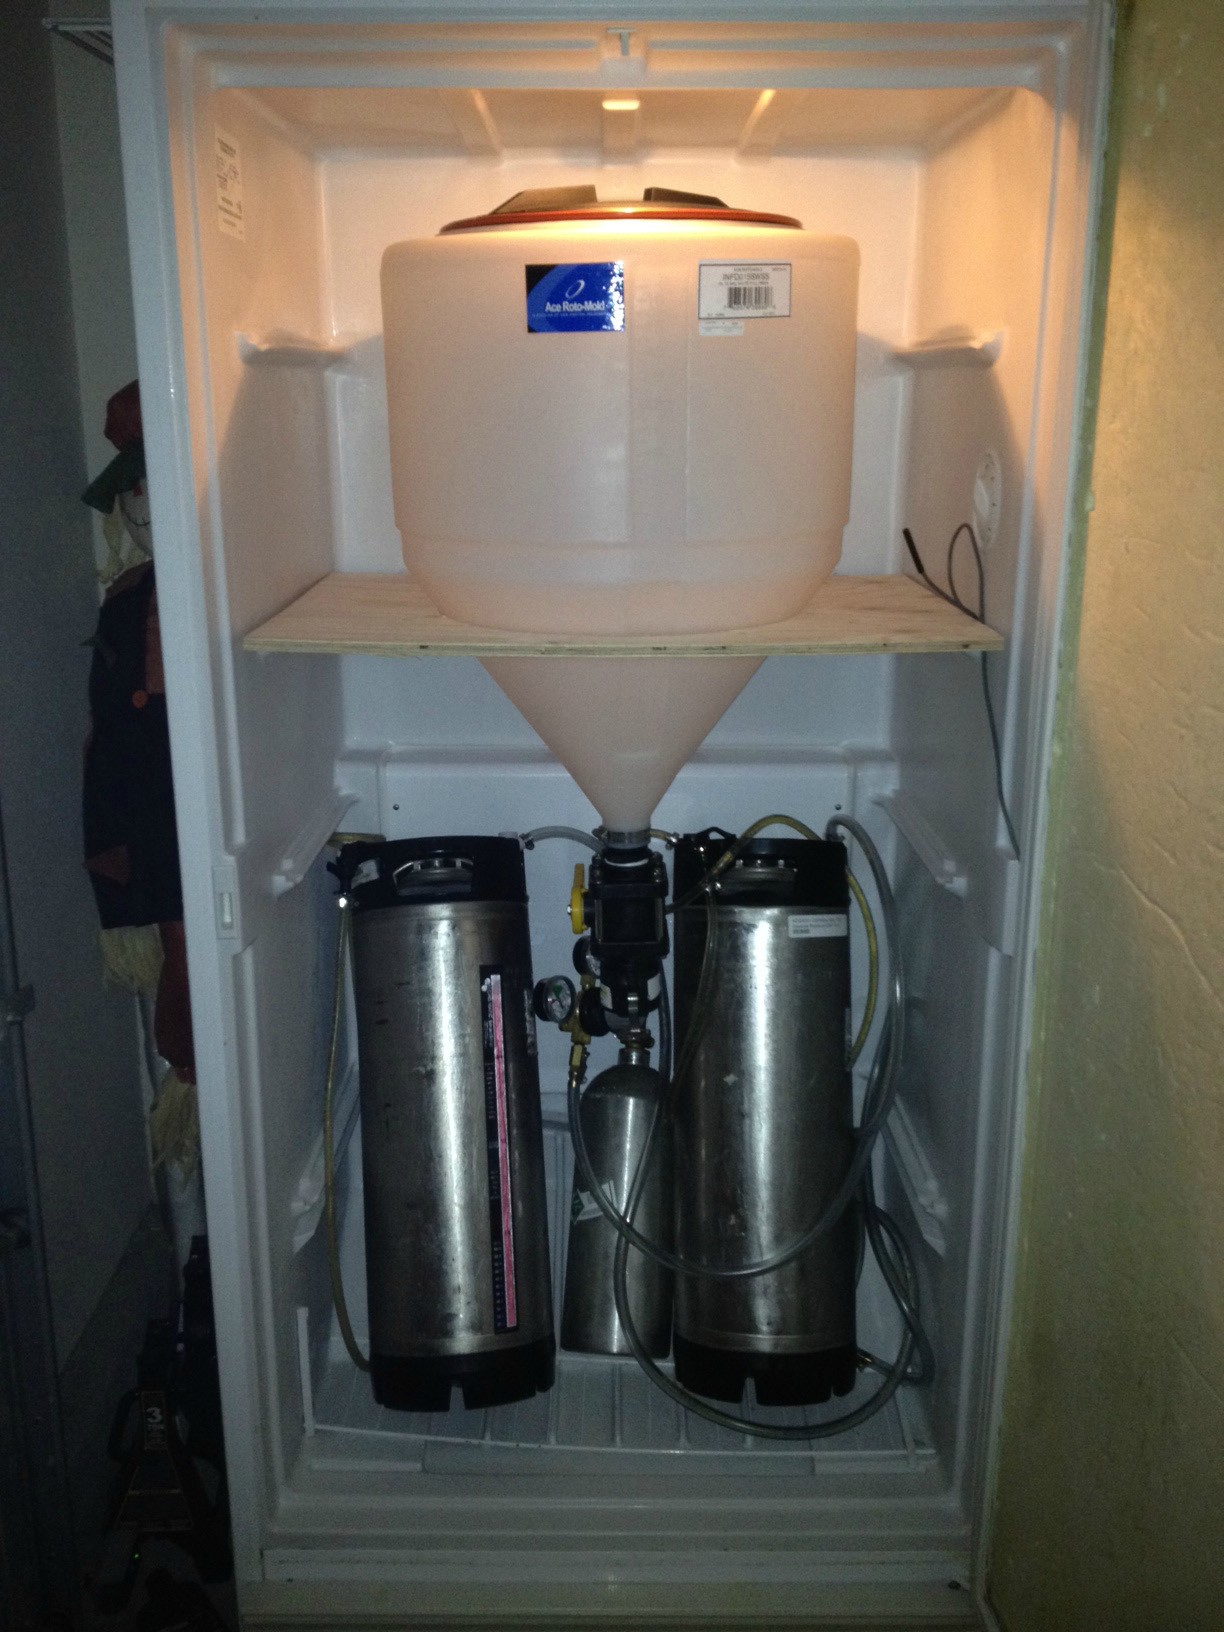
I would have used 3/4" plywood, the shelf brackets on the fridge I don't think so. It might work for awhile.
I love how everyone likes to overbuild a brewstand and don't say anything about fermentation since its not hot.
- Joined
- Jul 30, 2008
- Messages
- 660
- Reaction score
- 48
I would have used 3/4" plywood, the shelf brackets on the fridge I don't think so. It might work for awhile.
+1 on this. I used 3/4" ply for both of mine. I would suggest adding "joists" underneath in a box layout, like Squeeky's above. I used more 3/4" ply for those on mine.
I would not trust those shelf brackets with 40-80 pounds of wort (5-10 gallons). I would add some 2x4 legs in the corners, then add horizontal connectors at the very bottom, both to keep them in place, and to distribute the weight on the fridge's liner.

jcorn
Well-Known Member
I just a bought a full drain 15g roto tank ans I am just wondering how high to place my beer transfer ball valve above the trub ball valve. I am reading that everyone is going 6 to 6.5" above the bottom valve but wouldnt you lose a good amount of beer during transfer putting it so high? After 3 or 4 seperate days of a quick bottom drain flush everything close to the bottom should be somewhat cleaned up in time for transfer? The 6 to 6.5" mark puts me around 1/2 a gallon give or take lost during transfer. Also what valve kit for beer transfer would i buy if i bought one off say Northern Brewer? The cooler valve kit? Kettle valve kit?
Here's what I used.
http://www.banjovalves.com/blk-pp-bulkhead-fittings.
I also have a banjo 1.5" dump valve and camlock fittings if interested. Check my thread in classifieds or pm me.
http://www.banjovalves.com/blk-pp-bulkhead-fittings.
I also have a banjo 1.5" dump valve and camlock fittings if interested. Check my thread in classifieds or pm me.
jcorn
Well-Known Member
Url is coming up page not found. I will check the classifieds for your post
Click the link for bulkhead fittings......you want the 1/2"
Hey guys, I don't normally like to crosspost, but if anyone is looking for one of these in the Ohio area, I have one (new) in the classifieds. Cheers!
https://www.homebrewtalk.com/f16/15-gal-plastic-conical-w-stand-tri-clover-adapter-new-346151/
https://www.homebrewtalk.com/f16/15-gal-plastic-conical-w-stand-tri-clover-adapter-new-346151/
wagz
Well-Known Member
I just pulled the trigger. Picked up 2 of the Tanks from RuralKing for $132 delivered, the 1-1/2" valves form ebay $30 (link from first page) and a pair of those red orings. All is just under $86 each new conical. Cant wait til they arrive.
Firebat138
Well-Known Member
trying to decide if the legs are really needed... seems everyone builds them...
maussy
Active Member
Subscribed! Gonna build this one soon!
NachoDaddy707
Member
I skimmed through this thread trying to see if anyone had commented on the final beer coming out of these fermenters-sorry if I missed the answer to my question...
In the beginning there were some concerns about the grade of plastic used in these tanks. Has anybody had any issues with their final product? And has cleaning them been easy? Any scarring of the plastic inside that would potentially host some bacteria?
Seems like everyone is generally happy with these, I'm thinking about getting one
Huge improvement!! But it's hard to say its just the conical because I also did all three batches with new conical and cooling system.
Cleaning was a breeze. Just hosed it out. Made a small batch of oxyclean and swished it around, let it sit for 30 min while I cleaned other stuff, rinse, and ready for next batch.
The dump valve is also a big player. As soon as primary fermentation is done no transfer just dump.
I haven't sealed mine with an o ring and I don't think I will. No air lock. After my recent tour of a couple of the Trappist breweries I decided to go semi open fermentation for a while.
Noob question about this.. If I bought the parts to build including the 15 gal conical, how would i make 10 gal batches? I have a brewpot that is 8 gal. Would I do a concentrated boil and fill rest with water, or can I dump one batch and then brew another to add when its done? I am completely new to this as you can tell. If going the second with two separate batches, I assume I would throw yeast after each is boiled/cooled? I have all the equipment I need including chiller because I am determined to stay with the hobby, but i have never brewed because I close on a new house in a couple weeks and obviously will do my setup then. So when I say noob, I mean noooob! I guess my original plan was to brew 5 gal batches before seeing this thread. Could I still do 5 gal in 15 gal conical? Thanks in advance for any suggestion or info.
My bad. I reread the entire post and found my answers short of the yeast. But common sense tells me to pitch right away after each batch. I also see others didn't have an issue with the excess headspace from doing 5 gal batches in the 15 gal tank. Thanks anyways!
SleepyCreekBrews
Well-Known Member
Actually the model sold at spraysmarter is the same as that sold at USPlastics. Den Hartog is the parent company of Ace Roto-mold. Both meet FDA regulations upto 120 degrees (no ferm temps that high). I've been planning this project for several months so I'm rather confident everything is the cheapest I can find it and food safe.
Cleaning would require a PBW soak, rinse, starsan spraying.
this looks pretty attractive, but whats a PBW soak?
[edit] ...sorry, a quick search showed me Powdered Brewery Wash

noremorse1
Well-Known Member
Noob question about this.. If I bought the parts to build including the 15 gal conical, how would i make 10 gal batches? I have a brewpot that is 8 gal. Would I do a concentrated boil and fill rest with water, or can I dump one batch and then brew another to add when its done? I am completely new to this as you can tell. If going the second with two separate batches, I assume I would throw yeast after each is boiled/cooled? I have all the equipment I need including chiller because I am determined to stay with the hobby, but i have never brewed because I close on a new house in a couple weeks and obviously will do my setup then. So when I say noob, I mean noooob! I guess my original plan was to brew 5 gal batches before seeing this thread. Could I still do 5 gal in 15 gal conical? Thanks in advance for any suggestion or info.
You could do a concentrated boil and then top off with a few gallons of water. This what you would refer to as a "partial" boil. A lot of people starting off do this. It also helps to cool your wort to pitching temp when you put the gallon containers of water in the fridge overnight.
I made some great beer doing partial boils... but you get better results with a full boil. I would start out with partial and work up to full. For a 10 gallon batch, you are going to want to start your boil with about 12 gallons of wort or more. Hops and trub will suck up a bit of your wort and you will lose more in the conical fermenter. For that, you are best off with a 14-15 gallon kettle.
A lot of online stores are selling entry level kettles at 15 gallon volumes at a very reasonable price. Most all of them even have a port to mount a valve.
I would discourage you from doing 5 gallon batches in this big of a vessel. You will have 12 1/2 gallons of head space. That is a lot of O2 to displace. I would just use a 6 gallon food grade bucket fermenter or a carboy for my first few if that is the volume you are going for.
Good luck and keep us posted.
Firebat138
Well-Known Member
we are trying to find a couple of 35 gallon tanks... spray smarter only has 30 gallon... and a 35 with legs... but we are gonna build the legs... Tank-depot wants 150 bucks shipping.. lol... they have lost their mind... anyone have a link for another site...
wolfman_48442
Well-Known Member
Both SpraySmarter and RuralKing have the 40 gallon tank in 'Open Drain' and 'Full Drain' depending on the site.
The problem is they both list the part number of the NON full-drain model - IN0040-30. You want INFD40-30.
If one were to call them and found that they are indeed offering the INFD40-30, RuralKing might be a tad cheaper with the free shipping, but they're both pretty close.
Otherwise, like you've found, the other sites that do indeed offer the INFD40-30 want big bucks.
I accidentally bought the 60 gallon non-full drain because I couldn't find a full-drain version that didn't have those legs included. Is this a problem? Can I still use it? Can someone show me where I can buy a 60 gallon full drain tank?
Firebat138
Well-Known Member
is it necessary to SEAL these things?
jcorn
Well-Known Member
Firebat, to my understanding it is not necessary to completely seal this thing beyond the point of simply screwing the lid on tight UNLESS you plan to keep your batch in this thing for longer than 6 weeks or so. Some oxygen will get in over time but oxidation seems minimal from what I've read on here. My cap seals very tight so I do not see an issue. Its not tight enough to really need an airlock though in my personal opinion. Co2 pressure is allowed out during fermentation will the lid on tight. Just my opinion though...
wolfman_48442
Well-Known Member
Firebat, to my understanding it is not necessary to completely seal this thing beyond the point of simply screwing the lid on tight UNLESS you plan to keep your batch in this thing for longer than 6 weeks or so. Some oxygen will get in over time but oxidation seems minimal from what I've read on here. My cap seals very tight so I do not see an issue. Its not tight enough to really need an airlock though in my personal opinion. Co2 pressure is allowed out during fermentation will the lid on tight. Just my opinion though...
I pretty much agree with this, but I'd be careful of the hard time limit.
I would say you're fine until the CO2 blanket is gone. This can of course be a different time for different beer styles.
A sealed fermentor keeps the CO2 blanket longer, protecting your beer.
With an unsealed (essentially open) container, all kinds of bad things can happen once the CO2 layer is gone i.e. oxidation, spoilage, infiltration by an unwanted wild yeast, etc.
This is even more critical in lower gravity beers where there's just not enough alcohol to help preserve the beer.
oakgrovebrew
New Member
- Joined
- Sep 3, 2011
- Messages
- 3
- Reaction score
- 0
- Joined
- Jul 30, 2008
- Messages
- 660
- Reaction score
- 48
Firebat, to my understanding it is not necessary to completely seal this thing beyond the point of simply screwing the lid on tight UNLESS you plan to keep your batch in this thing for longer than 6 weeks or so. Some oxygen will get in over time but oxidation seems minimal from what I've read on here. My cap seals very tight so I do not see an issue. Its not tight enough to really need an airlock though in my personal opinion. Co2 pressure is allowed out during fermentation will the lid on tight. Just my opinion though...
Why risk it? I used a self-adhesive strip of door/window insulation, and wound it in a spiral for a couple of loops on the underside of the lid. It cost but a few dollars. Last night, sanitizing between batches, I had the thing out of its stand and upside down, with no leaking of the StarSan. It's a tighter seal than the Carboy Caps on my Better Bottles. It's cheap insurance against oxidation.
I would not bet on the CO2 "blanket". Gases diffuse. Even in an unventilated room, how long does it take for you to know if someone nearby stinks? The CO2 will diffuse from areas of greater concentration to areas of lesser concentration, and oxygen will do the same. If you don't want that to happen, don't bet against physics -- seal it!
I think all the breweries using open fermenters would disagree with you, but if you want to, more power to you.
allclene
Beer, What a beautiful thing
Personally, I feel it's a matter of preference. I seal mine just because I like the pressure buildup right before I rack it to the kegs. No more flat beers out of the fermentor that way. Others just leave it like it is with no airlock or anything and do just fine also so I've heard. So don't sweat the small stuff and do what makes you feel comfortable.
- Joined
- Jul 30, 2008
- Messages
- 660
- Reaction score
- 48
I think all the breweries using open fermenters would disagree with you, but if you want to, more power to you.
Disagree with what? My experience with my seal? The diffusion of gases? My understanding of physics? Perhaps my understanding of brewing biochemistry? I don't recall saying anything about using open fermenters. Those work, because of the Crabtree effect, for as long as you have a high sugar concentration in the wort. When the sugars are consumed, air exposure invites oxidation of your young beer. I don't like much acetaldehyde in my beer. Time in open primary before moving to a bright tank/secondary becomes quite important if you use an open primary. I'm not always free to move beer at the optimal time, so sealing out air becomes important to me. If you are reliably free to do so, more power to you.
Firebat138
Well-Known Member
any problem with doing all the valves in pvc... as long as we clean everything thoroughly...
allclene
Beer, What a beautiful thing
Firebat138 said:any problem with doing all the valves in pvc... as long as we clean everything thoroughly...
I've read through this hole thing and seems like people are using pvc with no problems. Just make sure it's cleaned well after each use. Don't use a scrubby on them or you will leave scratches for bacteria to hide in.
Hey folks,
Popular thread for my first post!
Anyways, I've now read through all 60(!) pages and am sold. I ordered my 15G from spraysmarter yesterday, and I see that it has shipped. I specified in the comment section of the order that I wanted the full drain model, so hopefully they get it right. After shipping, it was slightly cheaper than rural king ( I'm in Canada, so shipping was $44).
First off, I'm seeing people being pretty anal about most aspects of the build (which is good!), but I'm also seeing a lot of PVC being used in the pictures - for valves, yeast catchers, etc. A quick google turns up quotes like:
I'm wondering about plastic, because I should have ordered SS fittings when I ordered the tank. They're not as easy to find as I anticipated and shipping costs are pretty bad. I was going to use brass, since I read that you can treat it with peroxide and vinegar to get off excess lead, but then there was all that discussion about how nasty copper is during fermentation (and more here - http://www.howtobrew.com/appendices/appendixB.html). So brass is a no-go. Someone said to use either ss or plastic - what kind of plastic should I be looking for?
Now to add to the thread instead of simply leaching:
I had an idea while reading about the problem of shooting an air bubble up through your beer upon re-attaching your yeast catcher - why not just install a smaller valve on the bottom of the catcher that you leave open when you re-attach? That way, you open the main valve, and the air should(?) be forced out the bottom instead of rising to the top. Yes - you'll drip on the floor, but you'll keep the air out. And it seems simpler than trying to fill the catcher with C02 in advance.
Lastly, I've seen people in this thread working to get these things air-tight via silicone and weatherstripping. I came across this thread, which looks to me to be a simpler\"cleaner" solution, which I thing I'll implement - http://www.jimsbeerkit.co.uk/forum/viewtopic.php?f=6&t=38876&start=15 (pretty sweet fridge modification there too).
Cheers!
Popular thread for my first post!
Anyways, I've now read through all 60(!) pages and am sold. I ordered my 15G from spraysmarter yesterday, and I see that it has shipped. I specified in the comment section of the order that I wanted the full drain model, so hopefully they get it right. After shipping, it was slightly cheaper than rural king ( I'm in Canada, so shipping was $44).
First off, I'm seeing people being pretty anal about most aspects of the build (which is good!), but I'm also seeing a lot of PVC being used in the pictures - for valves, yeast catchers, etc. A quick google turns up quotes like:
To soften into its flexible form, manufacturers add plasticizers during production. Traces of these chemicals can leach out of PVC when in contact with foods. According to the National Institutes of Health, di-2-ethylhexyl phthalate (DEHP), commonly found in PVC, is a suspected human carcinogen. - http://www.care2.com/greenliving/which-plastics-are-safe.html
Is what I'm seeing in the pictures PVC, or is it some other type of food-safe plastic? Just looking for clarity.I'm wondering about plastic, because I should have ordered SS fittings when I ordered the tank. They're not as easy to find as I anticipated and shipping costs are pretty bad. I was going to use brass, since I read that you can treat it with peroxide and vinegar to get off excess lead, but then there was all that discussion about how nasty copper is during fermentation (and more here - http://www.howtobrew.com/appendices/appendixB.html). So brass is a no-go. Someone said to use either ss or plastic - what kind of plastic should I be looking for?
Now to add to the thread instead of simply leaching:
I had an idea while reading about the problem of shooting an air bubble up through your beer upon re-attaching your yeast catcher - why not just install a smaller valve on the bottom of the catcher that you leave open when you re-attach? That way, you open the main valve, and the air should(?) be forced out the bottom instead of rising to the top. Yes - you'll drip on the floor, but you'll keep the air out. And it seems simpler than trying to fill the catcher with C02 in advance.
Lastly, I've seen people in this thread working to get these things air-tight via silicone and weatherstripping. I came across this thread, which looks to me to be a simpler\"cleaner" solution, which I thing I'll implement - http://www.jimsbeerkit.co.uk/forum/viewtopic.php?f=6&t=38876&start=15 (pretty sweet fridge modification there too).
Cheers!
I can't read through 60 pages anytime soon. I just want to encourage OP's to update the first post often with relevant updates from subsequent pages; like contact info, mistakes and their corrections, links, etc. It would make the site a lot more helpful.
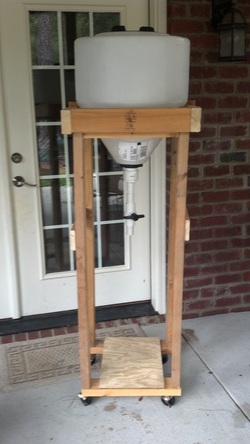
Here is my version of this. I used the 60 gallon model from Norweso as that was the easiest to get. I have since found a supplier for Ace tanks in Winnipeg, so I could replace these with full drain Ace tanks later if I wanted as they are about the same size. Until then I might have to disassemble the bulkhead fitting for cleaning.
Would not have thought of building the stand like that before I saw this thread. I have since added a 1x3 diagonal on each side and it is rock solid. I tested it with 45G water and I can give it a pretty good shove on any side and it doesn't budge. The outlet has a 2" NPT to 2" Tri-clamp adapter and a 2" butterfly valve.
Thanks for all the great ideas!
http://imgur.com/u7cCv
WPStrassburg
Well-Known Member
Here's my 15 gallon
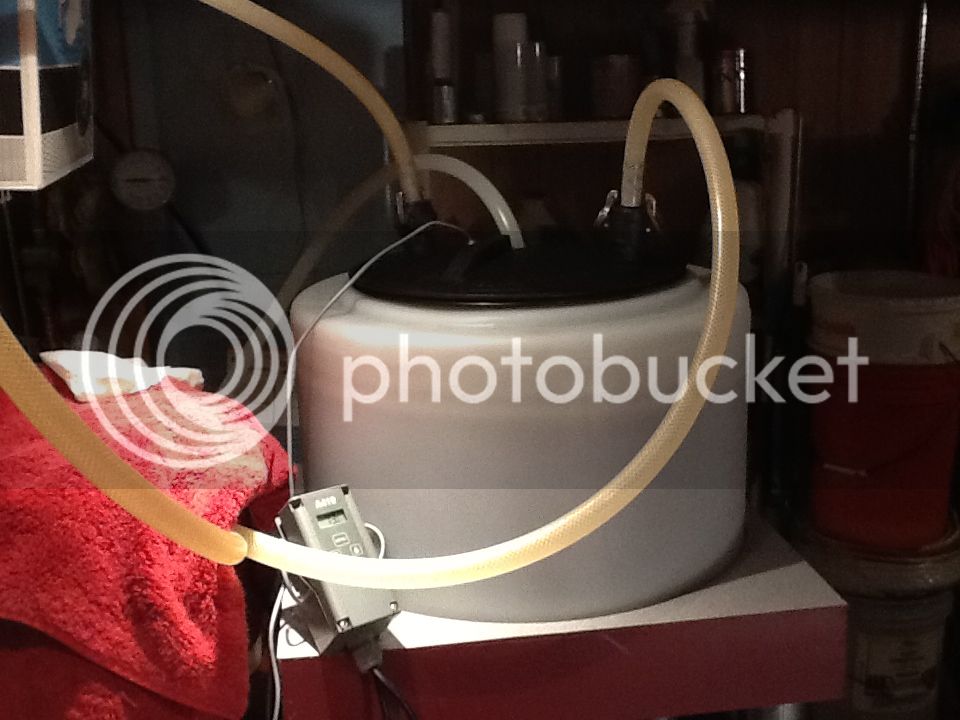
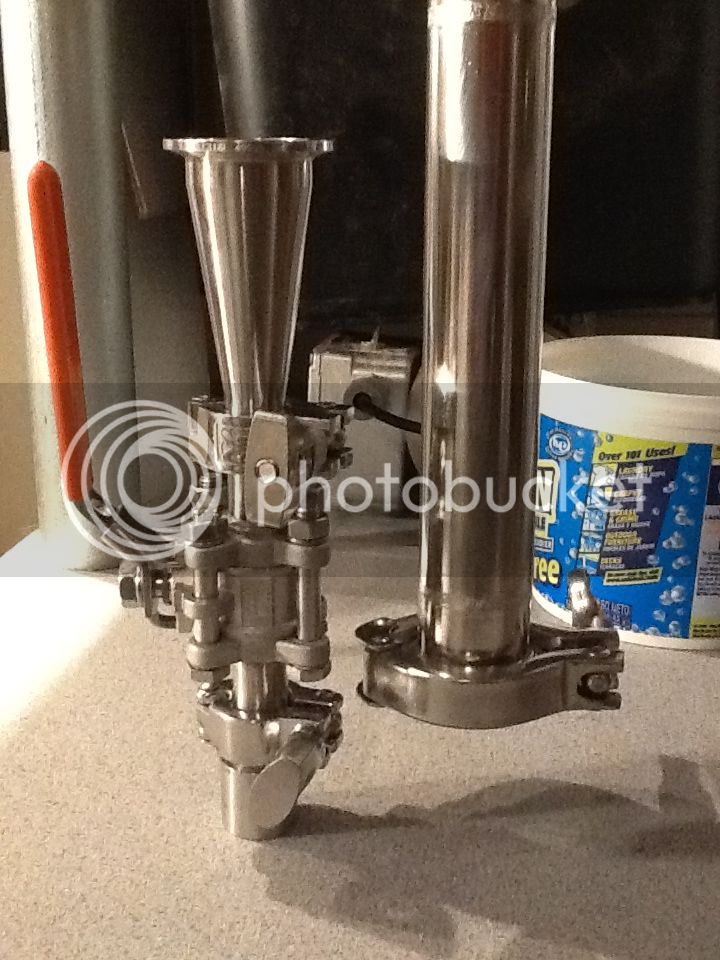
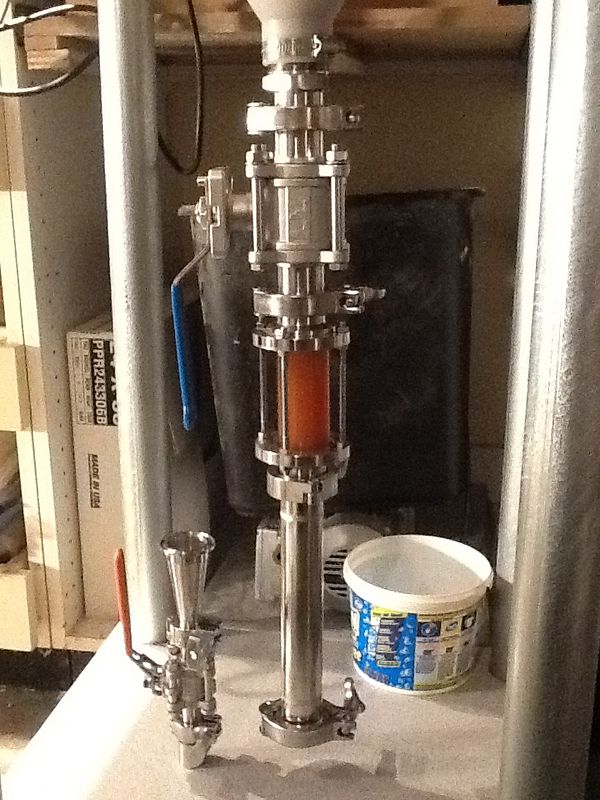
I have a 25' 3/8" stainless coil mounted to the top that heats and cools via a mag 3 aquarium pump that's controlled by a Johnson A419. I built the thermowell with a piece of 3/8" ss that I crimped and then silver soldered a slug into the bottom. Cutting the crimp off and sanding the end gave a nice solid end with a smooth finish instead of the crimp. I built the stand with 2" conduit and wood to give me the height for a 1.5" triclamp ball valve, sight glass reducer to 1/2", another ball valve, and cap. The second 1/2" valve lets me do trub dumps and more controlled yeast harvests. This batch I have pulled the reducer and valve after my first round of yeast drop and replaced it with a section of triclamp spool. This will give me a larger reservoir for the last of the yeast to collect where I'll top off the first round of harvested yeast.
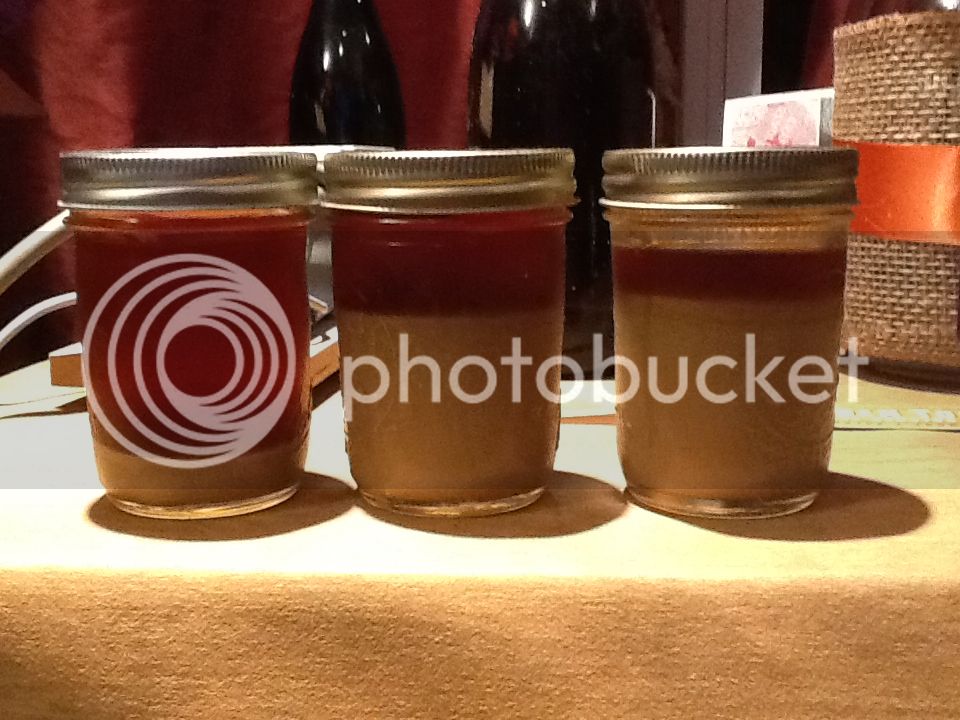
I have leaned not to fill the mason jars all the way right away as the last bit of fermentation will build pressure in the jars and can make a mess if it pushes any beer out while venting. I've left a bit of headspace and after a week drain a bit of beer off the yeast and top off with cooled boiled water to dilute the remaining beer and fill the jar to exclude any air.
Overall shot
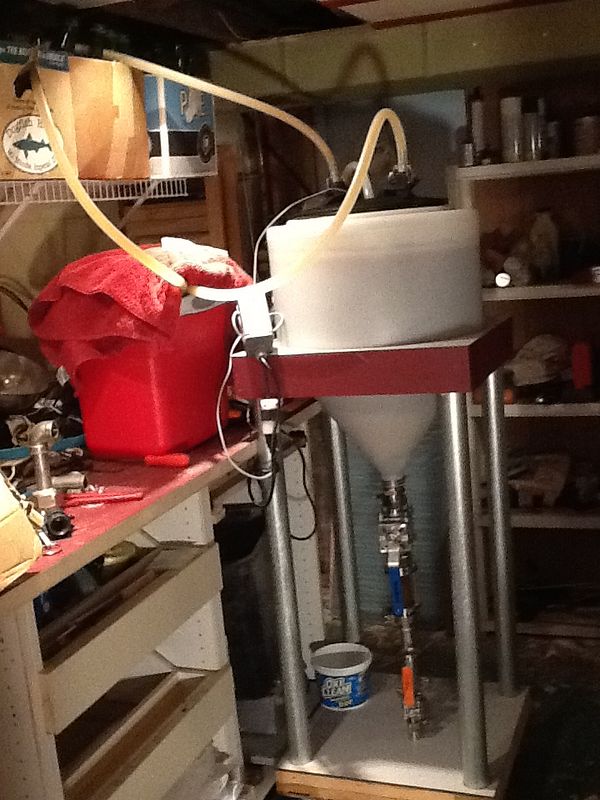
Coil connections, thermowell, and blowoff tube
reducer and 1/2" ball valve
Sightglass and collection spool
3 pint jars from first harvest
I have a 25' 3/8" stainless coil mounted to the top that heats and cools via a mag 3 aquarium pump that's controlled by a Johnson A419. I built the thermowell with a piece of 3/8" ss that I crimped and then silver soldered a slug into the bottom. Cutting the crimp off and sanding the end gave a nice solid end with a smooth finish instead of the crimp. I built the stand with 2" conduit and wood to give me the height for a 1.5" triclamp ball valve, sight glass reducer to 1/2", another ball valve, and cap. The second 1/2" valve lets me do trub dumps and more controlled yeast harvests. This batch I have pulled the reducer and valve after my first round of yeast drop and replaced it with a section of triclamp spool. This will give me a larger reservoir for the last of the yeast to collect where I'll top off the first round of harvested yeast.
I have leaned not to fill the mason jars all the way right away as the last bit of fermentation will build pressure in the jars and can make a mess if it pushes any beer out while venting. I've left a bit of headspace and after a week drain a bit of beer off the yeast and top off with cooled boiled water to dilute the remaining beer and fill the jar to exclude any air.
Overall shot
Coil connections, thermowell, and blowoff tube
reducer and 1/2" ball valve
Sightglass and collection spool
3 pint jars from first harvest
gruvn said:...I'm also seeing a lot of PVC being used in the pictures - for valves, yeast catchers, etc. ...A quick google turns up quotes like:
To soften into its flexible form, manufacturers add “plasticizers” during production. Traces of these chemicals can leach out of PVC when in contact with foods. According to the National Institutes of Health, di-2-ethylhexyl phthalate (DEHP), commonly found in PVC, is a suspected human carcinogen.... Is what I'm seeing in the pictures PVC, or is it some other type of food-safe plastic? Just looking for clarity.
In case anyone else is curious - i read a bit more and learned that schedules 40 & 80 PVC are rated for potable water as long as it's not hot. Since the tank isn't supposed to get hot either, there's really no reason you should't use PVC (CPVC is rated for hot potable water, but there's really no reason to use it here since the rig shouldn't get hot).
Anyway, my move to PVC was spurred on by 2 quotes I got on 1-1/2" single piece ball valve - 60$ and 80$. Forget that.
Doctor_Wily
Well-Known Member
- Joined
- May 7, 2011
- Messages
- 349
- Reaction score
- 33
wow, popular thread. loved reading all 60 pages of it....
anyway, posting for subscription and to say awesome. I want to build one of these soon....
edit: W00T, my 100th post!
anyway, posting for subscription and to say awesome. I want to build one of these soon....
edit: W00T, my 100th post!
Similar threads
- Replies
- 16
- Views
- 1K
- Replies
- 1
- Views
- 675
- Replies
- 7
- Views
- 569
- Replies
- 4
- Views
- 589
- Replies
- 0
- Views
- 425

Latest posts
-
-

-
-

-

-
-

-
 For Sale NJ-Selling all brewing equipment
- Latest: IslandLizard