ShooBrew 2.5 vessel hybrid RIMS/HERMS system

Homebrew Talk - Beer, Wine, Mead, & Cider Brewing Discussion Forum

Help Support Homebrew Talk - Beer, Wine, Mead, & Cider Brewing Discussion Forum:

This site may earn a commission from merchant affiliate links, including eBay, Amazon, and others.

shoo

Well-Known Member
Joined
Aug 14, 2017
Messages
93
Reaction score
28
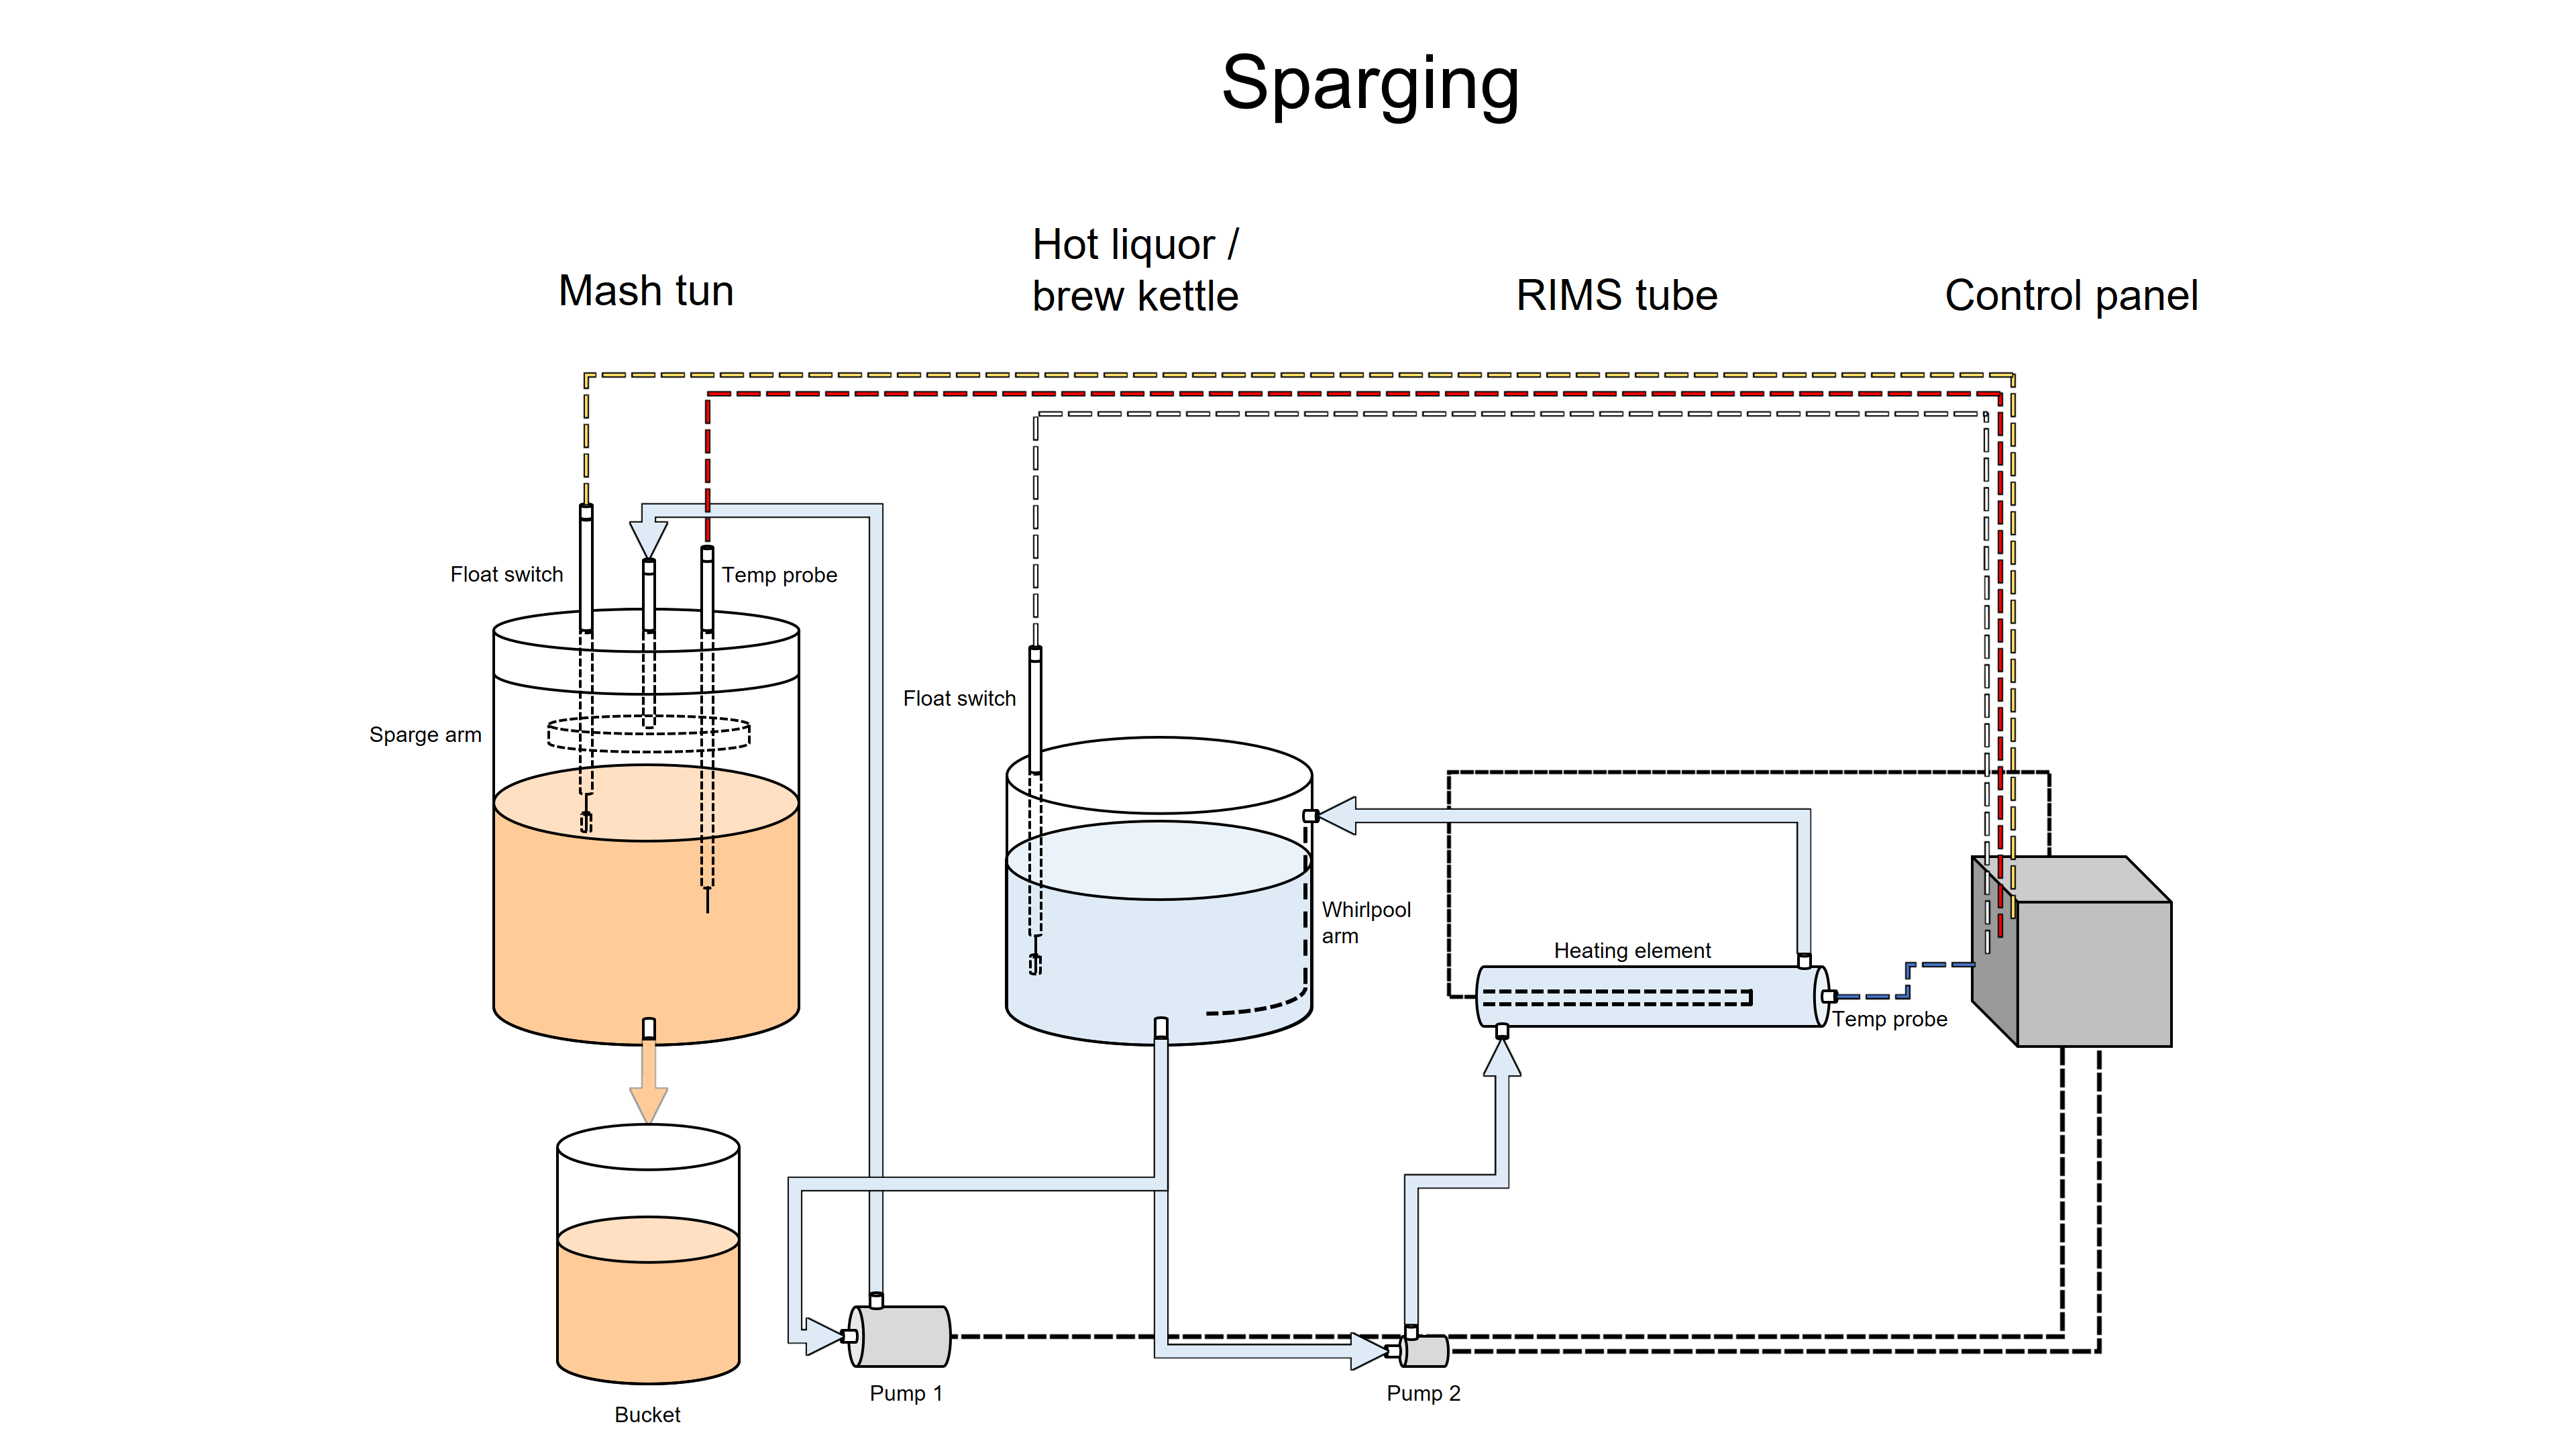
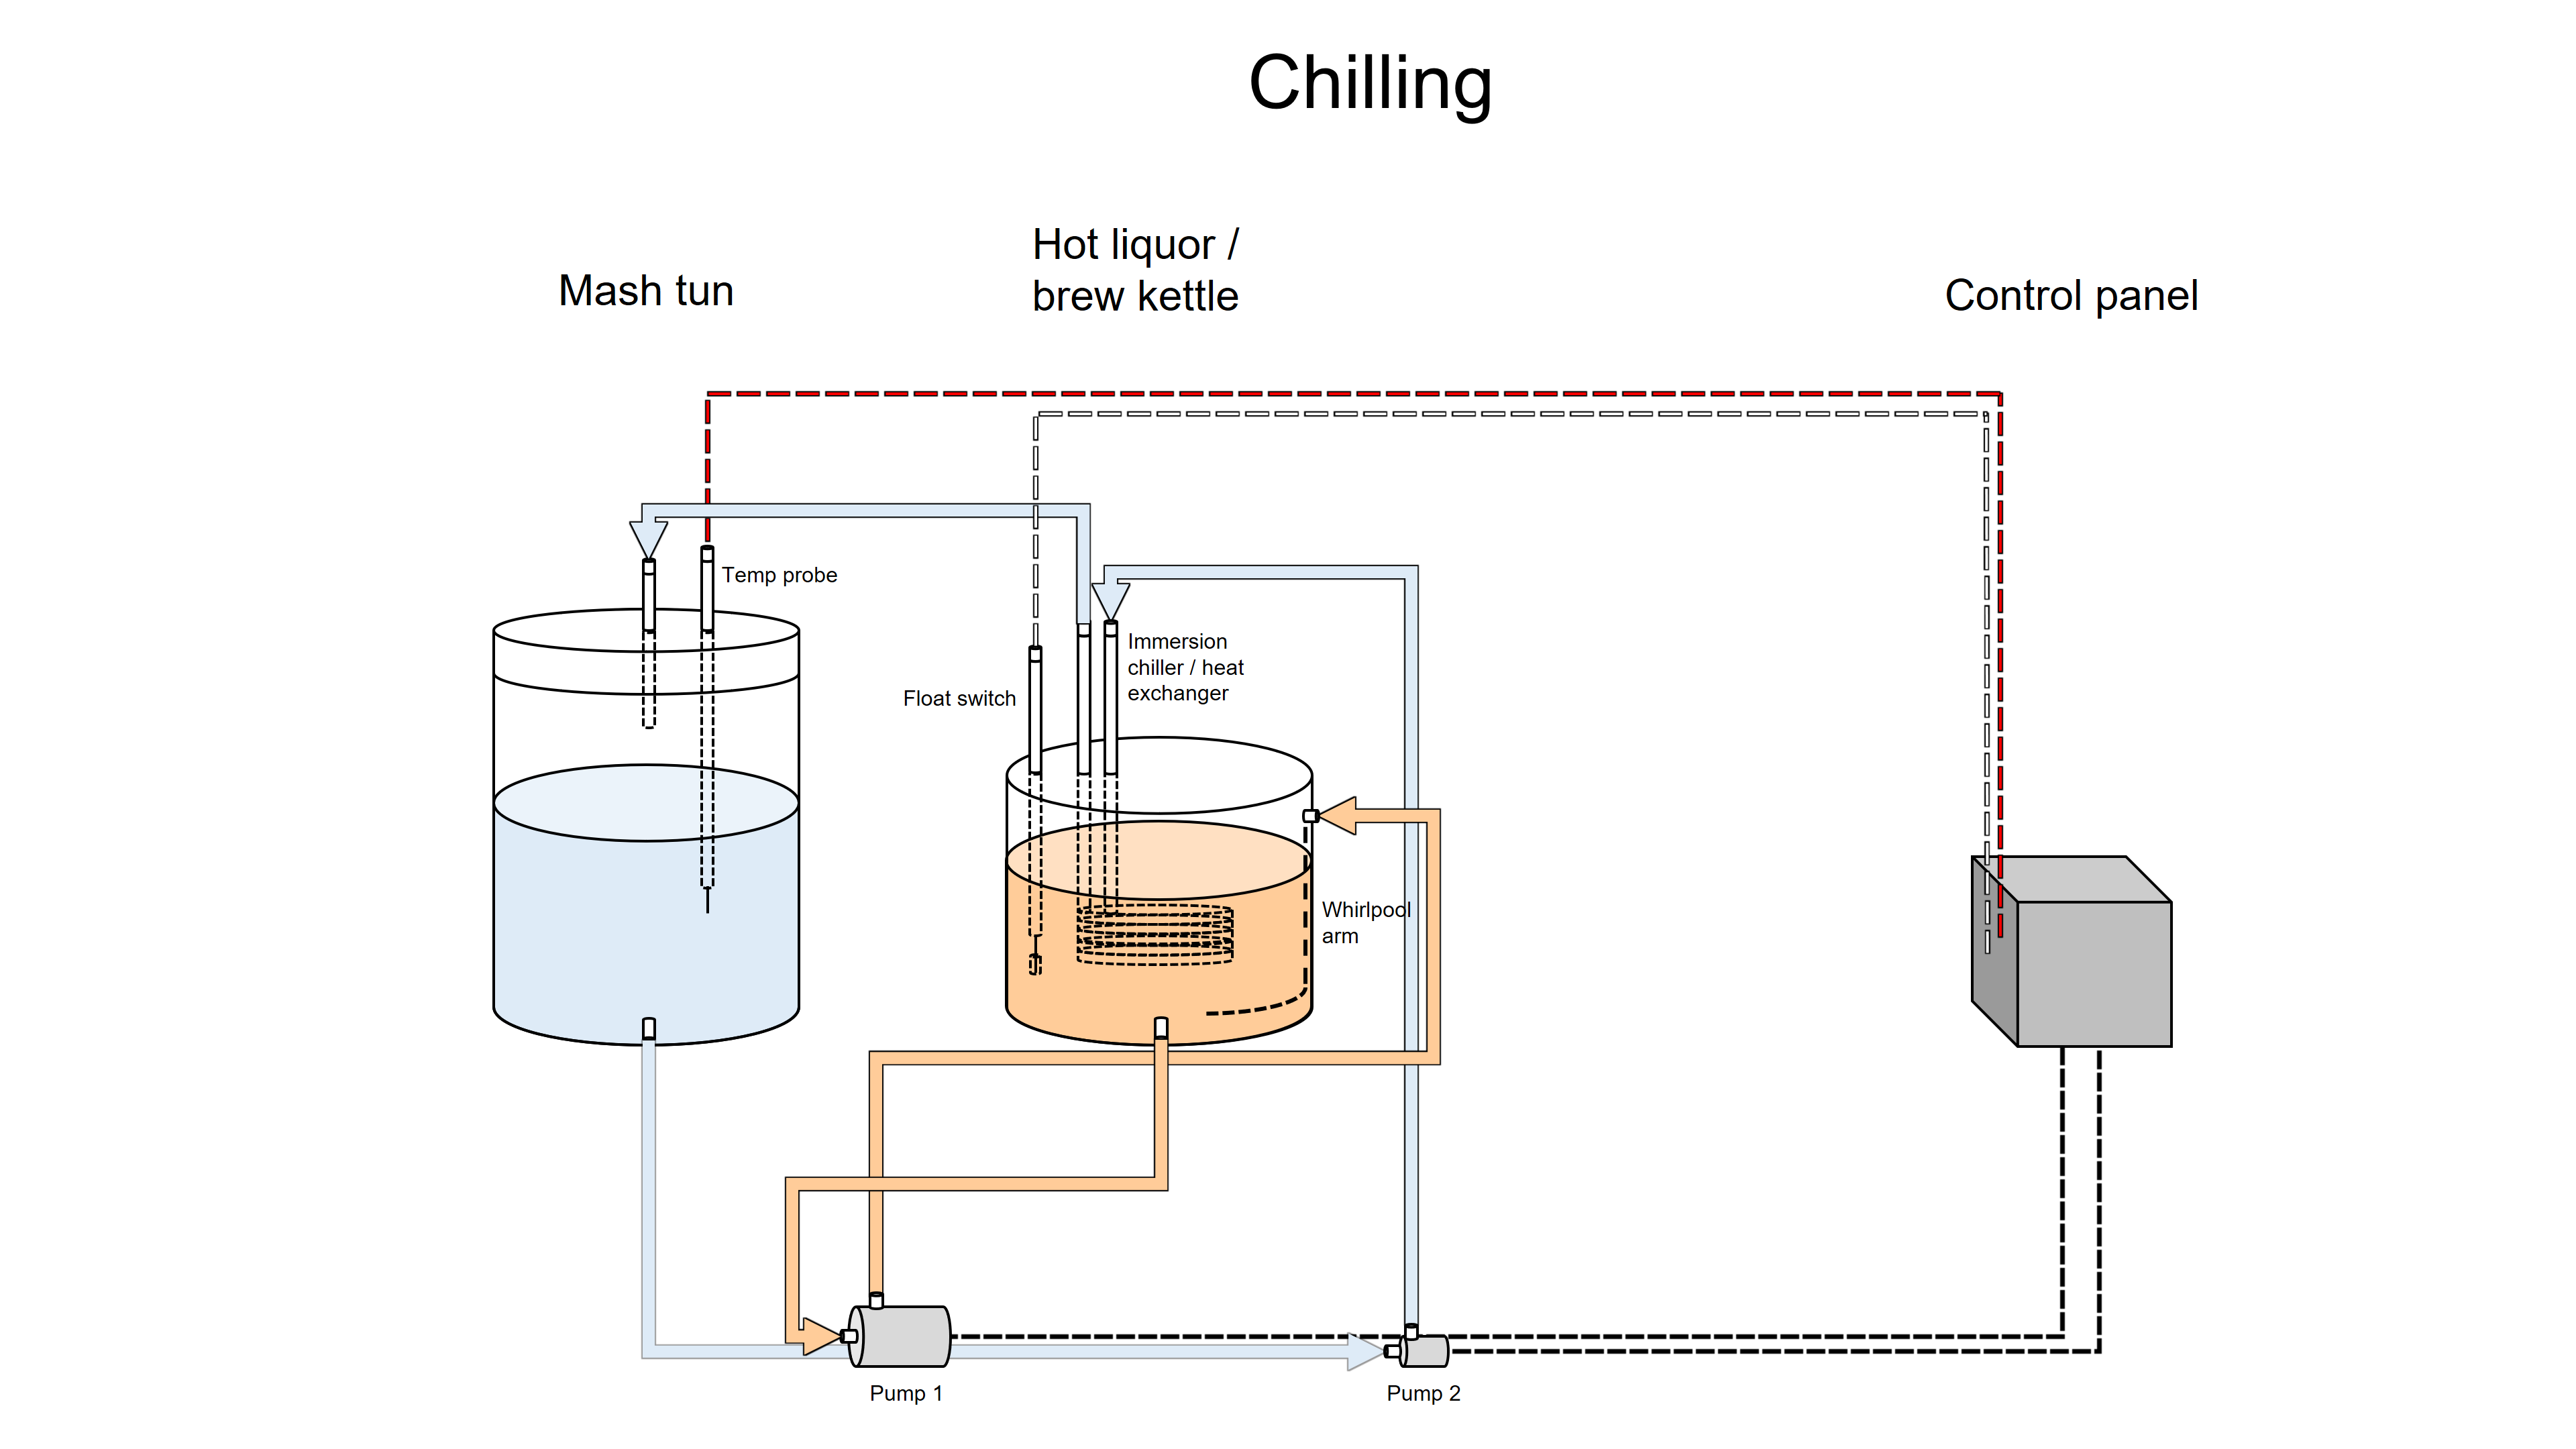
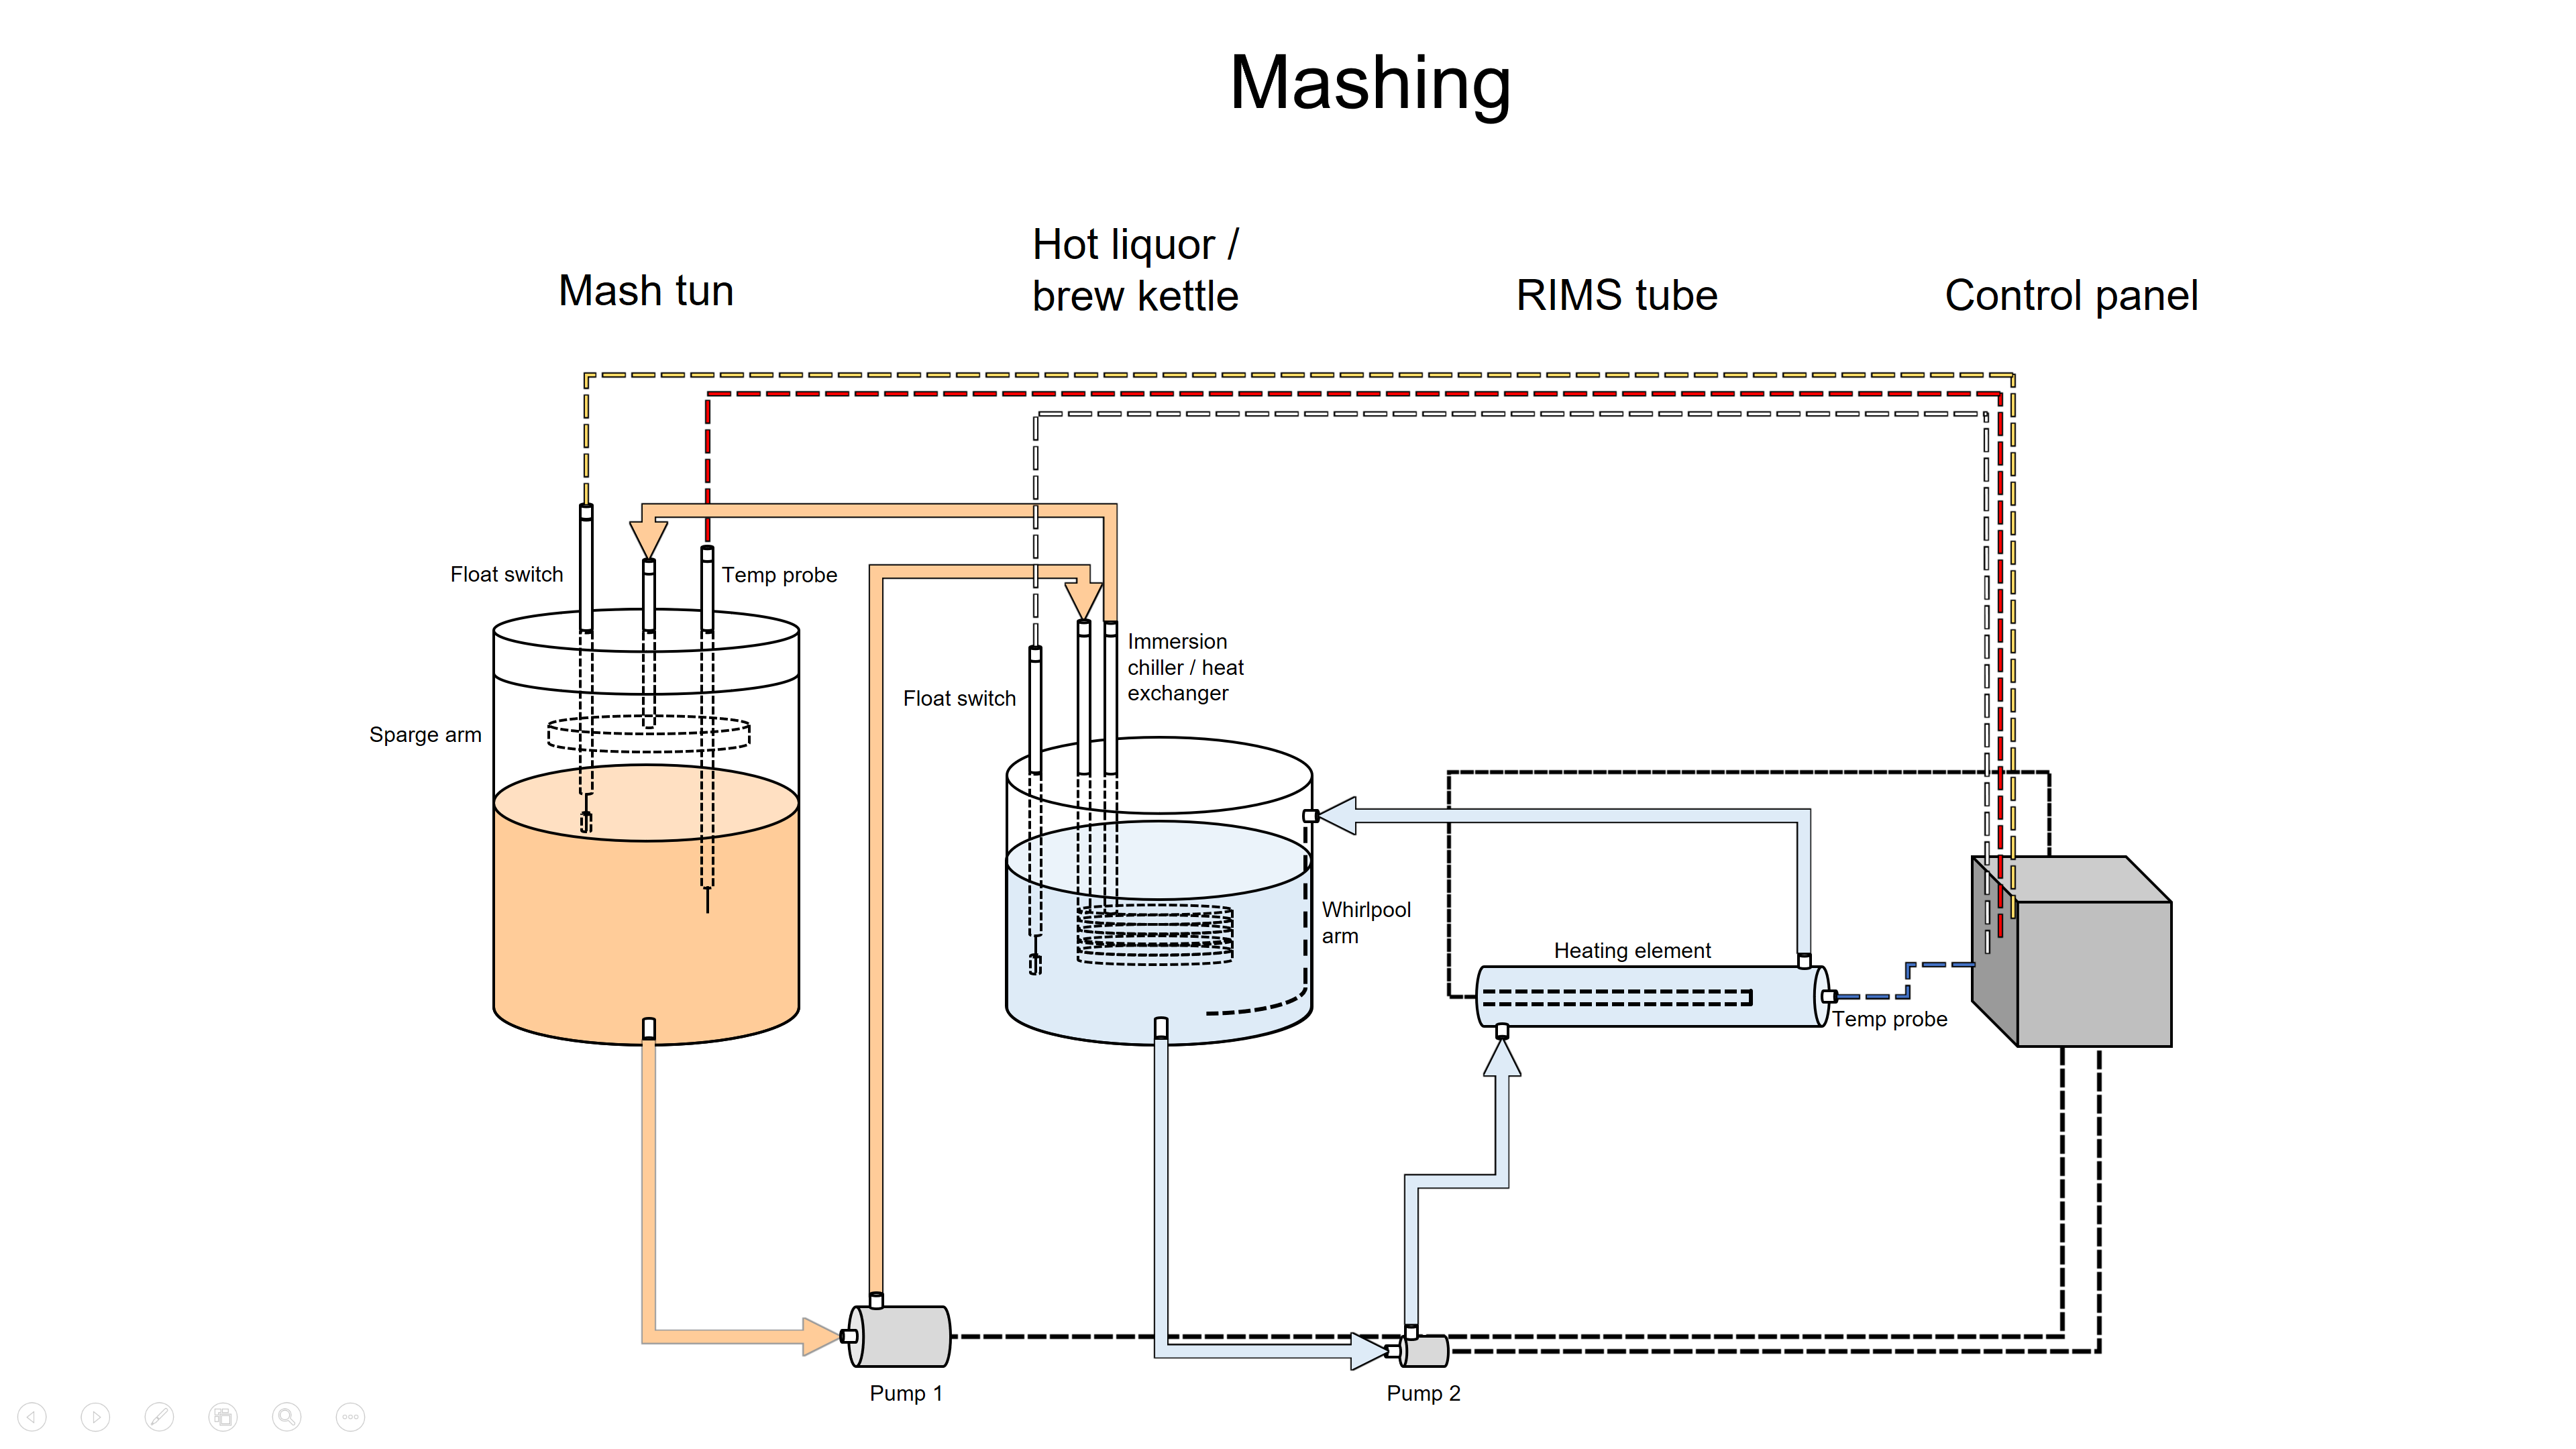
Finally got the build to a functional state, so time to show off a bit. At its core, it's a HERMS system, with a few twists. 1) Instead of heating the HLT with a dedicated element, it's heated with a RIMS tube. 2) Instead of heat exchange through a dedicated exchanger, I use a standard immersion coil chiller. 3) The heating element in the RIMS tube never comes into contact with anything except water, so it (almost) never has to be cleaned or could scorch if a pump fails, and 4) My HLT doubles as my BK, and sits on an electric stove for boiling and to make temperature ramps faster.

Instead of explaining it, better just to see it.

2DKDtYq.png

3GOWaZ9.png

irdkCWQ.png

koXzT3f.png


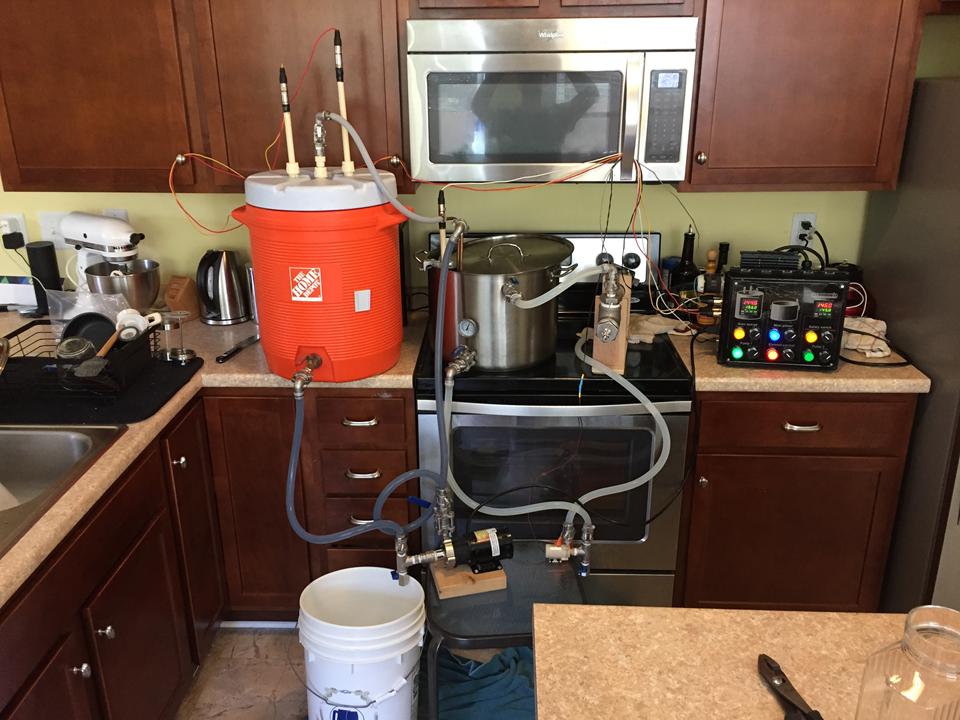
Finally, a picture of it all in action on my first brew with it all together yesterday. Next steps are to fix a few minor leaks and broken items and to build in some easier cord and pump management.
DLu3Vje.png


If there is interest, I may detail some of the build, particularly some of the more "interesting" DIY bits (the mash tun and control panel in particular are a bit outside the norm).
 
Why not put the heating element in the hlt/kettle?

A few reasons, most of them coming down to the RIMS tube + BK being useful for other non brew day stuff, and I like the cost savings associated with the increased versatility.

1) I want to be able to use a water heat / recirculation system of a lot of different things, including sous vide cooking, temperature control for souring, bread proofing, and all kinds of other stuff. Keeping the element out of the pot makes that easier, since I can then use the RIMS tube to circulate water through basically any vessel. More importantly, I can use my BK as the vessel, and don't have to worry about plastic bags touching elements, or having heavy stuff resting on top of elements. Keeps the BK open and clean for all kinds of other uses.

2) Circulating water helps keep even temps in a HLT. While I could definitely do that with an element in the pot, if I'm going to take water out of the HLT anyway, might as well run it through a RIMS tube and keep my kettle simpler.

3) I don't want to have to clean elements. If I used an element that was built-in, it would be in the wort during boil. The "standard" triclover setup would let me take out the element, but triclover fittings are expensive and usually require welding. I didn't want to do that.

4) If I decide HERMS sucks because it takes too long to ramp up temperatures, I can just go straight RIMS.

5) Easier to swap hoses to change configurations than swap in/out the elements.

6) Also improves portability and storage, as the slightly delicate element is permanently stored in a pipe, so I can haul it anywhere without worry about breaking/bending/whatevering it.
 
Thanks for posting it up. I agree with @thekraken and personally believe it is extra hardware which is unnecessary for brewing, but as you mentioned, you will use it for other purposes, so from that perspective it is interesting. Also, as we know, there are lots of ways to skin the old beer cat! Good luck and make some good beer!
 
Thanks for posting it up. I agree with @thekraken and personally believe it is extra hardware which is unnecessary for brewing, but as you mentioned, you will use it for other purposes, so from that perspective it is interesting. Also, as we know, there are lots of ways to skin the old beer cat! Good luck and make some good beer!

Oh yeah totally agreed that it doesn't add a whole lot to the brew process that regular old RIMS/HERMS doesn't already do, and it's definitely more complicated. Maybe saves some cleaning time and helps storage. Maybe. However, the hardware requirements would have been basically the same for the hybrid system vs. either RIMS or HERMS, so the non-brewing benefits make it very much worth it for me (and maybe for others in this forum).

In comparison with regular RIMS: The hybrid requires more hoses for sure. However, I save some money by making a RIMS tube that doesn't need to be cleaned (i.e. can skip triclover fittings). So the above system probably comes in at roughly the same costs.

In comparison with regular HERMS: Similar story here. The hybrid system requires more hoses (albeit only 1 more hose if you recirculate the HLT, or even no more hoses if you do that plus attach the pump directly to the RIMS tube), and have to buy RIMS tube pipes and bushings. However, you can save a bit of cash not having to make kettle fittings for the element.

It ends up being pretty similar cost-wise to DIY a regular RIMS or HERMS. Definitely more complicated in operation, but that's an inherent cost of versatility. Note: I could have saved a hose by attaching the RIMS tube directly to a pump. May still do this. Meh.
 
This is great and I applaud you for thinking out of the box to try to avoid the things you unfortunatly often hear are associated with rims giving it a bad rap. Please dont take this as any type of condescending negative remark because its not my intention. please think of it as constructive criticism and know Ive never used YOUR system so..

BUT TO ME and from my experience with both herms and rims. If your going to go through such lengths, costs and levels of complexity why not just build a rims that can heat directly without any chance of scorching and have the added simplicity and speed of rims?

I was concerned of the things you mentioned so I built my rims to flush completely clean with water after use just as your herms coil and if I want to open it up and inspect the element inside its done in 2 seconds via the 1" camlock(no expensive tri clovers here or hoses to move around) at one end holding it together... Theres zero chance of the element scorching due to the 36" long ULWD cartridge heater and temp probe 1/2" from the element end as well as a flow switch to kill power if flow stops which wasnt needed but cheap and easy to wire directly to the ssr for the $10-15 cost it added. Many people have build many types of rims that work great with no issues or problems and have the benefits so when I see someone got through such efforts to build around those non existent issues if implemented correctly and I know they could have built an even more effective system if the same though and energy was applied I just feel it needs to be mentioned my 2 cents and put my vote in that rims works great if done right for other still on the fence about what to build. I myself wasted a bunch of time and money on a herms because I too had heard all sorts of things that scared me away from rims at first.

Maybe its just the way im seeing it but This system requires one to build a rims AND a herms minus he element in the HLT... And then your still limited even more on speed and how to bring your HLT water up to sparge temp while recirculating and having the water in your HLT at mash temps.. I see higher build costs, more switching of hoses and no functional benefit unless im missing something? I see by the fact that your still heating with gas that your not thrilled with elements in your kettles so I see why you may go with this solution but im curious as to why if its not because of power limitations (which if your using the rims to heat the strike and sparge water should be a non issue) and if you have ever brewed on an electric system?
 
As mentioned previously, the primary motivations for this build had little to do with scorching, and had much more to do with versatility and (believe it or not) cost savings in my particular case (though I do think you are underplaying the risk of scorching and the costs associated with preventing it).

I don't have access to anything more than 120v (I rent). That doesn't leave me with much incentive to build an element into my HLT/BK, so a stovetop or other external heat source is required regardless. Stovetop + external element also makes ramp up times pretty quick (will measure next brew). And as mentioned previously, I also have other non brew day reasons to keep an element out of my BK.

The hardware costs are virtually the same for this build vs either standard RIMS or HERMS, as explained above in a previous post. Given what I already had on hand (immersion coil), I (probably) saved money doing it this way.

Also, the hoses don't switch very much at all, and it's the exact same number of hose switches for RIMS/HERMS. To switch from mashing to sparging, you change the input to pump 1 from the MT outlet to the HLT outlet. That's it. Dead simple.

Side note: what do you use for your flow switch? Been looking around, but all I see are flow meters, which would require something like an arduino to shut off my SSR. Was looking for something more binary on/off. I have a float switch that kills the element if the water level in the HLT gets too low, but a flow switch is even better.
 
Off the top of my head I'd say if you don't have wort flowing through the RIMS then don't worry about a float switch.

I used an arduino a flow meter like you mentioned. Like this http://www.astrocaver.com/rims/.

Flow/float switch is handy if I want to do things like overnight heating and don't want to worry about what happens if all my water evaporates away and/or my pump fails. Two examples: kettle souring for a few days at 115, where the "kettle" is a glass carboy placed inside the actual kettle with 115 water running in it through the external tube, or overnight sous vide. Note that you can't really do either of these if there's an element in the BK.

The 120V limitation is a big one justifying building this way. I don’t recall you mentioning that.

WRT flow switches, they are all over eBay and Amazon.

That's probably because I failed to mention it. WRT flow switches, would be nice to see what others have experience with in brewing, given temps and food safeness and whatnot. A lot (all?) of them say they are flow switches, but are actually flow meters.
 
Flow/float switch is handy if I want to do things like overnight heating and don't want to worry about what happens if all my water evaporates away and/or my pump fails. Two examples: kettle souring for a few days at 115, where the "kettle" is a glass carboy placed inside the actual kettle with 115 water running in it through the external tube, or overnight sous vide. Note that you can't really do either of these if there's an element in the BK.
You can do these things with a false bottom above the element.

https://www.brewhardware.com/product_p/biabbottom13.htm

Though a glass carboy might be a little heavy and dangerous, a smaller dia kettle might work better

A float switch should work in these instances too.

food safeness and whatnot.

I'm not sure that any of the floats or switches at the price point that we we homebrewers typically use aren't *strictly* food grade. That said I use a plastic flow meter anyway. I was mentioning to BrunDog last night that you could use a pressure sensor tee'd off of a liquid line to indirectly detect flow and use this as a flow switch and this wouldn't come in contact with the 'food'.

Since your liquid that flows through the RIMS doesn't come in contact with food or wort I suppose that it really shouldn't be a problem anyway..?
 
Flow/float switch is handy if I want to do things like overnight heating and don't want to worry about what happens if all my water evaporates away and/or my pump fails. Two examples: kettle souring for a few days at 115, where the "kettle" is a glass carboy placed inside the actual kettle with 115 water running in it through the external tube, or overnight sous vide. Note that you can't really do either of these if there's an element in the BK.


That's probably because I failed to mention it. WRT flow switches, would be nice to see what others have experience with in brewing, given temps and food safeness and whatnot. A lot (all?) of them say they are flow switches, but are actually flow meters.

when I types in "flow switch" in ebay the top results were all flow switches...
I use this one which was designed for grocery store misting systems apparently but the food grade plastic reed magnet needed to quick filing down with a file to allow more flow in my system, https://www.ebay.com/itm/Chrome-Mag...881157&hash=item233b067be3:g:LIgAAOSwtnpXjqun

In reality though if the temp probe is located right at the end of the rims element this is completely not needed... It was added by me before I realized I'm being paraniod after reading about all these rims scorching events on here including one of my own.I do like it because if I forget to turn it off the switch prevents any firing of the element.. It wasnt till later when I realized these are all due to poor implementation and there are a number of things that can be done to completely prevent it...

Im not underplaying it or the cost to prevent it... To make a cheap scorch free rims...
buy some 1" stainless pipe, nipple ,a couple tees and a 1" to 1/2 or 3/8" depending on diameter of cartridge heater compression fitting... buy the longest cartridge heater element you can find within reason which allows both longer contact time on each pass and lower watts per square inch. This will allow the element to gently heat of the wort as it passed through.
drill out the shoulder of the compression fitting to allow the element to pass into it to the base to make a water tight compression seal when mounting.

The last step is very important, Mount the temp probe so the tip is very close to the element tip without touching it.

a flow meter like this one is also very helpful because you will have less channeling, risk of plugged false bottom or pump (#1 source of rims problems) and better even heating with LESS flow than many people try to implement... 1.5-2.5 gallons per minute is the sweet spot (im usually around 1.8gpm). I use this one


https://www.ebay.com/itm/1-2-Female...197262?hash=item1c87d8810e:g:38wAAOSw8GtZOPLX

so your looking at about $100-$150 depending on if you want to get fancy and add camlock quick disconnects and sight glasses and such...
 
1) I want to be able to use a water heat / recirculation system of a lot of different things, including sous vide cooking, temperature control for souring, bread proofing

I'm curious, how do you plan to use it for bread proofing?
 
I'm curious, how do you plan to use it for bread proofing?

This is something I've already done (for the first proof, anyway). First proof happens in a large bowl in my usual bread process. All I had to do is set the bowl in the BK with the water level low enough that the bowl doesn't float.

Worked great! I did a side-by side dual batch and had one batch proof at room temp (70F in my case), and one in the proofing "chamber" at 80F. Noticeably faster/larger rise in the 80F one.

Second/third proof (post-shaping) could be done just by keeping the bread sheet above the water level by setting it on top of a pot or similar. The ambient temperature in the chamber basically matches the water temperature (tested alongside the above proofing test, as my BK thermometer is a bit high and in the air when the water levels are lower). Steam in the chamber could be beneficial or harmful depending on the bread, so definitely might have to figure out how to manage humidity in the chamber.

Re: Flow switches: Thanks all for the help with this! I'll probably make the flow switch a (small) task for the future as I fine-tune the system a bit.

Re: everything else: Got a whole lot of experimenting to do now that the build is working.

Experiment #1: Tonight! Sous vide steak. For science, doing a boneless ribeye and a NY strip side-by-side, 1.5 hours, 130F precisely for rarer side of medium rare.

Experiment #2: Lightning fast half batch spargeless no boil BIAB for a sour. The idea here is to do sub-2-hour all grain half or smaller batch for something for which bittering isn't important (like a sour). Since I have a precision temp water bath, all I need is smaller vessel (i.e. a pot) that fits inside either my existing brew kettle or a tub. I can do a half-batch mash in a bag inside those smaller vessel using muslin bag or nylon BIAB bag, pull the bag, raise the temperature to pasteurization (exactly 170, just below the point at which DMS forms), chill by circulating water through chiller in an ice bath, rack to carboy. Just a matter of if I have the right sized vessels to make it work. Magic of the external RIMS tube: I can use basically any vessel (like a large tub or brew bucket, for example) for the outer hot water vessel.

Experiment #3: The great NEIPA hopsperiment. The idea is similar to above. Because you don't need a whole lot of bittering in an NEIPA, you could feasibly skip the boil. But what if, instead of using one vessel to mash in, you used, say, 5-10 small vessels, with a muslin bag in each vessel with an identical grain bill. And each one gets its own oz or two of hops at a "hop stand" during a long pasteurization and a dry hop later. And instead of racking each one, just using each vessel as its own fermentor with improvised air locks. What you get: 5-10 exactly identical extremely small batch NEIPAs with the only difference being the hops used. (Note: I can also add bitterness here by doing a separate 60 minute boil and dosing each subvessel with the resulting bitter wort.)


Note that you can technically do all of the above with either a standard RIMS tube (though you still need a vessel for water circulation) or a false bottomed HLT (though you are limited with vessel sizes). Convinced yet?
 
Back
Top