fermentation chamber/workspace pics

Homebrew Talk - Beer, Wine, Mead, & Cider Brewing Discussion Forum

Help Support Homebrew Talk - Beer, Wine, Mead, & Cider Brewing Discussion Forum:

This site may earn a commission from merchant affiliate links, including eBay, Amazon, and others.

rebel_scum

Well-Known Member
Joined
Apr 12, 2014
Messages
63
Reaction score
11
hi all!

My first post here at HBT! I just competed my first extract brew (an irish stout) and I am struggling keeping it at a consistent temp, and I LOVE building stuff so...

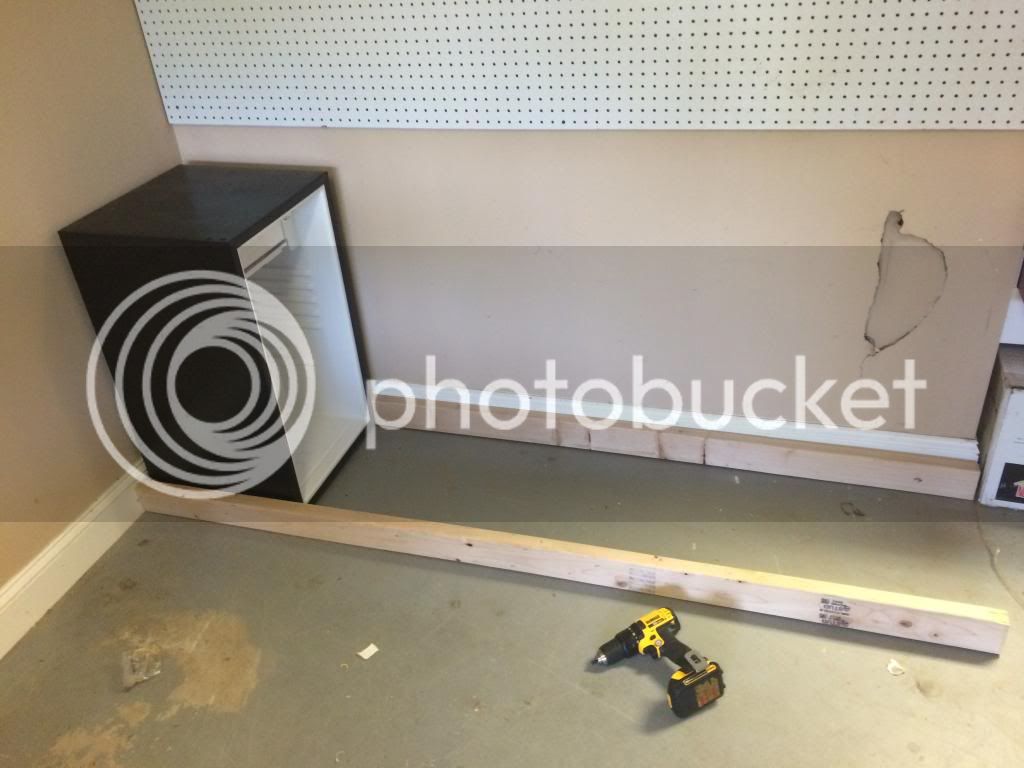
After browsing these forums for hours and hours, I decided to embark on a new addition to my garage!

Total cost of this project so far has been around $250 including the fridge, which is much better than freezing my arse off in my house which I cooled down to 66 degrees to keep the beer cold enough in the closet upstairs.

Hope you like, and any advice is certainly welcome. I am quite sure this will get terribly out of hand if my aquarium build is any indicator.

Here's my progress so far, with a couple of questions at the end.

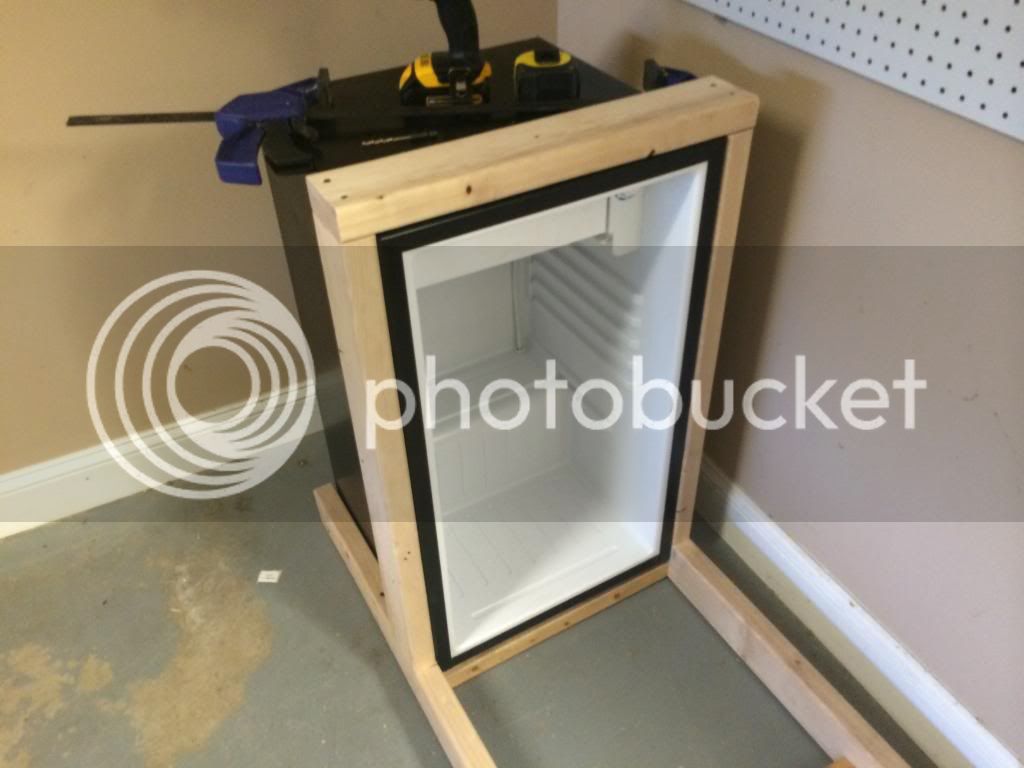
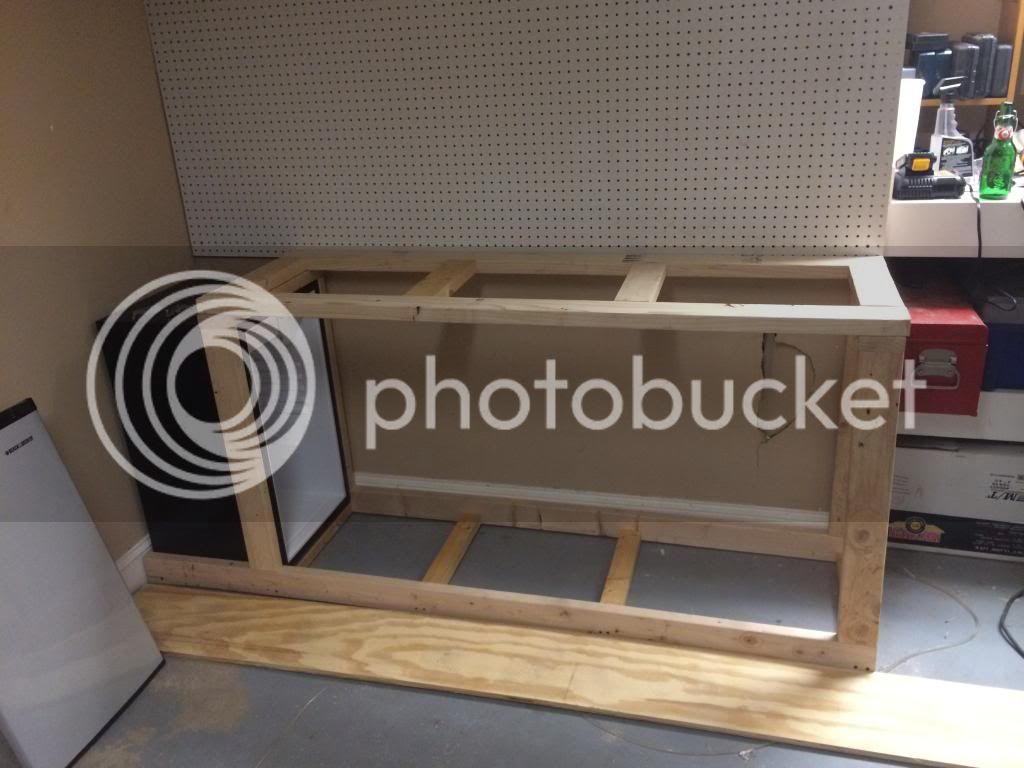
framing the mini fridge:


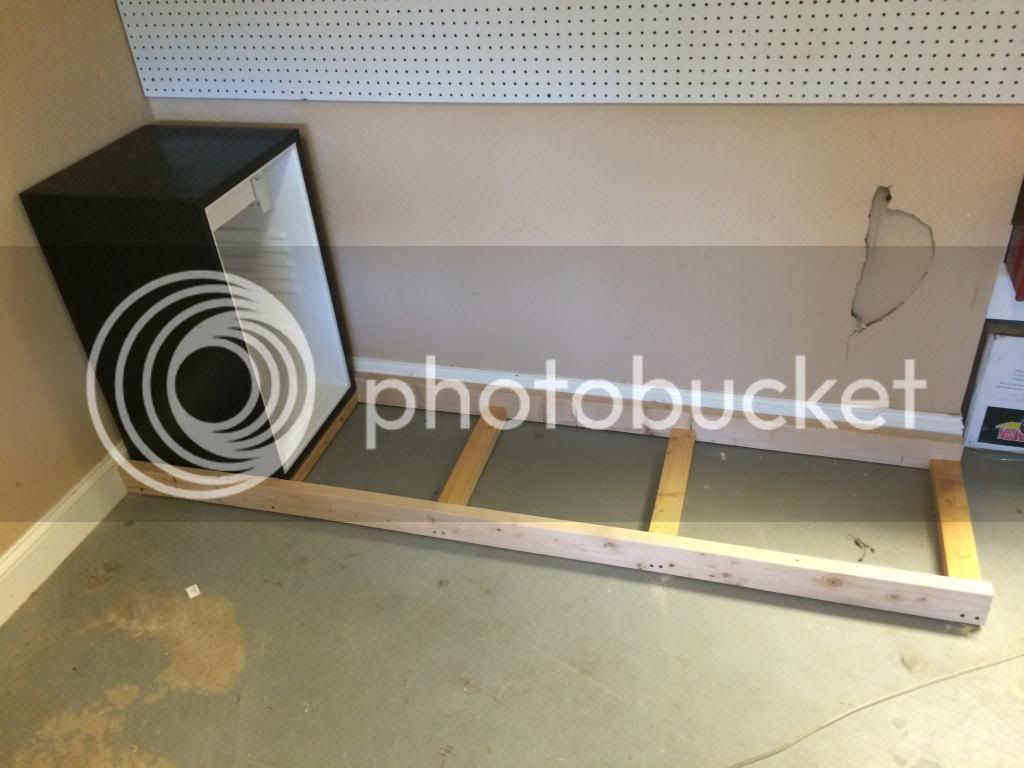
Added the end support:
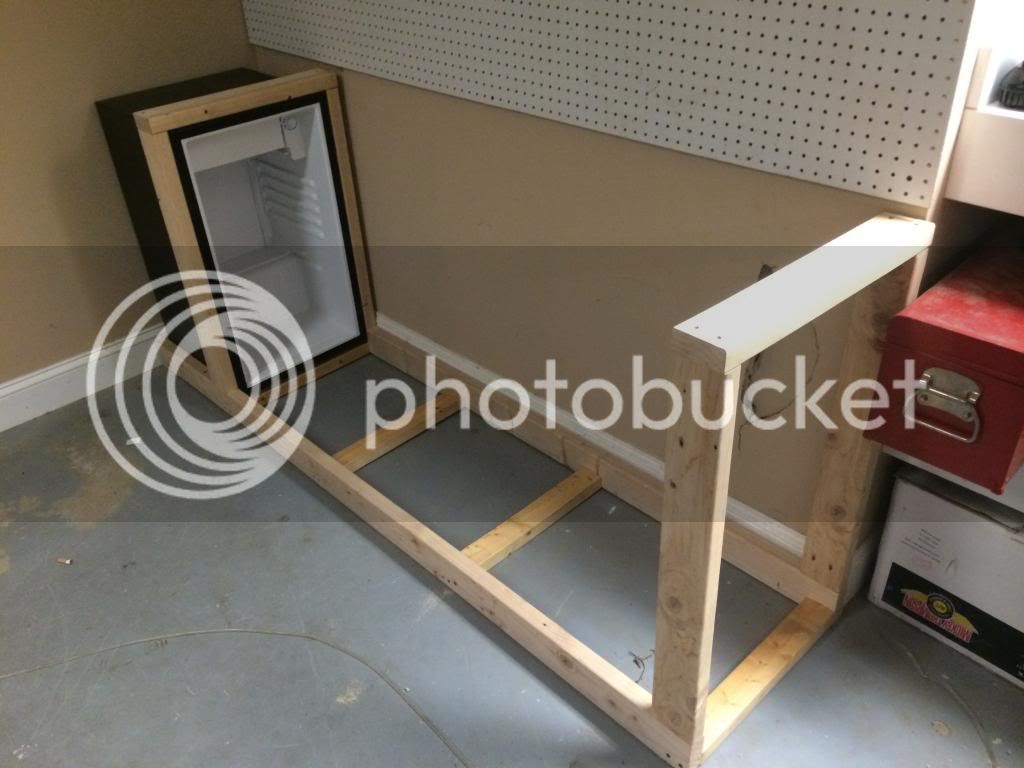

And the top:


Questions so far:

I have a 4x8 sheet of rigid foam insulation, R7.5 @ 1.5" thick. I intend to ply the bottom and cover it with FRP, would the insulation be better on the floor under the ply or should I ply the bottom and put the insulation on top between the ply and the FRP?

I am re-purposing the fridge door on the front of the cabinet, I would also like to add another door towards the end for easy access. any advice on getting a good seal on a wooden door?

Also any links to a good, small ceramic heater or similar for the winter months would be awesome. I will be using a 2 cycle temp controller for the cooling and the heating respectively.

Thanks in advance for any help you can give me!

Jeff
 
I would say the foam for the floor would need to go under the ply so it doesn't get torn up when moving things in and out.

As far as the seal goes I would trim the opening out on the inside so the trim overhangs the opening by about an inch. Then get some weather striping and place it all the way around on the trim, snug the wooden door to that with a sliding lock or something and that should keep a good seal.

hope that helps.

I was looking around the web and found this build which is exactly the same as the one you are taking on.
This may help http://www.nchomebrewing.com/diy-mini-fridge-beer-fermentation-chamber-build/
 
Thanks for the help!

I like the wooden door on that one- exactly what I need to do. I stole shamelessly from another post on here as well.

The bottom part is going to be covered in FRP plastic sheeting so no worries about sliding things around, my real question was whether or not the insulation would lose efficiency if I put it underneath the plywood bottom as opposed to sandwiched between the ply and the FRP. I don't imagine it should make a huge difference at the op temps I will be using though.

I made some good progress today actually, I'll post some pics if I am sober enough after mourning the lightning losing again. /sigh.

Thanks again!

Jeff
 
Looks nice!!! I use an aquarium heater in a bucket of water. It keeps my chamber warm even in the 20s in the garage.
 
Mine is similar. Out of probably laziness I never hinged the door. I just made it a tight fit using the foam insulation. Put two handles on it and pull it off and push it back on. The upper lip overhangs to keep it in place. After a little practice I can open and close with no problem.

As to heat. I don't know if this works for very cold areas but I use the reptile heating wrap around one carboy. Seems to do the trick. But this is calif, although the chamber is outside.

Also, one thing i had to retrofit. From your controller run two or three extension cords into the chamber. One for hot, one for cold, and one always on. That way you can always use multiple items for each cycle. For the always on one I power my stir plate for starters.

I also left some space behind the back of the fridge to make sure I had good ventilation. This was also because my whole chamber is enclosed, including the fridge. It's a side yard half height shed up against my house.
 
Thanks!

I had thought about aquarium heaters- I have quite a few lying around- good to know it works!

The fridge is going to remain exposed and a bit away from the wall to avoid ventilation problems- I had planned on building a small electronics box with the controller and possibly a stir plate that sits on the top.

Off to radio shack to get some stir plate stuff- thanks again for the replies!

Jeff
 
Added a frame for the fridge door, notched out for the hinge mounts:


Dry fit the door, it will line up better once the hinges are permanent:


back ply and top lined up to make sure everything is straight:


Working on the insulation today- tried to cut some last night with a utility knife and it wasn't working too well- gonna try the table saw today.
 
Got crackin on this thing yesterday and this morning!

Insulated the top and back wall:


Dry fit the front ply, and installed the door- I dremeled out 2 slots for the factory hinges to slide through from the 2x4s so the door stays flush:


Insulated the front side and cut a hole for door #2, I wound up cutting all the 1.5" insulation with my table saw and a super sharp diablo blade. I adjusted to a 10 degree miter when I cut the door insulation to make the door fit easier:


Here's the front with the door installed and the cutout pushed back in the second doorway:


Lastly I cut some thin metal strips to surround the door frame so the gasket would stick. I still need to adhere these and clamp them down:


Anyone know a good adhesive to get that aluminum to stick to the wood around the door? I tried liquid nails silicone adhesive with no luck.

Will start on the FRP panels here shortly and update again soon :)

Jeff
 
Wow man Heck Yes this thing Rocks :rockin: I am hoping to build something very similar. I know Elmers just came out with some kind of glue that sticks to anything. I listen to sports talk radio and they have a commercial every morning for the stuff. They say it works on Wood, Metal, Stone and glass. Might be something to check out.

Keep the updates coming man it looks Great. Do you have a material list and cost by chance? I know you said $250 but I know other things come up so was wondering once it is all said and done what your total price is.
 
+1 on materials cost.

This looks great, have subbed and love the pictures, think it looks great. Really want to do one myself, but need to get rid of a project truck in my garage that's only taking up brew space. Nice work and cheers!
 
Anyone know a good adhesive to get that aluminum to stick to the wood around the door? I tried liquid nails silicone adhesive with no luck.
Jeff

Try construction adhesive. It's a very aggressive bond, but the metal must be totally clean of any oily residue.
 
Does your door from the fridge have a magnetic seal on it?
I ask 'cause you could use thin galvanized steel around the opening, and utilize the existing door seal.
Whatever you decided to glue, ( aluminum or steel), clean it first, with some lacquer thinner or acetone, scuff the adhesion side WELL, ( 80 grit is ideal!), and then apply your adhesive.
You can also tack it in place with some small head nails, ( and leave them there),whilst your glue dries, and also for extra holding power.
 
Thanks for the compliments and advice!

Total cost is up around $380 now... That includes an ST-1000 build and parts to incorporate a stir plate (thermal take fan, magnets, hardware), 2 sheets of R7.5 insulation (1.5 in thick), the mini fridge ($129 new), all the ply and 2x4s, a sheet of FRP, and another 80 or so for some cosmetic stuff I picked up yesterday at HD.

If you sourced the fridge, used OSB instead of ply, and eliminated the stir plate mod and cosmetic stuff I would imagine you could keep it well under $300 pretty easily.

I will post a total parts list and cost eval once i button everything up, and split it up between needed and optional stuff for the bare bones type folks. I tend to go overboard on any project I get going on lol.

I will check out some of that Elmer's and construction adhesive for sure. I didn't clean or scuff the metal before trying the liquid nails either. I have a tube of loctite construction adhesive but it's the kind that won't melt the insulation... Wonder if that would work?

Thanks again for all the views and help!

Jeff
 
Yeah sorry- the original fridge door has a magenetic gasket.

I bought a long strip of "u" shaped metal at home depot the exact width of the 1/2 inch ply with the intent of framing the door opening from the get go.


Only problem I had was at first I tried to use liquid nails to attach it to the door opening, and it wouldn't hold. the construction adhesive I had bought to glue the FRP to the insulation worked great though (after I scuffed it real good with 80G), and this is what I ended up with:


Gasket sticks really well except for a 1" long gap about 1/16" at the very top corner.

Worked on it a bit more tonight but I ran out of FRP :(

I only have the very end left to cover so I may just use some leftover ply and paint it white to match the FRP, as its like 40 bucks for a 4x8 sheet and they don't have anything smaller. melamine is an option as well.

More pics incoming in a few!

Jeff
 
Got all the insulation cut and installed and taped off the seams:


This is a pic of the planks for the front and side, got them on sale for $3.50 per 8 foot length:


And the FRP installed on the back panel:


I hope to get the whole thing finished and ready for the pretty stuff tomorrow- one more trip to HD should do it. The STC and the stir plate stuff should be here this week, I am going to build a wooden box to get all that wired up and mount it on top of the exposed fridge top on the left end here:


Cant wait to get back to brewing!

Jeff

Jeff
 
Got some more stuff done-

competed the ply on the outside:


Started the electronics box:


Neato plug I found with 2 USB outputs for the fans inside the box:


Dry fitting the tongue and groove planks:


Installed the planks and finished the other door:


One coat of red mahogany stain, the door has a second coat and is what the rest will look like when done:


Wired up the STC, will be adding a stir plate eventually:


And this is where it lives:


More to come tomorrow I hope!

Jeff
 
haha thanks wingnut!

I measured it out and it will hold 5 big mouth bubbler carboys with some room to spare. Hoping it will hold temp well enough to do some lagers but we shall see- its kinda big.

Jeff
 
ImageUploadedByHome Brew1399003212.806348.jpg

Worked on the project box today

Waiting on the flask to arrive to measure it all out.


Sent from my iPhone using Home Brew
 
Looks pretty slick! My only concern would be if the small refer system intended for cooling the enclosed mini fridge will be up to the task of cooling that whole chamber without killing the compressor prematurely. I believe most of the way the mini fridges work is coolant going through plate coils in the walls, not just the freezer box. Will you have fans to circulate the air I assume from previous posts?
 
Yeah I actually had the same thought.

I installed two 120 mm fans blowing straight out from the freezer part of the mini fridge, I'm hoping that the combination of that and the r7.5 insulation will do the trick.

It should be operational within the next couple of days- I will start at 65 degrees or so and keep an eye on the compressor times.

Fingers crossed!

Jeff


Sent from my iPhone using Home Brew
 
Looks awesome.... I just saw this post...... I would like to know if the fridge is up to the challenge of cooling a larger space than it was designed for....and not run extended periods of time. How many additional cubic feet did you make?


Sent from my iPhone using Home Brew
 
Interior dimensions are 5'x 2.5'x 1.5'

So about 18.5 plus the fridge at 3.2 would be 21.7.

The walls are all 3/5" ply with a layer of 1.5" r7.5 rigid foam and covered with a layer of frp, which I sealed up with caulk.

Jeff


Sent from my iPhone using Home Brew
 
Wrapped it all up today-

Finished the electronics box with the built in stir plate- got a good vortex at the lowest speed:


Plugged it in and set it for 65 degrees (18.3 celcius). it started at 24 degrees and got down to temp in about 15 minutes, after that the compressor was kicking on about once an hour unless I opened the door. variance is set for .5 degrees and compressor delay at 3 min :


Final coat of gloss lacquer- I love that stuff!


and all my stuff hanging up neat and all:


That's a wrap! Thanks for all the help and advice-starting a mini fridge kegerator (about 1/3 that size) to match it here shortly...

Jeff
 
Damn dude!!!! I would put a patten on that. Look all pro and stuff. Plexie glass for the fan and all. build me one.....
Great job for real though man that thing looks tough.
 
Thanks for the kind words!

Forgot to give a cost rundown, in case anyone needs it:

fermentation chamber cost breakdown:


Mini Fridge: $129 new- Black and Decker 3.2 cu foot (wal mart)

2x4's: (5) 8 foot length: $15

Plywood sheets: (2) 4x8 foot 5/8": $66 <can sub OSB easily @ $30> (HD)

R 7.5 insulation (1.5" thick): 2 4x8 sheets: $46 (HD)

FRP: (2) 4x8 sheets: $60 (Lowes)

Pine Tongue and groove siding: (10) 5/8" x 4" x 8' $35 (HD)

Trim for the top: (2) 1x1 "L" shaped pine: $11 (HD)

Thermaltake 120mm fans: (3) $60 (amazon)

Regular 110v outlets: (2) $8 (HD)

110v outlet with 2 USB outputs: $22 (HD)

STC 1000: $18 (amazon)

1 qt cabot red mahogany stain: $9 (lowes)

1qt minwax high gloss lacquer: $14 (HD)

14g power tool replacement cord (for wires) $12 (HD)

Adhesives (liquid nails insulation safe adhesive, silicone caulk, and epoxy) $10

Random screws, switches, and hardware: ~$30


Used a table saw, miter saw, dremel, jigsaw, and router for the majority of work


Total project cost: $545 ( could easily save ~$175 by sourcing a fridge, using OSB, and omitting the FRP, and another $46 if you don't want the aesthetic trim- bare bones cost would be ~$250)
 
Great build! I love the temp controller/stir plate combo.

Sent from my KFSOWI using Home Brew mobile app
 
Any reason not to build something like this, and use it as a brew stand for a 3 vessel converted keggle kal clone HERMS system on top? Seems like the perfect space efficient idea.
 
Been upgrading my workspace a bit lately- here's some pics:

Added a kettle stand with propane tank storage:


which lives here:


Also added a sink with some additional workspace:


Here's the brew corner altogether:


Still need to hang a bit more pegboard and stain the sink but it seems to be coming together nicely! Just wish I had a bigger garage :)

Working on a mini fridge 6 tap kegerator now- ill link the build thread in a bit.

Jeff
 
How has the mini fridge been handling the extra area to cool? Does it constantly run or does the whole system keep a consistent temp with all that insulation once it gets to temp?
 
I generally have it between 65 and 74 degrees for fermentation purposes, and at those temps the compressor only kicks on two to three times a day, which is not much at all.
I cleared it out a couple weeks ago and cold crashed 5 gallons of California common at 38 for two days and it seemed to be running pretty constantly, although it did get the temp down to 36 for those purposes.
Judging by that, I don't think it is capable of lagering due to the size, but for normal ale fermentations and occasionally cold crashing it seems to be pretty solid.

The kegerator I am currently working on is very similar to this build but about 1/3 the size with a bit larger mini fridge, and I am pretty concerned about its compressor. it will be running at around 45 degrees:


Jeff
 

Latest posts

Back
Top