
Atlmustang
Well-Known Member
- Joined
- Mar 15, 2016
- Messages
- 229
- Reaction score
- 63
Hello fellow homebrewers!
I did a mega brew day yesterday. I combined brewing and building all in one day. In the time it took for me to mash, I was able to build an awesome new addition to my ever expanding homebrew operation. I am a CPA, so naturally I am in tune with not only brewing beer as my hobby, but how can I also cut costs per batch? Obviously grains, hops and yeast are the biggest variable costs, but I was struggling with ice baths. I hated spending $8-10 a batch on 40 pounds of ice. I tried cooling my kettle down by itself and splitting the batch into two smaller stock pots to decrease the volume being cooled, but neither used less ice. Money just melting away.
I knew about immersion chillers (AKA Wort chillers), but I brew in my kitchen and my sink doesn't have a traditional hose connection (fancy faucets!) and the thought of running water for 45-60 minutes through the chiller down the drain seemed like a huge waste of water. I don't pay for my water here as it is included in my HOA, but I don't want to be wasteful.
But what if I could combine an ice bath and immersion chilling using a pump and recycling the water through the system? Well...that's what I set out to accomplish. Here's how:
Items required:
1). 20' of 3/8 OD copper tubing (My HD only had 20' or 50') - $28
2). 10' of clear vinyl tubing 1/2" ID or any length to fit your needs - $4.50
3). 1 290 GPH Pond Pump (You could get away with 140 GPH) - $39
4). 3 Hose clamps - $3
5). 1 Cylindrical object such as a corny keg or small stockpot as long as it fits into your kettle
Total cost: $74.50

Step 1: Take your coil of copper tubing and work out the end. Lay your keg or cylinder on it's side and start working the coil around the object.

Step 2: Once you have wound up the entire spool around your cylindrical object, remove the object from the center and stand the spool up and go ahead and work the coils out to your desired distance between coils. You will want a little room between coils as you don't want them touching. If you allow them to touch you are reducing surface area of wort they touch and you'll have a harder time trying to cool the coils if they are working off each others heat.


Step 3: Be very careful here! Some immersion chillers have their in/out imputs at 90 degree angles at the top of the coil, which makes it look a bit more professional, but I am going for function over form and I have $28 invested in a copper tube and I am not risking a kink. I chose to not test angles and worked the copper into form without rigid angles. I started at the top coil and worked it out straight and then formed it up and out. Then, I straightened out the bottom coil to however much I thought I'd need to come up the coil and out parallel to the top in spout. It wasn't hard to work with the copper, but just take your time and don't be a hero trying to make beautiful angles, unless you invest a pipe bending wrench.


Step 4: Take one of your metal non-corrosive hose clamps and clamp the in/out tubes together.

Step 5: Take your 10' of clear vinyl tubing and a box cutter and cut it half such that you end up with 2 5' tubes. Work one end the tubing over the copper inlet and outlet about 2-3" and clamp down with remaining hose clamps. I did not get a picture of that, but I think it's pretty self explanatory.
Step 6: The coil is built!!! Looks great right? Well, let's make it even cooler (pun intended if you use a cooler as a water source :rockin") . Let's attach that pump and put some water through it to test for leaks. Go to your kitchen sink or cooler (yep, you can even just add water to a cooler for the water source). Set the pump down in the sink/cooler and fill the water until the pump is completed covered with water, plus 3 or so inches. Connect the inlet hose (top coil) to the pump, my pump had several hose attachment options, just make sure you buy a pump that will fit the 1/2 ID hose. Set the connected pump back down in the water and throw your out hose down in the water. Plug in the pump and behold your new cooling system. You should see water flowing through the system, lift the out hose out of the water and check the outflow. Check the hose clamps at the inlets for leaks. Tighten up if necessary. That's about it!
. Let's attach that pump and put some water through it to test for leaks. Go to your kitchen sink or cooler (yep, you can even just add water to a cooler for the water source). Set the pump down in the sink/cooler and fill the water until the pump is completed covered with water, plus 3 or so inches. Connect the inlet hose (top coil) to the pump, my pump had several hose attachment options, just make sure you buy a pump that will fit the 1/2 ID hose. Set the connected pump back down in the water and throw your out hose down in the water. Plug in the pump and behold your new cooling system. You should see water flowing through the system, lift the out hose out of the water and check the outflow. Check the hose clamps at the inlets for leaks. Tighten up if necessary. That's about it!
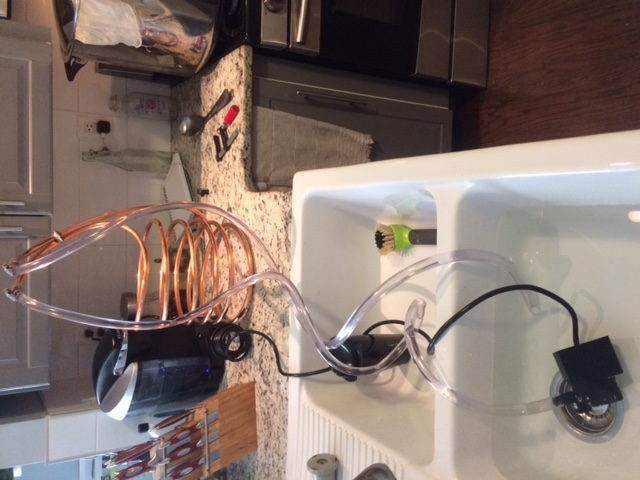

Now...I know what you are thinking. "Yeah, great...but you still need ice cold water for best results". Indeed, you are correct. Still have the ice problem. Well, I bought a case of water for $3 and froze them all (Me and my wife don't buy frozen food and the only things we have in our freezer is a couple bottles of liquor and beer glasses). I rationed them out over the cooling process in the water and at the end when got it down to 80 degrees and needed that extra 5-7 degrees, I used the ice in my fridge (free) and nailed it. Refroze the bottle once done for next time (resusable). For the first half of the cooling process, I let the out hose go down the drain and just left the faucet running in the water sink to keep water levels up and hot water out of the cool water bath. So, still a little wasteful, but once the out water cooled down, I threw it back in the water vat and turned off the water and the same water cycled through. Here's what the system looks like in the actual brew process:

It didn't really save me any time on the cooling process. It took about an hour because the water bottles actually melted a lot faster than I would have imagined. But they were not completely frozen as I rushed them a bit. If anyone has an ideas on that I would be more than receptive. Anyways, I just wanted to share my experience and maybe I can inspire someone to change up their process a bit to fit their needs. Brew on!
I did a mega brew day yesterday. I combined brewing and building all in one day. In the time it took for me to mash, I was able to build an awesome new addition to my ever expanding homebrew operation. I am a CPA, so naturally I am in tune with not only brewing beer as my hobby, but how can I also cut costs per batch? Obviously grains, hops and yeast are the biggest variable costs, but I was struggling with ice baths. I hated spending $8-10 a batch on 40 pounds of ice. I tried cooling my kettle down by itself and splitting the batch into two smaller stock pots to decrease the volume being cooled, but neither used less ice. Money just melting away.
I knew about immersion chillers (AKA Wort chillers), but I brew in my kitchen and my sink doesn't have a traditional hose connection (fancy faucets!) and the thought of running water for 45-60 minutes through the chiller down the drain seemed like a huge waste of water. I don't pay for my water here as it is included in my HOA, but I don't want to be wasteful.
But what if I could combine an ice bath and immersion chilling using a pump and recycling the water through the system? Well...that's what I set out to accomplish. Here's how:
Items required:
1). 20' of 3/8 OD copper tubing (My HD only had 20' or 50') - $28
2). 10' of clear vinyl tubing 1/2" ID or any length to fit your needs - $4.50
3). 1 290 GPH Pond Pump (You could get away with 140 GPH) - $39
4). 3 Hose clamps - $3
5). 1 Cylindrical object such as a corny keg or small stockpot as long as it fits into your kettle
Total cost: $74.50
Step 1: Take your coil of copper tubing and work out the end. Lay your keg or cylinder on it's side and start working the coil around the object.
Step 2: Once you have wound up the entire spool around your cylindrical object, remove the object from the center and stand the spool up and go ahead and work the coils out to your desired distance between coils. You will want a little room between coils as you don't want them touching. If you allow them to touch you are reducing surface area of wort they touch and you'll have a harder time trying to cool the coils if they are working off each others heat.
Step 3: Be very careful here! Some immersion chillers have their in/out imputs at 90 degree angles at the top of the coil, which makes it look a bit more professional, but I am going for function over form and I have $28 invested in a copper tube and I am not risking a kink. I chose to not test angles and worked the copper into form without rigid angles. I started at the top coil and worked it out straight and then formed it up and out. Then, I straightened out the bottom coil to however much I thought I'd need to come up the coil and out parallel to the top in spout. It wasn't hard to work with the copper, but just take your time and don't be a hero trying to make beautiful angles, unless you invest a pipe bending wrench.
Step 4: Take one of your metal non-corrosive hose clamps and clamp the in/out tubes together.
Step 5: Take your 10' of clear vinyl tubing and a box cutter and cut it half such that you end up with 2 5' tubes. Work one end the tubing over the copper inlet and outlet about 2-3" and clamp down with remaining hose clamps. I did not get a picture of that, but I think it's pretty self explanatory.
Step 6: The coil is built!!! Looks great right? Well, let's make it even cooler (pun intended if you use a cooler as a water source :rockin
. Let's attach that pump and put some water through it to test for leaks. Go to your kitchen sink or cooler (yep, you can even just add water to a cooler for the water source). Set the pump down in the sink/cooler and fill the water until the pump is completed covered with water, plus 3 or so inches. Connect the inlet hose (top coil) to the pump, my pump had several hose attachment options, just make sure you buy a pump that will fit the 1/2 ID hose. Set the connected pump back down in the water and throw your out hose down in the water. Plug in the pump and behold your new cooling system. You should see water flowing through the system, lift the out hose out of the water and check the outflow. Check the hose clamps at the inlets for leaks. Tighten up if necessary. That's about it!
Now...I know what you are thinking. "Yeah, great...but you still need ice cold water for best results". Indeed, you are correct. Still have the ice problem. Well, I bought a case of water for $3 and froze them all (Me and my wife don't buy frozen food and the only things we have in our freezer is a couple bottles of liquor and beer glasses). I rationed them out over the cooling process in the water and at the end when got it down to 80 degrees and needed that extra 5-7 degrees, I used the ice in my fridge (free) and nailed it. Refroze the bottle once done for next time (resusable). For the first half of the cooling process, I let the out hose go down the drain and just left the faucet running in the water sink to keep water levels up and hot water out of the cool water bath. So, still a little wasteful, but once the out water cooled down, I threw it back in the water vat and turned off the water and the same water cycled through. Here's what the system looks like in the actual brew process:
It didn't really save me any time on the cooling process. It took about an hour because the water bottles actually melted a lot faster than I would have imagined. But they were not completely frozen as I rushed them a bit. If anyone has an ideas on that I would be more than receptive. Anyways, I just wanted to share my experience and maybe I can inspire someone to change up their process a bit to fit their needs. Brew on!
