New chiller methodology

Homebrew Talk - Beer, Wine, Mead, & Cider Brewing Discussion Forum

Help Support Homebrew Talk - Beer, Wine, Mead, & Cider Brewing Discussion Forum:

This site may earn a commission from merchant affiliate links, including eBay, Amazon, and others.

Willy

Active Member
Joined
Apr 7, 2024
Messages
26
Reaction score
15
Location
Charlotte NC
Still using an immersion chiller but getting much better results thanks to good advice from a fellow beer guy.

Fill up a baby pool with water, and leaves it out overnight in cooler months ... We only get down to 30s most days in winter...

Anyway - cool it down until it gets to about 100 degrees. I am using a sump pump to cycle the cold water thru the chiller. Next step is to place the sump pump in a huge hope basket, or something similar and add ice to the basket ... Chill some, add more ice etc. The hard part (waiting.... Waiting) was getting it down from 100°F to 68°F... But this new method (new to me :) does the job nicely!!!
 
I recently had an idea to do something similar, with a somewhat different goal of reusing the water as an infiinite water supply. I bought a 35 gallon food grade barrel. I plan on filling it with waste water from RO filter. Initially, I would divert several gallons into my HLT. Then I would pump the water from the barrel through my counterflow chiller and back to the barrel. I estimated the water and wort temperatures would eventually level off around 100F. Next, I take prefrozen containers of water and put them in the HLT. (A gallon of water weighs about 8 lb, so that's a small bag of ice right there.) Then I would pump the chilled water through the CFC. The wort would be looping back to the BK while being chilled. Once the wort was chilled sufficiently, I would then pump to the fermenter. The water in the barrel would eventually reach room temperature again by the time of my next brew. I would return the HLT water back to the barrel too. I also thought about using the method you proposed and put the barrel outside during the colder months. Another option I have considered is burying it in the ground.

During the growing season, I try to collect my waste water from chilling and RO for use in the garden but wanted to do something with it in the winter. This method wouldn't waste any water. I haven't tried it yet as I am still deciding whether to get a submersible pump or to put a bulkhead fitting on the barrel and use my brew pumps. I figured somebody must have tried this.

What are the dimensions on the baby pool? I'm curious how much water was needed.
 
Baby pool is about 5'-6' diameter. From 200 wort cooling to 100°, the pool water gets quite warm. I have two dogs and use it to give them bathed sometimes, otherwise I pump it to water the 7 raised beds (grow all year long in NC)

At 100° +/- I empty the water water and fill it up from the return of the chiller which is now using hose water, which exits into the pool... Anyway, pool gets filled again and I do the ice routine.

The key is save your ice for the final chill. Your wort will cool well if there is a large difference in temps.
 
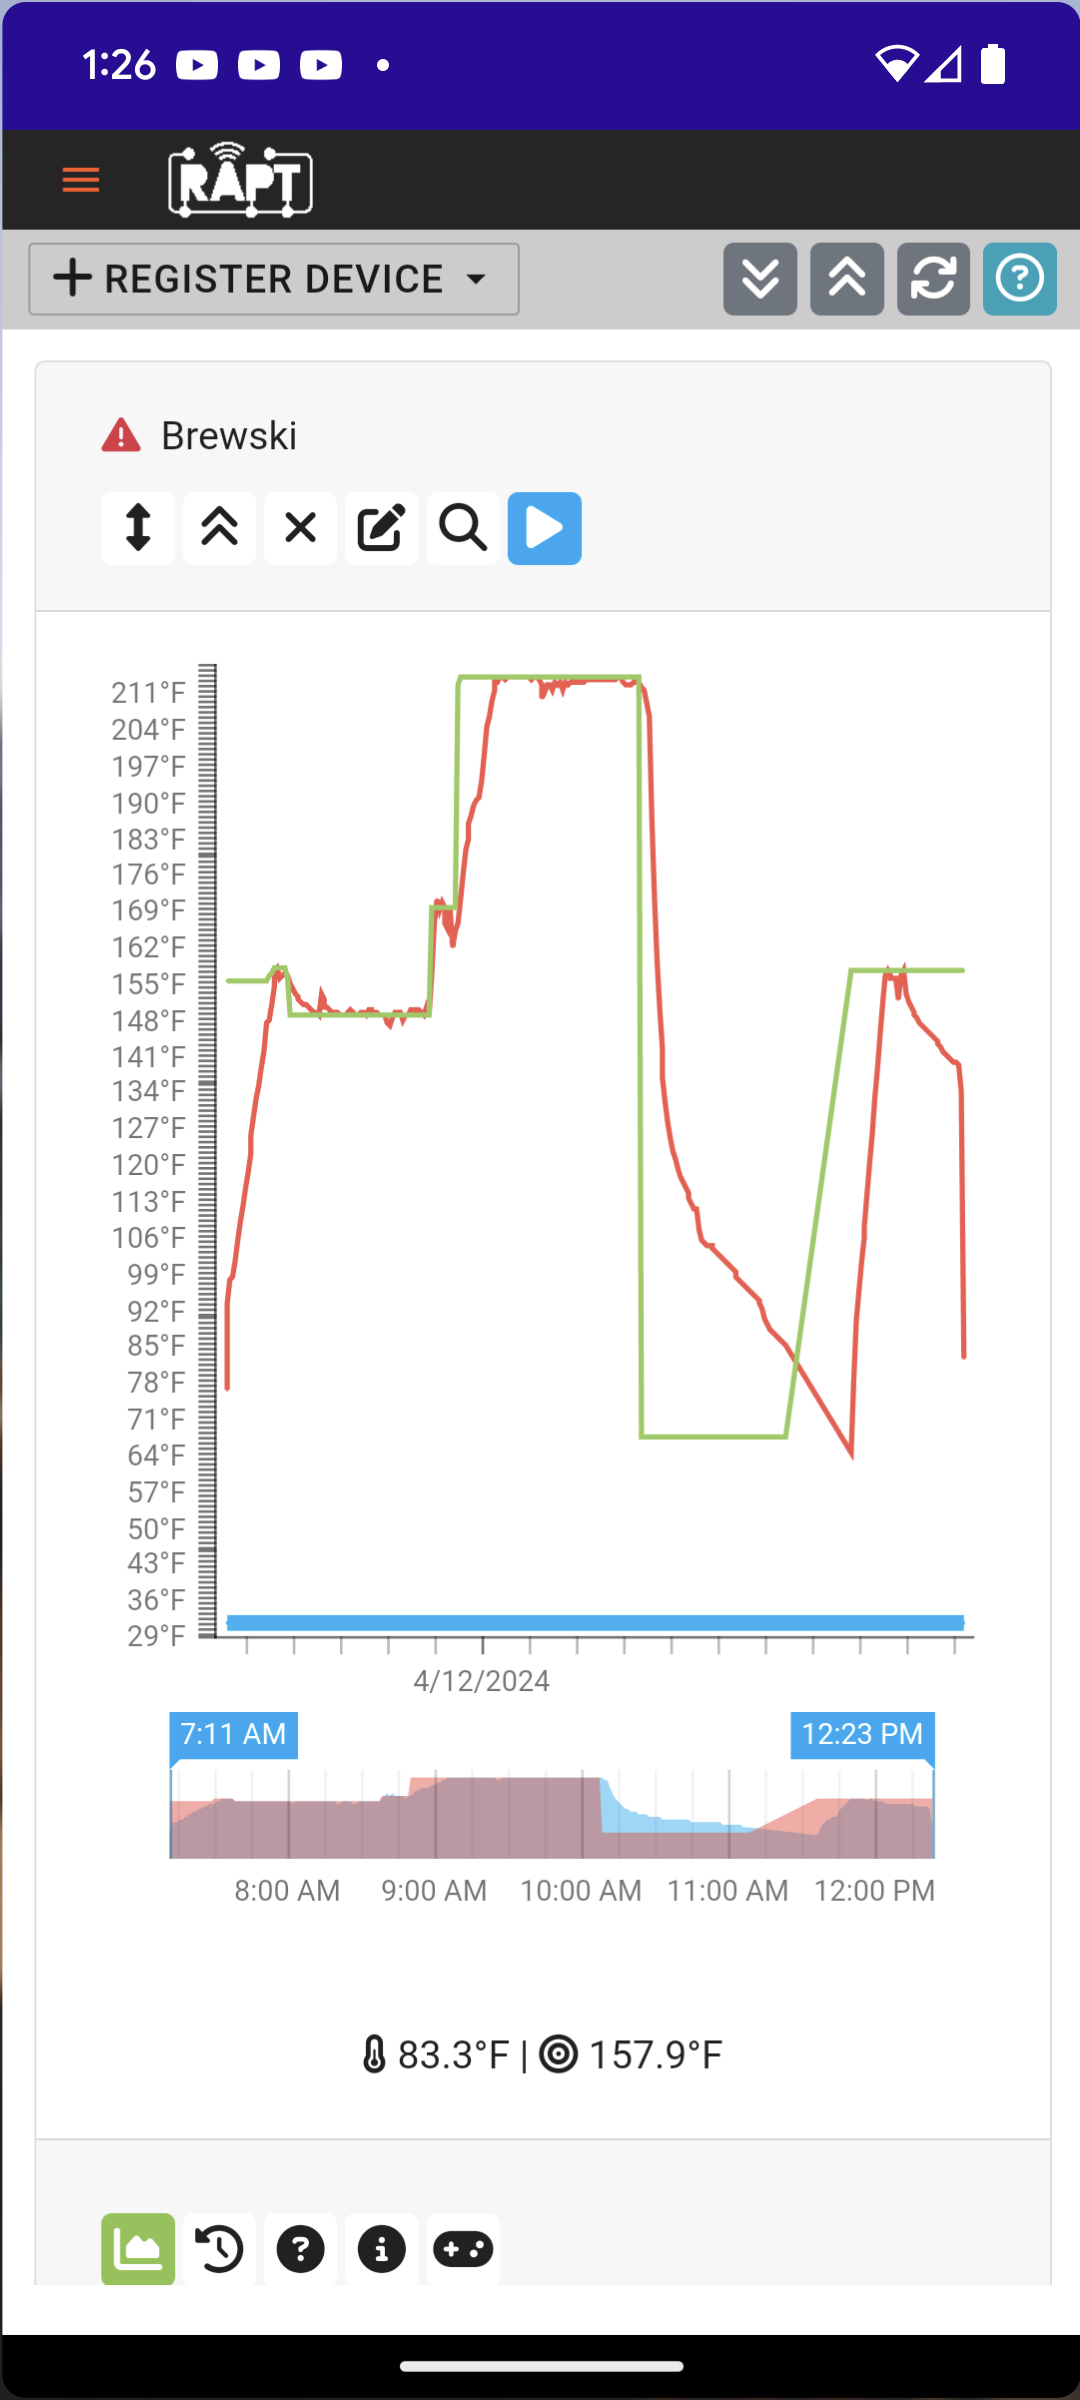
I brewed today ... You can see the cooling decline over time. I got it to temp and transferred to fermenter... The final late morning heat up is for PBW cleaning, rinse and sanitize.
1000000675.png
 
When I had an above-ground pool, I pumped the pool water in through my immersion cooler to conserve water and heat the pool.

We got rid of it, so I switched to just putting a lid on my pot to let it cool off overnight, then transfer and pitch yeast in the morning.
 
Y'all ain't doing it right 😁


That's the opposite of what I did. The chiller went into the wort, the pool water was pumped through it.
The dumping is correct, although I have several auto-siphons. Just too lazy to bother with a 5 gallon batch. Over that, auto-siphon.
 
When I had an above-ground pool, I pumped the pool water in through my immersion cooler to conserve water and heat the pool.

We got rid of it, so I switched to just putting a lid on my pot to let it cool off overnight, then transfer and pitch yeast in the morning.
Excellent use of resources! That works!
 
Baby pool is about 5'-6' diameter. From 200 wort cooling to 100°, the pool water gets quite warm. I have two dogs and use it to give them bathed sometimes, otherwise I pump it to water the 7 raised beds (grow all year long in NC)

I’m about 30 miles south of you, and I save the water for my garden, too. I have several 5 gallon, plastic, gas jugs marked for “water only” that I fill with the water exiting the chiller. Since this water doesn’t return to the source, it is very hot and I use a lot of it for cleanup. What does not get used for cleaning gets repurposed for the garden or watering the dogs/chickens.

I use a pre-chill coil in a 5 gallon bucket in which I place frozen half-gallon jugs and cover with water. Works great!
 
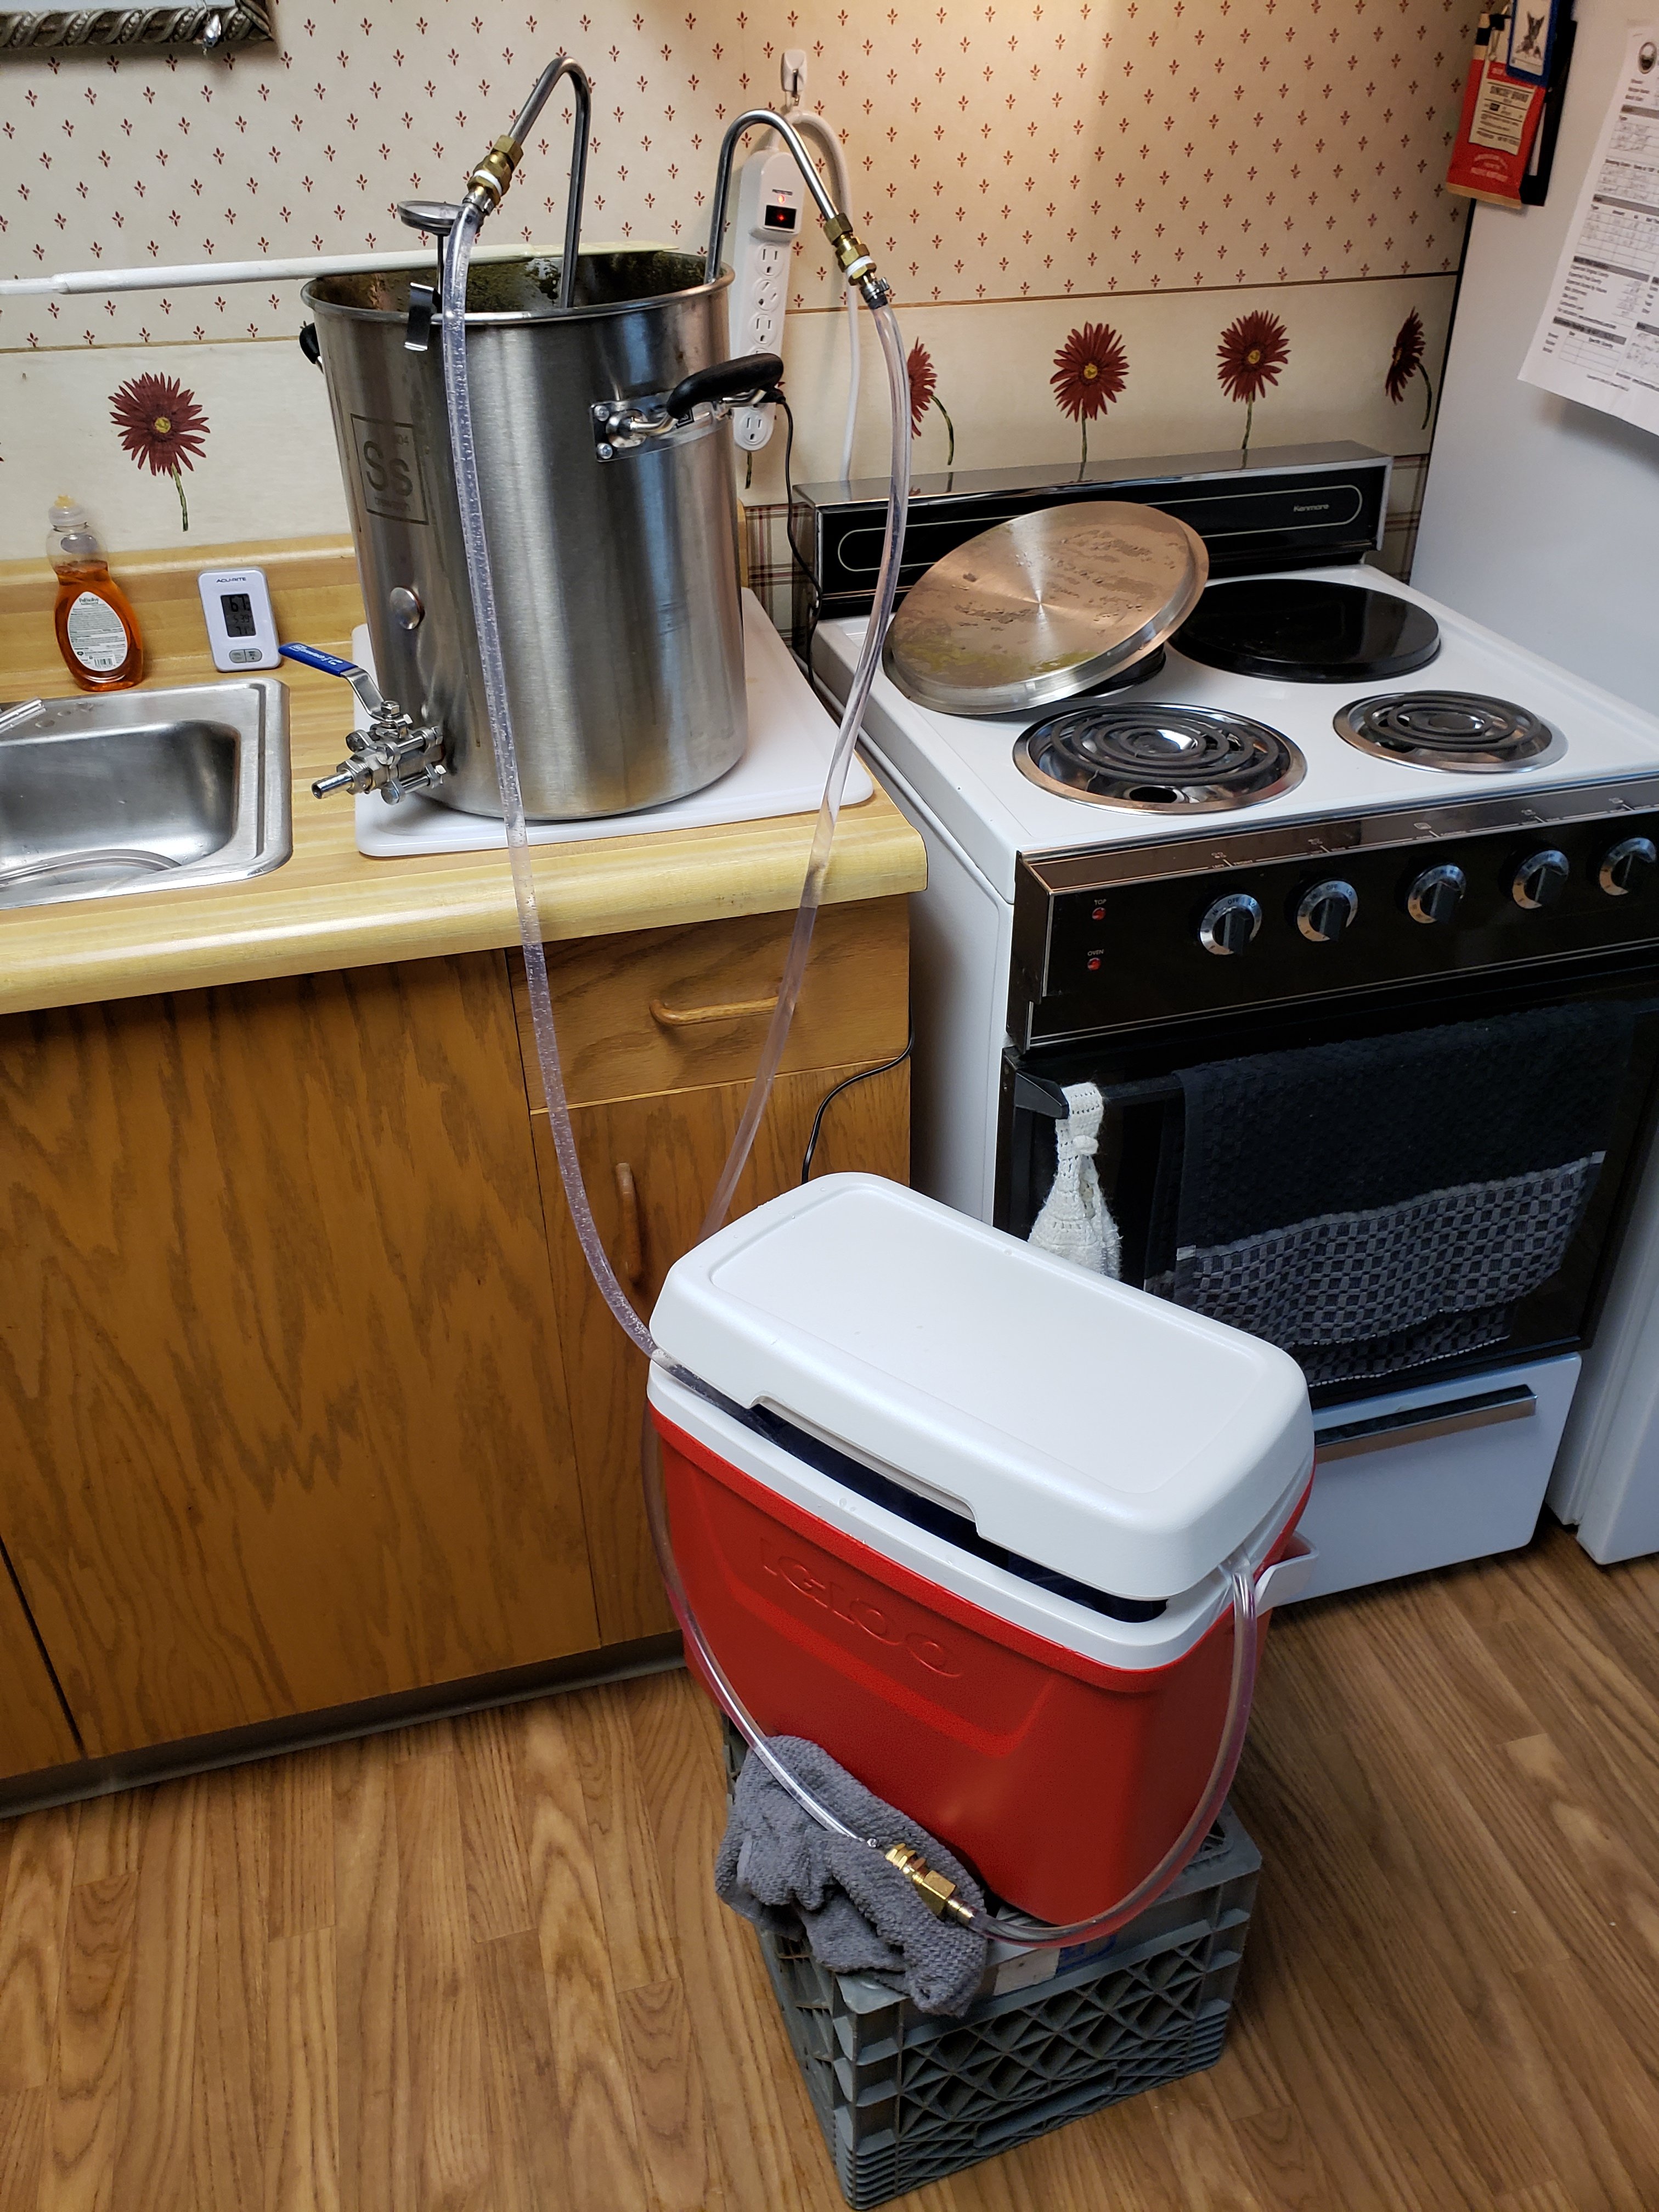
Here's my system. Cooler with 20lbs of ice recirculating with small immersion pump.
View attachment 846424
If you diverted some of the initial exit water to that sink you would have hot water for cleanup! Of course, that would require adding replacement water to the cooler as you go. You would likely get a little more chilling speed and ice longevity since you wouldn’t be heating up the water in the cooler with the return.
However, I am for anything that folks do and like. You have a simple system that works, and that’s great! Cheers! 🍻
 
My chilling water comes from my rain barrels and goes back into my rain barrels when I'm done. Gets to pitching temps in no time in winter of course, but the wort is more than cool enough to transfer to the fermenter in less than an hour even on really hot summer days.
How big are your barrels and are you just drawing from one barrel or are your barrels connected? What type of chiller? I wanted to go a little bigger than 35 gallons but all the food grade barrel sellers were a bit of a drive. This 35 gallon barrel happened to be at a small winery going out of business just 30 minutes away. I do collect rainwater into a big IBC tote. I didn't mean to leave it connected this winter as I was concerned it might freeze and crack but circumstances prevented disconnnection. It didn't crack though. Do you know if your barrels freeze in the winter?
 
It's all very good during the cold months, but for most of us it's a really limited timeframe. For those who are doing recirculating of icewater where you've made the ice in a freezer, maybe it doesn't need to be said but:
1. Use the coldest tap water you have for the first few minutes of chilling. Even if the water is 90F, it's still WAY colder than 210F wort and it will drag heat away very quickly. Once you start stalling, such as when the wort reaches 120F, then switch over to your icewater source. It will preserve a lot more ice cost.

2. Don't recirculate the water back into the icewater bath. The output temp of your chiller will always be hotter than your tap water temp. It would be better to send the chiller's output down the drain while topping off the icewater with a similar stream of tap water. Again, it saves ice in a big way.
 
How big are your barrels and are you just drawing from one barrel or are your barrels connected? What type of chiller?
Four 50 gallon barrels connected at the taps so I can draw from all four at the same time if I want to. They're about three feet off the ground, so there's a pretty good pressure head when they're all full and open. Immersion chiller; two actually, so I could set one up as a pre-chiller in an ice bath if I wanted to. The barrels are repurposed olive barrels so definitely food grade but the water never touches anything that anyone is going to eat or drink anyway.
Do you know if your barrels freeze in the winter?
They do not, but winters are pretty mild here. It's rare to get more than three or four days in a row where daytime highs aren't over 40F.
1. Use the coldest tap water you have for the first few minutes of chilling. Even if the water is 90F, it's still WAY colder than 210F wort and it will drag heat away very quickly. Once you start stalling, such as when the wort reaches 120F, then switch over to your icewater source. It will preserve a lot more ice cost.

2. Don't recirculate the water back into the icewater bath. The output temp of your chiller will always be hotter than your tap water temp. It would be better to send the chiller's output down the drain while topping off the icewater with a similar stream of tap water. Again, it saves ice in a big way.
This^. And this^. And once again, this^.
 
Wh
Oh and in case I wasn't clear above, the output from the chillers gets collected in couple of large tubs. It doesn't go back into the barrels until I'm done chilling.
Gotcha ya. What I am proposing and somewhat what the OP is doing is a closed reservoir. Simplistically, it's like taking a gallon of 68F water and a gallon of water at 212F and mixing them to get 2 gallons at 140F. Except I want to weight the mean here. Suppose I hold off 5 gallons of my barrel and use 30 gallons to cool a 6 gallon batch. Then I have [30x68F(garage temp)+6x212F]÷(30+6)~95F. Both the water and wort would loop around and exchange heat inside my CFC I can put the extra 5 gallons of barrel water in another vessel (HLT) and ice it with water frozen inside say milk jugs. I hadn't worked the next part out because I thought I needed to look up some specific heat values plus I forget what you call that energy value for changing physical state. Anyway, I see a shortcut. Assume first that just enough ice is added such that the ice melts completely and the chill water is 32F. So then [6x95+5×32]/(6+5)~66F. Now if I add more ice, the ice can continue to absorb heat and drop the wort temperature further if needed. Personally I could also cool with my glycol chiller or ferm fridge. If using rain water there's no waste there so need to close the loop and that's a conservation minded solution. My IBC tote is about 25 ft away from my brew stand. I do send my waste RO water to it sometimes but I also send that water to a barrel near my greenhouse. I don't have a use for extra water outside the growing season which is why I was considering a dedicated reservoir.

I could probably squeeze a little extra chilling in by using a short burst of tap water to capture a little heated water for cleaning. I use excess HLT water for cleaning my mash tun but could use 5-6 gallons later for CIP. I'd need a temporary container but I have a cooler that would do.

So no water would be touching wort but I don't want unknown barrel chemicals affecting my CFC or my HLT.
 
It's all very good during the cold months, but for most of us it's a really limited timeframe. For those who are doing recirculating of icewater where you've made the ice in a freezer, maybe it doesn't need to be said but:
1. Use the coldest tap water you have for the first few minutes of chilling. Even if the water is 90F, it's still WAY colder than 210F wort and it will drag heat away very quickly. Once you start stalling, such as when the wort reaches 120F, then switch over to your icewater source. It will preserve a lot more ice cost.

2. Don't recirculate the water back into the icewater bath. The output temp of your chiller will always be hotter than your tap water temp. It would be better to send the chiller's output down the drain while topping off the icewater with a similar stream of tap water. Again, it saves ice in a big way.
In one word: That! ^

The very hot water from the first round can be captured for cleanup. That's what I do.
All the chilling water gets captured, and eventually used for plants or washing things.
 
My washer is only 5ft away from my brewing set up. I even use the cold water line going to the washer to supply my thermochiller. I put my laundry in the washer and drain my chiller into it until full and do a load of laundry. Water is expansive here.
 

Attachments

  • P2150049.JPG
    P2150049.JPG
    267.4 KB · Views: 0
  • P2150050.JPG
    P2150050.JPG
    261.5 KB · Views: 0
The hard part (waiting.... Waiting) was getting it down from 100°F to 68°F... But this new method (new to me :) does the job nicely!!!
Agitating your chiller, such as slowly moving it up and down or swirling, helps enormously, preventing cold pockets around the coil.
Or if you use a (wort) pump, recirculating the wort while chilling will do the same with less manual effort.
 
I love chilling discussions!

1) I have found great success with what @Bobby_M is speaking of. Ground water to about 100F - 90F then switch to something colder. I like to keep at least a 30F degree of differential between my chilling water temp and the wort temp. Buying a bag of ice (at Twice the Ice) and eventually switching over is how you really speed things up. The key is to limit the flow of hot return water and to keep the water level in the ice at a minimum. Why at the minimum? You want the phase change (ice melting) to continue to take place. That is the coldest you can get to put in your chiller. If you have a large reservoir of water, the phase change gets wasted in the holding tank instead of being put in your chiller.

2) On the large recycled loop of chilling water - I had an idea: What if you found a used freezer, and two large tanks. Put one tank in the freezer and one outside of it. Fill the tank inside the freezer (with a controller to keep it at 33F) and keep it at the low temps. Add a pump to pump the chiller water to your chiller on brew day then return the hot water to the empty tank beside the freezer. Later, gravity feed or pump the water back into the freezer tank for re-chilling back down to 33F. A forever loop of 33F water. Sound plausible if one has the space? It has to be cheaper than a glycol setup. Chilling would be an easy start it and stop it endeavor.
 
I like to keep at least a 30F degree of differential between my chilling water temp and the wort temp.
This becomes impossible eventually. 🤣
2) On the large recycled loop of chilling water - I had an idea: What if you found a used freezer, and two large tanks. Put one tank in the freezer and one outside of it. Fill the tank inside the freezer (with a controller to keep it at 33F) and keep it at the low temps. Add a pump to pump the chiller water to your chiller on brew day then return the hot water to the empty tank beside the freezer. Later, gravity feed or pump the water back into the freezer tank for re-chilling back down to 33F. A forever loop of 33F water. Sound plausible if one has the space? It has to be cheaper than a glycol setup. Chilling would be an easy start it and stop it endeavor.
Sounds like that should work. And the tanks and freezer might not even have to be that big if you only used it for the last 30-50 degrees of chilling.
 
Ha! Yes, keeping 30 degrees of differential is tough for lagers!

My thought was to use the tank for all of the chilling to make it easy and and fast as possible. While I like chilling discussions, I hate chilling itself. I want it to be done yesterday. But I do not have the space for this setup. Maybe one day.
 
Excellent use of resources! That works!
i have a small above ground 3000 gallon pool. cant wait to try this and see if i can heat my pool a little ! swimming drinking homebrew and boiling 6 gallons of hot sticky liquid cant be too dangerrous right?😉

question: my ground water even in summer gets me down to 70 degrees. when i make lagers and sometimes pitch low at like 50 i will often just add the 70 degree wort to the fv and chill it in there with the chilling coil and then pitch. Is there any downside to finishing off the cooiling in the FV rather than the kettle? i have already seperated the hot break and have clear wort.

is it like an oxygen issue or something.
 
Last edited:
2) On the large recycled loop of chilling water - I had an idea: What if you found a used freezer, and two large tanks. Put one tank in the freezer and one outside of it. Fill the tank inside the freezer (with a controller to keep it at 33F) and keep it at the low temps. Add a pump to pump the chiller water to your chiller on brew day then return the hot water to the empty tank beside the freezer. Later, gravity feed or pump the water back into the freezer tank for re-chilling back down to 33F. A forever loop of 33F water. Sound plausible if one has the space? It has to be cheaper than a glycol setup. Chilling would be an easy start it and stop it endeavor.

A chest freezer will usually hold water on its own, perhaps with a little 100% silicone smeared at the joints for good measure. It would chill the water much faster than if there was an air gap between the freezer walls and your container. You certainly would have to collect the hot output in a separate tank and let it slowly cool down naturally before you pump it back into the freezer for the next use. Chest freezers have a pretty small BTU cooling system.
 
Even better with only one tank. A 5 cubic foot chest freezer would hold 37 gallons of water. That would be plenty of space for a 5 gallon batch. Maybe 10. Wal-mart has a 5 cu. ft model for $138
 
Back
Top