You are using an out of date browser. It may not display this or other websites correctly.
You should upgrade or use an alternative browser.
You should upgrade or use an alternative browser.
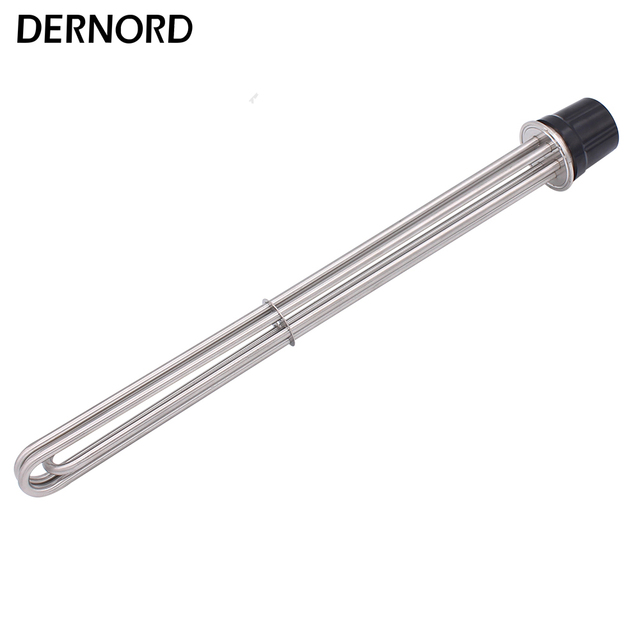
Dernord elements
- Thread starter Brewvy
- Start date

Help Support Homebrew Talk - Beer, Wine, Mead, & Cider Brewing Discussion Forum:
This site may earn a commission from merchant affiliate
links, including eBay, Amazon, and others.

It's what I use. Works well so far with around 8 batches brewed with it. Mine looks a little different - the only knock I have is the twist lock connection is a bit loose (there is a small gap). I usually cover with a wide strip of electrical tape or wedge the cord so it pushes in tight.
Wish they sold just the housing on it's own.
Check out BrewHardware.
https://www.brewhardware.com/category_s/1895.htm
don_bran321
Well-Known Member
- Joined
- Oct 27, 2017
- Messages
- 183
- Reaction score
- 65
I use them and they are sick. You can buy just the housing at brew hardware.com but it looks like you'll get a better price buying then together on Amazon. $50 is a great deal
augiedoggy
Well-Known Member
pretty sure they make these with the TC base as well and sell them on ebay... its much easier to sort and find them on ebay IMO.. I hate amazons sorting rules..
edit*
Heres one,
http://rover.ebay.com/rover/1/711-5...0001&campid=5338413729&icep_item=401651112805
and without the tc base,
http://rover.ebay.com/rover/1/711-5...0001&campid=5338413729&icep_item=323112498361
heres the other popular style..
http://rover.ebay.com/rover/1/711-5...0001&campid=5338413729&icep_item=254072749455
Last edited:
augiedoggy
Well-Known Member
I have the enclose from brewhardware... Its works well but its not going to be as robust as these the shell is much thinner stamped stainless where these look to be machines and much more heavy duty the brew hardware one is longer and larger as well so if you bang your stuff around...
I dont own so take one but its an observation take it with a grain of salt.
this is the other populkar version which is pricey but very heavy duty.. they make them without the tc base too I think stilldragon carries them.
http://rover.ebay.com/rover/1/711-5...0001&campid=5338413729&icep_item=282929881037
JONNYROTTEN
Well-Known Member
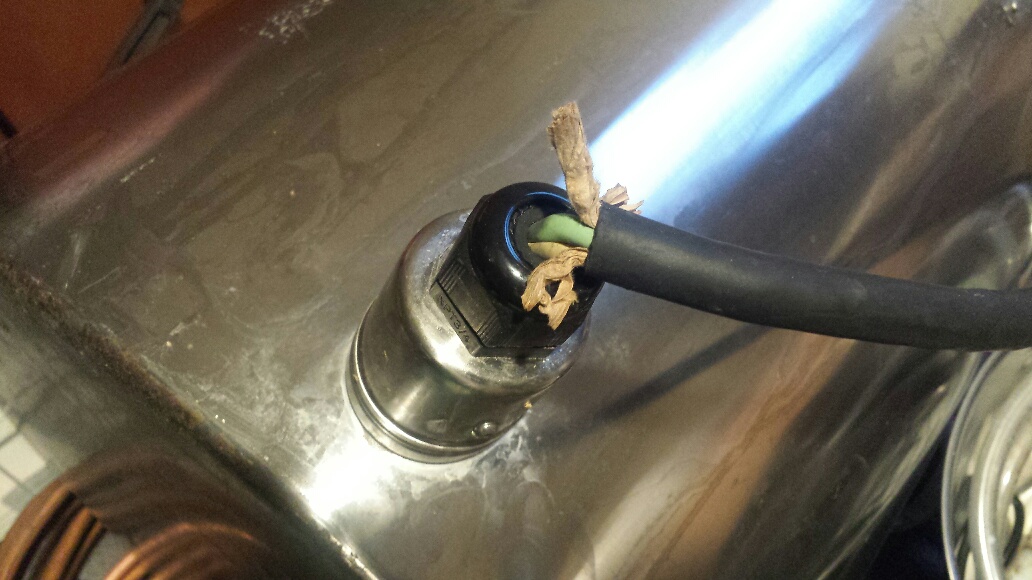
Mine from BH has the same issue someone else has mentioned. The cord doesnt clamp in well with the plastic twist lock on the housing and is loose and the wires inside the cord sheath are exposed.It always makes me nervous when we're dealing with 240 and water
augiedoggy
Well-Known Member
I think the ones mentioned above are the nema twqist lock style like this,Mine from BH has the same issue someone else has mentioned. The cord doesnt clamp in well with the plastic twist lock on the housing and is loose and the wires inside the cord sheath are exposed.It always makes me nervous when we're dealing with 240 and water
http://rover.ebay.com/rover/1/711-5...0001&campid=5338413729&icep_item=323186203375
as far as the BHW element enclosures,
Thats pretty much a possible concern with any element enclosure right? especially if your using power cable thats a smaller awg than the gland is designed to hold..(replacement wire glands are about $4 online if needed) im not sure why the wires would be exposed inside? isnt there terminal screws that you connect the wires to under the cover plate like any other element? you can use shrink tube or electrical tape if you stripped the wires back too far but im having a hard time visualizing what your saying. your not supposed to be getting these things wet guys... They are on the outside of the kettle not the inside.
the element linked above would likely have the same setup.. I know of no completely waterproof electrical connections for these.. and exposed terminal screws inside of an electrical enclosure is completely normal. the gfci should protect you if for some reason you spill enough liquid for it to emerse the connections in water which is realistically less likely that the 30p nema plug style connectors many use now on thier elements. which is what I think the guy above was talking about.
Last edited:
I cant imagine why this is. Our grips can lock down on 3/8" cords so 10/3 cable should be a no brainer.Mine from BH has the same issue someone else has mentioned. The cord doesnt clamp in well with the plastic twist lock on the housing and is loose and the wires inside the cord sheath are exposed.It always makes me nervous when we're dealing with 240 and water
JONNYROTTEN
Well-Known Member
Maybe you could shed some light on my issue. The sheath has slid down over the years. It was inside the clamp when I made the pot, probably the length of the paper. It gets moved a lot being I dont have a dedicated brew area. It kinda looks like the sheath is bunched up the first couple inches. If you zoom in it looks like there is clamp marks on the very edge of the black sheathing. If you look inside the black twist clamp it looks like either more sheathing and somehow the sheathing cracked perfectly round ..or cut by the clamp somehow which makes more sense....or...its some sort of padding that comes with the housing? I've just deal with it but I remember when I built the pot I was thinking...THis doesnt seem very tight....It could be my fault and I did something wrong...not putting the blame on you but now that we're talking about it'd be nice to fixI cant imagine why this is. Our grips can lock down on 3/8" cords so 10/3 cable should be a no brainer.
EDIT: now that I look at it closer it's gotta be sheathing in the clamp and it somehow got cut exactly where the clamp ends
Attachments
augiedoggy
Well-Known Member
the black outer rubber sheathing was supposed to go all the way through the hole before you tightened it down. the picture shows some inside the hole as if the rubber spacer was left in the hole or thats a piece of the sheathing and it somehow ripped in a perfect line my guess is you cut that line when originally stripping the sheathing but it was still attached since you cut another line above it where you removed the other sheathing.Maybe you could shed some light on my issue. The sheath has slid down over the years. It was inside the clamp when I made the pot, probably the length of the paper. It gets moved a lot being I dont have a dedicated brew area. It kinda looks like the sheath is bunched up the first couple inches. If you zoom in it looks like there is clamp marks on the very edge of the black sheathing. If you look inside the black twist clamp it looks like either more sheathing and somehow the sheathing cracked perfectly round ..or cut by the clamp somehow which makes more sense....or...its some sort of padding that comes with the housing? I've just deal with it but I remember when I built the pot I was thinking...THis doesnt seem very tight....It could be my fault and I did something wrong...not putting the blame on you but now that we're talking about it'd be nice to fix
EDIT: now that I look at it closer it's gotta be sheathing in the clamp and it somehow got cut exactly where the clamp ends
You may want to think about redoing that connection Johnny, or we may be calling you SPARKYROTTEN soon.
On second thought knowing how you roll, you’ll likely put a couple wraps of electrical tape on it and call it good lol j/k
On second thought knowing how you roll, you’ll likely put a couple wraps of electrical tape on it and call it good lol j/k
JONNYROTTEN
Well-Known Member
Danger's my middle name [Austin Powers]You may want to think about redoing that connection Johnny, or we may be calling you SPARKYROTTEN soon.
On second thought knowing how you roll, you’ll likely put a couple wraps of electrical tape on it and call it good lol j/k
I need to get it fixed just havent gotten around to it....Its not my pump I swear
JONNYROTTEN
Well-Known Member
its possible I scored it twice and left it. Seems odd it would work out to exactly where the clamp ends with clamp marks on the end of the sheathing...but anythings possiblethe black outer rubber sheathing was supposed to go all the way through the hole before you tightened it down. the picture shows some inside the hole as if the rubber spacer was left in the hole or thats a piece of the sheathing and it somehow ripped in a perfect line my guess is you cut that line when originally stripping the sheathing but it was still attached since you cut another line above it where you removed the other sheathing.
I just bought this same element, how are you guys mounting it to your kettles/what size hole did you make for it? I'm having the hardest time finding any info on this, and it seems like you guys have that part figured out.
sw_reijnders
Member
- Joined
- Nov 13, 2017
- Messages
- 7
- Reaction score
- 1
- Joined
- May 28, 2018
- Messages
- 3,057
- Reaction score
- 2,498
Dernord makes a 5500W 240V element with tri clamp mounting that uses L6-30 twist lock plug. Model # X001KEWVP. They work very well in my HLT and BK.
To convert your kettle, all you need to do is weld, braze or silver solder a tri clamp ferule in a hole you drill in kettle.
To convert your kettle, all you need to do is weld, braze or silver solder a tri clamp ferule in a hole you drill in kettle.
Loosen it all the way, and get the larger part of the wire in there.Maybe you could shed some light on my issue. The sheath has slid down over the years. It was inside the clamp when I made the pot, probably the length of the paper. It gets moved a lot being I dont have a dedicated brew area. It kinda looks like the sheath is bunched up the first couple inches. If you zoom in it looks like there is clamp marks on the very edge of the black sheathing. If you look inside the black twist clamp it looks like either more sheathing and somehow the sheathing cracked perfectly round ..or cut by the clamp somehow which makes more sense....or...its some sort of padding that comes with the housing? I've just deal with it but I remember when I built the pot I was thinking...THis doesnt seem very tight....It could be my fault and I did something wrong...not putting the blame on you but now that we're talking about it'd be nice to fix
EDIT: now that I look at it closer it's gotta be sheathing in the clamp and it somehow got cut exactly where the clamp ends
Brewvy
Well-Known Member
I used a step bit for the holes , they come out to about 1 1/4" but check at each step when you get close. I also bought on Amazon the 1" npt nuts front dernord but they did not work,too big. Ended up buying from bargain fittings, I believe they are 1" NPS nuts with gasket. Bought my 3 wire cord at home Depot by the foot.I just bought this same element, how are you guys mounting it to your kettles/what size hole did you make for it? I'm having the hardest time finding any info on this, and it seems like you guys have that part figured out.
augiedoggy
Well-Known Member
or use a weldless TC fitting like I did.Dernord makes a 5500W 240V element with tri clamp mounting that uses L6-30 twist lock plug. Model # X001KEWVP. They work very well in my HLT and BK.
To convert your kettle, all you need to do is weld, braze or silver solder a tri clamp ferule in a hole you drill in kettle.
Similar threads
- Replies
- 14
- Views
- 1K
- Replies
- 0
- Views
- 381
