Control Box Wiring Questions

Homebrew Talk - Beer, Wine, Mead, & Cider Brewing Discussion Forum

Help Support Homebrew Talk - Beer, Wine, Mead, & Cider Brewing Discussion Forum:

This site may earn a commission from merchant affiliate links, including eBay, Amazon, and others.

Spartan1979

Supporting Member
HBT Supporter
Joined
Feb 13, 2011
Messages
2,260
Reaction score
794
Location
O'Fallon, MO
I’m in the process of wiring my control box and I had few questions.

A friend has written a program for the Raspberry Pi that controls all the processes and it’s run through a tablet (or some device, I haven’t got that far yet).

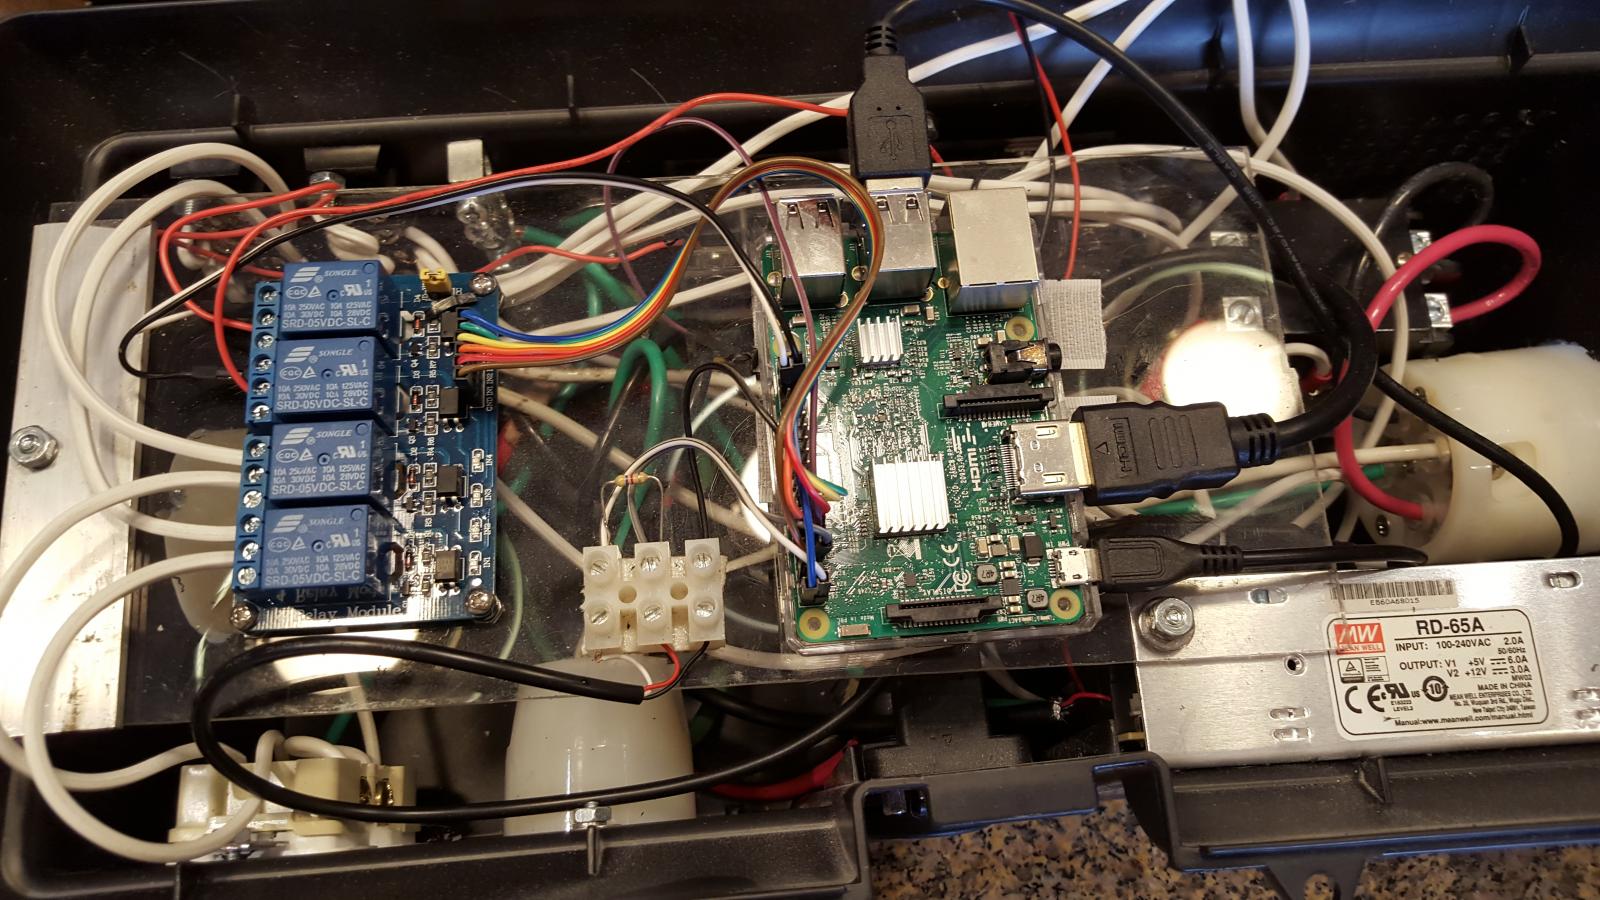
Anyhow, here’s my current wiring (without the Raspberry Pi):

diagram 1.jpg

Any obvious faults other than what I mention below?

The first thing is that it doesn’t have any contactors/relays that completely cut off the SSR’s. The Raspberry Pi only has an output of 3.3 volts. It can operate the SSR’s but, other than SSR’s, I can’t find any relays that will handle 220 volts and a coil that can be operated with 3.3 volts. Any suggestions? I can add a switch to the box and two contactors but this defeats some of the functionality of using a Raspberry Pi.

The program can also turn the pumps on and off. But again, I can’t find any contactors/relays that will work other than an SSR. Would an SSR be a good choice for a relay to run a pump? I’m concerned about the amount of heat generated when up to three SSR’s are all running at the same time. The other option would be to just add a couple of switches to the control box but again this defeats some of the functionality of using a Raspberry Pi.

I used 220 volt indicator lights but as I was looking at this again, I realized that I probably could have used 110 volt lights (and 14 AWG wire instead of 10) if I had wired them up with the black lead and the neutral (white) something like the diagram below. Can I do it this way? Should I use a fuse for this? If so, can it be on the neutral side so I only need one rather than on the hot side where it would take 3?

diagram 2.jpg


Thanks for any input. I’m really trying to understand how this will work. This forum has been very helpful with this.
 

Attachments

  • 20170601_162633.jpg
    20170601_162633.jpg
    125.7 KB · Views: 65
I wouldnt rely on the Pi to control the main contactor, I'd use a physical switch. Small 10amp opto isolated 5v relays work fine on GPIO pins (with appropriate amperage PS).

https://www.amazon.com/gp/aw/d/B079FJSYGY/ref=sspa_mw_detail_4?ie=UTF8&psc=1

Here's a drawing of how mine is wired. 2 pumps two elements. No comment on the indicator lights

Thanks for the info. After looking at your diagram, the pumps would be wired like this:

diagram 3.jpg

The wires from the Raspberry Pi would be connected to the DC+ and the DC-. The hot wire would go to COM and out through NO. Is that correct? The only thing I wasn't sure about was whether it would go to COM or IN.

As far as the kettle wiring goes, if I understand it correctly, the relays insulate the Raspberry Pi from the SSR but it wouldn't prevent any leakage from the SSR.

I actually have this switch (32A 2 poles) so I don't need a main contactor.

https://www.auberins.com/index.php?main_page=product_info&cPath=69_77&products_id=580

I was talking about contactors that would be on the hot wire going to the SSR to prevent leakage.
 
Thanks for the info. After looking at your diagram, the pumps would be wired like this:

View attachment 619488
The wires from the Raspberry Pi would be connected to the DC+ and the DC-. The hot wire would go to COM and out through NO. Is that correct? The only thing I wasn't sure about was whether it would go to COM or IN.

As far as the kettle wiring goes, if I understand it correctly, the relays insulate the Raspberry Pi from the SSR but it wouldn't prevent any leakage from the SSR.

I actually have this switch (32A 2 poles) so I don't need a main contactor.

https://www.auberins.com/index.php?main_page=product_info&cPath=69_77&products_id=580

I was talking about contactors that would be on the hot wire going to the SSR to prevent leakage.
I like to design with contactors in series with the SSR to prevent leakage, and also be able to isolate the SSR in event of failure, without having to shut the whole panel down. You'd use one of the low voltage input relays to connect the Pi to the contactor.

For the interface relays, I think you connect +5V to the DC+, gnd to the DC-, and the GPIO to the IN (someone please correct me if I am mistaken.)

Brew on :mug:
 
The relays before the SSRs are really just there to provide a quicker way to shut heaters off. The on off relay button is bigger on my phone and easier to click on than small heater swich. They arent for safety.

These are simpler relays to use, low level trigger:

https://www.amazon.com/gp/aw/d/B00E0NTPP4/ref=sspa_mw_detail_2?ie=UTF8&psc=1

Pi gnd pin to gnd plus to + and gpio to trigger. See photo
 

Attachments

  • 20170726_175301.jpg
    20170726_175301.jpg
    238.9 KB · Views: 42
The relays before the SSRs are really just there to provide a quicker way to shut heaters off. The on off relay button is bigger on my phone and easier to click on than small heater swich. They arent for safety.

These are simpler relays to use, low level trigger:

https://www.amazon.com/gp/aw/d/B00E0NTPP4/ref=sspa_mw_detail_2?ie=UTF8&psc=1

Pi gnd pin to gnd plus to + and gpio to trigger. See photo
The relays linked by in your previous post only require 5ma trigger current, whereas the ones you linked say 15 - 20ma. I'd go with the lower trigger current relays to reduce the load on the Pi GPIO pins.

Brew on :mug:
 
I like to design with contactors in series with the SSR to prevent leakage, and also be able to isolate the SSR in event of failure, without having to shut the whole panel down. You'd use one of the low voltage input relays to connect the Pi to the contactor.

For the interface relays, I think you connect +5V to the DC+, gnd to the DC-, and the GPIO to the IN (someone please correct me if I am mistaken.)

Brew on :mug:

Thanks for the input.

If I get this correctly, I would wire the Raspberry Pi to a relay. The relay would trigger a 120 volt circuit that would then trigger the contactor that would have both legs of the 240V circuit running through it with one of the legs going to the SSR and the other to the heater outlet.

BTW, did I have it right about using 110v indicator lights?
 
That will work as long as your Pi software doesn't decide to lock up on you or your network takes a dump.... I would at least put a backup switch after the relay running the contactor. But then youll need several switches to go with several contactors.... That's why I did mine the way I did. One manual switch, one contactor. My rationale is that if something happens, I will just kill heat and pumps and leave the Pi on. At least I can still see temp probes. I can plug the pumps into the wall if necessary, but it's not like I'm going to change an SSR mid brew. This is basically how the Hosehead controller is laid out I think, that's what I tried to duplicate. Not the belt and suspenders safety some prefer, but KISS.
 
Thanks for the input.

If I get this correctly, I would wire the Raspberry Pi to a relay. The relay would trigger a 120 volt circuit that would then trigger the contactor that would have both legs of the 240V circuit running through it with one of the legs going to the SSR and the other to the heater outlet.

BTW, did I have it right about using 110v indicator lights?
Yes. 120V indicator lights for the 120V coil contactors, wired in parallel with the contactor coil (between hot and neutral.) 240V indicator light for the element firing light, wired in parallel with the element (between hot from contactor and hot on load side of SSR.)

Your main switch/breaker is adequate as an emergency power off, as long as it is mounted to the front of the control panel (where you can easily get at it.)

Brew on :mug:
 
I got my relays https://smile.amazon.com/gp/product/B079FJSYGY/ref=ppx_yo_dt_b_asin_title_o04_s00?ie=UTF8&psc=1

On one side it has a jumper labeled "Relay Module High/Low Level Trigger." What does this mean? Which setting do I want?

Thanks.
It determines whether the relay engages when the control signal goes from low-to-high or high-to-low. How you set it depends on what your software tells the GPIO to do when triggered. The software can choose to do either type of triggering, so you have to look at the software's documentation. The software may even allow you to choose whether to use active high or active low triggering, in which case you have to make sure you configure the software and relays the same way.

Brew on :mug:
 
Back
Top