
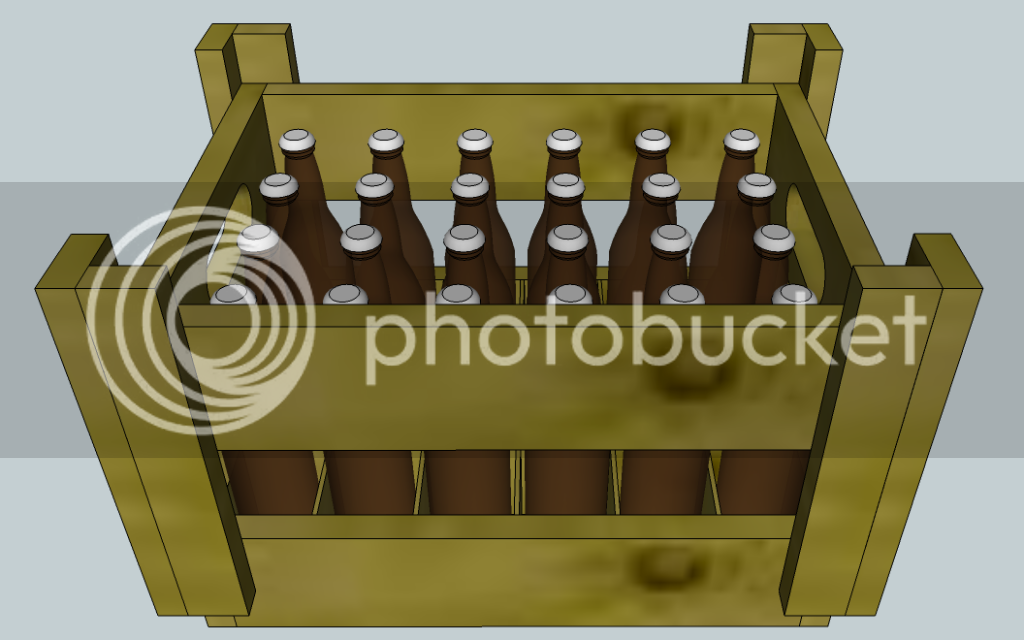
After being inspired by Electrolight's crate build, I wanted to design my own stackable crate with dividers. This design uses one plank of 1"x4"x16' rough cut cedar with only a little over 3 inches to spare.
Equipment list:
Miter saw w/ 1/8" kerf blade.
Drill w/phillips head driver
Square
Tape Measure
Wood Glue
Outdoor screws
1"x4"x16' cedar plank
2'x2' 1/8" solid paneling (for spacers)
(Optional) Router with a round-off bit
Cut List
1"x4"
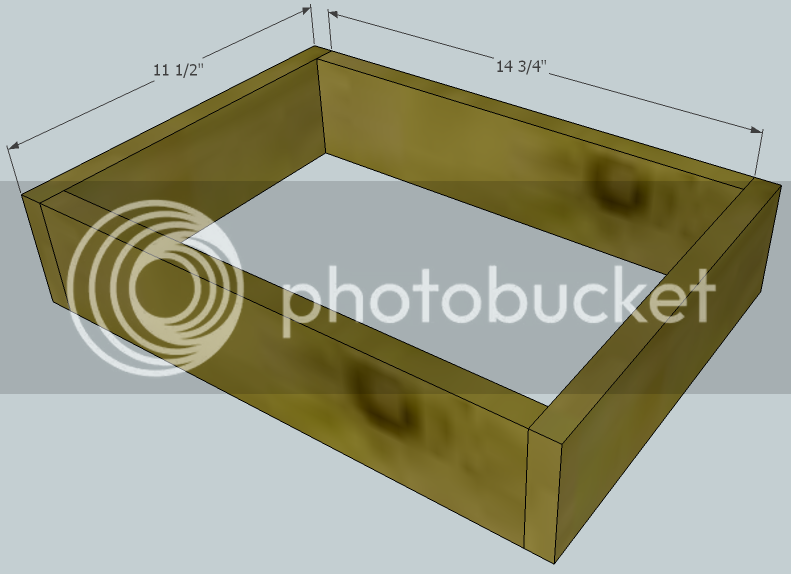
4- 14 3/4"
4- 11 1/2"
4- 10"
4- 10" ripped at 1 1/2" from one side
1/8" paneling
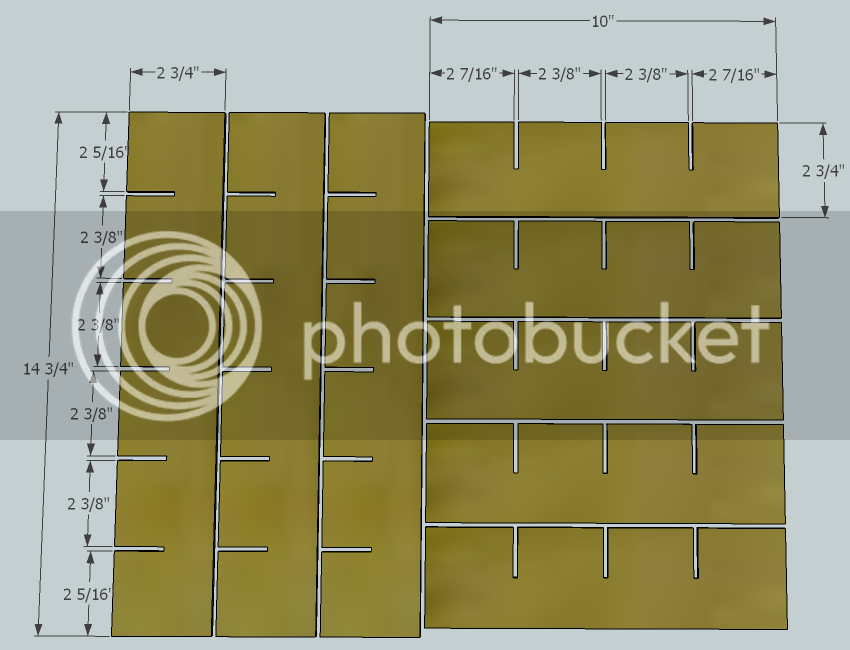
3- 2 3/4" x 14 3/4"
5- 2 3/4" x 10"


Construction
Glue and screw 2- 14 3/4" and 2- 11 1/2" pieces together to form the base. Be sure to square up everything.
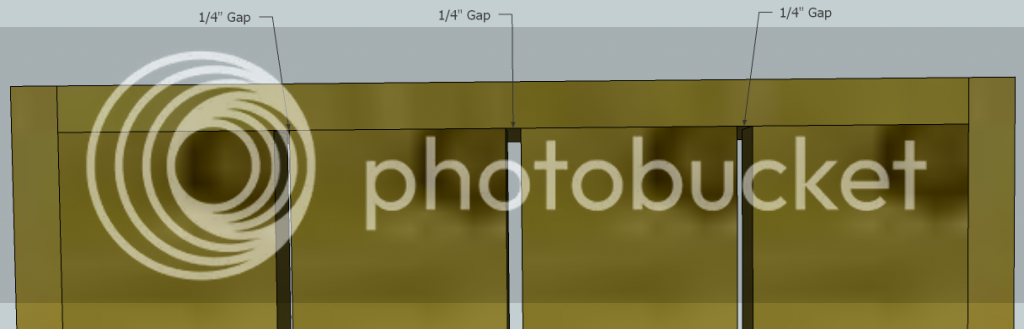
Glue and screw in the 4- 10" pieces into the base with 1/4" gaps between the inside boards.
Glue and screw 2- 14 3/4" and 2- 11 1/2" (If routing in the handles do this prior to attaching) pieces together to form the top. Be sure to square up everything.
Take an 1 7/8" ripped board and place it square 1 1/2" up from the base on the side of the 11 1/2" board. Then place on the 1 1/2" ripped board on the other corner level with the first. Do this to all 4 corners. Then take the top piece and place it 1 1/2" down from the top of the ripped boards. This should give you a 3" gap in-between the top and base.

Slide together the dividers and lower into the base (this can be done a little easier in you put it together one piece at a time before you attach the sides and top pieces, and hold it together with some tape.)
Stand back and marvel at what you've accomplished, then repeat 7 more mind numbing times (in my case)
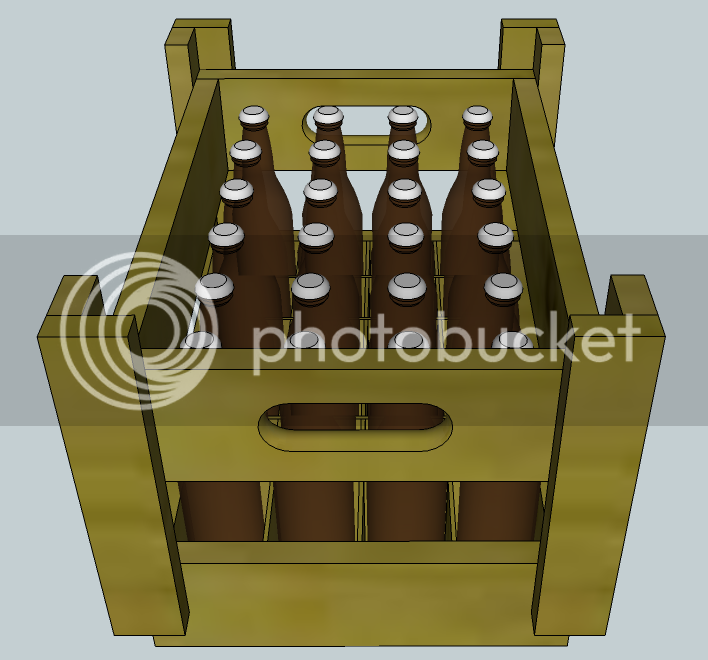

I did this in Google Sketch-up (It's FREE, simple to get the hang of, and comes in handy when designing without spending cash on a cad program) and will be more than willing to shoot you a copy of it if you would like. Just PM me your email!
Equipment list:
Miter saw w/ 1/8" kerf blade.
Drill w/phillips head driver
Square
Tape Measure
Wood Glue
Outdoor screws
1"x4"x16' cedar plank
2'x2' 1/8" solid paneling (for spacers)
(Optional) Router with a round-off bit
Cut List
1"x4"
4- 14 3/4"
4- 11 1/2"
4- 10"
4- 10" ripped at 1 1/2" from one side
1/8" paneling
3- 2 3/4" x 14 3/4"
5- 2 3/4" x 10"
Construction
Glue and screw 2- 14 3/4" and 2- 11 1/2" pieces together to form the base. Be sure to square up everything.
Glue and screw in the 4- 10" pieces into the base with 1/4" gaps between the inside boards.
Glue and screw 2- 14 3/4" and 2- 11 1/2" (If routing in the handles do this prior to attaching) pieces together to form the top. Be sure to square up everything.
Take an 1 7/8" ripped board and place it square 1 1/2" up from the base on the side of the 11 1/2" board. Then place on the 1 1/2" ripped board on the other corner level with the first. Do this to all 4 corners. Then take the top piece and place it 1 1/2" down from the top of the ripped boards. This should give you a 3" gap in-between the top and base.
Slide together the dividers and lower into the base (this can be done a little easier in you put it together one piece at a time before you attach the sides and top pieces, and hold it together with some tape.)
Stand back and marvel at what you've accomplished, then repeat 7 more mind numbing times (in my case)
I did this in Google Sketch-up (It's FREE, simple to get the hang of, and comes in handy when designing without spending cash on a cad program) and will be more than willing to shoot you a copy of it if you would like. Just PM me your email!
