Where to put wort chiller?

Homebrew Talk - Beer, Wine, Mead, & Cider Brewing Discussion Forum

Help Support Homebrew Talk - Beer, Wine, Mead, & Cider Brewing Discussion Forum:

This site may earn a commission from merchant affiliate links, including eBay, Amazon, and others.

skokott

Well-Known Member
Joined
Aug 19, 2013
Messages
69
Reaction score
1
Location
Toronto
Newb question: Just bought a kettle from OntarioBeerKegs (very awesome prices) and it has a ~6" thermometer.
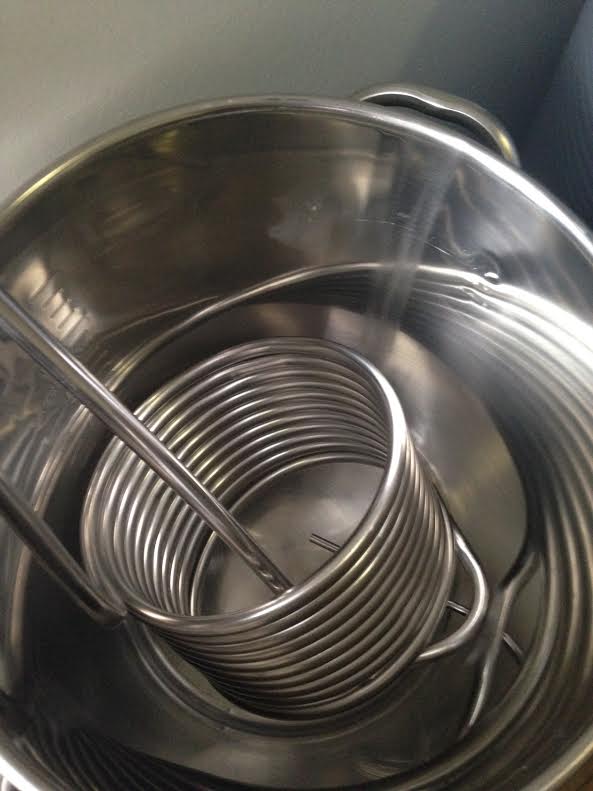
However now I don't know how to fit my immersion coil chiller in there.
Are my options to chill in mash tun or replace thermometer with a plug?
 
Why do you need a thermometer on your BK?
You could add a CFC to your equipment & chill directly from the BK. You can even whirlpool while chilling.
 
Your immersion chiller didn't need to sit on the bottom to work. Just set it on the thermometer and let it rest there. Works much better when stirring anyway.
 
Newb question: Just bought a kettle from OntarioBeerKegs (very awesome prices) and it has a ~6" thermometer.
However now I don't know how to fit my immersion coil chiller in there.
Are my options to chill in mash tun or replace thermometer with a plug?

You could probably find a thermometer with a shorter probe.
It might also be possible to carefully bend the copper IM so that it will fit.
 
I always liked having one so I knew when it was fully chilled.
You can always use a long probe thermometer for observing your chilling progress. If you whirlpool you can put a thermometer in-line with your return to get an accurate measure of your wort temp.
 
Shorter probe thermometer, try to modify the IC, switch to counterflow or plate chiller, chill with the IC on top of the probe if it is still in the wort, remove and use a handheld thermometer.

Choice would be what works best for you and fits your budget.
 
lol @ stick my hand in.

I do like the thermometer in there as it's very convenient.
I'd rather not change it out for one with a shorter probe because I just bought this one. Maybe the seller will exchange?

Therefore I like the idea of sitting the chiller on top of the probe, but then it sits in there at an angle. See attach

Not sure it would cool properly and if I would damage the probe or chiller by doing this often.

See attachment

chiller.jpg
 
Also spending more than $20 right now is not an option. I just spent about $550 on brewing equipment and I'm planning to spend another $500-600 on making my own ferm chamber again.
 
That's exactly why I got my kettle without the thermometer. I do BIAB and didn't want anything in there that could tear the bag, or interfere with the chiller. I drilled a small hole in my lid and use a longer stem thermometer. That way I can watch mash temp thru the lid, clip it to the side to watch bringing up to a boil, then back in the hole for watching while chilling.
 
Also spending more than $20 right now is not an option. I just spent about $550 on brewing equipment and I'm planning to spend another $500-600 on making my own ferm chamber again.


That's going to be a helluva ferm chamber for $500-600!
I built mine for under $300 w/ heating too & a 2-stage Ranco. It holds 6 carboys!
 
Here's my price-list.

Any suggestions welcome. Total $415

Item Price
ST-1000 temp controller 24.99
hobby box 11.83
14 AWG for wiring 24.00
AC cord 24.00
heater 40.00
wire nuts 7.00
coping saw 12.00
file 12.00
round file 12.00
small drill bit 1.00
nm clamps 7.00
outlet tester 7.00
fuse 7.00
fuseholder 15.00
gorilla glue 4.00
2 x gfci 11.40
stud finder 20.00
thermal insulating tape for probe 25.00
freezer 150.00
 
Not sure any of those prices are bad, but I wouldn't count non-consumable items in the price (i.e., your drill bits, files, coping saw, etc. don't count). I would also amortize the price of small items that aren't completely used. For example, if you use half the wire nuts and half the wiring, call it 15.50, not 31.

I definitely thought $500-600 was a ton, but seeing your numbers (considering you purchased a freezer specifically for the project) nothing seems crazy.

For me, we replaced a freezer that was too small. SWMBO asked what to do with the old one and I said I would keep it. STC-1000, hobby box, and wire were probably $35 total, heater was a $5 paint can and repurposed light fixture, all tools I had, and I split a single $2 outlet to have heating and cooling in a single outlet for space. So I would tell people the project was $50 plus a freezer.
 
Also, is your 2xGFCI a total price or a price per each? If it was me, I would buy a single one to replace the wall outlet and split a single, non-GFCI to go in the project box. Not sure you need GFCI at all, but I'm not an electrician.

I don't know the size of your project box, but two GFCI outlets are going to take up a lot of space. I used the smallest box I thought I could and space was at a premium for me.
 
To me I see $ as a barrier to me doing this thing.
Even if you can amortize the cost of a coping saw, I imagine I'll use it two more times before I die. Even if I used it 100 times I still need to cough up the dough now. ;)

Keep in mind I'm in Canada and we don't like "do"/"make" stuff, we just steal it from you and then say you're the worst country in the world anyway.

Freezers are very hard to get around these here parts. In the US and especially on the coasts you'll always find rich people throwing out treasures, but that's not so much here. It'll be next to impossible to get a used freezer for < $150 CAD, which to you is about $2.50 USD.


Great idea about replacing the GFCI in the wall. I don't want to mess with the installation as I'm renting.
 
Instead of a freezer how about a larger "mini" fridge for cooling. Built a box using good foam sheet insulation all around for your chamber. A small fan will help circulate your air evenly. Also for heat use a reptile ceramic bulb attached to your two stage controller (I use a Ranco). Much safer than a bulb in a can or mini heater. Also add large casters for easy movement.
 
Why not just a regular mini fridge and a two stage controller ? Ink bird or ranco. Mine holds one bucket of carboy at a time. Would be about $250 total and no cutting or extra tools needed.
 
Why not just a regular mini fridge and a two stage controller ? Ink bird or ranco. Mine holds one bucket of carboy at a time. Would be about $250 total and no cutting or extra tools needed.

Same here, bought a brand new chest freezer and an Inkbird controller. Works great and was just over $200. Plug and play.
 
(My comments in parenthesis)

Here's my price-list.


Any suggestions welcome. Total $415


ItemPrice

ST-1000 temp controller 24.99

hobby box 11.83

14 AWG for wiring 24.00
(Too much wire. Go to a big box store and get 1' of the bulk roll. Save at least $20)

AC cord 24.00
($11: https://www.amazon.com/gp/product/B003OQVGP0/?tag=skimlinks_replacement-20)

heater 40.00
(Paint can/light bulb is much cheaper, but based on a previous post, apparently a reptile heater is healer yet)

wire nuts 7.00 (no need that I can see)

coping saw 12.00 (no need that I can see)

file 12.00 (no need that I can see)

round file 12.00

small drill bit 1.00

nm clamps 7.00 (not sure what this is)

outlet tester 7.00 (no need)

fuse 7.00 (no need)

fuseholder 15.00 (no need)

gorilla glue 4.00

2 x gfci 11.40 (1x not-GFCI for ~$1)

stud finder 20.00 (no need)

thermal insulating tape for probe 25.00 (use scrap cardboard/masking tape)

freezer 150.00

----
Your STC-1000 is about $5 more expensive than mine was and your hobby box is a little more. If prices went up, prices went up. Tough to fight inflation. I would use the smallest hobby box you can fit the controller into.
Your wire is way overkill. Get a foot of bulk wire. That's more than enough. No way it costs more than $1. (-$23)
Your AC cord is WAY too expensive. Mine was about $8, but I can't seem to find it in under 2 minutes. Amazon is great for that stuff. (-$13)
$40 for a heater is also way too much. Paint can/light bulb is much more economical. With a little searching, this should be under $10. (-$30)

Where are you using wire nuts? I didn't (-$7)
I used a dremel to cut holes. Seems like you have way too many tools. Ask friends, somebody's gotta have one (-saw, file, file, drill bit ... -$37)
I don't know what nm clamps are, but I didn't use them. (-$7)
Don't use an outlet tester. Use a lamp (-$7)
Fuse/fuse holder. No need, your breaker will take care of it (any fridge/freezer needs to be on a dedicated circuit, if yours isn't, demand the apartment complex fix the situation. It's code). (-$22)
Gorilla glue. Not sure where this is used. I attached mine with Command strips (3M adhesive that doesn't destroy walls). Leave the $4 in for that.
You don't need GFCI. Get one outlet and split the bar. (-$11 or -$22 if it was price/ea)
What are you doing with a stud finder? (-$20)
Skip the expensive thermal tape and use almost anything you have around your house. Old t-shirt sleeve, some bubble wrap or a bit of cardboard, whatever. It's beer, not a rocket ship. (-$25)

I won't touch the freezer. Sounds like they're not easy to find. Of course, scour craigslist, but it sounds like you might be stuck.

I just saved you >$200.
 
Last edited by a moderator:
View attachment ImageUploadedByHome Brew1465477992.869942.jpg
Lol, sorry. I did use wire nuts.

Anyway, this is how simple the inside should look. No need for a lot of the stuff you listed. Not sure where you're going to stuff $24 of wire. :)

If you really think you need to spend $415, shoot me $150, I'll give you mine, and you can buy a freezer to put it on with the leftover $265.
 
Back to your chiller, I am presuming that you put it the BK in prior to filling it with wort? Could you work the probe in between the coils?
 
Submitted a new thread for the ferm project. Thanks for all your feedback guys
It's here:
https://www.homebrewtalk.com/showthread.php?p=7593781#post7593781

dsniegocki I can't work the probe between the coils or can't figure out how to.

The solution I'm going with is to chill in the mash tun. Don't want to really do that but my BK handles are spot welded and the brew shop guy freaked out and said it's unsafe to carry like that for a couple blocks when full. The coil fits perfectly into the mash tun
 
Wow, this thread got derailed!
Back to the beginning, I just added a thermometer to my BK for BIAB use (not too concerned about ripping a bag, hasnt happened so far in 2 batches of use...
I also was able to borrow "indefinitely" or until a later date a copper immersion chiller which I am now in love with, however the first batch with the thermometer I went to drop it in, and much like your picture it sat right on top of the thermometer...
I WAS able to insert it at an angle and sort of poke the thermometer about halfway up the layers of coils so the chiller would sit flat.
I cant quite find a picture to explain, but my copper coils are not attached to each other and I had enough play/flexibility to wiggle the coils in with the thermometer in between.


NOW on to the ferm chamber stuff: Im assuming these are canadian prices, so Ill skip the fact that the ITC-1000 on amazon is only $16 USD
ST-1000 temp controller 24.99
hobby box 11.83 - use a cigar box, or any small thing you can cut a few holes in easier, plenty of ideas for a project box on the cheap
14 AWG for wiring 24.00
AC cord 24.00 - find a spare IEC cable or a broken appliance that you can snip the wire off of to use (no need to buy an AC cord and clip one end off IMO)
heater 40.00 - could also use a light bulb in a tin can for cheap, though heat MAY be more important for you than for me in NC, USA
wire nuts 7.00
outlet tester 7.00 - multi meter works if you got (though I suspect you may not already have one) might be worth buying a $20 one that can test more than just an outlet
fuse 7.00 - not sure what a fuse is needed for with the GFCIs below, do you have a wiring diagram in mind?
fuseholder 15.00 - same
gorilla glue 4.00
2 x gfci 11.40 - Not sure why two GFCI are needed for a temp controller. The refrigerator should have all its wiring outside and in normal use fridges dont have to be plugged into a GFCI. The heater you MAY want on a GFCI, however I would rather replace the outlet that the ITC/STC plugs into for a GFCI or add an inline GFCI for the whole unit if moisture is going to be an issue.
stud finder 20.00
thermal insulating tape for probe 25.00
freezer 150.00

EDIT, somehow I missed the last page on this thread and all this is redundant pretty much
Also here is a link to the temp controller I made with a cigar box, get creative, no need to have ugly wart on top of your cooler if you can make something nice looking with junk laying around!
https://www.homebrewtalk.com/showthread.php?t=579514
 
Back
Top