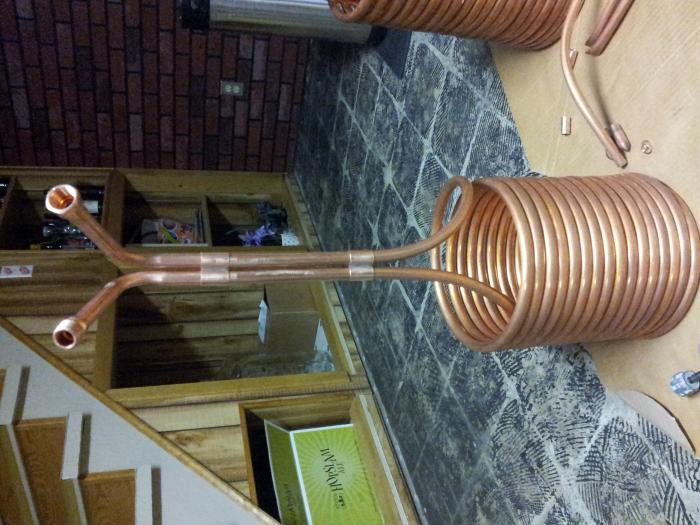
On another note, I just picked up my 60' roll of 1/2id copper coil. I am gonna build my hlt herms coil with it. I like the idea of an inner coil because I mostly do 5 gallon batches. Long ways from being finished with my all electric keggle build.... 
You are using an out of date browser. It may not display this or other websites correctly.
You should upgrade or use an alternative browser.
You should upgrade or use an alternative browser.
What have you built with the HD copper tubing?
- Thread starter Epimetheus
- Start date

Help Support Homebrew Talk - Beer, Wine, Mead, & Cider Brewing Discussion Forum:
This site may earn a commission from merchant affiliate
links, including eBay, Amazon, and others.
Sar_dog great point that I did not think of. I will test as is because another valve will be easy to add even after its built. Thanks for pointing that out I will keep you up to date on how it works once its built.
MindenMan
Well-Known Member
Sure you would have a clue. You deal with it all the time. Drop one ice cube in a drink and it gets colder. Wait until it completely melts and you have efficiently gotten all the possible use from it. In contrast, drop two ice cubes in a drink and pull them out half-melted when the drink is cool enough, throw them away.
Same thing as single-pass and dual pass.
A dual pass uses more water so it cools faster. Done.
The bad part of an immersion cooler is wort circulation. Somehow, you gotta move the wort around so it touches the coils. I was thinking of a small stirrer on a slow electric drill.
fitting sizes
Normal copper pipe
1/2" is 1/2" ID, 5/8" OD
3/8" pipe is 3/8 ID, 1/2" OD
Refrigerator tubing
1/2" is 1/2" OD, just like 3/8" PIPE, so use 3/8 fittings
Schlep the whole big roll back to the store and try various fittings. I did. the 1/2" sweat fittings will be too large.
Yeah, it uses Ts at top and bottom. If you make single pass nested, make 2 coils in the same direction and connect the bottom ends with a straight slip coupling.
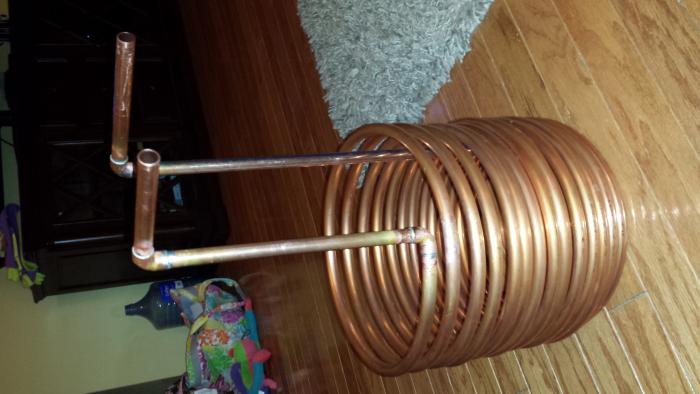
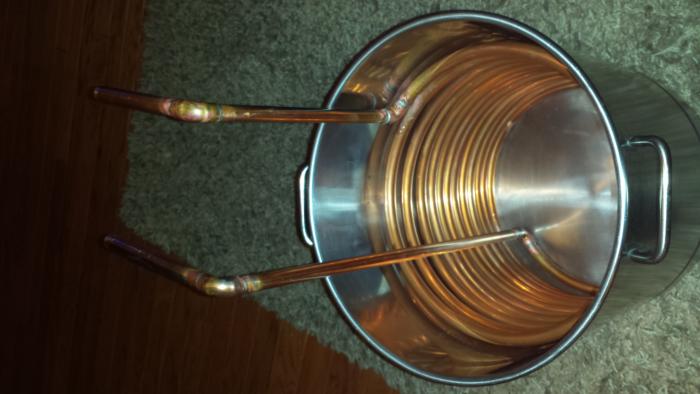
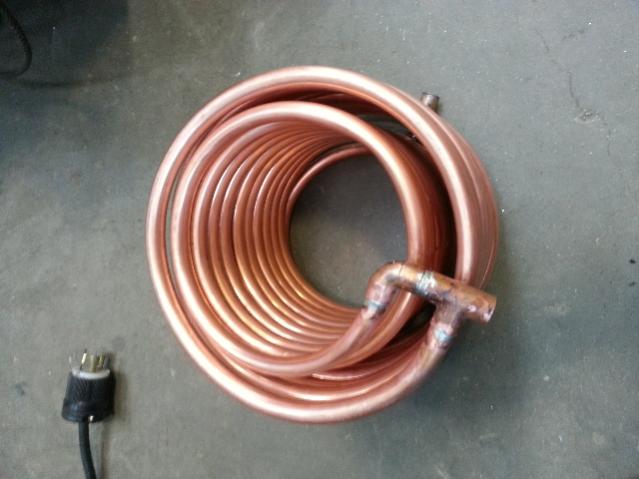
Please look at the picture below, this is how not to wind chiller coils. They are both wound clockwise the same, so both of the in/exit tubes cannot be put together with a slip coupling at my house. I had to make ugly "U" connectors including a tee on both ends. I stopped at adding the connectors as I am not sure of the type or orientation as of yet.
![DSCN0835[1].jpg DSCN0835[1].jpg](https://cdn.homebrewtalk.com/data/attach/134/134813-DSCN0835-1-.jpg)
![DSCN0836[1].jpg DSCN0836[1].jpg](https://cdn.homebrewtalk.com/data/attach/134/134814-DSCN0836-1-.jpg)
![DSCN0837[1].jpg DSCN0837[1].jpg](https://cdn.homebrewtalk.com/data/attach/134/134815-DSCN0837-1-.jpg)
Maybe not the prettiest but I bet it cools wort!?
Mindenman. I did the same thing. Even after reading that others did the same thing. I told myself not to do that but I got a little too excited and just kept going. Lol. Here is what I did to correct it. I hope it helps!


mbbransc
Well-Known Member
I haven't seen anyone mention it but I plan to use the 1/2" 50' as a regular IC chiller (I may do the rib-style) and use my old 3/8" 20' as a pre-chiller in a bucket of ice water.
I was looking online at HD's website and they have some "solderless" copper fittings. Anyone ever used any of those? They call 'em "Sharkbite"
I haven't seen anyone mention it but I plan to use the 1/2" 50' as a regular IC chiller (I may do the rib-style) and use my old 3/8" 20' as a pre-chiller in a bucket of ice water.
Great minds!
MindenMan
Well-Known Member
Mindenman. I did the same thing. Even after reading that others did the same thing. I told myself not to do that but I got a little too excited and just kept going. Lol. Here is what I did to correct it. I hope it helps!
The difference between your coil, is yours looks store bought, damn near perfect. Mine on the other hand looks like Dr.Frankenstein cobbled it together. The "rib cage" design was intentional, and if the connections didn't look so crappy and sloppy, well, you know...
I did the same thing as you, tie the top coil ends together, tie the bottoms the same way, both with a tee connection on both ends.
Black Island Brewer
An Ode to Beer
I haven't seen anyone mention it but I plan to use the 1/2" 50' as a regular IC chiller (I may do the rib-style) and use my old 3/8" 20' as a pre-chiller in a bucket of ice water.
THIS is exactly what I'm doing. My old 3/8 chiller will now go into a bucket of ice to get the last few degrees, especially for lagers, and my new 50' 1/2 inch will be for my keggle. I have a whirlpool port on my keggle and a pump to circulate, so it should speed up chilling nicely!

Black Island Brewer
An Ode to Beer
I was looking online at HD's website and they have some "solderless" copper fittings. Anyone ever used any of those? They call 'em "Sharkbite"
I couldn't get the sharkbite fittings to work. Regular compression fittings did.
Philistine
Well-Known Member
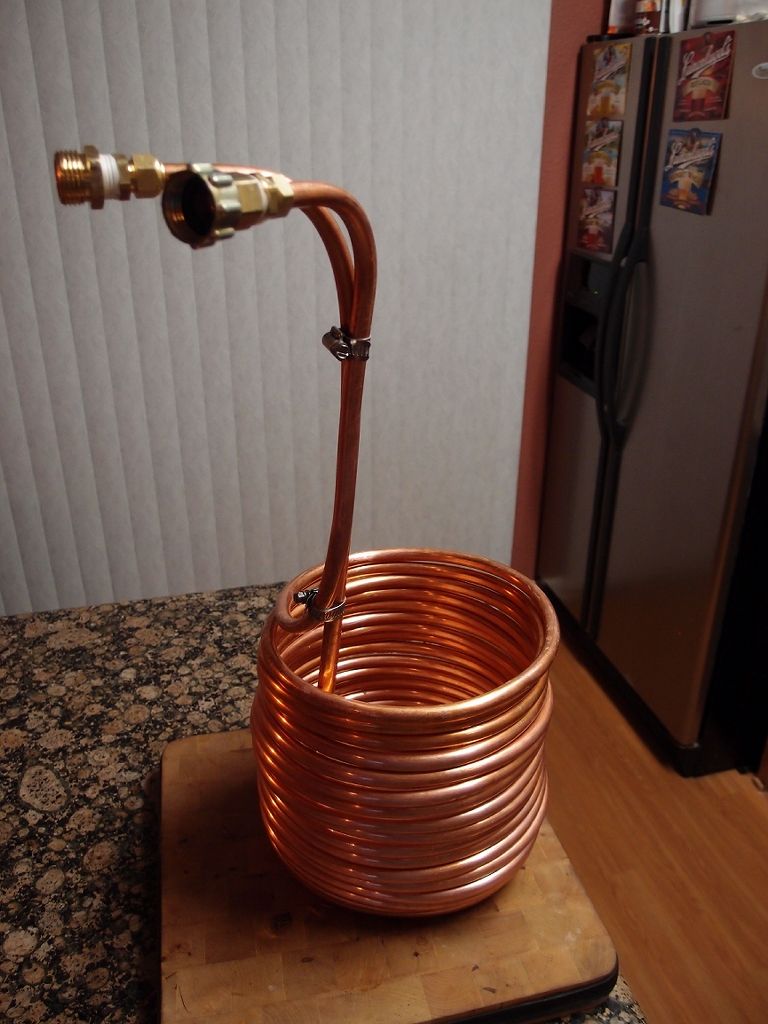
Here's mine. I got a second 50 ft length after I built this one just because it was so cheap.

Epimetheus
Well-Known Member
Mindenman. I did the same thing. Even after reading that others did the same thing. I told myself not to do that but I got a little too excited and just kept going. Lol. Here is what I did to correct it. I hope it helps!

Sar_dog, you design with the coils in the same direction is a better design than mine, as I found out AFTER I built it. It is better to have the coils going in the same direction because you can drain it more easily. Mine drains pretty well when I hold it upside-down, however, there is always the last few splashes stuck in there. With my coils in opposite directions, when you turn it the water spirals OUT of one coil, and IN the other one. With your design, you turn the coil one way and they both empty out.
ultravista
Well-Known Member
Subscribing ...
Justdrumin
Well-Known Member
Mindenman. I did the same thing. Even after reading that others did the same thing. I told myself not to do that but I got a little too excited and just kept going. Lol. Here is what I did to correct it. I hope it helps!
With your design, does the water run through both coils? It looks like it might bypass the outside coil. Just curious. I haven't pulled the trigger on using the coil I bought because I want to find the best design. I want dual coil because I only do 5 gallon batches. Unless ya'll think the 60' 1/2" I'd won't be too tall for a 5 gallon full boil batch.
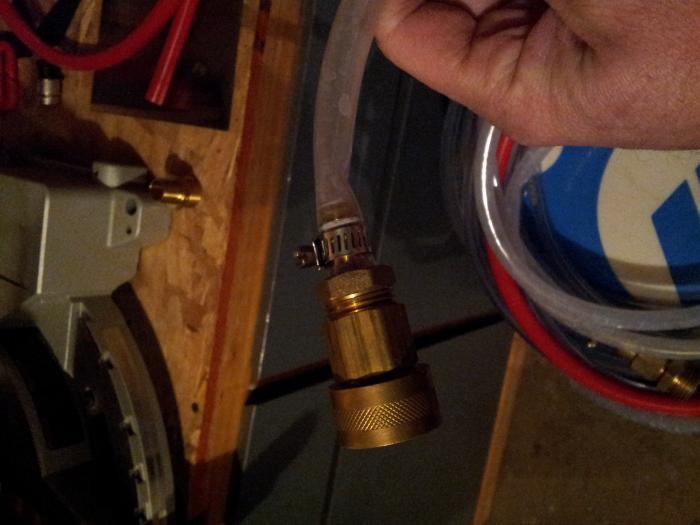
Since I've had a few folks ask about what fittings I used for the inlet & outlet, I thought I would post it. These work well for garden hoses but still considering something else, so I can easily connect/disconnect lines/hoses (maybe Camlocks since we use them for the rest of our brewery?)
Here is what I used but we built our chiller using 1/2 ID (5/8" OD) copper, so if you use a different size these wouldn't work for you:
2 x 039923037381 copper 1/2" Male Adapter (@$1.58/each) from Home Depot. Yes, these are sweated/solder on.
1 x 098268624731 WATTS LFA-668 Brass 3/4" MH x 1/2" FIP (Garden Hose) Adapter from Home Depot.
1 x 71938 Hose Adapter (swivel) 3/4" female hose threads with 1/2" female pipe threads - from ACE Hardware but I'm sure HD has them also.
Hope this helps!
Robert
GypsyBrew
I've been trying to find this info in other threads but am having a hard time searching for it. Does anyone know about how far from the sides of the pot it's recommended to construct an immersion coil? I don't know if I should be just shy of flush up against the sides, 1/2 an inch in, 1 inch in, or what.
I'm also wondering if there are recommendations for kitchen sink hook ups. It seems most people are using actual garden hoses. If I'm using a kitchen sink should I still get garden hose ends for my coil and connect to the sink that way via an adapter, or would some sort of camlock connection be better recommended?
I'm also wondering if there are recommendations for kitchen sink hook ups. It seems most people are using actual garden hoses. If I'm using a kitchen sink should I still get garden hose ends for my coil and connect to the sink that way via an adapter, or would some sort of camlock connection be better recommended?
Thanks, I actually did pick up the Watts lead free brass garden hose male and female connectors from HD when I got my cheap copper coil. I'm wondering though if they would be recommended for kitchen use as well as outdoor, attaching a small length of garden hose between kitchen sink and immersion coil, or if it would be better to make the sink to immersion coil connection with camlocks or some other connection type instead. I was planning on starting my soldering next weekend but wanted to get some opinions on what end piece might be best for my coil considering use with a standard kitchen sink.
chickens4life
Well-Known Member
what sar dog was referring to is a sink to garden hose adapter, that is all that you need to use the chiller with garden hose fittings indoors. and every hardware store should have that (and a lot of homebrew stores will to).
Ah, right sorry. Maybe I'm not being clear. I understand it's possible to connect a kitchen sink to the immersion chiller via garden hose adapters, I'm just wondering if that's considered the best way to do this. I know most people connect actual garden hoses and thought maybe that's why people do it with kitchen sinks too, for convenience with what's common.
Because I have no reliance on garden hoses, given other options should I still just stick with garden hose connections?
Because I have no reliance on garden hoses, given other options should I still just stick with garden hose connections?
Ah, right sorry. Maybe I'm not being clear. I understand it's possible to connect a kitchen sink to the immersion chiller via garden hose adapters, I'm just wondering if that's considered the best way to do this. I know most people connect actual garden hoses and thought maybe that's why people do it with kitchen sinks too, for convenience with what's common.
Because I have no reliance on garden hoses, given other options should I still just stick with garden hose connections?
you can use whatever hose ya want, just buy the right barb. so if ya get a 3/8" hose get a 3/8" barb to 1/2' or 3/4" npt to connect to your hose fittings and just attach that to the sink. only way to make it work is to get the hose attachment fitting for the sink..make sence?
Epimetheus
Well-Known Member
I know most people connect actual garden hoses and thought maybe that's why people do it with kitchen sinks too, for convenience with what's common.
Because I have no reliance on garden hoses, given other options should I still just stick with garden hose connections?
the garden-hose-to-faucet adapter is popular because faucet heads take special fine threads, and I've never seen any other adapter than to 3/4 MGHT (that's tech speak for male garden hose thread).
Like this picture. This one happens to be on the Walmart site. Fine threads on one side for the faucet, 3/4 MGHT threads on the other.

Now, once you have male garden hose threads, you can use a barbed fitting like below to hook up to vinyl tubing or garden hose or any type of tubing of the desired diameter. Or, seeing how the faucet-to-3/4-thread adapter is already there, you could use a garden hose.

hungry4hops
Hop to it!
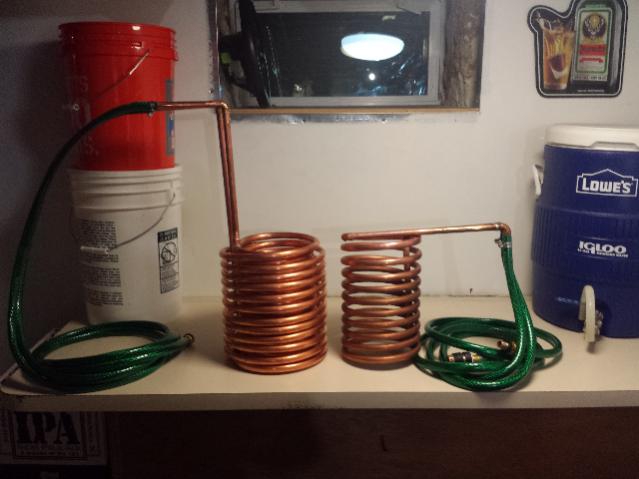
Here's mine! 60' 1/2" double coil next to my old 20' 1/2" can't wait to take it for a test run!


ultravista
Well-Known Member
hungry4hops - how did you get the coils coiled so even?
I've got 50 ft of the 5/8 tubing.
I've got 50 ft of the 5/8 tubing.
hungry4hops
Hop to it!
Take it slow Dont rush, it also helps to hold the beginning in place so that the entire coil stays tight
ultravista
Well-Known Member
Take it slow Dont rush, it also helps to hold the beginning in place so that the entire coil stays tight
What are you wrapping the inner and outer coils around?
hungry4hops
Hop to it!
What are you wrapping the inner and outer coils around?
I used a keg for the outer coil and a gallon paint can for the inner coil
ultravista
Well-Known Member
Is it one solid continuous coil? How do you coil, start with one end, get to where you think the middle is, then start the larger coil? Are the inner and outer coils the same length, about 25 ft?
MindenMan
Well-Known Member
With your design, does the water run through both coils? It looks like it might bypass the outside coil. Just curious. I haven't pulled the trigger on using the coil I bought because I want to find the best design. I want dual coil because I only do 5 gallon batches. Unless ya'll think the 60' 1/2" I'd won't be too tall for a 5 gallon full boil batch.
Yes, in theory the water runs through both coils at the same time. Due to ell's and kinks, it may not be at the same volume exactly. But instead of taking heat out in 1 coil and putting it back in in the second being in series, parallel cooling actually being a by-product of a winding mistake.
Justdrumin
Well-Known Member
Here's mine! 60' 1/2" double coil next to my old 20' 1/2" can't wait to take it for a test run!
This is the design I will do. You had to wind the coils in opposite directions right? And how did you figure out how long to make each coil? Are they both the same length? Thanks! I just ordered some cornys for my new chest freezer too : D so I just need to go to my dads and find a paint can in his garage.
hungry4hops
Hop to it!
This is the design I will do. You had to wind the coils in opposite directions right? And how did you figure out how long to make each coil? Are they both the same length? Thanks! I just ordered some cornys for my new chest freezer too : D so I just need to go to my dads and find a paint can in his garage.
Yup opposite directions, They were the same length but the inner coil ended up being slightly taller. I just spaced out the outer rings a bit so they would be the same height. I'm wasent sure how to measure out the lengths, but I'm happy the way it turned out
Similar threads
- Replies
- 0
- Views
- 656
- Replies
- 6
- Views
- 1K

