StillDragon DIY Controller Kit

Homebrew Talk - Beer, Wine, Mead, & Cider Brewing Discussion Forum

Help Support Homebrew Talk - Beer, Wine, Mead, & Cider Brewing Discussion Forum:

This site may earn a commission from merchant affiliate links, including eBay, Amazon, and others.

hio3791

Well-Known Member
Joined
Mar 23, 2011
Messages
535
Reaction score
155
Location
Pittsburgh
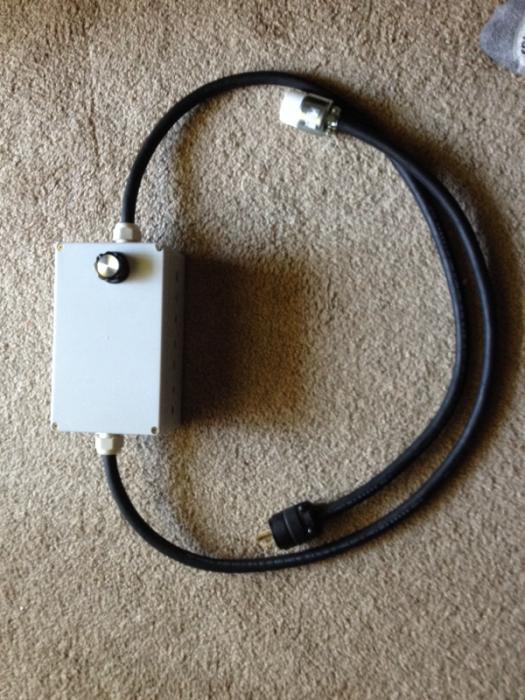
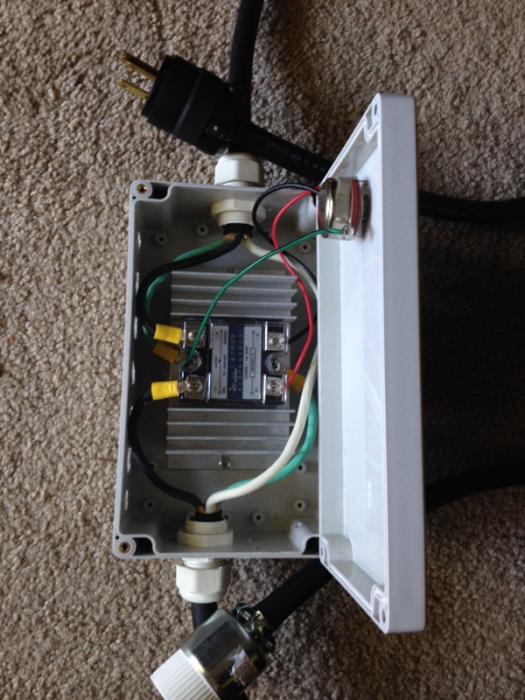
Anyone has the StillDragon DIY Controller kit and wouldn't mind posting some pics?

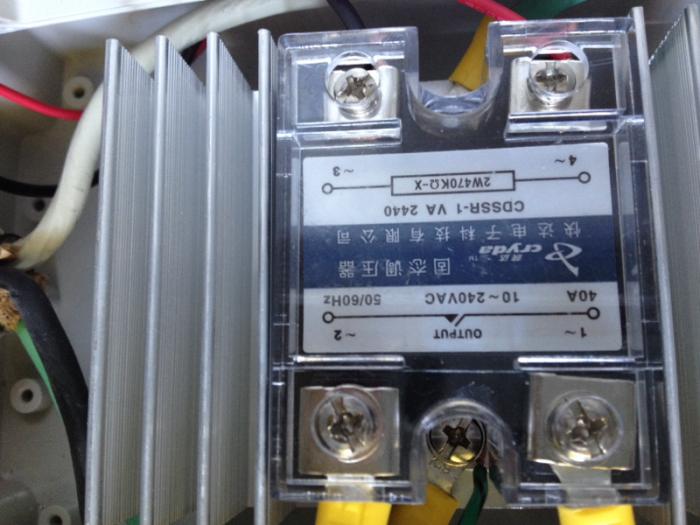
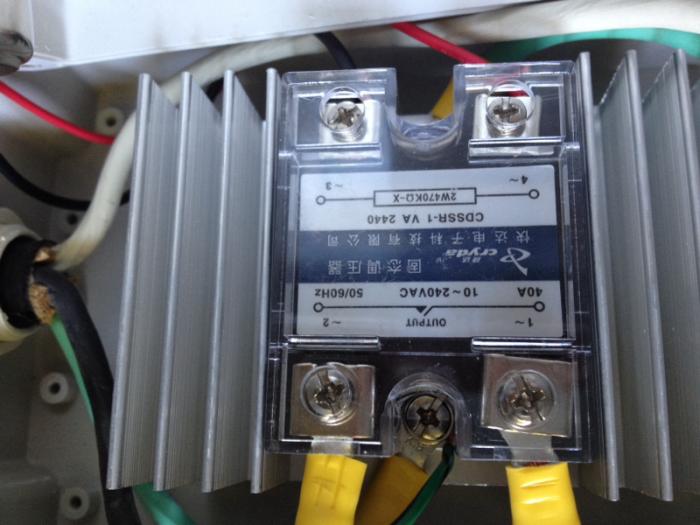
I'd like to hear your thoughts, good and bad. I'd also like to know more about the SSR in the kit. The website says SSR but wouldn't it be an SSVR in order to regulate the power with a potentiometer? And is it a 40 amp SSVR (or SSR)?

I am really close to switching to electric brewing. I brew in the garage and it so happens, it's where the service panel resides. Putting in a 30 amp gfci breaker and running a line should be fairly easy.

I think the StillDragon controller meets my needs but I may make some minor modifications to it. I'd like to add a switch so I can cut the power (like an eStop) and it would also be nice to put a light after the switch so that I can visually verify the element is powered. Should be easy to wire everything as long as I get a switch and light rated for 240V / 30A.

Would be nice to add an outlet for my pump but that would add complexity. I already have a gfci circuit in my garage that I connect the pump to so I really don't need to add a 120V outlet to the controller. But I haven't made my mind on that addition yet.

Sorry for the long winded post. I would like to get feedback on this controller.
 
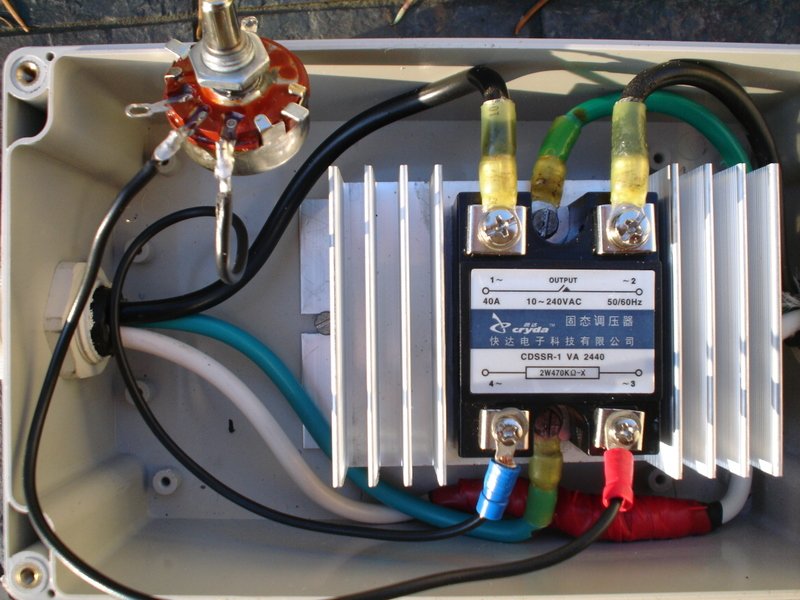
I believe it's a 40A SSVR. Here's a picture from the Stilldragon forum.

4492b06dc9ee8bcea2136ed7ec529c.jpg


For the switch you might use something like this: http://amzn.to/1bexJvx Or just turn it off at the breaker.

You can wire up a 220V led in parallel: http://amzn.to/1c6r30O
 
Thanks Alien but now I am even more confused. I see 3 lines coming in, 2 hot lines (black and white) and 1 ground (blue). But if I am running HHNG, how would N be wired?
 
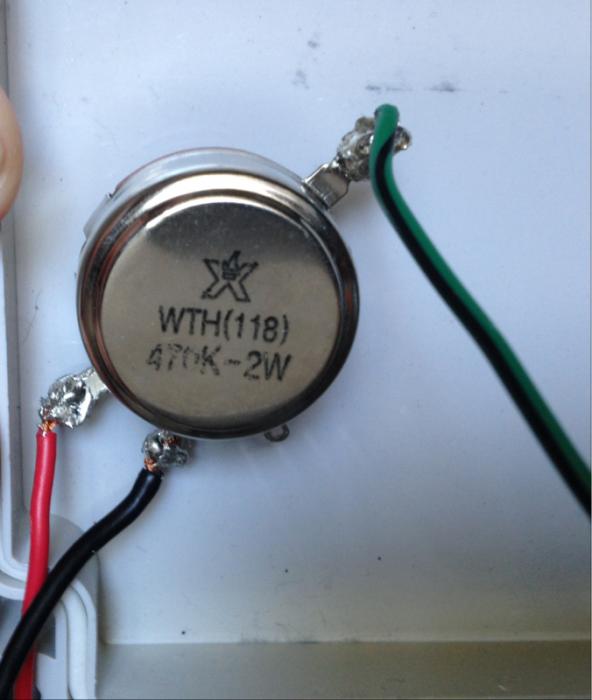
There are 2 grounds attached to the base. The fat black wires are hot in and hot out. The skinny black wires connected to the rheostat govern the output. NB they are also hot.

Assuming this is 240V, the other hot line is the white wire that connects straight through. White is usually reserved for the neutral wire. Perhaps that is what is confusing you. You don't need to run HHNG to a 240V element, just HHG.
 
Thanks Alien, but I understood the picture just as you described it. My question is, if I run from a GFCI breaker, wouldn't I have HHNG coming into this controller and that being the case, what would I do with the neutral line?

As a side note, I came across other forums where the rheostat on this controller is grounded, which it isn't in this picture.
 
hio3791 said:
Thanks Alien, but I understood the picture just as you described it. My question is, if I run from a GFCI breaker, wouldn't I have HHNG coming into this controller and that being the case, what would I do with the neutral line?

As a side note, I came across other forums where the rheostat on this controller is grounded, which it isn't in this picture.

The Neutral, in this case, would just be capped unless you were to get a bigger box and wire up a pump or something else that requires 120V.
 
I recently got and built this controller. It is perfect for my simple ebiab needs.

To confirm...Yep, it's a 40amp ssvr. Yes, ground the rheostat, using the 4th tab that is off center from other 3 tabs. As for extra wire on your 240v set up, I believe you'd just cap it as a previous post mentioned.

I currently use the controller for my 2 - 120 v element setup, which allows finer control of one element during boil and mash.

My pic of internals would be same as above, but with addition of rheostat grounded to ssr as well. Can post some if you'd still like...

Cheers!!
 
so so new to this...such a newb question. I've ordered this stilldragon controller and plan to use it with the brew hardware element enclosure that has a screw to clamp down the neutral wire.

solgoman, I don't see how/where the neutral runs to the pot?
 
Neutral does not run to the pot.

Solgoman's controller looks like it is being used for 110V rather than 220V. The white wire is Neutral and goes connects directly to the output.

When the kit arrives, you can try looking/asking on the StillDragon forum also. I'm sure plenty of people have the same questions that you do. :)

Im going 220. Cheers!
 
so so new to this...such a newb question. I've ordered this stilldragon controller and plan to use it with the brew hardware element enclosure that has a screw to clamp down the neutral wire.

solgoman, I don't see how/where the neutral runs to the pot?

That screw in the housing is for ground... not neutral.

I built my still dragon kit much different from standard. I made spacers to mount the heatsink mostly outside the box. Where the center flat area is sits just proud of the lid surface and I sealed around with high temp RTV. This allowed me to keep the box "water tight" ( really just splash resistent). I also have the power in/out on the same end of the box to make the cable clutter in my brew area more manageable.
 
These are actually very reasonably priced kits.... the components alone still come to about $50-60 if bought separately and waiting weeks for shipping from various venders...
 
These are actually very reasonably priced kits.... the components alone still come to about $50-60 if bought separately and waiting weeks for shipping from various venders...

And mine was shipped same day. Should be here today or tomorrow. So pumped!
 
When it runs on full power (5500watt heater on 100% ) for 10 minutes or more heatsink became very hot. It can be used without a fan but you need a lots of vent holes below and above heatsink..
 
Hmm. It would be handy if they sold kits with fans.
Not many 120v fans that small that are reasonably priced....most are dc requiring another powersupply... This linked would increase the cost of the parts about $30.
I bet many people would prefer to just buy a 12v fan and powersupply for $10 if given the choice... or at least buy their own $25 120v fan.

EDIT**** the comment above have been edited as I got the wrong price for the wrong kit when I googled this item the first time.
 
If you are using it at 120Volts most likely your load I'd drawing not more than 15 Amp. In that case SSVR generate much less heat.
 
Not many 120v fans that small that are reasonably priced....most are dc requiring another powersupply... This linked would increase the cost of the parts about $30. which if the markup was comparible to what it is on the rest of the kit, would bring the cost of this kit up by about $60-80 and likely more if they have to drill the hole for you.
I bet many people would prefer to just buy a 12v fan and powersupply for $10 if given the choice... or at least buy their own $25 120v fan.

Perhaps I was being rather too charitable. This is the point that I was trying to get across.

The kit is advertised as a 5500W controller. But Lloyd StillDragon recommends a fan to operate at 5500W. So why isn't the fan in the kit :|
 
Perhaps I was being rather too charitable. This is the point that I was trying to get across.

The kit is advertised as a 5500W controller. But Lloyd StillDragon recommends a fan to operate at 5500W. So why isn't the fan in the kit :|
Well when put that way you make a very good point.
My point way simply be carefull what you wish for because a $25 fan increases the cost quite a bit

EDIT when I first googled this kit I was taken to a site that suggested the kit cost quite a bit more than the $31 I just found when taking another look... kudos for stilldragon this is the most reasonable kit Ive seen period for what you get for the money.
 
I have this kit. Abandoned the original enclosure it came with. Much too small for heat dissipation. I bought a small ammo can from amazon with a gasketed lid and used that. I have an amp/volt meter and a fan pushing heat out continuously. I run the fan using a wall wort and male and female adapters from eBay. I was given a small panel power converter also but can't use it without 4 wire coming in. I use a spa panel, so no neutral is available.

Anyway I like the kit. I have around 15 or so batches with it. Works well for me. I just wish the 240v receptacles were cheaper so unplugging the heavy/awkward wires was possible.
I have never seen a spa panel without neutral ? I have two spa panels one for my beer and one for..well my spa. I wired them both and they are certainly 4 wire wit two hots a ground and neutral. I run 220 and a 120v circuit off it for my panel..the 120v circuit mainly runs a dc powersupply supplying 24v and 12v dc for my relay coils and fan/pump power.
and switchcraft plugs are a cheap 30A rated option... Its what I and many others here use. there are other options too that dont break the bank.
 
just put the heatsink in the wort too, it will help you get to a boil faster

Is that supposed to be funny? Are you sampling a lot of homebrew at the moment? :drunk: be careful what you suggest... I seen a naive kid flush his engine out with hot water and run it till it seized because another forum member told him it was the best way to remove engine sludge...
 
I have never seen a spa panel without neutral ? I have two spa panels one for my beer and one for..well my spa. I wired them both and they are certainly 4 wire wit two hots a ground and neutral. I run 220 and a 120v circuit off it for my panel..the 120v circuit mainly runs a dc powersupply supplying 24v and 12v dc for my relay coils and fan/pump power.
and switchcraft plugs are a cheap 30A rated option... Its what I and many others here use. there are other options too that dont break the bank.

To my understanding (don't quote me on this): my stove receptacle is 3-wire 240v, HHN. No ground. Instead of re-wiring the house (which isn't mine) I made the spa panel and bonded the N to G. So I have my kettle grounded using the neutral, which leaves me with HHG effectively until I get an outlet capable of running 4 wire to my panel. I have also been told its not up to code to bond the neutral to the ground unless its in the main panel or something. But with no other options this was the route I was directed towards.

Thanks for the advice on the plugs. Do you have a link handy?
http://www.mouser.com/search/refine.aspx?N=4294959356&Keyword=hpc
 
Ok, so I have a couple of questions about this. I just got this kit. The only wire I could fine in my garage was 10/4. I'll have to check my 30A outlet in their, it "may" be 10/3 but I"ll double check.

If I were to use the 10/4, basically I would run 1 hot into the SSR #1 input(from the outlet), and the hot from the SSR #2 input going to the heating element. The other hot, would just go straight through, from the outlet, into the other input on the heating element. The ground would go from the outlet, into the ground on the SSR, then the other ground from the SSR would go to the ground screw on my keggle element container. Then I should just cap of the neutral on the outlet side, run it straight through the box, and then cap it on the keggle side? Does that all sound right?

Question #2, if I wanted to also wire in a voltage/amp reader. Would 1 wire go to the hot in, and the other wire to the hot out, is it that simple?
that should work... although I strongly advise a GFCI.

10/3 has 4 wires btw they dont count the ground as a wire for some reason...
 
that should work... although I strongly advise a GFCI.

10/3 has 4 wires btw they dont count the ground as a wire for some reason...

I will see if I can check my welding wire outlet and see if that is HHG and not HHNG. My understanding between 10/3 and 10/4, they both have ground wires, but the 10/4 one, the ground has a covering on it like the other wires.

Anyone have a link for reasonable GFCI options, most of the breakers I see are double or triple the price I just paid for this controller kit :-(
 
I will see if I can check my welding wire outlet and see if that is HHG and not HHNG. My understanding between 10/3 and 10/4, they both have ground wires, but the 10/4 one, the ground has a covering on it like the other wires.


Anyone have a link for reasonable GFCI options, most of the breakers I see are double or triple the price I just paid for this controller kit :-(


I got my gfi spa panel at lowes for around 50$. Then the cost of running 10/3 line in and out made it around 100$ (plugs and receptacles included).
 
There are inline 20A gfci units that are much cheaper than $50 which will work if you go with a 4500w element instead of the 5500w ... I use the 4500w elements and they are plenty for 5 or 10 gallon batches..

I totally agree the extra cost stinks but in the long run even $50 is nothing compared to the piece of mind and the life it could save...

You know, I do have a 4500W element right now, not a 5500W, now that I think about it. Here is my question though, that puts it at 18.75A requirement. Is there any surge amperage when you fire this up, that could cause it to go over 20A and trip the breaker? Or I suppose I could set my Potentiometer at 75% at startup and not worry about that? You thoughts?

As afar as inline units, is this what you are talking about?

http://www.amazon.com/dp/B00279LG50/?tag=skimlinks_replacement-20
 
Last edited by a moderator:
No there is no surge since it pure resistive load. However I'd reccomend to set potentiometer to "min" position every time when you switching your controller on or off.
 
To measure voltage on element you need to connect it in parallel to element (black wire to to one SSVRvoutput red wire to second hot which going straight to element. And you need to put any hot leg through that black transformer (ring). But be aware - power supply inside that meter doesn't like chopped sin wave produced by SSVR so you have a good chance to burn it out.

So I'd reccomend to connect black wire to SSVR in. This way voltmeter will show not the voltange on an element but your mains voltage (ie 240v). But you will see changing amps going through an element.
 

Latest posts

Back
Top