
After many years of working overseas in hot climates, my wife and I agreed that we could never settle back in the UK again with its predictably dismal climate. There followed a lengthy process of elimination regarding our eventual retirement location. After considering and rejecting far-flung possibilities, such as Australia, Thailand, etc., we agreed that our European roots would always be a lure to us. It would also provide reasonably easy/quick access to family in the UK, which is essential. So, we quickly dismissed all of northern Europe (after all, the weather is not much better than in England) and settled for a very southerly point of the mainland continent: Algarve, Portugal.
Having made the decision and bought a property, we spent a lot of time getting to know the place and people, never regretting our decision. However, even with the lovely people, fantastic food, low cost of living, and wonderful climate, there was an important element missing: decent beer.
Portugal produces a number of lagers that range in quality and taste, but are generally acceptable to the palate on a hot day. However, they are still lagers of the “Euro-Fizz” variety that, in quantities greater than a ½ liter (16oz pint), do not appeal to someone brought up on proper English Ale. A few cans and bottles of imported beer occasionally appear on the shelves, but these are generally very expensive. One or two microbreweries exist, but they tend to make very strong bottled beers in small quantities that are expensive.
I therefore resolved to make my own beer. I tried kits with limited success when I was a penniless student, and I have tasted excellent beers in microbreweries in the US, Australia, and Singapore. With the growing popularity of microbreweries in the UK and elsewhere, I decided to pursue full mash brewing. That decision was the easy part. I did not anticipate that turning my idea into reality was going to create challenges at every step.
The first issue was kit size. I had floated the idea of making my own English ales to a number of friends and acquaintances here, and from their enthusiastic responses, I realized that there was a niche market among fellow expats in Portugal. A brew size of around 200 liters therefore seemed about right to start with and could be fitted into a small-purpose built (3.5m x 4.0m) brewhouse in my garden. Getting the structure built was relatively easy using our regular Portuguese builder who is talented at making new features, additions, and extensions in a way that captures our traditional property architecture.
For the kit, I wanted to replicate large-scale breweries as much as possible, rather than settle on home brew adapted buckets and pots. This meant going for purpose-built, stainless-steel vessels throughout. BrewBuilder in the UK supplied me with a 200-litre hot liquor tank (HLT), mash tun, and boiler, together with two 100-litre fermentation vessels, plus a HERMS system with all fittings, hoses, mini-pumps, and coil and temperature controls. Getting all the gear to southern Portugal was not too difficult; my neighbor runs a small transport and removal company and makes regular trips to the UK. He made a slight detour to Bristol from his planned route and collected most of the main equipment. A few items (false bottom, temperature controller, etc.) were not ready, but Mark at BrewBuilder was happy to send them later.
When all the kits arrived, I realized that the contents of my tool box were not equipped to properly assembly everything. All taps and fittings had to be installed in a particular way and required me to buy some large-diameter spanners from the local DIY center. Getting all the fittings leak tight was a challenge, but I eventually managed it after a lot of time and sweat. The summer shade temperatures here can exceed 40° C. Since I had no choice but to assemble everything in the garden, it was difficult. Another issue was that the mini-pumps have 12 V DC motors, so I had to search building supply shops for a couple of 240 V AC/12 V DC transformers. The 3,000 W heating elements in both the HLT and boiler also had to be wired, which meant locating suitably rated cable, connectors, and power plugs.
Over the next few months, I managed to get everything assembled and in place in the brewhouse. My design involved having the HLT elevated so it gravity feeds the mash tun (MT) for both filling and sparging. This involved a heavy lift of the tank, including in-place fittings and a steel HERMS coil, which sprained my right arm. You have to suffer for your passion! Fortunately, once the HLT was in place, it would not need to be moved again.
One of the mini-pumps is used for HERMS-liquid circulation and subsequently, by switching around hose connections, for post-mash transfer of the wort to the boiler. The second pump is used to transfer the boiled liquid to the fermentation vessel (FV) via a plate heat exchanger that is cooled by cold tap water. Because I wanted to gravity feed the fermented beer to my maturation tank, I needed the FV to be elevated above the boiler. My initial FV elevation selection was too high. Even though the pump can produce a differential head of 3m, there is considerable frictional pressure loss in the plate heat exchange. I consequently had to lower the height of the FV a little. Fortunately, there was sufficient available height to still allow gravity transfer to the maturation tank. I also had to make the hose between the boiler and pump as short as possible.
A major problem occurred when I tried to commission the system using just water to test for leaks and assure correct flow paths, etc. When I applied power to the two HLT elements, the brewhouse circuit breaker tripped. The installed 15-amp breaker was not sufficient for the load, so I had an electrician replace it with a 20-amp breaker.
Meanwhile, in addition to the equipment setup, I had to think about ingredients. Algarvian natural spring water is hard and not greatly conducive to brewing. However, most domestic water is treated rain water from reservoirs and also transferred by pipeline from the north of the country during droughts. A visit to the local council offices produced a water analysis and a webpage address where regular water reports are published. This indicated that no additional water treatment was required for brewing. The local water tends to be over treated, which imparts a chemical taste. The simple solution is to filter water for drinking, so I had my plumber fit an inline water filter in the brewhouse.
The next ingredient to be sourced was the malt. I wanted to make English ales and bitters similar to those I routinely chose in the UK. I therefore needed to acquire recipes for these types of beers. Luckily, a very good friend of mine had given me a copy CAMRA’s Brew Your Own British Ale by Graham Wheeler. This book is full of good recipes for popular beers; plus brewing fundamentals, good practices, and hints and tips. I selected a half a dozen for my initial product slate. The book is aimed at the home brewer, so the maximum brew capacity is 25 liters. I merely up-scaled the recipes to suit my brewery capacity. Most importantly, each recipe quotes the type of base and adjunct malts, the type of hops and when to add them, plus mashing time, boiling time, and total liquor volumes.
Finding a supplier was not so easy. There is no shortage of malt producers in the UK and northern Europe, but many will only supply to VAT-registered companies and not private home brewers. The same goes for commercial hop suppliers. However, after an Internet search, I came across a company in Holland called The Swaen. A very helpful fellow home brewer named Csaba at The Swaen offered to supply my needs. I gave him a list of the types of English malts I was looking for, and he suggested equivalents from their product catalogue. A few weeks later, a palate of fourteen 25 kg bags of malt arrived by truck. Fortunately, I had cleared out a storage cupboard in our kitchen courtyard, and it was just big enough to store the malt in dry but naturally airy conditions.
Hops, yeast, and Irish moss were less of a problem, since they are used in such small quantities. I found I could get them shipped easily from home brew shops in the UK. I use vacuum packed hop pellets and dried yeast, although I am told that liquid yeast produces better results.
So by the time I had everything in place and was ready to brew, November had arrived. Maximum ambient temperatures in November are in the low 20s C, which was low enough to brew and offer reasonably cool maturation conditions. For my first brew, I chose a recipe based on Fullers ESB. This was an old favorite of mine. Virtually all the local beers are around 5% ABV, so I chose a number of recipes with a similar alcohol content. Although my main equipment capacities are 200 liters, I decided to make 100 liters of final production in order to have plenty of hot liquor for a good sparge and to allow for boil off. This also allowed me to use one of the FVs for fermentation and one for maturation.
My brew routine has become as follows: one day of preparation (malt milling, equipment checks, measuring exact quantities of yeast, hops, Irish moss, etc.) followed by one day of brewing (heating HLT, mashing, sparging, boiling, and transfer to FV) followed by at least one day of cleaning (MT, pumps, boiler, hoses, H/E).

I have learned a few lessons from my first brew (maximize sparging, wait until FV liquor is at a low enough temperature before pitching the yeast, use a hop bag to minimize mess, etc.) and applied them to my next brew, a 5.8% Old Peculiar recipe that has another four weeks before it achieves optimum condition. My friends and I are getting so impatient for the next brew that I am in the middle of ordering additional fermentation and maturation tanks. My next door neighbor has his 50th birthday coming up. When I asked him what he would like as a present he said, “More of your beer!”
Having made the decision and bought a property, we spent a lot of time getting to know the place and people, never regretting our decision. However, even with the lovely people, fantastic food, low cost of living, and wonderful climate, there was an important element missing: decent beer.
Portugal produces a number of lagers that range in quality and taste, but are generally acceptable to the palate on a hot day. However, they are still lagers of the “Euro-Fizz” variety that, in quantities greater than a ½ liter (16oz pint), do not appeal to someone brought up on proper English Ale. A few cans and bottles of imported beer occasionally appear on the shelves, but these are generally very expensive. One or two microbreweries exist, but they tend to make very strong bottled beers in small quantities that are expensive.
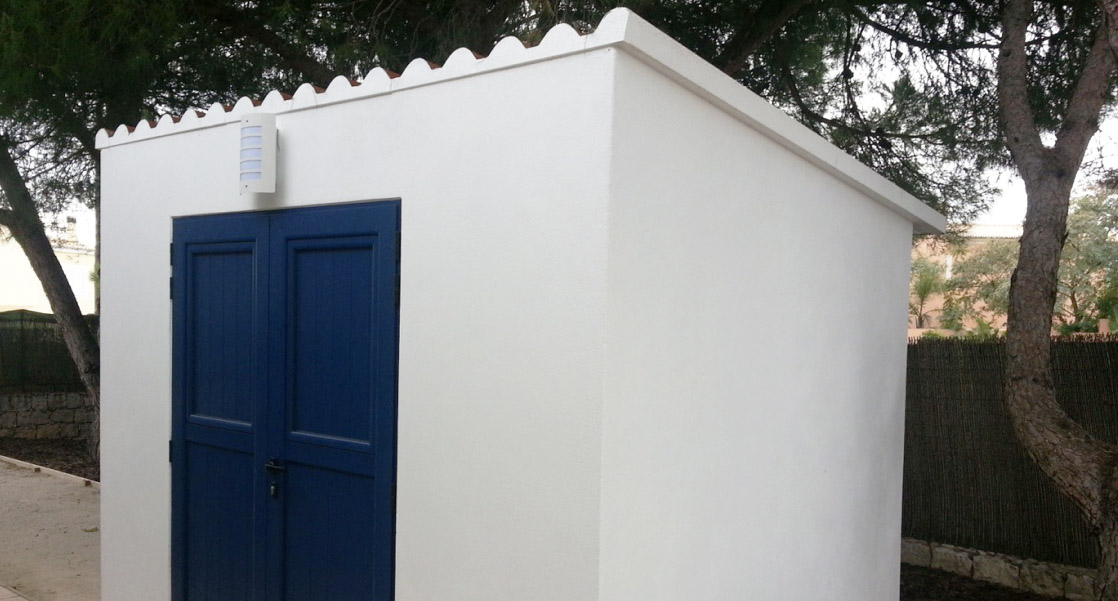
Brewhouse for the 50 Gallon Setup
I therefore resolved to make my own beer. I tried kits with limited success when I was a penniless student, and I have tasted excellent beers in microbreweries in the US, Australia, and Singapore. With the growing popularity of microbreweries in the UK and elsewhere, I decided to pursue full mash brewing. That decision was the easy part. I did not anticipate that turning my idea into reality was going to create challenges at every step.
The first issue was kit size. I had floated the idea of making my own English ales to a number of friends and acquaintances here, and from their enthusiastic responses, I realized that there was a niche market among fellow expats in Portugal. A brew size of around 200 liters therefore seemed about right to start with and could be fitted into a small-purpose built (3.5m x 4.0m) brewhouse in my garden. Getting the structure built was relatively easy using our regular Portuguese builder who is talented at making new features, additions, and extensions in a way that captures our traditional property architecture.
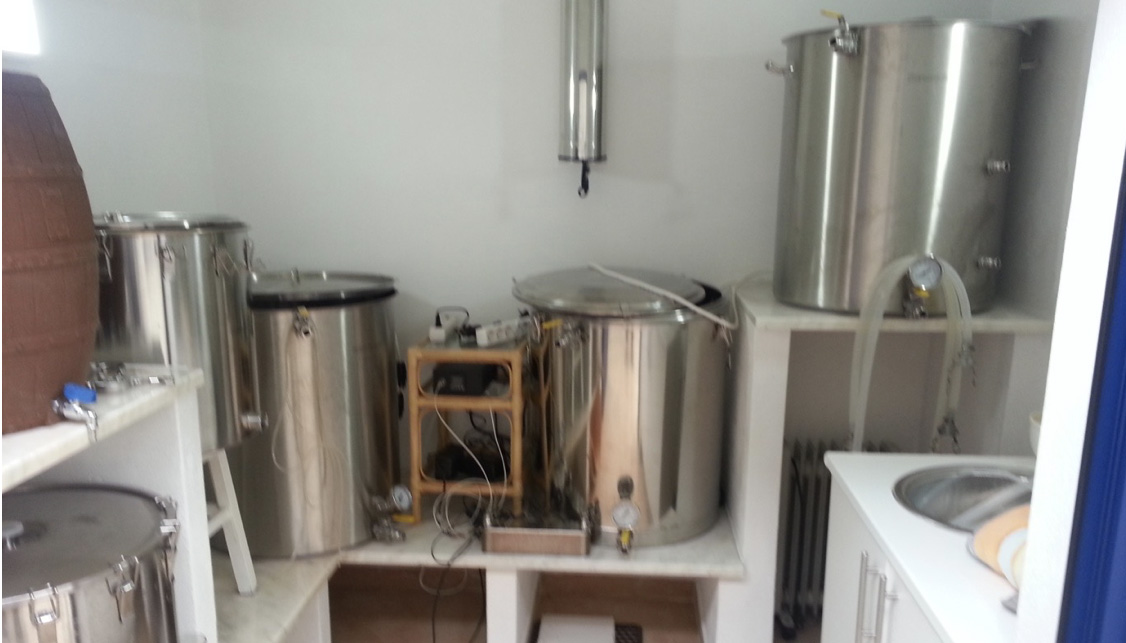
For the kit, I wanted to replicate large-scale breweries as much as possible, rather than settle on home brew adapted buckets and pots. This meant going for purpose-built, stainless-steel vessels throughout. BrewBuilder in the UK supplied me with a 200-litre hot liquor tank (HLT), mash tun, and boiler, together with two 100-litre fermentation vessels, plus a HERMS system with all fittings, hoses, mini-pumps, and coil and temperature controls. Getting all the gear to southern Portugal was not too difficult; my neighbor runs a small transport and removal company and makes regular trips to the UK. He made a slight detour to Bristol from his planned route and collected most of the main equipment. A few items (false bottom, temperature controller, etc.) were not ready, but Mark at BrewBuilder was happy to send them later.
When all the kits arrived, I realized that the contents of my tool box were not equipped to properly assembly everything. All taps and fittings had to be installed in a particular way and required me to buy some large-diameter spanners from the local DIY center. Getting all the fittings leak tight was a challenge, but I eventually managed it after a lot of time and sweat. The summer shade temperatures here can exceed 40° C. Since I had no choice but to assemble everything in the garden, it was difficult. Another issue was that the mini-pumps have 12 V DC motors, so I had to search building supply shops for a couple of 240 V AC/12 V DC transformers. The 3,000 W heating elements in both the HLT and boiler also had to be wired, which meant locating suitably rated cable, connectors, and power plugs.
Running Into Issues
Over the next few months, I managed to get everything assembled and in place in the brewhouse. My design involved having the HLT elevated so it gravity feeds the mash tun (MT) for both filling and sparging. This involved a heavy lift of the tank, including in-place fittings and a steel HERMS coil, which sprained my right arm. You have to suffer for your passion! Fortunately, once the HLT was in place, it would not need to be moved again.
One of the mini-pumps is used for HERMS-liquid circulation and subsequently, by switching around hose connections, for post-mash transfer of the wort to the boiler. The second pump is used to transfer the boiled liquid to the fermentation vessel (FV) via a plate heat exchanger that is cooled by cold tap water. Because I wanted to gravity feed the fermented beer to my maturation tank, I needed the FV to be elevated above the boiler. My initial FV elevation selection was too high. Even though the pump can produce a differential head of 3m, there is considerable frictional pressure loss in the plate heat exchange. I consequently had to lower the height of the FV a little. Fortunately, there was sufficient available height to still allow gravity transfer to the maturation tank. I also had to make the hose between the boiler and pump as short as possible.
A major problem occurred when I tried to commission the system using just water to test for leaks and assure correct flow paths, etc. When I applied power to the two HLT elements, the brewhouse circuit breaker tripped. The installed 15-amp breaker was not sufficient for the load, so I had an electrician replace it with a 20-amp breaker.
Meanwhile, in addition to the equipment setup, I had to think about ingredients. Algarvian natural spring water is hard and not greatly conducive to brewing. However, most domestic water is treated rain water from reservoirs and also transferred by pipeline from the north of the country during droughts. A visit to the local council offices produced a water analysis and a webpage address where regular water reports are published. This indicated that no additional water treatment was required for brewing. The local water tends to be over treated, which imparts a chemical taste. The simple solution is to filter water for drinking, so I had my plumber fit an inline water filter in the brewhouse.
The next ingredient to be sourced was the malt. I wanted to make English ales and bitters similar to those I routinely chose in the UK. I therefore needed to acquire recipes for these types of beers. Luckily, a very good friend of mine had given me a copy CAMRA’s Brew Your Own British Ale by Graham Wheeler. This book is full of good recipes for popular beers; plus brewing fundamentals, good practices, and hints and tips. I selected a half a dozen for my initial product slate. The book is aimed at the home brewer, so the maximum brew capacity is 25 liters. I merely up-scaled the recipes to suit my brewery capacity. Most importantly, each recipe quotes the type of base and adjunct malts, the type of hops and when to add them, plus mashing time, boiling time, and total liquor volumes.
Finding a supplier was not so easy. There is no shortage of malt producers in the UK and northern Europe, but many will only supply to VAT-registered companies and not private home brewers. The same goes for commercial hop suppliers. However, after an Internet search, I came across a company in Holland called The Swaen. A very helpful fellow home brewer named Csaba at The Swaen offered to supply my needs. I gave him a list of the types of English malts I was looking for, and he suggested equivalents from their product catalogue. A few weeks later, a palate of fourteen 25 kg bags of malt arrived by truck. Fortunately, I had cleared out a storage cupboard in our kitchen courtyard, and it was just big enough to store the malt in dry but naturally airy conditions.
Hops, yeast, and Irish moss were less of a problem, since they are used in such small quantities. I found I could get them shipped easily from home brew shops in the UK. I use vacuum packed hop pellets and dried yeast, although I am told that liquid yeast produces better results.
Ready to Brew
So by the time I had everything in place and was ready to brew, November had arrived. Maximum ambient temperatures in November are in the low 20s C, which was low enough to brew and offer reasonably cool maturation conditions. For my first brew, I chose a recipe based on Fullers ESB. This was an old favorite of mine. Virtually all the local beers are around 5% ABV, so I chose a number of recipes with a similar alcohol content. Although my main equipment capacities are 200 liters, I decided to make 100 liters of final production in order to have plenty of hot liquor for a good sparge and to allow for boil off. This also allowed me to use one of the FVs for fermentation and one for maturation.
My brew routine has become as follows: one day of preparation (malt milling, equipment checks, measuring exact quantities of yeast, hops, Irish moss, etc.) followed by one day of brewing (heating HLT, mashing, sparging, boiling, and transfer to FV) followed by at least one day of cleaning (MT, pumps, boiler, hoses, H/E).
I have learned a few lessons from my first brew (maximize sparging, wait until FV liquor is at a low enough temperature before pitching the yeast, use a hop bag to minimize mess, etc.) and applied them to my next brew, a 5.8% Old Peculiar recipe that has another four weeks before it achieves optimum condition. My friends and I are getting so impatient for the next brew that I am in the middle of ordering additional fermentation and maturation tanks. My next door neighbor has his 50th birthday coming up. When I asked him what he would like as a present he said, “More of your beer!”
