Second Time All Grain - Stuck Sparges and the benefit of brew buddies

Homebrew Talk - Beer, Wine, Mead, & Cider Brewing Discussion Forum

Help Support Homebrew Talk - Beer, Wine, Mead, & Cider Brewing Discussion Forum:

This site may earn a commission from merchant affiliate links, including eBay, Amazon, and others.

knotquiteawake

Well-Known Member
Joined
Aug 24, 2009
Messages
1,210
Reaction score
52
Location
Dallas TX
My first all grain attempt went really smoothly. I used my smaller cooler because the grain bill was small enough to do it and I used a grain bag that fit my my 5 gallon cooler. It was great. I'm pretty sure i hit all my target gravity.

With my overconfidence in hand i upgraded to a 10 gallon cooler, a slightly larger grain bill, and invited some friends over to brew and drink. We were making the well known Deception Sweet Stout from the forums here.

I tossed the grains directly in the mash tun putting my faith in the steel braid to filter. This was a mistake. Within seconds of draining we were clogged up good. No amount of stirring or anything was fixing it.

Thankfully my friends were there to help, this would have been a pain to do on my own or request assistance from my wife.

I had one guy holding a small metal mesh colander over the kettle while i scooped grain and mash out of the mashtun, then another guy put the drained grains into my old grain bag. We did this until the mash tun was almost empty, i rinsed the mash tun out, back-pressured the hose, and cleared the clog.

Then i had them put the grains in the smaller grain bag BACK into the mash tun and on top of the steel braid. Then i ran the wort back through the mashtun again because I'm pretty sure a LOT of grain got into the kettle by mistake too and so i wanted to filter all that out.

This time using the grain bag I had no clogs. I ran my second batch sparge through no problem, ended up with exactly 6.5 gallons pre-boil.

At pitching time I was pretty short at 1.050 instead of 1.059. but there was sugar, there was yeast, and there was malty delicious wort so its all good. Its bubbling away now.

I'm still in love with all grain. Also i've ordered a custom mesh bag for the cooler. No more stuck sparges.

Is there a term for running wort back through the mash (other than "oops")?

Relax, don't worry, have a homebrew.


(side note, everyone should have a friend with a portable pizza oven. One of the guys brought one called an Uuni, and it basically made brewday like hanging out at a brewpub).
 
I basically vorlauffed the entire first runnings.

This was probably not warranted. So what if a few grain particles make it to your boil pot and on to the fermenter. They will not likely to give up their tannins in the boil because the wort should be too acidic for that and when the ferment is over they will either be at the bottom with the rest of the trub or floating on top.
 
This is exactly why everyone should use a bag in their mash tun. Glad it turned out well.

I love this method. It makes it so much easier and removes all the processes of sparging and vorlaufing, at least in my case. I do a “full volume” mash and it simplifies things tremendously. And after having a stuck mash where the grains got under the false bottom, there are no issues with a bag. It even makes cleanup so much easier.
 
As another possible method, I use a false bottom with a 6" section of braided stainless attached to my diptube under the false bottom (secondary filter for the small tan food grade pumps I use). This have worked very well for me over the years and I recirculate with a rims so consistent flow is important.. I think starting the flow very slowly helps prevent stuck sparged too.
 
I too MIAB and will never go back. I have a false bottom and bazooka too, may seem like overkill but it makes for a clearer, cleaner wort going into the boil kettle, less goopy cold break after chilling, and no grain bits to worry about, either in the boil, pump, or fermenter. And the cleanup is something to rave about. Before I had the bag I would let the mash sit in the tun to cool and occasionally "forget" about it (read: got lazy and tired and didn't feel like cleaning it) to the point my garage stunk like a compost heap. Now once the bag is drained I just dump it out, rinse it good in hot water, and hang it to dry; I don't even worry about getting the last few bits of grain out of it, because once it's dry I just shake it out, snap it a few times, and it's perfectly clean and ready for next brew day. I've even used it for hops in batches where my hop bill was bigger than any bags I had on hand and it did great.
 
Another MIAB guy. I use a 50 Qt rectangular cooler and a bag. I started with a bazooka screen and went through the whole vorlauf process and a batch sparge, but I was consistently hitting 62%. I wanted to do a big stout (over 12%....25 lbs of grain) and I knew I'd never come close to hitting my numbers. I switched to MAIB and immediately jumped to over 70%.

My big stout came in at 12% with 25 lbs of grain... I was very happy with that. The only thing that will make me switch from MIAB is possibly switching to electric recirculating BIAB (though probably using a basket instead of a bag).
 
I have a heavy duty braid from a water heater supply line. I can bash the crap out of it. It keeps the grains out. Only the stickiest mashes will clog it. When I have a questionable recipe I add rice hulls. I had only one stuck sparge in now 98 batches and with that one I stirred in a handful of rice hulls and proceeded. No bag to clean....
 
I know this is an older post, but the following may help someone......

I have fixed the stuck mash problem! It's easy, use a brew bag, use a pump to under let the strike water, then recirculate the wort WITHOUT ever stirring the mash tun. That's right, don't stir the mash! Yep, throw out that mash paddle. And don't worry, brewing is still fun. Under letting really does prevent dough balls. Where as stirring the mash causes the grist to settle out in layers. Think about yeast cleaning in how the fine particles suspend then settle on top, same thing happens in the mash tun. I crush my grist directly into the mash tun alternating bowl fulls of the malts into the mill as a means of mixing, though it's not really necessary. I also use a flowmeter on the output of my pump for consistency and proof that my mash never even slows down. I under let the mash tun at 2 gallons per minute and then immediately start to recirculate the wort at 3 gallons per minute for a 10 gallon batch.

The brew bag is essential for clear wort to the kettle, just as leaving the hops, and the cold and hot break material in the kettle is important for clear wort to the fermenter. I whirlpool my NEIPA hops at 160 F and then let the wort settle in the kettle overnight. I get all the hop flavor without dry hopping and as a nice side effect the fermenter never erupts krausen out the airlock, even with a hefeweizen. The theory being the yeast cling to the solids causing greater movement which leads to faster fermentation and the eruption. My beers have improved dramatically since I started clear wort brewing. It is right up there with oxygen free brewing techniques. Try it.
 
every situation/setup is truly different... Ive underlet in my home system with great results but on my larger 3bbl system its had a number of shortcomings like drastically lower mashin temps at the top of the grain bed because of the continuous cooling of the water as it travels through the grainbed to the top. Also I have in fact found doughballs which although werent dry in the middle, they were a much lighter color than the surrounding grain leading me to believe that proper flow was not getting to and through that area. I also found that my rims was unable to properly even out the temps before much of the conversion was done with a 5gpm rims flow rate on such a large brew size. This was partly due to the 10-15 degree or so difference between the water at the top and the water near or below the false bottom. So while is seems to work for my 5 and 10 gallon brew sizes, I can see why its not used in larger scale brewing often.
 
very situation/setup is truly different... Ive underlet in my home system with great results but on my larger 3bbl system its had a number of shortcomings like drastically lower mashin temps at the top of the grain bed because of the continuous cooling of the water as it travels through the grainbed to the top. Also I have in fact found doughballs which although werent dry in the middle, they were a much lighter color than the surrounding grain leading me to believe that proper flow was not getting to and through that area. I also found that my rims was unable to properly even out the temps before much of the conversion was done with a 5gpm rims flow rate on such a large brew size. This was partly due to the 10-15 degree or so difference between the water at the top and the water near or below the false bottom. So while is seems to work for my 5 and 10 gallon brew sizes, I can see why its not used in larger scale brewing often.
Yes, I also have the same effect happening with my 10 gallon set up. But the mash temperature is always stabilized within 10 minutes of recirculating. While scooping out the waste grist, I have never seen anything resembling a dough ball. I use a wide mash tun, false bottom and a single addition mash ratio of 2.6 qt/lb which greatly reduces the temperature differences. The no stir, no sparge approach yields about 80% mash efficiency which is acceptable for a little easier brew day.

At the same time, I'm sure this approach does not scale up well. But keep in mind if you scaled up this approach you would be recirculating at ~28 gallons per minute and need a 15,000 watt RIMS. I normally start my mash at 145F for the beta amylase rest and then ramp up through the alpha amylase temperature range prior to transferring to the boil kettle.
The amount of false bottom surface area to recirculate at that 28 gallons per minute without compacting the bed would be insane... I do have 9000w of rims heating avaliable although I have it set to a max of 70% duty cycle to help keep the ULWD elements even lower watt density and because even now I can raise the wort 10 degrees in one pass at 5gpm... when we mash in the traditional way the rims works fine to raise and stabilize temps quickly enough and also to step mash. (we also raise to between 158-162 for head retention prior to mashout)

At home I normally stir in the mash... I get close to 100% mash efficiency and average 91% brewhouse efficiency. at the brewpub I only average 86%.
This is really cool stuff! Your numbers trend very nicely with my flow rate, power to RIMS, and the increased wort temperature (3.5 degrees at 3 gallons/min). Since my wort pump basically runs non-stop, except for most of the boil, I find it advantageous to monitor the strike water and wort temperature with a dual BBQ wireless thermometer with the probes at the RIMS input and output. I also step mash with the RIMS and finish the mash above 158F. I look at the RIMS and wort pump as a single entity, the RIMS is always in the liquid flow path and also aids in heating the strike water, and bringing the wort to a boil.

To me it seems that 5gpm is too slow for 3bbl (~120 gallons strike water) and a 10 degree increase for RIMS would be too much. I need to decrease my RIMS power toward the end of the mash to prevent the alpha amylase from denaturing. I use SCRs for power control, as opposed to PID controllers.

So I guess your high home efficiencies are due to fly sparging? My numbers....I'm embarrassed to say are ~80% mash and ~55% for brewhouse. Okay, I know, crazy, but it's a very easy single run mash. And the 55% brewhouse number is due to my clear wort approach to brewing. I leave all the hops, whirlpool hops, and cold and hot breaker in the kettle, which is usually about 3+ gallons of trub. BTW, clear wort into the fermenter makes yeast harvesting much easier!

I like your comment about the high mash out temperature and head retention. BTW I'm an ex-New Yorker living in NC, even spent a year and half in Lockport.
My rims tube is 6 ft long so it applies that heat wattage to a lot of very low watt density surface area and I have no issues. at home my 1800w rims element is 5/8" diameter and 36" long also preventing any denaturing with the low 1.8gpm flow rate I use to prevent the grainbed from compacting. I also get nothing but clear wort going into the boil kettle on both systems and very very little trub in the conicals which I can dump from the bottom if I ever wanted to completely eliminate it but since I dont reused the yeast its not a concern. I do use hop spiders or bags normally.
on a 3bbl system the amount of strike water is about 75 gallons on average btw.
 
Last edited:
My rims tube is 6 ft long so it applies that heat wattage to a lot of very low watt density surface area and I have no issues. at home my 1800w rims element is 5/8" diameter and 36" long also preventing any denaturing with the low 1.8gpm flow rate I use to prevent the grainbed from compacting. I also get nothing but clear wort going into the boil kettle on both systems and very very little trub in the conicals which I can dump from the bottom if I ever wanted to completely eliminate it but since I dont reused the yeast its not a concern.

It's amazing the different configurations of brewing systems and procedures. I save $25 every time yeast is recycled. Kind of makes up for my poor efficiencies.

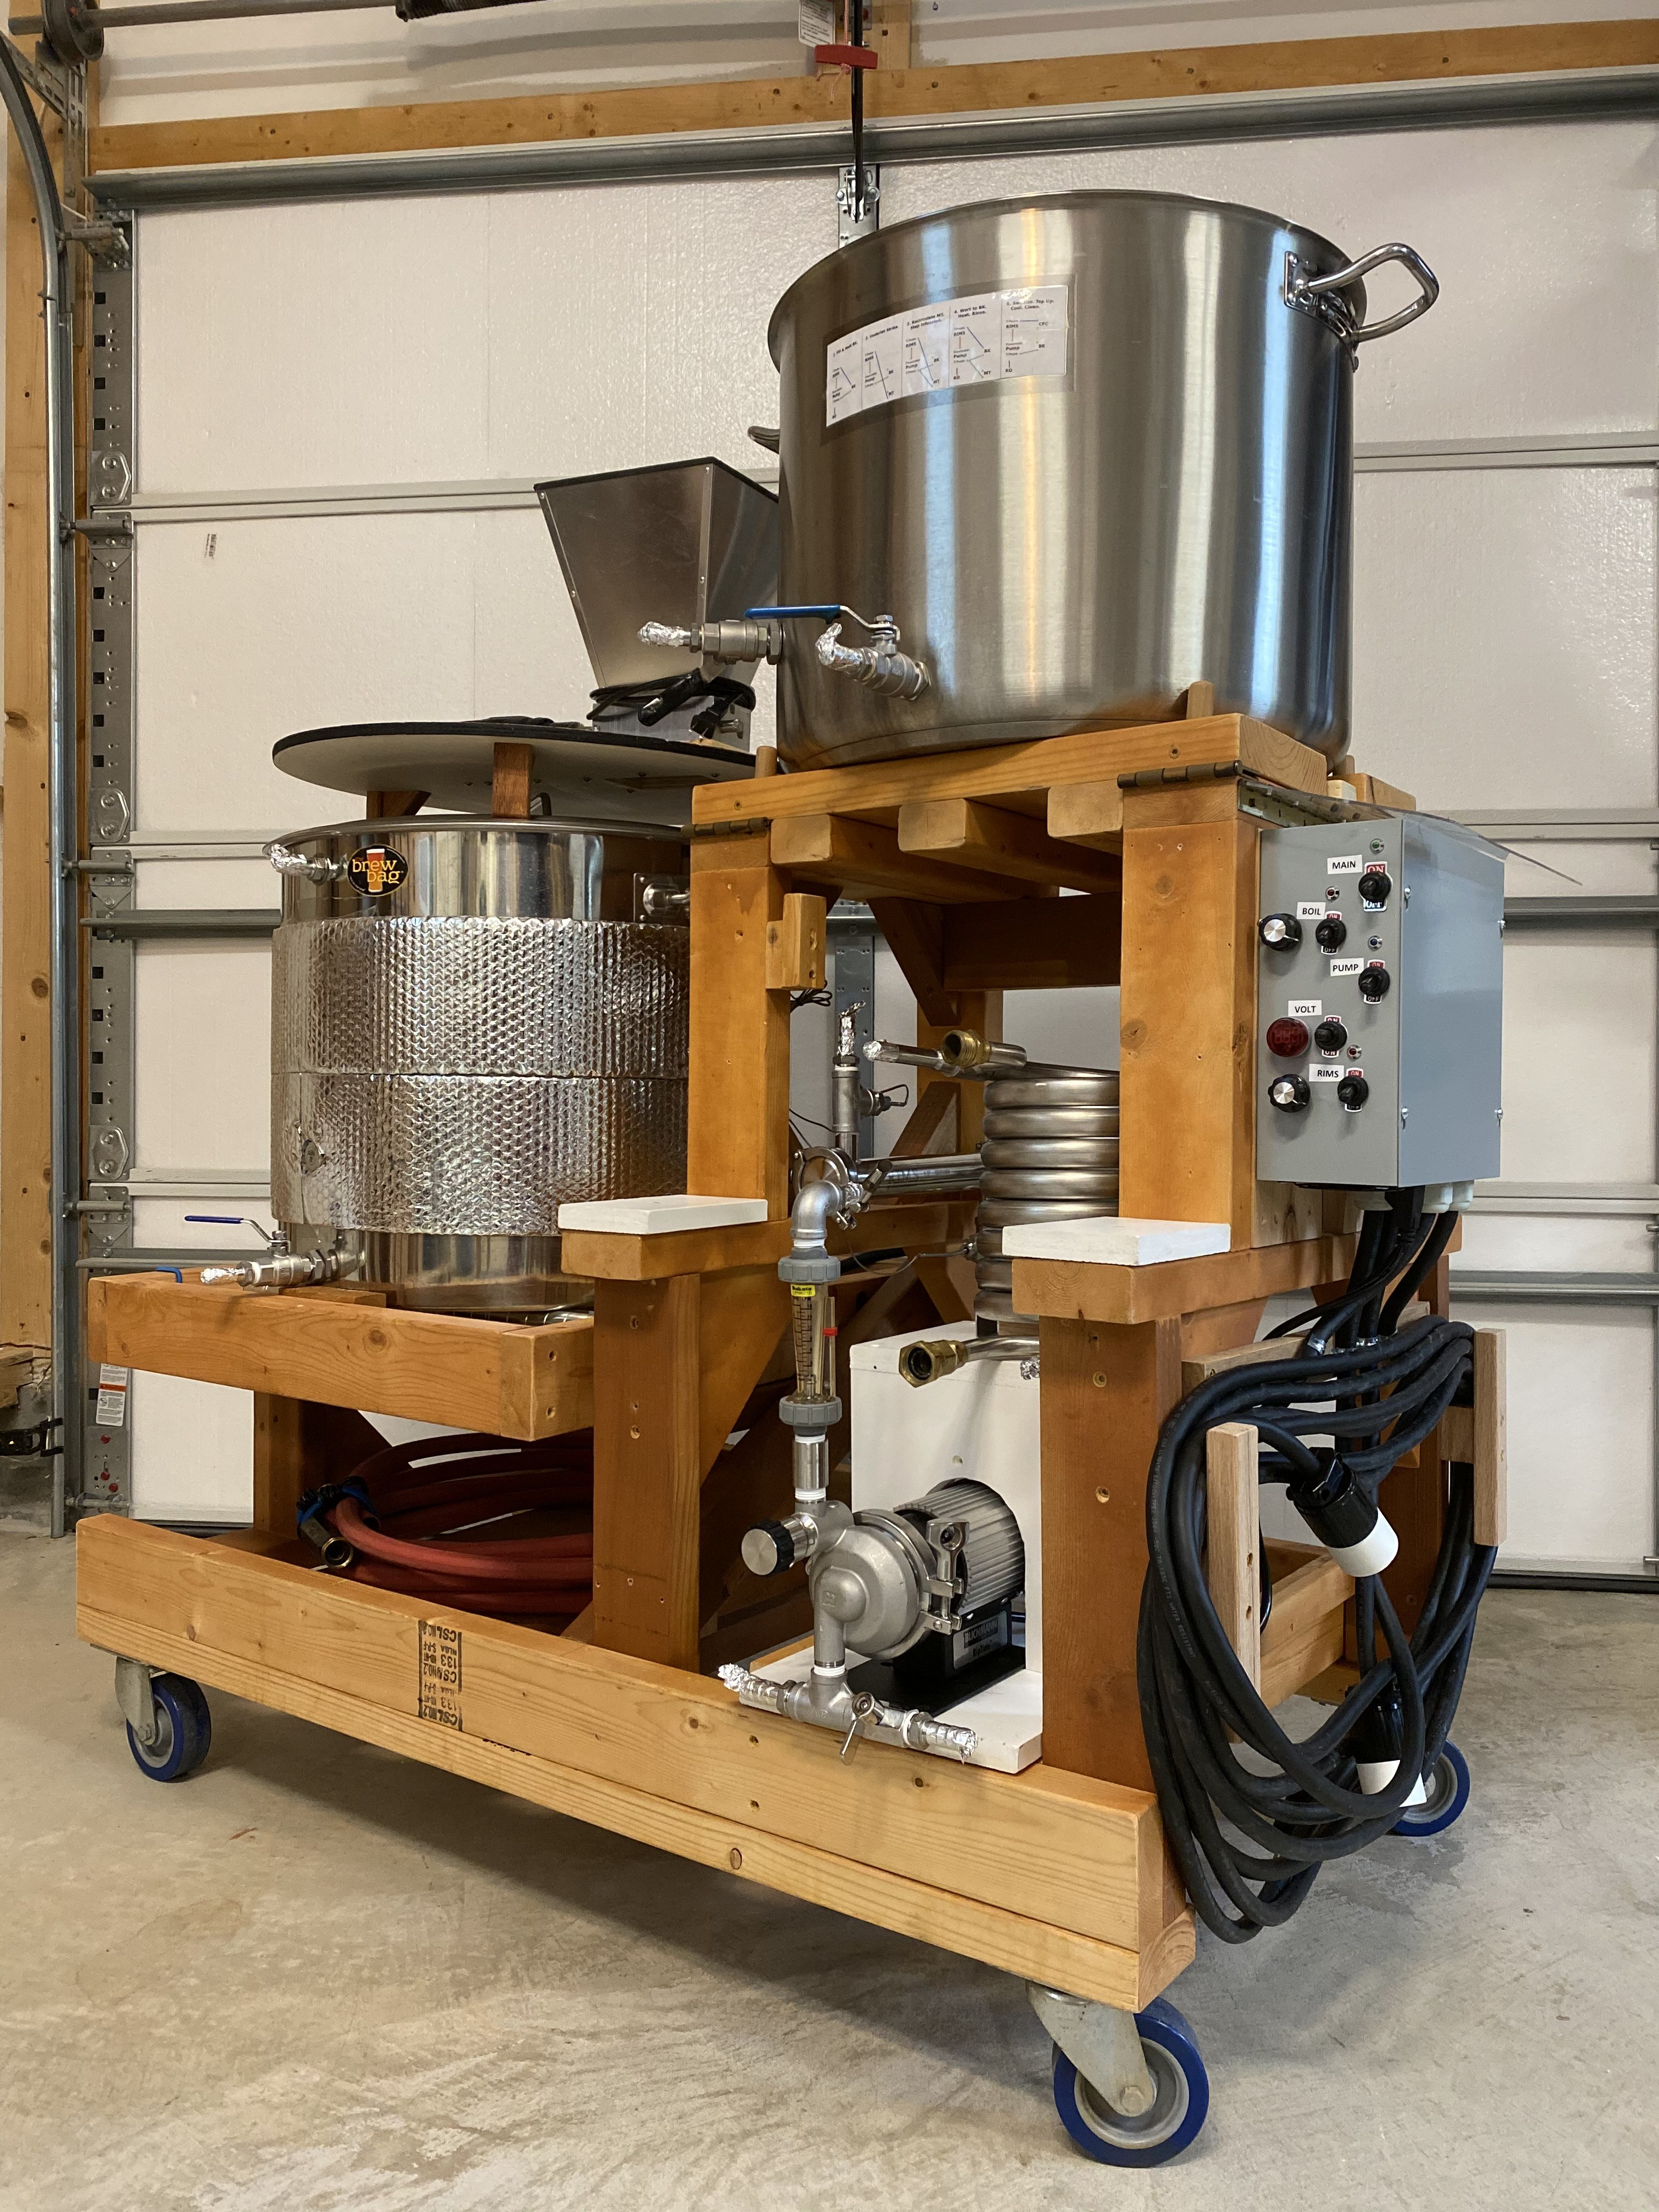
My baby just had it's portrait taken. I seem to like the process as much as the beer.
Electric Brew Cart.jpeg
 
Back
Top