You are using an out of date browser. It may not display this or other websites correctly.
You should upgrade or use an alternative browser.
You should upgrade or use an alternative browser.
Ready or Not E-BIAB Here I Come....
- Thread starter aubiecat
- Start date

Help Support Homebrew Talk - Beer, Wine, Mead, & Cider Brewing Discussion Forum:
This site may earn a commission from merchant affiliate
links, including eBay, Amazon, and others.
Thanks for the reply.
Mine seems very bright. The lamp part is fine and cool, its the stem that was hot. I imagine there is something inside stepping down the voltage to the LED, that's probably whats getting hot.
I'll run mine again tonight and get a temp reading off the stem.. maybe I'm being too subjective on what 'hot' is.
OP
OP
aubiecat
Well-Known Member
Maybe it's the angle I'm looking at it or something. Hope I didn't get a bad one. I already had to return the temp. sensor for a new one.
I will run mine with the cover off and check it with my digital thermometer to see what we have.
I will run mine with the cover off and check it with my digital thermometer to see what we have.
OP
OP
aubiecat
Well-Known Member
aubiecat,
did you cut the electrical plug off of the pump and rewire it with the 15 amp twist lock? I see a regular 110V single outlet in the picture of all the parts on the table.
Yes I cut the plug off and put a twist lock on there. I was going with the regular plugs at first but when I made the final decision on my box layout I wanted the plugs on the bottom of the box. The twist locks are just a personal preference.
One draw back of using a twist lock for a 110v plug is you can't plug the pump into a regular outlet in a pinch.
One draw back of using a twist lock for a 110v plug is you can't plug the pump into a regular outlet in a pinch
I was setting here looking at my parts and had that same thought. I think I may go with the hospital grade single outlet facing down. I don’t think there will be enough strain on the wire to make it come loose. I am using your post as a play book and ordering all my supplies to follow along step by step. Just got off the phone with Auber 5 min ago. Thanks for blazing the trail for me!!
I like how you have the control panel at a slight angle. ") Since I won't have a drawer handy, I was thinking of possibly putting some rubber feet on the back and making something like a lectern that they have in church to prop it at an angle for easy viewing.
Since I won't have a drawer handy, I was thinking of possibly putting some rubber feet on the back and making something like a lectern that they have in church to prop it at an angle for easy viewing.
I can't thank you enough for posting this. I'm not afraid of doing the electrical work, but the idea of punching a hole in a brand new $100 kettle was rather unsettling. I will go with the Greenlee punches, since this is already costing me a small fortune. At the rate I'm going ($150 a month or so), it's a race between next winter and me brewing inside. I still need to buy the Auber parts, a cart, the stainless fittings and hoses and a pump. Pretty much all I will use of my current setup is the rope ratchet and my immersion chiller.
This really ought to be a sticky.
Since I won't have a drawer handy, I was thinking of possibly putting some rubber feet on the back and making something like a lectern that they have in church to prop it at an angle for easy viewing.I can't thank you enough for posting this. I'm not afraid of doing the electrical work, but the idea of punching a hole in a brand new $100 kettle was rather unsettling. I will go with the Greenlee punches, since this is already costing me a small fortune. At the rate I'm going ($150 a month or so), it's a race between next winter and me brewing inside. I still need to buy the Auber parts, a cart, the stainless fittings and hoses and a pump. Pretty much all I will use of my current setup is the rope ratchet and my immersion chiller.
This really ought to be a sticky.
OP
OP
aubiecat
Well-Known Member
I was setting here looking at my parts and had that same thought. I think I may go with the hospital grade single outlet facing down. I dont think there will be enough strain on the wire to make it come loose. I am using your post as a play book and ordering all my supplies to follow along step by step. Just got off the phone with Auber 5 min ago. Thanks for blazing the trail for me!!
The single outlet I had was originally going to use was one of those tamper proof outlets. They tend to hold on to a plug pretty well too. You will be just fine with what you want to do.
OP
OP
aubiecat
Well-Known Member
I like how you have the control panel at a slight angle.
I can't thank you enough for posting this. I'm not afraid of doing the electrical work, but the idea of punching a hole in a brand new $100 kettle was rather unsettling. I will go with the Greenlee punches, since this is already costing me a small fortune. At the rate I'm going ($150 a month or so), it's a race between next winter and me brewing inside. I still need to buy the Auber parts, a cart, the stainless fittings and hoses and a pump. Pretty much all I will use of my current setup is the rope ratchet and my immersion chiller.
This really ought to be a sticky.
Ha Ha, the last real hurdle is for me to mount the control box on a pedestal. I plan on coming off the front right post of the cart with a mount. I just need to sit down and think it out. It was laying on the drawer because I couldn't wait to get it up and running.
About punching a hole in a kettle, believe me, I know how you feel. When I first punched the holes in my kettle I felt almost nauseous. There is always that little gnawing feeling of doubt about if you put the holes in the right place. Then you start putting the fittings on and it all starts coming together.
Just sit down and look at everything and consider the type of element you'll be using. A ripple element has to be father off the bottom of the kettle because of its shape. You have to consider whether or not you're going to be using a steamer basket and is the element going to fit under it.
I put the sight glass and the valve outlet as close to the bottom as the washers would let me.
Plan, plan and plan. You'll never regret spending a few hours sitting down and contemplating your plan of attack.
BTW, the Greenlee punches are the cat's whiskers. They are worth every penny. A clean, perfectly round hole is a thing of beauty.
Ha Ha, the last real hurdle is for me to mount the control box on a pedestal. I plan on coming off the front right post of the cart with a mount. I just need to sit down and think it out. It was laying on the drawer because I couldn't wait to get it up and running.
About punching a hole in a kettle, believe me, I know how you feel. When I first punched the holes in my kettle I felt almost nauseous. There is always that little gnawing feeling of doubt about if you put the holes in the right place. Then you start putting the fittings on and it all starts coming together.
Just sit down and look at everything and consider the type of element you'll be using. A ripple element has to be father off the bottom of the kettle because of its shape. You have to consider whether or not you're going to be using a steamer basket and is the element going to fit under it.
I put the sight glass and the valve outlet as close to the bottom as the washers would let me.
Plan, plan and plan. You'll never regret spending a few hours sitting down and contemplating your plane of attack.
BTW, the Greenlee punches are the cat's whiskers. They are worth every penny. A clean, perfectly round hole is a thing of beauty.
Quick note on the ripple element. I suppose that is one of the benefits of going weldless for the element mount. You can simply hold the element in place and tighten locknut on the inside. If you look how Kal mounted his elements you could easily fit the ripple element under the basket.
Of course if you have soldered or welded fittings then yes the ripple element would be a problem. Once my bayou classics kettle gets in, I'll be mounting the ripple element and give an idea on spacing to the basket.
Thank you. I will be going weldless using Kal's method - with the single gang box like johnodon used. I'll be ordering the 15 gallon Bayou Classic with steamer basket tomorrow. (I keep on SWMBO's good side by depositing the money for my toys into the Credit Union before I buy anything, so the element and punches and need to man up and make holes is deferred a bit.)
In the meantime, I carry a bucket of hot wort in from the deck and down the cellar stairs. I can't tell you how much I look forward to not doing this anymore.
In the meantime, I carry a bucket of hot wort in from the deck and down the cellar stairs. I can't tell you how much I look forward to not doing this anymore.
OP
OP
aubiecat
Well-Known Member
I didn't even think about the weldless mounting method for the element. That would alleviate any problem with respect to size and shape of the element.
My kettle is the 44qt. (11 gal.) model and the 4500watt element I have is perfect for this setting. It takes 20 minutes to get to 154° and then another 20 minutes to get to a rolling boil. During the boil I dialed it back to 60% on manual and it still held the boil. Needless to say I am very pleased so far.
NOTE: Let me give you guys a forewarning about cavitation (air in the pump head) in your system while recirculating during the boil. The amount of gas bubbles created during the boil and the multiple 90° turns on my system creates harsh cavitation. Remember running a March pump dry will destroy it so keep that in mind when you are going to recirculate during you boil.
On my system cavitation begins around 203°. I have read extensively on this and it is a very common problem with these systems.
Fluid dynamics seems to be the main culprit. Some of the remedies that have been mentioned are cutting down the flow, via your valve, on the out feed side of your pump. Decreasing the number of 90° bends will increase smooth flow and decrease the turbulence of a quick turn around a sharp corner.
A larger dip tube in the kettle or no dip tube at all.
Or simply not recycling during boil mode.
Each system is a little different so you have to tinker with it to find that sweet spot.
I'm not getting rid of my 90° bends so I will play around with the valve a bit and see what happens.
I didn't even think about the weldless mounting method for the element. That would alleviate any problem with respect to size and shape of the element.
My kettle is the 44qt. (11 gal.) model and the 4500watt element I have is perfect for this setting. It takes 20 minutes to get to 154° and then another 20 minutes to get to a rolling boil. During the boil I dialed it back to 60% on manual and it still held the boil. Needless to say I am very pleased so far.
NOTE: Let me give you guys a forewarning about cavitation (air in the pump head) in your system while recirculating during the boil. The amount of gas bubbles created during the boil and the multiple 90° turns on my system creates harsh cavitation. Remember running a March pump dry will destroy it so keep that in mind when you are going to recirculate during you boil.
On my system cavitation begins around 203°. I have read extensively on this and it is a very common problem with these systems.
Fluid dynamics seems to be the main culprit. Some of the remedies that have been mentioned are cutting down the flow, via your valve, on the out feed side of your pump. Decreasing the number of 90° bends will increase smooth flow and decrease the turbulence of a quick turn around a sharp corner.
A larger dip tube in the kettle or no dip tube at all.
Or simply not recycling during boil mode.
Each system is a little different so you have to tinker with it to find that sweet spot.
I'm not getting rid of my 90° bends so I will play around with the valve a bit and see what happens.
Excuse my ignorance, but why would you have to recirculate during the boil? Shouldn't the wort have enough movement caused through the boiling action to keep the whole volume at a consistent temp? The way I look at it I never recirculated on my stove top.
I have heard of recirculation issues with the steamer basket, but the swiss cheese mod should take care of that. The only other issue I could think of is if you want to whirlpool at the end of the boil. Although I suppose a fix for that could be a run through your chiller and recirculate into the kettle to drop temp below 140 just to be on the safe side with DMS and also eliminate the cavitation issue.
Excuse my ignorance, but why would you have to recirculate during the boil?
Don't people usually recirculate during the boil through the CFC to sterilize it? That is what I was planning to do.
Don't people usually recirculate during the boil through the CFC to sterilize it? That is what I was planning to do.
And there's that ignorance shining through
Yup I was planning on that too, I need to finish my build so I can get back to brewing, I feel so rusty.
OP
OP
aubiecat
Well-Known Member
To follow up I have two brews with this system so far and everything on the system works like it should. I had to run auto tune on the PID twixe to get it right. Now it holds within 1°+- pretty well. It will get better with time I am told.
I am have a little trouble getting my efficiency where it should be right now. That will get better as I get used to brewing with this rig.
I think I still need to put more holes in the steamer basket but I can get past that right now by choking down on the flow.
I was able to control the cavitation during the boil by choking the flow as well.
Mashing and brewing with this system is so easy it makes you think you are doing something wrong.
OP
OP
aubiecat
Well-Known Member
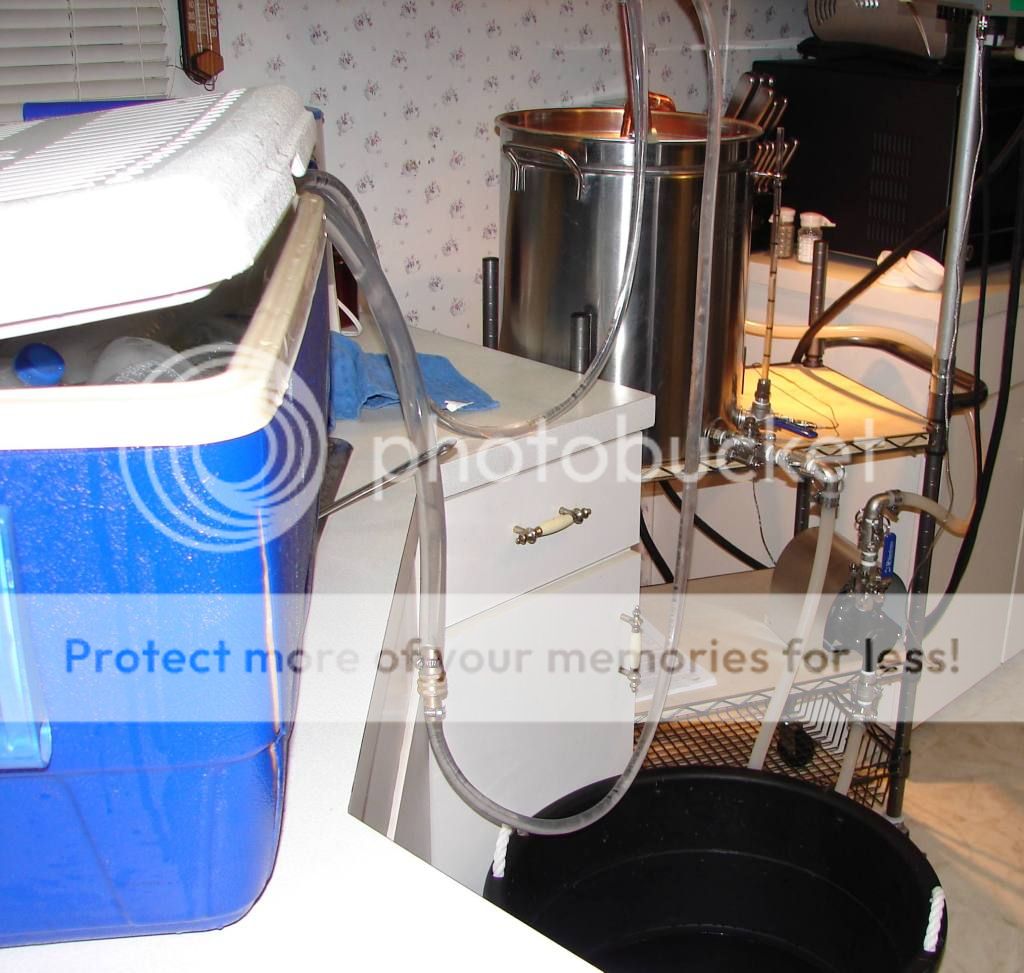
Just thought I'd add that I am using a recirculating chill system.
One of my old 48qt coolers,
an Attwood 800gpm bilge pump,
a 25 amp 12 volt power supply
and a case of frozen bottles of water.
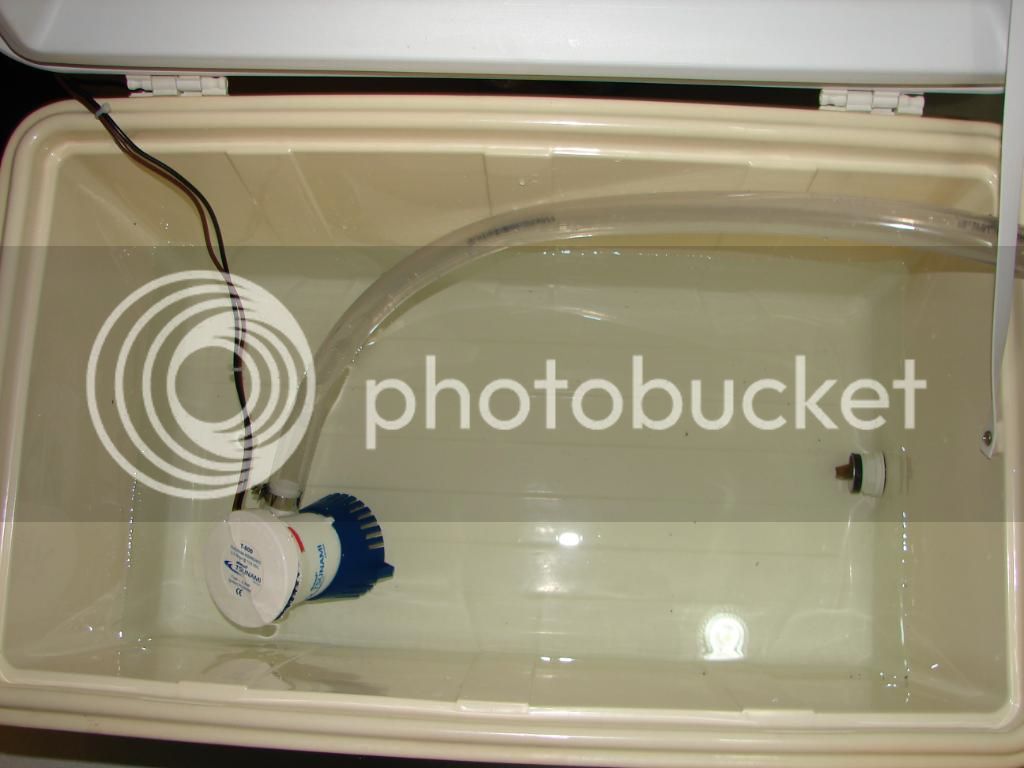
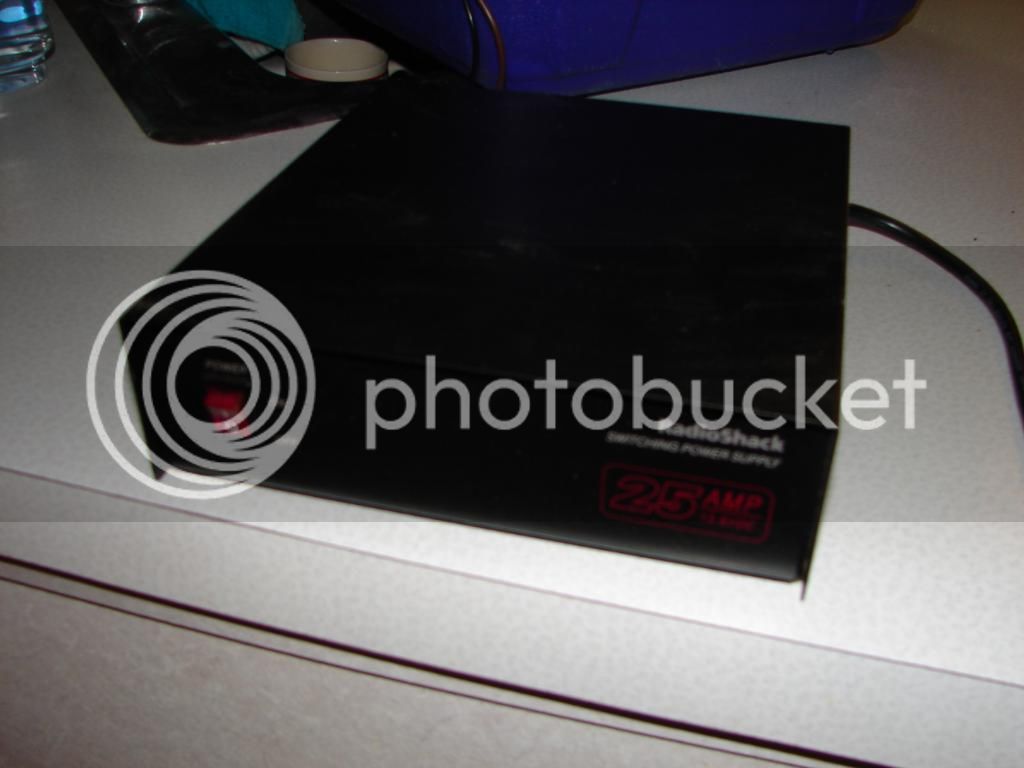
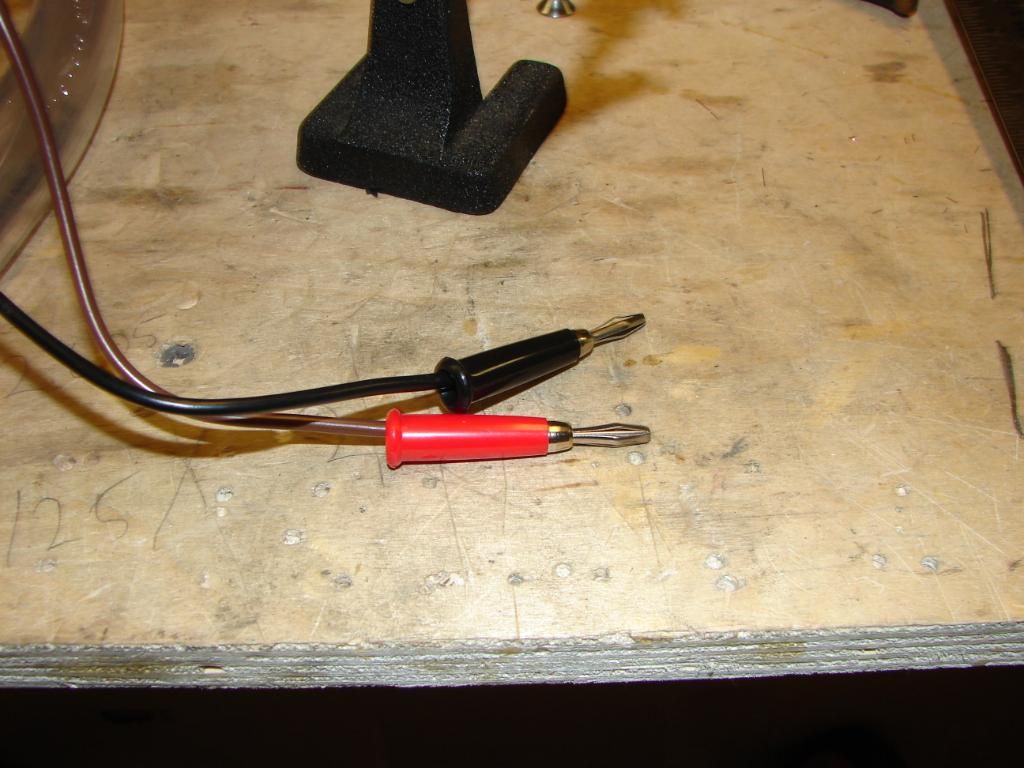
I soldered banana plugs on the pump leads to plug directly into the power supply.
Chiller up and running.
One of my old 48qt coolers,
an Attwood 800gpm bilge pump,
a 25 amp 12 volt power supply
and a case of frozen bottles of water.
I soldered banana plugs on the pump leads to plug directly into the power supply.
Chiller up and running.
kzimmer0817
Well-Known Member
Blake,
I'm planning a build much like yours. I, too, studied the builds by thughes, johnodon, voltin, jsguitar, and others. I keep trying to decide if I'm going to build a cheap controller using a PWM first, then move up to a PID controller. Gotta few questions if you don't mind:
1. I think I see one of the Auberins black project boxes in the photo on your post #3 (thughes, johnodon, and jsguitar used this). Apparently, you decided to use a 12 x 12 x 6 plastic box, correct.
2. Do you recirculate during mash to maintain temps? Do you recirculate while heating up to mash-out temp?
3. Regarding your basket: I know Todd made his basket into Swiss cheese but still felt that it drained too slowly and impeded his recirculation during mash, so he has abandoned the basket. What has your experience been with the basket thus far?
4. I trust that you set the PID to Manual Mode once you get to boil. Do you find it difficult to make rapid adjustments if you notice an impending boil-over, or have you figured out where to manually set your PID once you see the boil about to happen?
5. Are you doing full volume BIAB with no dunk sparge or additional rinse after lifting the bag?
6. After receiving the comments others have posted, would you do anything different if you were to do this again?
Thank you for posting so many details of your build.
Keith
OP
OP
aubiecat
Well-Known Member
So sorry it took me forever to reply. I'm still not used to the new format with the notifications at the top of the browser.
I hope you found my answers satisfactory.
This was a fun build and worth every penny. I have 10 brews through it so far and I am still learning. Everything I did with this build was to try and make the brew day more enjoyable and less like work.
Blake,
I'm planning a build much like yours. I, too, studied the builds by thughes, johnodon, voltin, jsguitar, and others. I keep trying to decide if I'm going to build a cheap controller using a PWM first, then move up to a PID controller. Gotta few questions if you don't mind:
1. I think I see one of the Auberins black project boxes in the photo on your post #3 (thughes, johnodon, and jsguitar used this). Apparently, you decided to use a 12 x 12 x 6 plastic box, correct.
I was going to use the Auberins box but I saw that with what I wanted in the build I was going to run out of room real quick. I have short fat fingers so I went with the Home Depot plastic box so I would have plenty of space. It has worked out beautifully and stays very cool with the internal fan design.
2. Do you recirculate during mash to maintain temps? Do you recirculate while heating up to mash-out temp?
Yes I always recirculate during mashing to maintain a consistent temp. I never turn the pump off when I am mashing no matter what mash technique I am using.
3. Regarding your basket: I know Todd made his basket into Swiss cheese but still felt that it drained too slowly and impeded his recirculation during mash, so he has abandoned the basket. What has your experience been with the basket thus far?
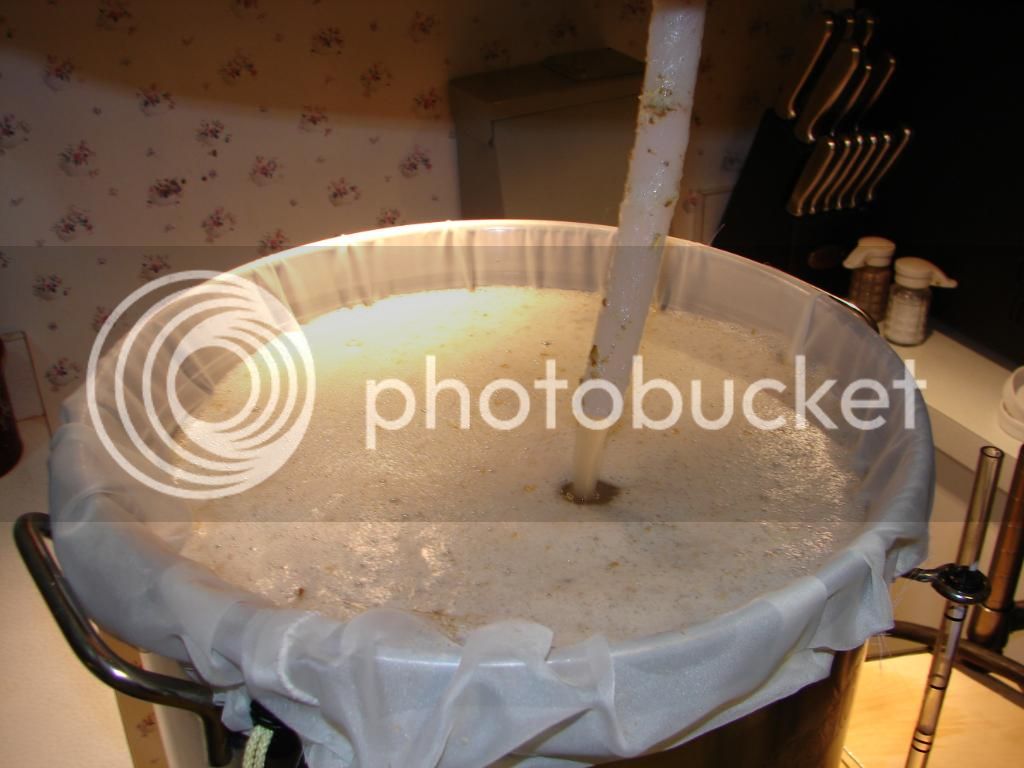
I went back and put as many large hole in the basket as I could. It improved the flow a little but not what I was hoping for. I still use the basket because it makes my life easier when I pull the malt out to drain. Each brew is a bit different due to different type of grain so I adjust the flow with the cut off valve till I see the fluid stop falling in the sight glass. It has worked very well so far.
I have a plan to make a huge improvement with basket. I have acquired some 1/2" heavy stainless mesh from work. I am going to build a custom basket with that mesh so the will be very little fluid resistance during mashing.
4. I trust that you set the PID to Manual Mode once you get to boil. Do you find it difficult to make rapid adjustments if you notice an impending boil-over, or have you figured out where to manually set your PID once you see the boil about to happen?
Yes I use manual mode for my boil. 100% till it's rolling and I pull it back to 75% until I drop the wort chiller in. I turn it back to 100% to compensate for heat loss cause by the chiller.
I don't recommend trying to time it with the PID because it takes several seconds to reset once you punch in the numbers.
I don't usually have trouble with the threat of boil overs unless I have a huge grain bill. There is normally plenty of head space in the 11 gallon pot. Once the boil starts I go get the Fermcap S and stand there with it just in case. I never needed it till last weekend when I was brewing a Belgian Strong Dark. I waited till the hot break was within an inch from the top and then I put a couple of drops in. The hot break dropped out like a rock.
5. Are you doing full volume BIAB with no dunk sparge or additional rinse after lifting the bag?
I only do full BIAB. It's just too easy and it makes great beer.
6. After receiving the comments others have posted, would you do anything different if you were to do this again?
So far everything, with the exception of the basket flow, has performed almost flawless.
I haven't had a hint of a leak from either type of through wall fittings. The solder and solderless fittings are both great. The only deciding factors should be personal preference or possible future improvements.
The mounting position of the heating element has worked out well, about 1/2" under the basket.
I am so glad I bit the bullet and got the quick disconnects. Heavy and fool proof.
I have made a couple of improvements so far.
I put a larger barb for the pickup tube, from 1/2" - 5/8", to help combat the cavitation that can occur during boil/recirculation.
I changed out the site glass from the thin site glass with the heavier 1/2" model.
The free flow basket that I am going to build should just about get this rig right where I want it.
Thank you for posting so many details of your build.
Keith
I hope you found my answers satisfactory.
This was a fun build and worth every penny. I have 10 brews through it so far and I am still learning. Everything I did with this build was to try and make the brew day more enjoyable and less like work.
Can you tell me what size of knockout punches you used for the for the heating element, ball valve, and sight glass? I'd like to use the harbor freight punches but I'm not sure how the size relates to actual inner diameter. Thanks.
OP
OP
aubiecat
Well-Known Member
Can you tell me what size of knockout punches you used for the for the heating element, ball valve, and sight glass? I'd like to use the harbor freight punches but I'm not sure how the size relates to actual inner diameter. Thanks.
Harbor Freight punch sets are "Electrical Conduit Punches" & punch a hole for the conduit fitting.
Here are the stated sizes and the actual hole size:
Die - Actual Hole
1/2" = 7/8"
3/4" = 1-3/32"
1" = 1-11/32"
1-1/4" = 1-11/16"
So, with that stated, be very careful.
P-J
OP
OP
aubiecat
Well-Known Member
Measure twice, cut onceHarbor Freight punch sets are "Electrical Conduit Punches" & punch a hole for the conduit fitting.
Here are the stated sizes and the actual hole size:
Die - Actual Hole
1/2" = 7/8"
3/4" = 1-3/32"
1" = 1-11/32"
1-1/4" = 1-11/16"
So, with that stated, be very careful.
P-J
kzimmer0817
Well-Known Member
Blake,
Thanks for answering my questions in post 103. Question about brewing in your 11 gallon kettle.
My 1st 4 batches (extract + steeping grains) were done in a 7.5 gal kettle. In anticipation of going all-grain BIAB, I've researched kettle size. I was concerned that 5 gallon batches would get lost in a 15 gallon kettle - the one BIABrewers seem to recommend - so I've wondered about the 10-11 gallon kettle. Meanwhile, my son was given a dented up keg by his boss, which I cut and made into a keggle. Nevertheless, I think I'd like to get a kettle and have something a little dressier, so I'm still wondering about size.
I "think" my first all-grain - as well as first BIAB - brew went well last Sunday.
https://www.homebrewtalk.com/f36/my-first-all-grain-biab-no-chill-356409/.
The keggle I made ends up being about the equivalent of a 14 gal kettle the way I cut it. I found that the volume isn't lost at the end of the boil, nevertheless, I still want to ask about your experiences with your kettle.
I plugged some gravity figures into the calculator on the BIABrewer forum. The B3 Stout kit I brewed in my little kettle has an O.G. of 1.083. Plugging this into the calculator shows that my starting volume (full volume BIAB) would be 8.8 gal and mash volume (grain + water) would be 10.11 gallons.
The pumpkin ale I just brewed by BIAB had O.G. of 1.065 requiring starting volume of 8.5 gallons with mash volume of 9.5 gallons. After pulling the bag, the start of boil volume at 212* is estimated at 7.9 gallons.
So, I could brew this pumpkin ale in the 11 gallon kettle. But, the Stout would require me to hold back some of the water and perform a dunk sparge. Apparently, the start of boil volume would still be 7.9 gallons.
To cut to the chase, what O.G. beers are you brewing in your kettle, and do you find yourself wanting for a larger kettle? Have you brewed any beers for which you could not start with the full volume?
Thanks - and sorry for being so long-winded.
Keith
OP
OP
aubiecat
Well-Known Member
I can't mash anything over about 12-13 lbs because of the water volumes.
The Belgian Dark I just brewed was 1.100 but that was due to the addition of 1 lbs. of corn sugar and 2 lbs. of candi syrup.
For me to brew a beer that big getting the sugars from malt only would require me to do partial mash.
I have considered getting the larger kettle because I want to do some larger beers without having to use malt extract.

OP
OP
aubiecat
Well-Known Member
I was able to brew a BIAB Russian Imperial Stout, 6 gallon batch, in a 15 gallon pot, with 26 lbs. of grain and 12 gallons of water. That was the absolute limit.
That is sort of where I was going next. I have a SN Big Foot in mind but I can't attempt it unless I get a 15 gallon kettle.
kzimmer0817
Well-Known Member
I can't mash anything over about 12-13 lbs because of the water volumes.
The Belgian Dark I just brewed was 1.100 but that was due to the addition of 1 lbs. of corn sugar and 2 lbs. of candi syrup.
For me to brew a beer that big getting the sugars from malt only would require me to do partial mash.
I have considered getting the larger kettle because I want to do some larger beers without having to use malt extract.
You'd have to do what the guys on the Biabrewer forum call Maxi-BIAB - how to brew when you can't fit it all in the kettle. You mash as usual in the single vessel, but don't use all the water. When you pull your bag, you perform 1 or 2 dunk sparges with the hot water you initially set aside. If your kettle is small enough that you can't quite fit all your pre-boil volume, you add the runnings throughout the boil. So you're still doing a full volume boil, as opposed to simply adding plain top-off water to the fermenter.
"My" concern about a 15 gallon kettle is that I might want to do some small batches: 2.5 - 3 gallons. I'm not sure how much more $ I want to invest in this keggle since it really belongs to my son. So, it might be best for me to get a 15 gallon kettle so I could do almost any 5 gallon beer I'd ever want. For the smaller batches, I could electrify my 7.5 gallon kettle and build a 120V controller for it.
Enjoying reading about your build. I did find the 12x12x6 Carlon PVC box at Home Depot and purchased it. I'll start my e-build when we get moved.
Thanks,
Keith
jeffmeh
Well-Known Member
- Joined
- Feb 26, 2009
- Messages
- 2,145
- Reaction score
- 216
If I do get the opportunity to build out an e-BIAB system, I will likely go with a 20 gallon kettle to be able to do some 10 gallon batches. I figure that with that I could fairly easily mash 25 lbs. of grain with full water volume.
OP
OP
aubiecat
Well-Known Member
I was reading your mesh false bottom thread and found the link to this build at the bottom. You do great work.
Thanks a bunch. Now that I have about 8 or so brews on this rig I can start tweaking and improving little things here and there.
rex
Well-Known Member
Great build!
I am going to copy a lot of it.
This is what I am trying to do with the addition of an E stop and a main on/off keyed switch.
http://www.pjmuth.org/beerstuff/images/Auberin-wiring1-a4-simple-1-s.jpg
I am going to copy a lot of it.
This is what I am trying to do with the addition of an E stop and a main on/off keyed switch.
http://www.pjmuth.org/beerstuff/images/Auberin-wiring1-a4-simple-1-s.jpg
bellinmi88
Well-Known Member
Easily one of the best build threads on this site, nice job. Thanks for sharing.
inhousebrew
Well-Known Member
Ummm, based off the title of the thread I thought this was going to be someone with no idea what they were doing winging it but I'm gonna go ahead and say you were ready for the eBIAB setup. Great job! This will be a nice reference for mine since the pics were so step by step when a lot of other people just post of an assortment of pieces and then Bam! a wiring is done photo. Thanks for the details.
OP
OP
aubiecat
Well-Known Member
Thanks a bunch guys. I tried to document it in a way that would be clear and helpful. It was a fun build and to this date I have had no trouble with it.
bellinmi88
Well-Known Member
What is your efficiency?
Jps101
Well-Known Member
Build Questions:
I apologize at the outset for my ignorance on the topic of electricity. We all have a certain skill set, mine is not Amps, Watts and Volts! After reading your write up (great job BTW), I do have a few questions. From your pics and list of components I am a bit confused. It appears you are using a 50 amp sup panel. Did you also put a 50 amp breaker in the main box? What gauge wire did you run from panel to sub-panel. I thought you needed to run 6 gauge, but I don’t see 6 gauge wire in your purchase list. From your purchase list it appears you may have used the 40 amp wire? Thereafter, did you then use the 30 amp wire from the sub panel to the control panel? Then the 10/3 SJOOW cord from the CP to the Kettle? Did you decide to use the 50 amp sub panel to give yourself the ability to expand? Are there any issues using a lower gauge wire (higher number) off of the main panel? Again, apologies for what may seem to many to be very simplistic questions, just not fond of frying myself.
This is one of the cleanest and best documented builds, and I have read many of them. Thanks for your contribution to the group.
John
OP
OP
aubiecat
Well-Known Member
Build Questions:
I apologize at the outset for my ignorance on the topic of electricity. We all have a certain skill set, mine is not Amps, Watts and Volts! After reading your write up (great job BTW), I do have a few questions. From your pics and list of components I am a bit confused. It appears you are using a 50 amp sup panel. Did you also put a 50 amp breaker in the main box? What gauge wire did you run from panel to sub-panel. I thought you needed to run 6 gauge, but I dont see 6 gauge wire in your purchase list. From your purchase list it appears you may have used the 40 amp wire? Thereafter, did you then use the 30 amp wire from the sub panel to the control panel? Then the 10/3 SJOOW cord from the CP to the Kettle? Did you decide to use the 50 amp sub panel to give yourself the ability to expand? Are there any issues using a lower gauge wire (higher number) off of the main panel? Again, apologies for what may seem to many to be very simplistic questions, just not fond of frying myself.
This is one of the cleanest and best documented builds, and I have read many of them. Thanks for your contribution to the group.
John
I am no electrician and I built my rig based on many that have come before me. I built it to be used in my kitchen and I move my range out of the way when I brew. The range outlet, 40 amps, is what I use to power my control panel.
You don't have to have a 50 amp breaker in your main panel to run a 50 amp spa breaker. The 50 amp spa box is just the cheapest way to get a GFCI between the control panel and the power. A GFCI breaker alone is around $100.00 and the spa box is $50.00-$60.00. Many people plug 50 amp spa boxes into 30 amp drier circuits to run their brew rig.
I doubt my brew rig uses much more power than my range.
Jps101
Well-Known Member
Thanks!
I brew in the garage (SWMBO) will not allow me in the kitchen. As such, I am going to add a new circuit to the main panel regardless. Guess I will probably add 50 amp breaker, buy a 50-60 amp w/ GFI Spa Panel and run 30 amp wire from there to where I will brew, which is about 30 feet away. Hate spending money on big gauge wire, would rather spend on cool controls. As another option, I guess I could tap into the furnace (40amp) or oven (30 amp - wife rarely uses that - trust me) and use that as the feeder for the spa panel. So many different ways to do it right.
Again, thanks for the documentation - as most have said, one of the cleanest, best documented builds.
Similar threads
- Replies
- 9
- Views
- 3K
- Replies
- 3
- Views
- 1K
