My Ugly Junk- Corona Mill Station...

Homebrew Talk - Beer, Wine, Mead, & Cider Brewing Discussion Forum

Help Support Homebrew Talk - Beer, Wine, Mead, & Cider Brewing Discussion Forum:

This site may earn a commission from merchant affiliate links, including eBay, Amazon, and others.
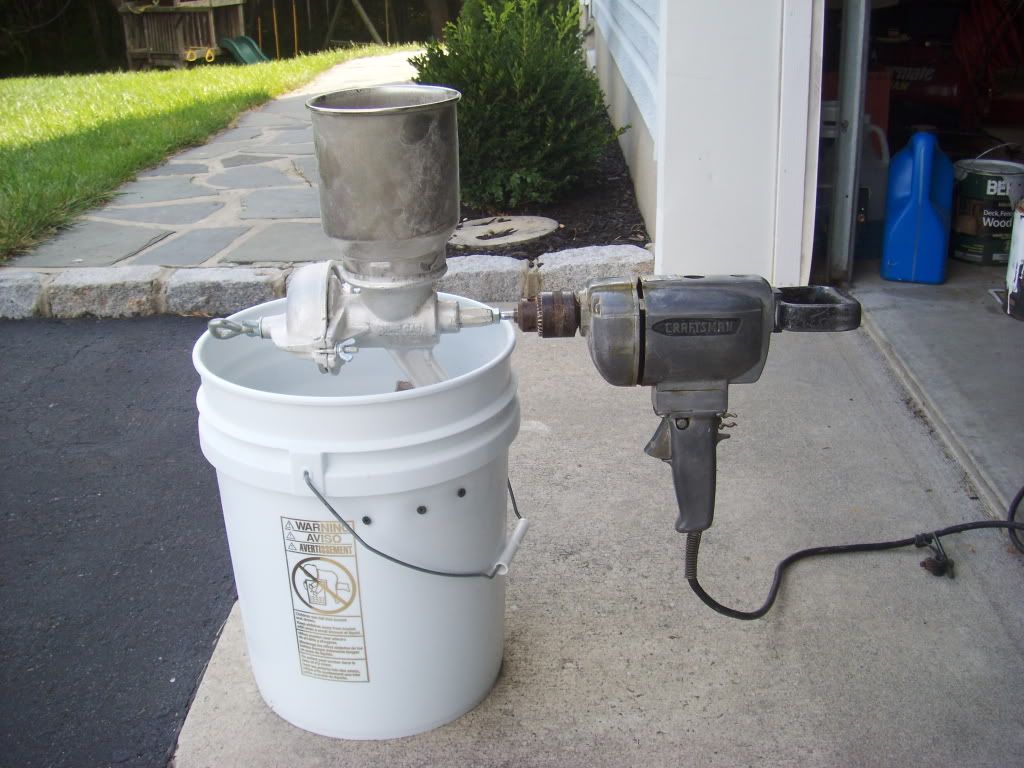
My Corona mill just arrived today. I'm going to check with the chinese restaurant down the street and see if they have any buckets I could have. If they do, I think I'm gonna go with a double bucket setup. But I might go about it the same way the guy in this video does it.

I'll also be throwing some washers on it to get the spacing right, and putting a bolt in it so I can use a drill. A bigger hopper will probably happen at some point, but it isn't a high priority for now. I'm going downstairs right now to see if I can find some washers. :ban:

Edit:
Argh. No washers to be found, but I did find a bolt for drill use.

That's some ugly junk. Mine never required washers, though I know that some do. Tightened to where I cringe a bit, it gives me completely crushed grains, decently intact husks and a fair amount of flour. Grain conditioning is very helpful in this.

I had to cut the head off a bolt and used a file to make 3 good flat areas to chuck onto (vocabulary failing due to excessive mead consumption...). My old Craftsman 3/8" 1/2 hp does wonders with the grain. I generally get my 8-15 lb. bills done in ~15-20 min.

I'd rather have less flour, but I've never had a problem with stuck sparges, so who am I to complain? I batch sparge with efficiency stuck at around 70%, so I'm no pro, but I'm happy with my results.
 
Had big dreams for this... this is just how it is now. used the other 2/3 of wood for another project after getting frustrated and ripping it apart. IMG_20130916_222654.jpg
grain everywhere every time. there is a hole in that bucket.
 
How long a bolt are you using...perhaps a shorter length w/ only 1/2" to 3/4" protruding would not put it as far off center and minimize the flaw in the ugly junk. The longer the bolt, the more it will wobble perhaps? My bolt only protrudes a little more than an inch...just enough to get the drill on it.

Or perhaps try a short bolt w/ the head still on, and drive the mill with a socket on the drill, coupled to the bolt, so it is not a ridgind connection and has a little play???

Perhaps the guy drilling and tapping the mill shafts was a noob or came to work w/ a terrible hangover and we are seeing his mistakes???

Need a little basic help with my ugly mill. I went to the hard wear store and got a screw to put where the handle was. Sawed off the end and attached my drill. But the screw/end of the moll is not straight. So the drill wobbles when I use it.

Any suggestions?

Mine is way off center. I've been using a smaller drill and just toughing it out, but it's way harder on the drill and my wrist. I bought a big honkin low rpm chinese POS from Harbor and I'm pretty sure it will rip my arm off if I don't do something. Some sort of universal joint socket adapter, probably for an impact wrench, sounds like the best bet to me.

Mine too is drilled way off center. I have not tried it yet, but my thought was to chuck up a rod, bolt, whatever... into the drill then find HD rubber hose to fit the rod and the mill shaft bolt and clamp them secure. Hopefully it will dampen the wiggle enough. We shall see...

I had the same problem with the tapped hole for the crank retaining bolt being off center and at a pretty bad angle. This is a link to a very short video showing my solution to the problem.

https://www.youtube.com/watch?v=76AJTwnWp2Y

The stainless braid should give it the strength it needs but heres the idea, worked great to keep the wobble of the uneven screw down.

These are some great ideas to fix the issue. I think the one with the eye bolt (?) seems best. I burnt through one battery doing a batch and wasn't sure if it was good for the nice Rockwell drill my FIL bought me. I may try it again with one of these solutions to see if that helps.

Is it possible that doing this with the hex bolt and socket could be bad for the drill?
 
Is it possible that doing this with the hex bolt and socket could be bad for the drill?

I blew up my corded black & decker drill with my corona mill setup. I was using a bolt and a socket. I think it was just too much resistance for it. Other people seem to have success with drill driving though.
 
I like the eye bold idea the best. All of the wierd rotation is taken up in the combination of the two eye bolts. Very creative.
 
Is it possible that doing this with the hex bolt and socket could be bad for the drill?

That looks like a very nice drill! Not that powering your mill is bad for the tool, but the job may be outside of it's limits and create excess wear and tear on your expensive cordless drill. In my opinion heavy corded tools are more appropriate for powering a mill whereby the tool is in constant operation for 10 minutes plus minus. I don't think cordless tools are really designed for that sort of use, but are designed to be lightweight and powerful for intermittent bursts on the fly. Running a cordless tool constantly and depleting a complete battery sounds close to abuse IMHO, but then again it would not surprise me if a quality cordless could take that kind of abuse.

I would suggest either a HF 1/2" drill, or check craigslist for a 20-30 year old beast of a corded 1/2" drill that's in good condition and pretty much been sitting in someone's garage. Not much of a market for big, ugly, and old drills these days with all the pretty cordless girls running around :)

With regards to the wobble problem, I recently foolishly broke the bolt clean off where in enters the crank and had a bear of a time drilling it out, and had to chase new threads in the crank that were off center and produced a wobble. The drill was jumping all over with a bad wobble. I simply and carefully located the eccentricity of the bolt stub by watching the drill and stopped the drill at the highpoint of the wobble, then I removed the drill and bent the stub of the bolt slightly downward. After a few iterations the mill drives smoothly with the drill again, it was never perfect of course, but it is as good or better than before IIRC. A fitting fix for a corona mill using brute force and heavy metal rather than finesse :)

Just wish I kept track of how many sacks I have put through my Corona, guessing about 20. Upon disassembly for this recent repair I expected to see some wear, either on the grinding plates or the shaft bushings, but it pretty much looked exactly like it did when it was new.

Perhaps my best homebrewing purchase to date!
 
I don't disagree about using a corded drill, I just don't have one right now. I also use mine on the low setting for more torque. At some point I am going to get a HF corded one, just haven't got around to it yet.
 
I'm more worried about it throwing the drilll off-center for other uses.


You probably won't affect your "spindle runout" unless you drop the drill and it lands on it's spindle.

Minor wobble won't hurt it, as it will have a little "give " in it's mounting more than likely.

Or your hands will provide the "give" if you're holding it.
 
Yeah, the plan was to get a cheap corded number form CL, but then my FIL got me this one, which I'm too scared to use, so I've been hand-milling. I'm gonna double check the drill to make sure I didn't eff it up already, and keep my eyes on CL.
 
I'm too scared to use, so I've been hand-milling. I'm gonna double check the drill to make sure I didn't eff it up already, and keep my eyes on CL.

On second look, that drill is 1/2" so it likely has some balls. It also has lifetime replacement batteries and a two year warranty on the drill...doubt FIL bought it to sit on a shelf...maybe you should run the *****!

Good luck!
 
Ha. Thanks. I've made my mash paddle with it and used it for various things, so it's getting some use, but I don't want to overdo the normal wear-and-tear which is not covered. I may try it for the next batch with an eye- or hook-bolt.
 
Can I still play if I've an 80 year old Keystone 20?

Needs some clean up and a hopper. Every piece is salvaged from scraps of other projects. I didn't even have to buy screws.

The bucket (garbage can) is holding 7 1/2 pounds of water in bottles to make sure it'll stay in the hole with grain. I cut the head off a bolt to attach a drill.

On the look out for mill attachments. I've already ground some dry peppers in it as is. Did great.

mill top.jpg


mill side.jpg
 
Can I still play if I've an 80 year old Keystone 20?

Needs some clean up and a hopper. Every piece is salvaged from scraps of other projects. I didn't even have to buy screws.

The bucket (garbage can) is holding 7 1/2 pounds of water in bottles to make sure it'll stay in the hole with grain. I cut the head off a bolt to attach a drill.

On the look out for mill attachments. I've already ground some dry peppers in it as is. Did great.

How do you get the grain into the bucket? Seems awful far away to me.

Also, you need an ugly hopper to go with it.
 
How do I get the grain to the bucket? Well, I've an amped up Leprechaun running around under the table catching it all. That's how.

Actually, I didn't realize grain was going go flying all over the place. I cut off both ends of a juicy juice bottle and taped them to the discharge. It looks like a horse with a feed bag on.

My top hopper is the same thing with just the bottom cut out. Fill from the cut end and let it flow through neck.

And condition those grains! Holy cow, yes. This thing sucks at dry grain. Wet grain though, well, it still took three passes to get a satisfactory crush. The lhbs does it a lot better. I think my plate was moving back and forth too much. I need a better spacer than tape and need to and keep pulled back on the drill.

I'll play with this some more but, right now a roller mill is looking like the way to go. I can easily adapt the table for it.

Yeah, looking at that thing, I can't figure how you'd adjust it. Is there any play in the wingnut on the back side? Could you take the nut off and add washers to increase the pressure?
 
I just installed the washers and bolt. The setup looks perfect. I just need to take the hacksaw to the bucket and I should be ready to put the hurt on some grains with a quickness.

I have about 10 lbs. of grains looking to get crushed for my partial mash porter that I'll be brewing soon.

I'll post a pic or two when I get to the next step.
 
I cut slots in the side of the bucket, cut down a scrap piece of wood, and mounted my Corona mill. I can't wait to grind up some grain for my next brew day.

988742_10202132959552230_517778441_n.jpg


1275957_10202132959432227_874367303_o.jpg


1237806_10202132959512229_598037237_n.jpg


I hadn't allowed quite enough space for the mill to fit between the wood and the side of the bucket, so I had to make the slot bigger. That left a little gap that you can see easily in that last picture. I just need to figure out how I'm going to go about keeping the grain from flying everywhere, and I'll be ready to grind.


Looks good, but you're gonna want a dust cover!
 
I think we just pegged the ugly meter.

LOL, thats some funny shiz! it is ugly, but functional and a place to store grain. Is that a boy scout emblem on the top? I see an eagle project coming soon!

What did you do for your eagle scout project? Well I got the members of the VFW blasted at thier last meeting! lol
 
Looks good, but you're gonna want a dust cover!

Pretty clean project, the cleanest ive seen for this mill. as far as keeping the grain contained. I just use a big bag (5 gallon I think) and hold it around bottom while i grind. never lost any grain yet. It drops right into the bag!
 
Pretty clean project, the cleanest ive seen for this mill. as far as keeping the grain contained. I just use a big bag (5 gallon I think) and hold it around bottom while i grind. never lost any grain yet. It drops right into the bag!

Yeah, I was considering using a bag. I could just use a rubber band or twine or something to hold it around the part where the grain comes out of the mill. Then, it would be ready to transfer into the mash tun.
 
I hadn't allowed quite enough space for the mill to fit between the wood and the side of the bucket, so I had to make the slot bigger. That left a little gap that you can see easily in that last picture. I just need to figure out how I'm going to go about keeping the grain from flying everywhere, and I'll be ready to grind.

If I were you, I'd get rid of the black rubber thing. That's only necessary if you're attaching it to a piece of wood that you're worried about marring. I'd remove the black rubber and then put some screws in those side slots where the rubber used to be. My mill wandered around a bit, so I got rid of the rubber.
 
If I were you, I'd get rid of the black rubber thing. That's only necessary if you're attaching it to a piece of wood that you're worried about marring. I'd remove the black rubber and then put some screws in those side slots where the rubber used to be. My mill wandered around a bit, so I got rid of the rubber.

Good idea. I don't care if it leaves a mark on the wood, but I will care if it is wiggling around as I try to mill the grain.
 
If I were you, I'd get rid of the black rubber thing. That's only necessary if you're attaching it to a piece of wood that you're worried about marring. I'd remove the black rubber and then put some screws in those side slots where the rubber used to be. My mill wandered around a bit, so I got rid of the rubber.

The rubber helps mine not wiggle, since I don't have screws in it. I'm not worried about the wood, but it helps with stability.
 
That is awesome. That makes it much easier to store the rig in a smaller space in between uses. I haven't quite decided yet how I'm going to expand the hopper on mine.
 
So I just got a 3/8" 2.5 amp old craftsman on CL for $5. $1 for a hook-bolt, and we'll see what happens next brew session.

Get some pics of the smoking gun, I mean drill...good luck w far...cheers

I ran a grain bill for a 4.25 gallon tripel with the drill. It seemed the crush left a lot more un-cracked grains than when I hand mill. I guess that's because I had to mill it so fast to actually get it to turn (It wouldn't budge at low speeds). I was scared of low efficiency, so I milled it again. No problem iwth run-off, but I didn't check the crush for a visual comparison with a hand-cranked batch. Maybe I'll do half and half with my next batch and compare, or try without the double crush and see if the eff takes a hit, since it was still on 85% with the double crush.
 
I ran a grain bill for a 4.25 gallon tripel with the drill. It seemed the crush left a lot more un-cracked grains than when I hand mill. I guess that's because I had to mill it so fast to actually get it to turn (It wouldn't budge at low speeds). I was scared of low efficiency, so I milled it again. No problem iwth run-off, but I didn't check the crush for a visual comparison with a hand-cranked batch. Maybe I'll do half and half with my next batch and compare, or try without the double crush and see if the eff takes a hit, since it was still on 85% with the double crush.

You need to tighten it up then if its leaving uncracked grains
 
^^^^^^

Per the above post, when I first started with my Corona mill, my uncracked grains were all about failing to tighten down the plates enough. When I finally listened to the sage advice of "wilserbrewer," I started getting a great grist, and hitting all my numbers. That advice was something to the effect: "Crank it down until you're scared, then give it another quarter-turn."
I was originally going with the "credit card gauge," but that simply wasn't tight enough.

I also found out a while back that the speed of my drill had little to do with the crush. I have an ancient all-metal Craftsman 1/2 drill, old enough that the variable trigger has a dead spot between "too slow" and "pretty quick." I was trying to use the slower speed for a while, but one day I got impatient and milled fast, and the results were the same.
 
I've been hitting 80-90% for a while, and when I got my mill, I dialed down until sparges got slow-stuck, then backed off a bit. I'm sure my mill is set fine. My issue would have been related to crushing really fast with the drill. You're saying that hasn't mattered for you, but it seemed to matter for me after a cursory looking at my crush with the drill. Maybe I always have a few uncracked and enough flour to make up for it, and the drilling isn't a concern (I hope, it sure was fast and easy!).
 
Hmm... I don't have time to read the whole thread, but that looks like the 'Farm Market' mill I got from Discount Tommy for 25 bucks... all the way down to the ill-fitting chunk of black rubber.

I've only used mine once, to mill some raw wheat. I was intending to grind all the grain for my saison with it, but the owner of Murrieta Homebrew Emporium was so quick to run them through his roller mill for free that I didn't have time to say so...

My solution to the way it sprays cracked grain around was just to stuff a piece of aluminum foil over the top and sides of the grinding plates. Primitive and completely inelegant; worked fine.
 
I'll admit I had some apprehension on watching a video of your junk. Nice work.

Thanks, I figured that anyone wanting to expand the hopper size and didnt want to use wire and duck tape would appreciate it, I just milled a 13 lb grain bill with it and didnt have to stop every 30 seconds and refill the hopper. Its also nice for me in that I can remove it easily and store it away. One note is that the hopper is top heavy so the way I worked around this was to take a 5 gallon bucket and fill it with rocks and then slip the main bucket into the rock bucket. it is now stable, but I have some more upgrading to do. not to the hopper, thats perfect, but to the base. Thanks for watching the vid.
 
Back
Top