Well, I'm finally far enough along to make a post on here.... First of all, I'd like to thank Brickout for posting his pallet keezer. When I bought the deep freezer, I knew I wanted to make a keezer and I had grand thoughts of spiffing it up and making a nice spot for it in the dining room. Well, the SWMBO had other plans and though the garage would be a better spot for it...
With that said, I posted a request on facebook looking for free pallets. Since this was going to be in the garage, I wanted it a little rustic and the build price had to be as cheap as possible. With in a few days, I had friends dropping off pallets at the house...")
One garage full of pallets...check! Easy to take apart, sure.... NOT. These things were a major PITA with a claw hammer and a pry bar! So, after spending 20 minutes pulling two boards off of a pallet, I decided to introduce Mr. Tiger saw to the pallet. Within an hour, I had all of my pallets cut up and boards separated. That saw was like a hot knife through butter. So, word to the wise, go the power tool route if you do this.
Once the boards were separated, I decided to work on the base. I built my base out of 2x4's and it's a little over-engineered. My base is larger than the freezer since I wanted to hold the co2 tank outside.
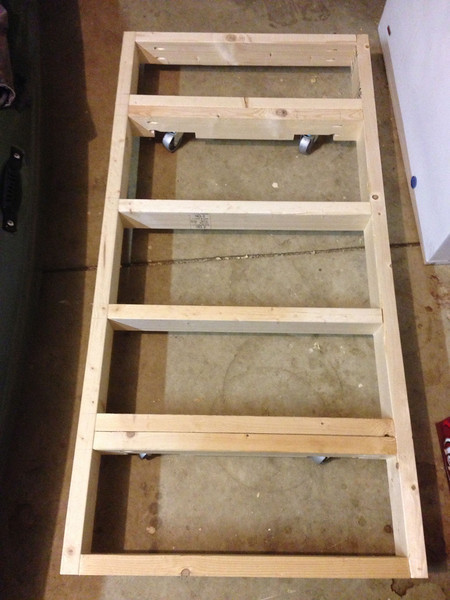
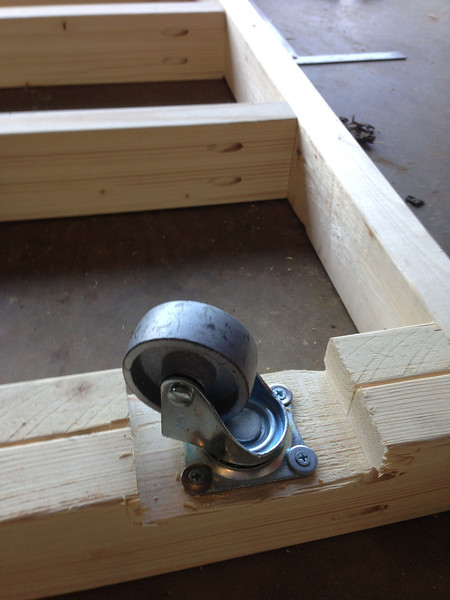
I also wanted it mobile because you never know when I need to add a motor to it. The casters that I used are all metal and I recessed them in the base a little to cut down on total height.
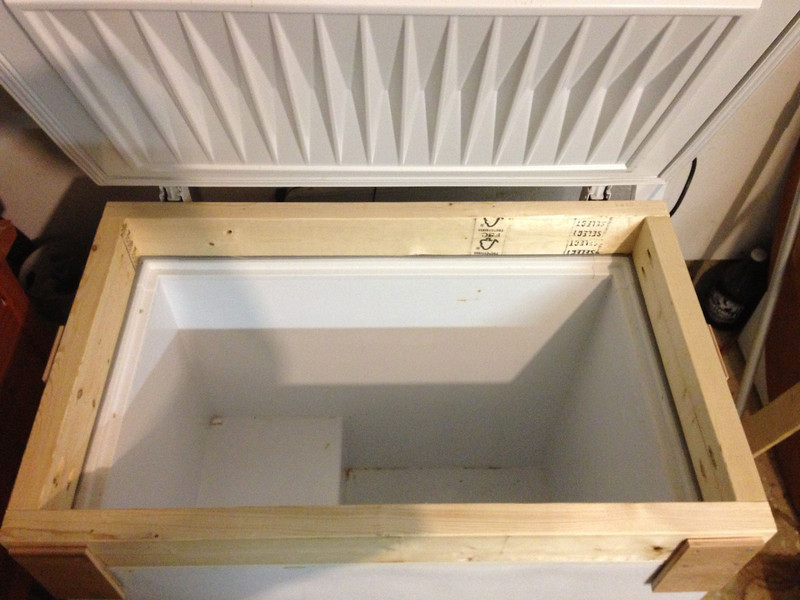
With the base complete, it was time to build a collar. As I mentioned earlier, I wanted to store the co2 outside of the keezer so I could maximize my keg space. I used some weather stripping on top of the keezer and sat the collar on top.
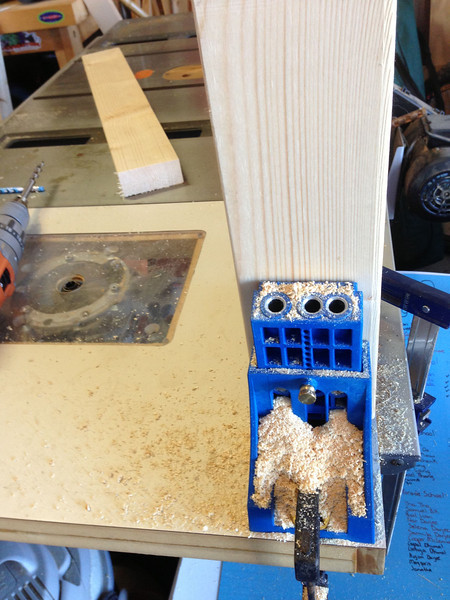
I used a kreg jig for the collar joints and it made for quick work when putting things together.
I didn't glue the collar down, instead I use some spare wood and made stops on all sides of the freezer to prevent the collar from moving. The weight of it is enough to hold it firmly to the top of the freezer.
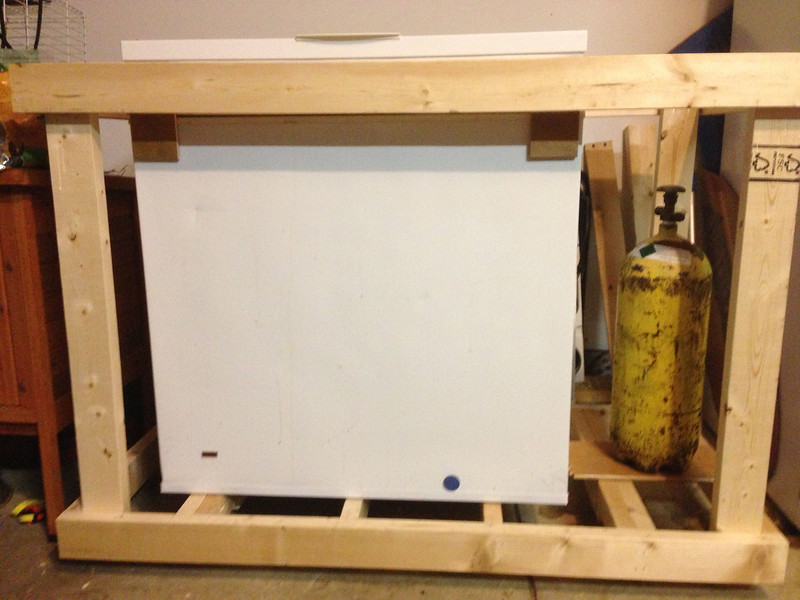
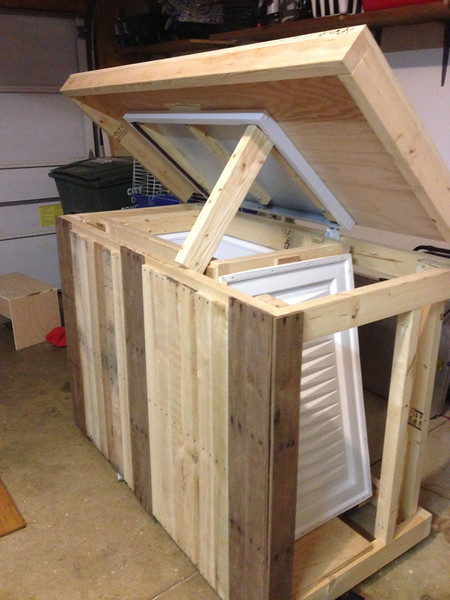
Base and frame are complete, so now it's time to finish the frame. Again, it's all built with 2x4's and it went together pretty easily. There is at least 4" on all sides of the freezer and the bottom is open for air circulation. The little gaps that will be in my pallet slats will help as well. Here's a pic of the frame.
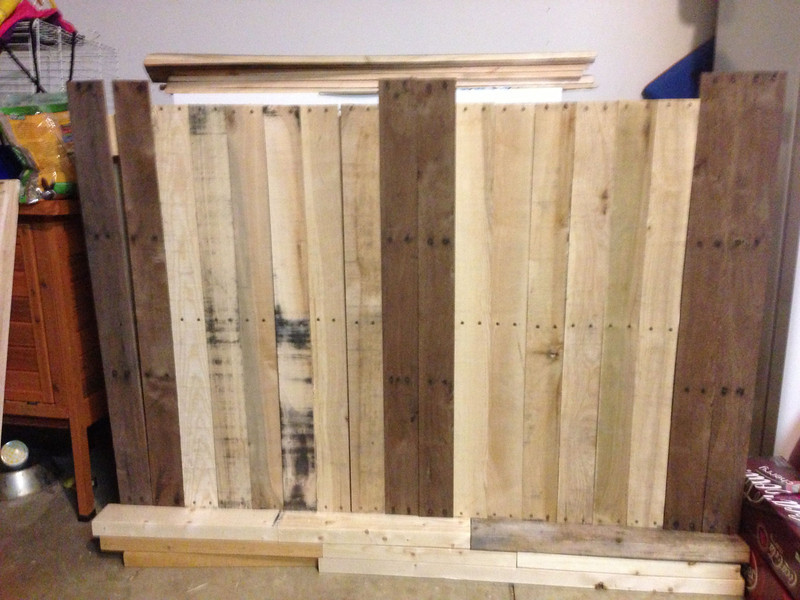
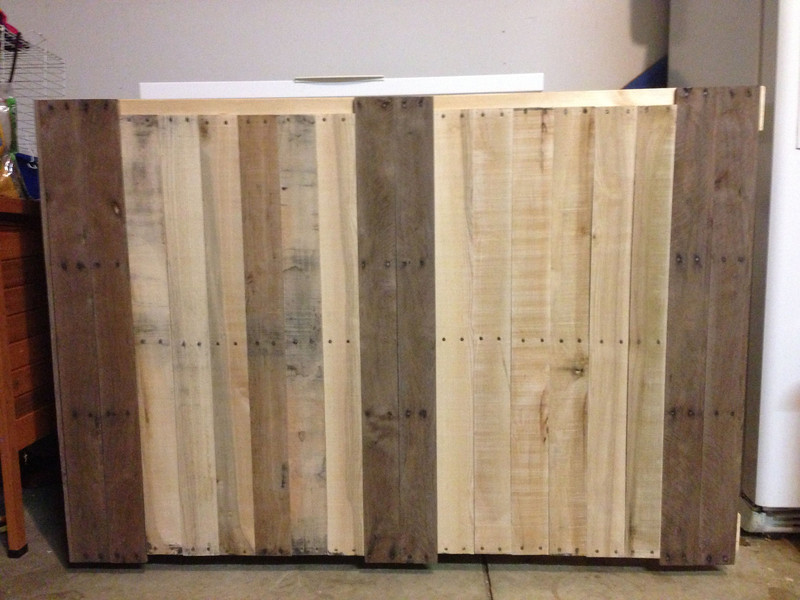
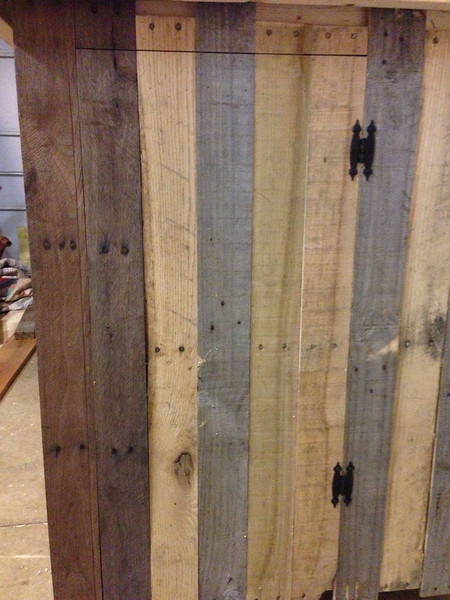
With all of the pallet slats separated, it was time to come up with a pattern for the keezer 'cabinet'. I had a few pallets that were darker than the others, so I got a little artistic. I had to come up with a crude method of standing the slats up, but hey, it worked.
After I was happy with the cabinet, I busted out my nail gun and attached the pallet slats to the frame. Talk about easy... Pop, pop, pop... and we were rolling.
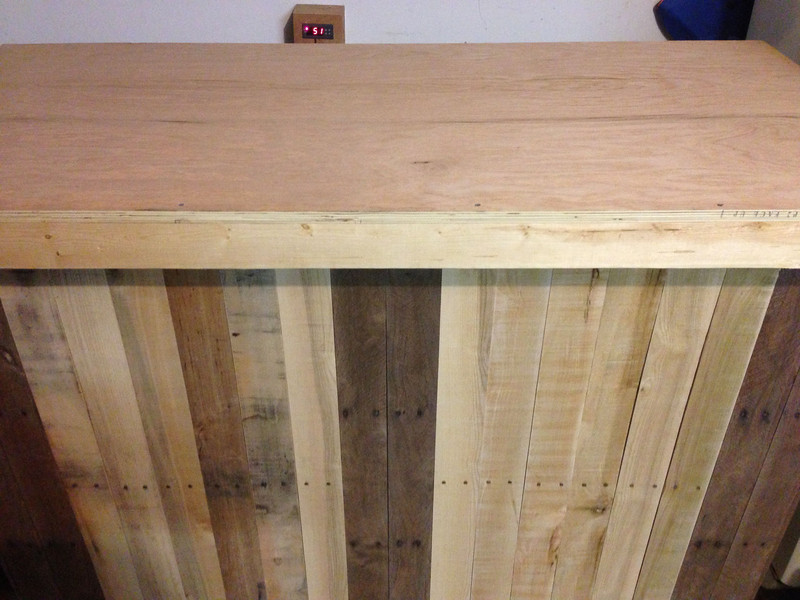
Ok, now that the cabinet is all set. It's time to start thinking about the top. So, I wander over to Lowes to buy some B/C plywood. My initial thought is to get some plywood, stain it dark'ish, randomly place coasters on it and pour on some poly. So, here I am in the lumber area talking to the associate and he asks, "Why don't you use oak for the top?". I told the guy that I didn't want to pay the $50 a sheet. He then says, "Well, come look at this... Someone was in earlier and gave me incorrect cut measurements." I walked over and it was like fate... there sat a sheet of oak almost exactly the dimensions I needed for my top. When asked how much, the rep said $10... or $15 for all of the cut pieces on this cart. SOLD!
I bring the load of 3/4" oak ply home and get to working on the top. Since the freezer top has a handle, I needed to route out a spot for it so the plywood will sit level on the lid.
Here's the top all framed up and sitting on the freezer.
Attaching the top is the topic of question in a ton of forum posts. I went the route you use the nuts with spikes (for lack of a better word). Basically, these grip into the plywood and you saw off the bolt. It's a straight forward process.
I initially just bolted the top through the lid. However, that lid is super flimsy so I stiffened up the lid with some support braces. I ripped a few 2x's down and attached sandwiched the lid between the braces and table top. It made a huge difference in the lid sturdiness.
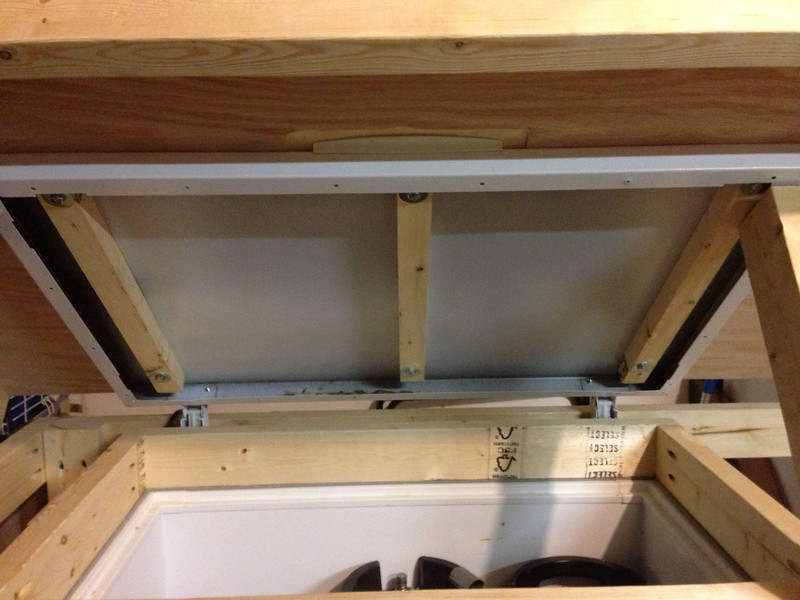
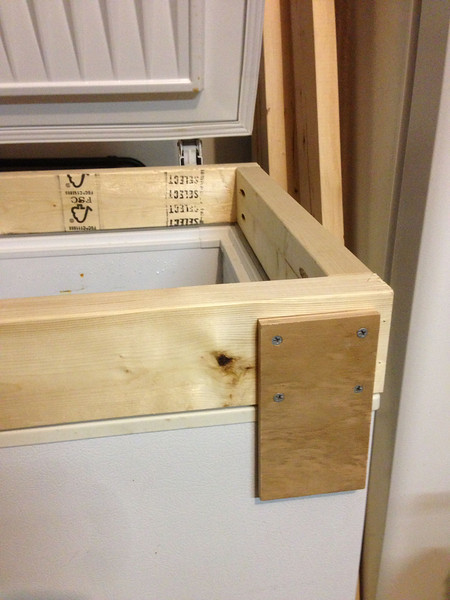
With the lid finally attached, I had to finish up my "trap door" for my co2 tank. Initially, I thought I may want this on the front of the freezer but I changed my mind and put it on the right side. So, here's how I did the door... I first made a frame and clamped it to the main keezer frame (using some scrap wood for spacers). From there, I used my brad nailer and nailed the pallet slats to the door frame instead of the keezer frame. Once complete, I took the door frame (with the slats attached) over to my table saw and cut it down to the right heigth. I then secured my door to the keezer frame and nailed the cut slats in their proper spot. I think it came out looking pretty good.
Working door with co2 tank inside.

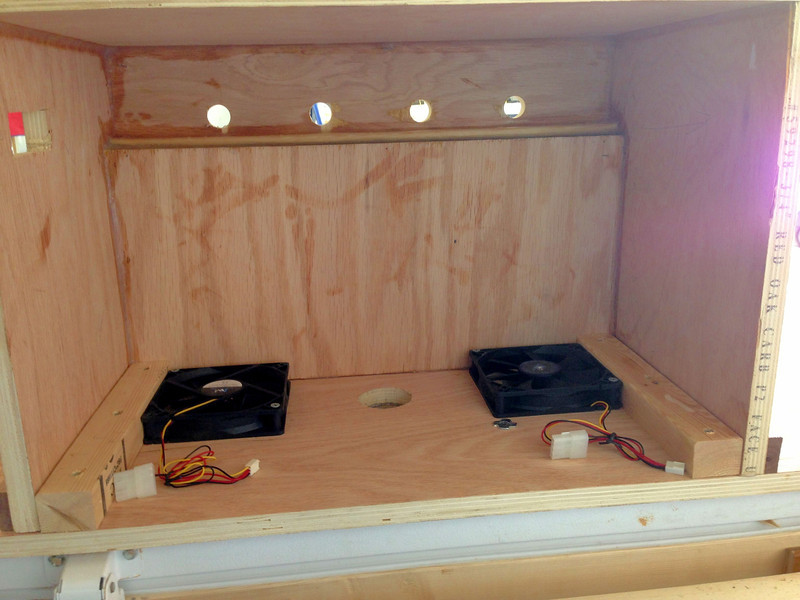
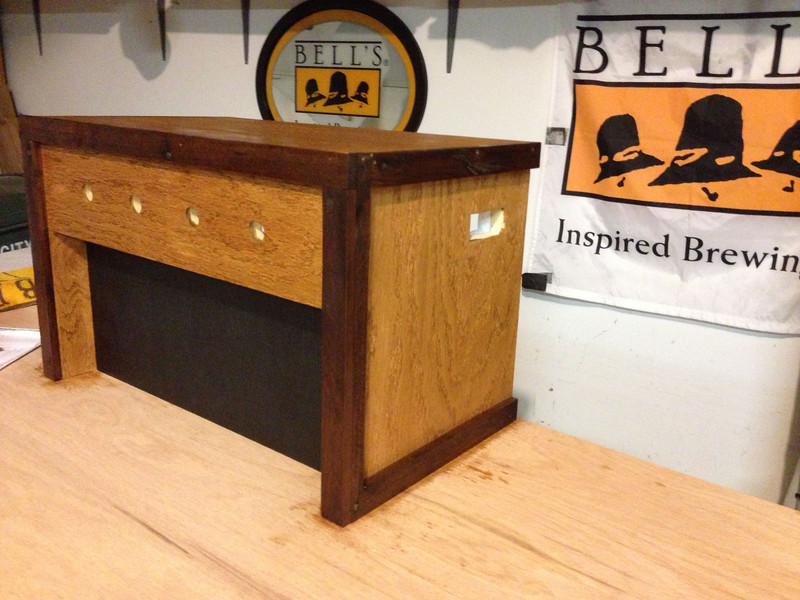
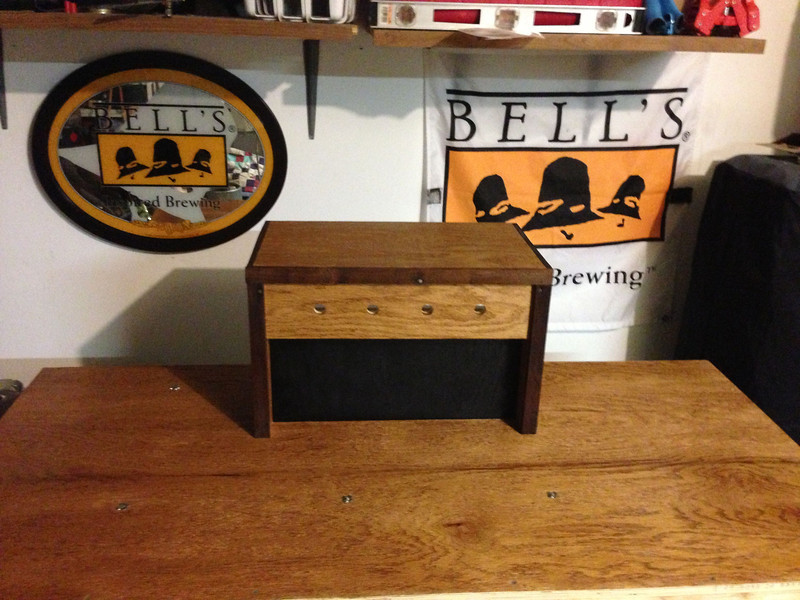
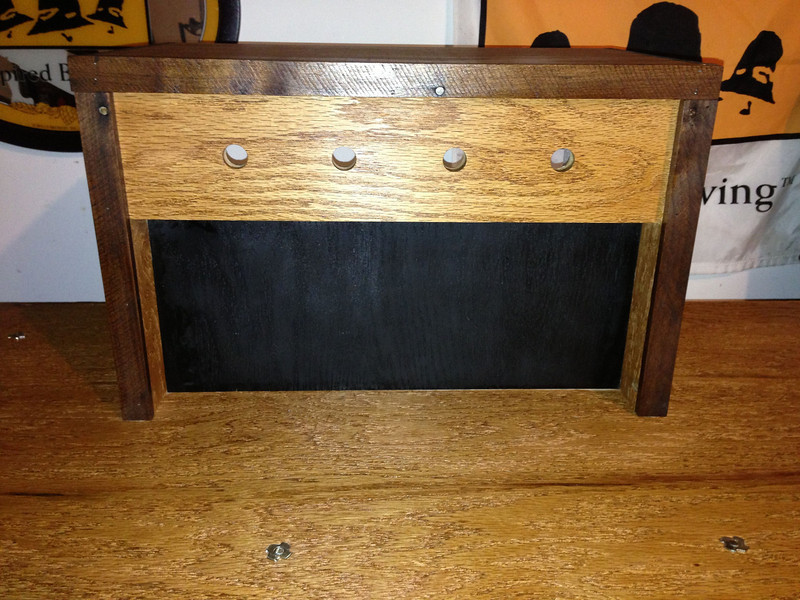
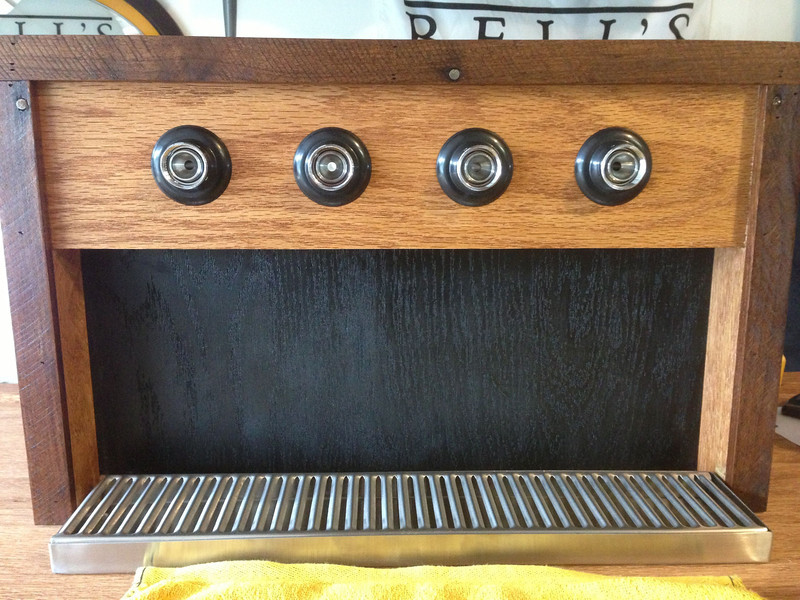
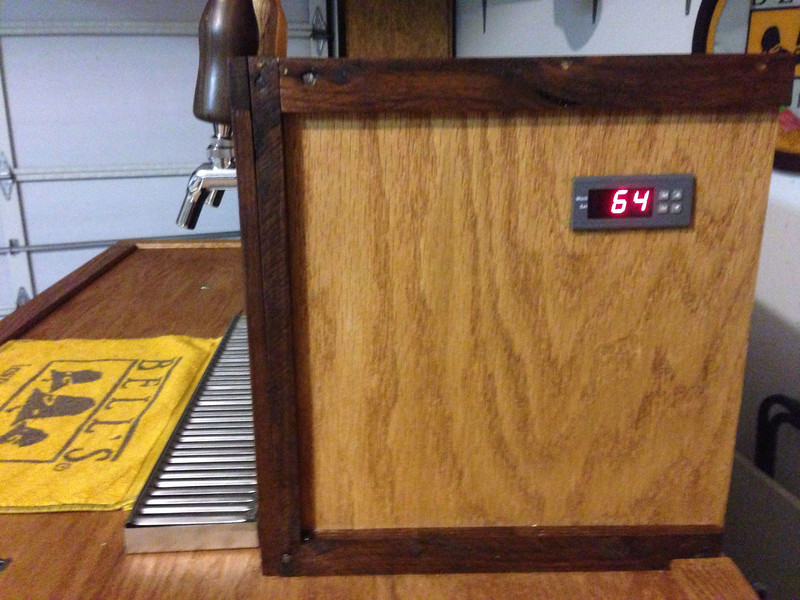
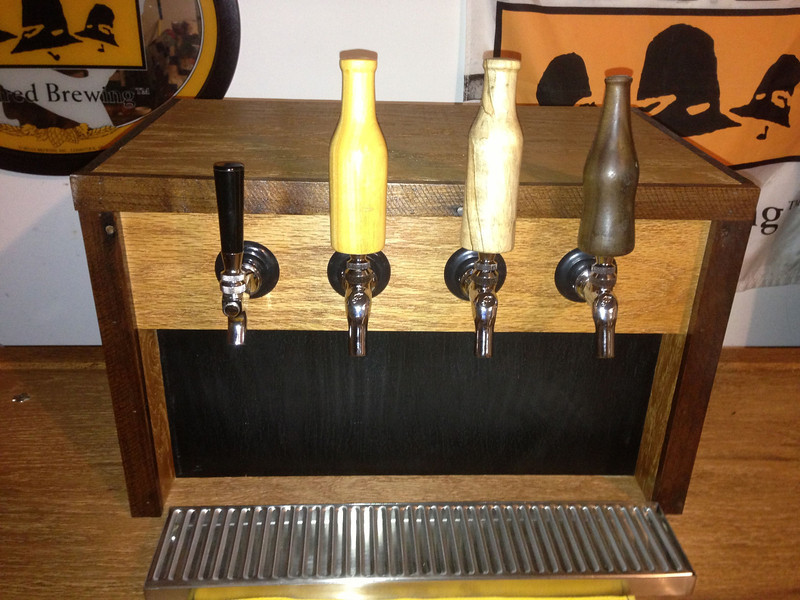
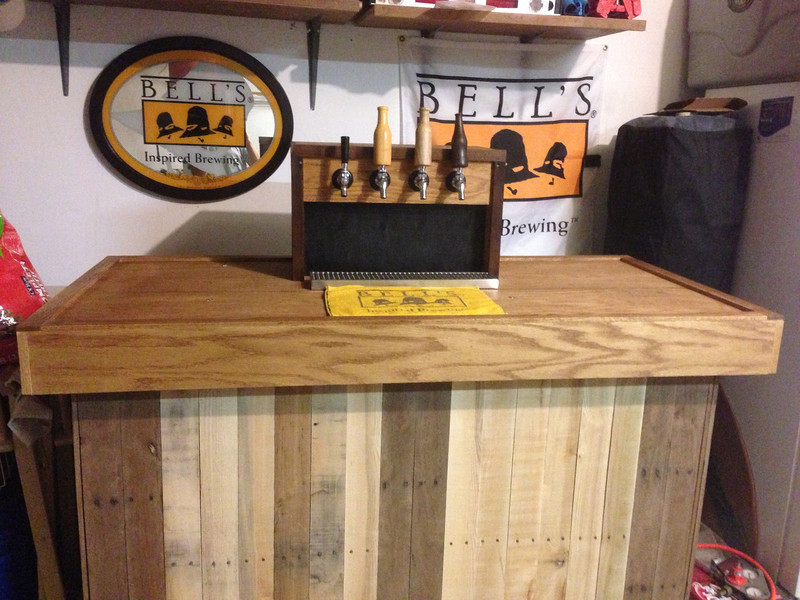
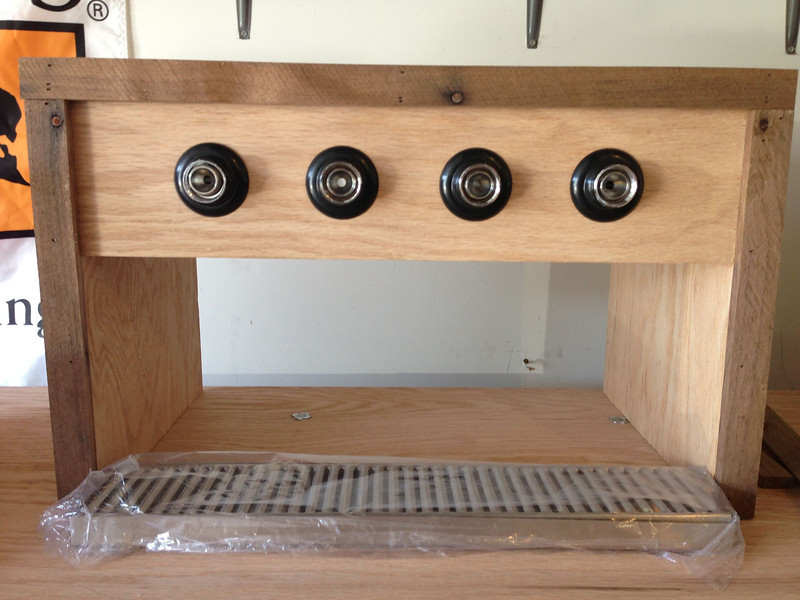
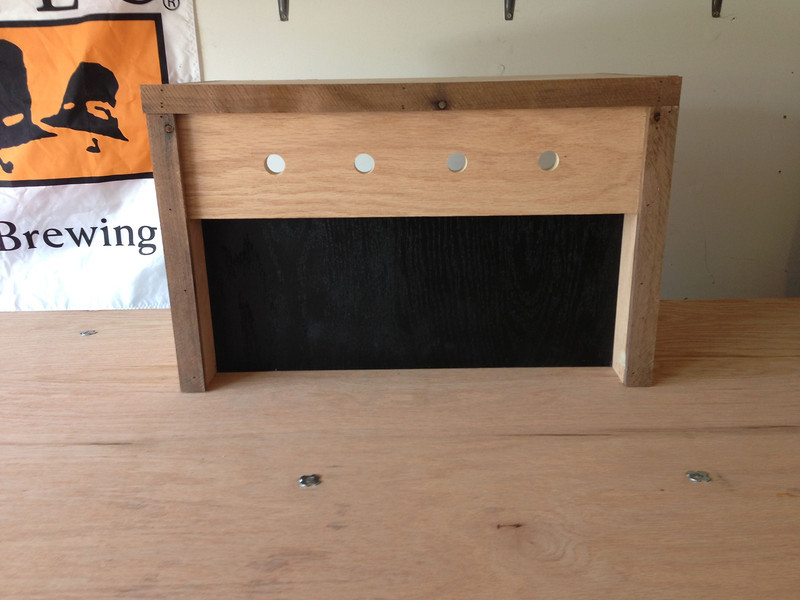
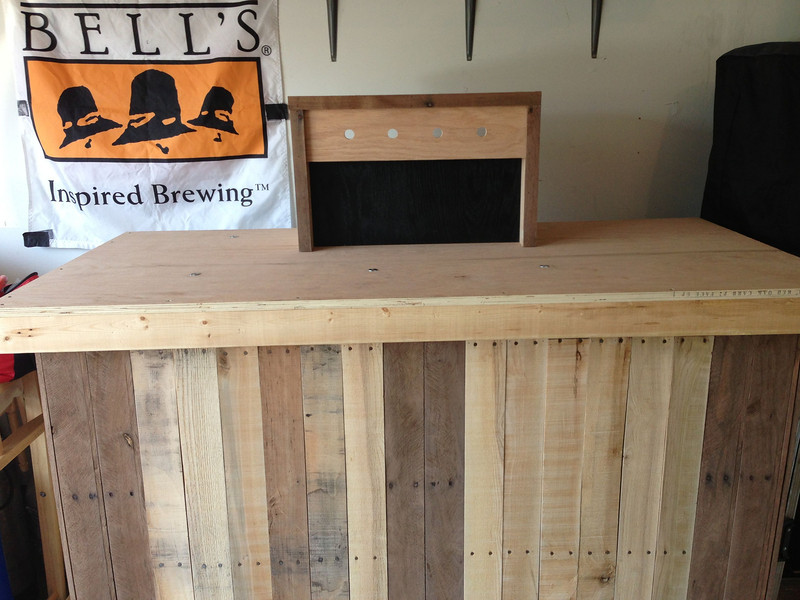
Cabinet... check, top installed... check, door in place... check! Next up is the tower design. So, the coffin tower was made out of some of the scrap oak plywood. I had it, so might as well put it to use. After building it, I trimmed it out using some of the darker pallet wood.
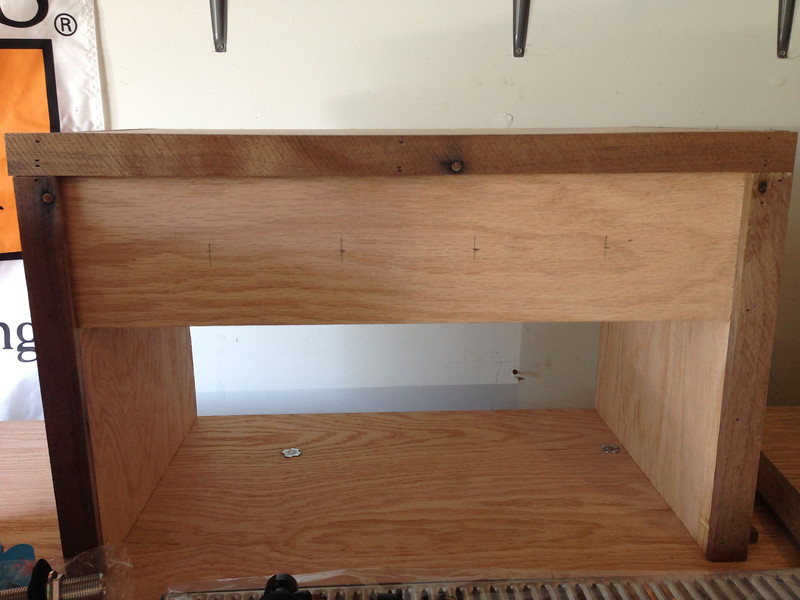
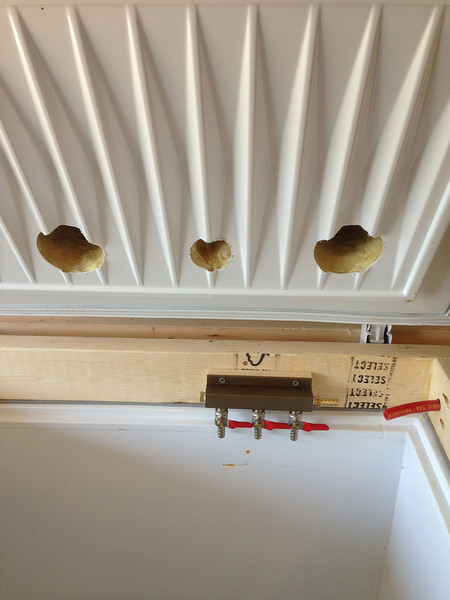
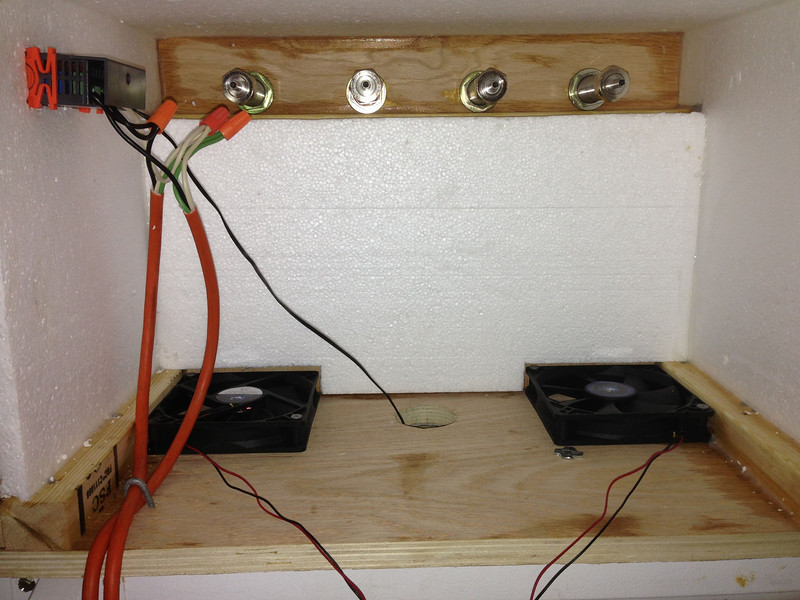
Next, I drilled out the holes for the shanks. The holes are 4" on center and 4" inside each edge of the tower. With the holes drilled out, it's time to dry fit the shanks.
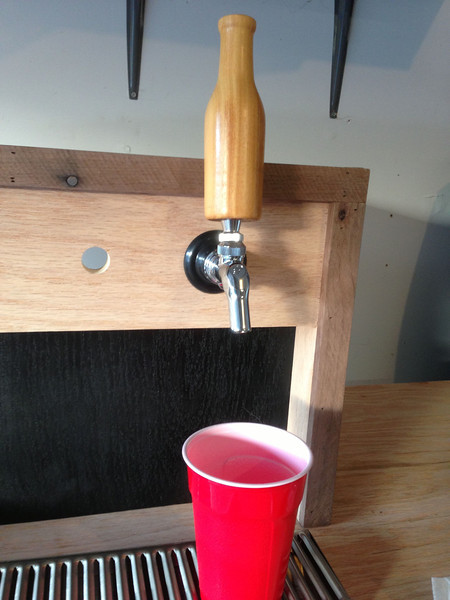
So, I have been seeing some users putting the chalkboard paint to use. I think that's an excellent idea and went to pick up a can for my project. Again, I used the oak scrap and sprayed the chalkboard paint on it. It came out ok and works fine. However, looking back on it I probably should have sealed the oak with primmer then hit it with the chalkboard paint. Oh well, live and learn. Not like I'll write on it every day.
And here's the full thing so far. Not too bad for a garage-based keezer.
Currently, I'm at a stopping point and look forward making a lot of progress this weekend.
With that said, I posted a request on facebook looking for free pallets. Since this was going to be in the garage, I wanted it a little rustic and the build price had to be as cheap as possible. With in a few days, I had friends dropping off pallets at the house...
One garage full of pallets...check! Easy to take apart, sure.... NOT. These things were a major PITA with a claw hammer and a pry bar! So, after spending 20 minutes pulling two boards off of a pallet, I decided to introduce Mr. Tiger saw to the pallet. Within an hour, I had all of my pallets cut up and boards separated. That saw was like a hot knife through butter. So, word to the wise, go the power tool route if you do this.
Once the boards were separated, I decided to work on the base. I built my base out of 2x4's and it's a little over-engineered. My base is larger than the freezer since I wanted to hold the co2 tank outside.
I also wanted it mobile because you never know when I need to add a motor to it.
The casters that I used are all metal and I recessed them in the base a little to cut down on total height.
With the base complete, it was time to build a collar. As I mentioned earlier, I wanted to store the co2 outside of the keezer so I could maximize my keg space. I used some weather stripping on top of the keezer and sat the collar on top.
I used a kreg jig for the collar joints and it made for quick work when putting things together.
I didn't glue the collar down, instead I use some spare wood and made stops on all sides of the freezer to prevent the collar from moving. The weight of it is enough to hold it firmly to the top of the freezer.
Base and frame are complete, so now it's time to finish the frame. Again, it's all built with 2x4's and it went together pretty easily. There is at least 4" on all sides of the freezer and the bottom is open for air circulation. The little gaps that will be in my pallet slats will help as well. Here's a pic of the frame.
With all of the pallet slats separated, it was time to come up with a pattern for the keezer 'cabinet'. I had a few pallets that were darker than the others, so I got a little artistic. I had to come up with a crude method of standing the slats up, but hey, it worked.
After I was happy with the cabinet, I busted out my nail gun and attached the pallet slats to the frame. Talk about easy... Pop, pop, pop... and we were rolling.
Ok, now that the cabinet is all set. It's time to start thinking about the top. So, I wander over to Lowes to buy some B/C plywood. My initial thought is to get some plywood, stain it dark'ish, randomly place coasters on it and pour on some poly. So, here I am in the lumber area talking to the associate and he asks, "Why don't you use oak for the top?". I told the guy that I didn't want to pay the $50 a sheet. He then says, "Well, come look at this... Someone was in earlier and gave me incorrect cut measurements." I walked over and it was like fate... there sat a sheet of oak almost exactly the dimensions I needed for my top. When asked how much, the rep said $10... or $15 for all of the cut pieces on this cart. SOLD!
I bring the load of 3/4" oak ply home and get to working on the top. Since the freezer top has a handle, I needed to route out a spot for it so the plywood will sit level on the lid.
Here's the top all framed up and sitting on the freezer.
Attaching the top is the topic of question in a ton of forum posts. I went the route you use the nuts with spikes (for lack of a better word). Basically, these grip into the plywood and you saw off the bolt. It's a straight forward process.
I initially just bolted the top through the lid. However, that lid is super flimsy so I stiffened up the lid with some support braces. I ripped a few 2x's down and attached sandwiched the lid between the braces and table top. It made a huge difference in the lid sturdiness.
With the lid finally attached, I had to finish up my "trap door" for my co2 tank. Initially, I thought I may want this on the front of the freezer but I changed my mind and put it on the right side. So, here's how I did the door... I first made a frame and clamped it to the main keezer frame (using some scrap wood for spacers). From there, I used my brad nailer and nailed the pallet slats to the door frame instead of the keezer frame. Once complete, I took the door frame (with the slats attached) over to my table saw and cut it down to the right heigth. I then secured my door to the keezer frame and nailed the cut slats in their proper spot. I think it came out looking pretty good.
Working door with co2 tank inside.
Cabinet... check, top installed... check, door in place... check! Next up is the tower design. So, the coffin tower was made out of some of the scrap oak plywood. I had it, so might as well put it to use. After building it, I trimmed it out using some of the darker pallet wood.
Next, I drilled out the holes for the shanks. The holes are 4" on center and 4" inside each edge of the tower. With the holes drilled out, it's time to dry fit the shanks.
So, I have been seeing some users putting the chalkboard paint to use. I think that's an excellent idea and went to pick up a can for my project. Again, I used the oak scrap and sprayed the chalkboard paint on it. It came out ok and works fine. However, looking back on it I probably should have sealed the oak with primmer then hit it with the chalkboard paint. Oh well, live and learn. Not like I'll write on it every day.
And here's the full thing so far. Not too bad for a garage-based keezer.
Currently, I'm at a stopping point and look forward making a lot of progress this weekend.