My new keggle

Homebrew Talk - Beer, Wine, Mead, & Cider Brewing Discussion Forum

Help Support Homebrew Talk - Beer, Wine, Mead, & Cider Brewing Discussion Forum:

This site may earn a commission from merchant affiliate links, including eBay, Amazon, and others.

Truble

Well-Known Member
Joined
Oct 5, 2005
Messages
1,101
Reaction score
20
Location
Boston, MA
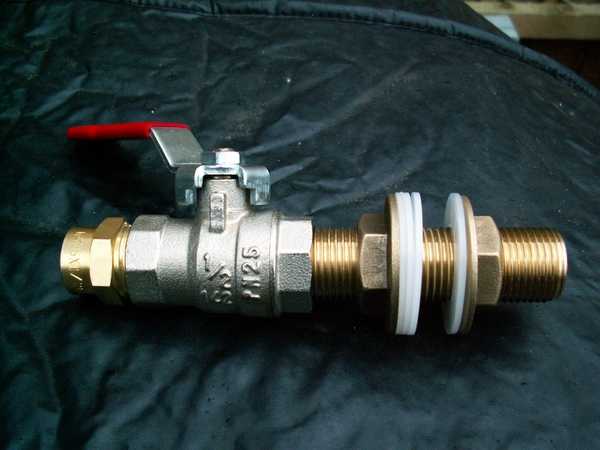
Well, I got my keggle finished. I am still looking for a good welder who does TIG, so I put together a weldless fitting. The keggle was cut out using a grinder and a cutting wheel, and tapped out with a regular drill. The fitting is made of a brass full flow ball valve, a hex nipple, 2 stainless steel fender washers, 2 high temp O-rings, and a female thread to compression fitting. The manifold is made of leftover tube from my immersion chiller. Copper is pretty expensive now, so I wanted to use what I had. It is only 3/8", and I would like to go to 1/2", but this should do for now. The manifold has holes drilled on the outside perimeter. I figured that possibly debris, when whirlpooled, would collect in the middle. Have no idea since I am new to this. I tested the drain, and it only leaves about 1 cup in the bottom.
I took a couple pics, and will have more since I plan on breaking it down to replace the O rings with more rigid ones, since the ones I used compress a little too much. I got the burner going and tested it out. There was the slightest bead of water, barely a drip, that formed one every couple minutes or so once it heated up. I can live with that for now.
2085-valve1.jpg


2085-manifold2.jpg


2085-manifold1.jpg


2085-cover1.jpg
 
Thx man. Forgot to mention that total cost was around $40. I didn't keep explicit track, but the keg was $20, the nipple, washers,O-rings, and compression fitting were less than $10, the valve was $7 or $8 (can't remember-had it left over from another DIY), and the copper might be a buck's worth or so.
 
I can TIG weld, and I plan on doing a bit of welding as well as using some weldless fittings on my stainless fermenter project. I might suggest that you stick with the weldless fittings for now and see if you can get a better seal - the advantage being that you can take the fittings completely off to clean your keggle and save a few bucks, too!

BTW, nice job! I'm envious, as I just paid a pretty penny for a 20 gallon stainless kettle! No luck finding used kegs legitimately around here, and I didn't want to be a scumbag and scam one by not returning it for the deposit.
 
Yeah. They are controlled here too, but a liquor store that I frequent does get legit ones from time to time, and sells them. There is a dent on this one, but it is not bad, and does not affect stability or volume. I have my name in for another to use as an HLT. I am currently constructing my MLT. Man copper got expensive since I last bought any! I still have a bunch of 3/8" tube from my chiller and about 10' of 1 inch from putting the whole house water filter when I moved in. I will probably make the manifold out of the 1 inch so I don't have to buy that much. Just a couple Ts and another weldless valve setup and I will be all set.

All Grain here I come.
 
For all who are interested, go to a Community College and take a welding class. It was a lot of fun for me when I took it. Couldn't weld now though... pacemakers and weling don't go together very well.
 
I think my dad has all the gear, he'd be happy as a pig in **** if I asked him to teach me how to weld. I think he's proud of how I'm half-ass decent with a skill saw these days, less than three years after buying my first one :D
 
I have a complete MIG setup, but I am a hack. I can do structural for home type stuff, and make it look ok after cleaning it up with the grinder, but I would want the keg to be more professional.

I am planning on fabricating my brew structure myself though.
 
Truble said:
Thx man. Forgot to mention that total cost was around $40. I didn't keep explicit track, but the keg was $20, the nipple, washers,O-rings, and compression fitting were less than $10, the valve was $7 or $8 (can't remember-had it left over from another DIY), and the copper might be a buck's worth or so.

Do you just have that so that you can drain from the keg without lifting it or is it an all grain thang?

Would you mind giving me a parts list and telling me how you cut the hole for that? Hole saw?
 
It is purely so that I can drain to my primary without having to lift anything. I am going to make a venturi aerator that will go inline to the primary.

Parts list (off my head-I will doublecheck and correct when I get home)

1 Brass Full Flow 1/2" ID Ball Valve. Make sure you get a full flow
2 Stainless Fender Washers
1 1/2" ID Brass Hex Nipple- This is a regular nipple, but instead of being close or having pipe in the middle, it has Hex to put a wrench on. This also provides a place to back the washer up against.
2 High Temp O rings-These are made to be snug around the nipple.
1 1/2" Brass ID Threaded to 3/8" compression coupling
1 Manifold from 3/8" copper tubing bent with standard brake line bender
1 1/2" ID to 3/8" Barb connector
I used pipe tape for every joint except the compression joint.

EDIT: I drilled the hole with a regular High Speed 13/16" bit. I used an awl to create a starter dimple, and sprayed with drill lube to keep from overheating. I then cleaned it up with a file. The top was cut out with a grinder and a cutting wheel disc.
Here is a crude drawing:
2085-TEMPvalve.jpg
 
I should add that I built this with all grain in mind, but I plan on doing at least a couple batches of extract before I make the switch. I wanted to be able to do full boils. The cost of large Stainless boilers was prohibitive to me-this was very cost effective- 15 Gallon Stainless Boiler with spigot for ~$40!!
 
Truble said:
It is purely so that I can drain to my primary without having to lift anything. I am going to make a venturi aerator that will go inline to the primary.

Parts list (off my head-I will doublecheck and correct when I get home)

1 Brass Full Flow 1/2" ID Ball Valve. Make sure you get a full flow
2 Stainless Fender Washers
1 1/2" ID Brass Hex Nipple- This is a regular nipple, but instead of being close or having pipe in the middle, it has Hex to put a wrench on. This also provides a place to back the washer up against.
2 High Temp O rings-These are made to be snug around the nipple.
1 1/2" Brass ID Threaded to 3/8" compression coupling
1 Manifold from 3/8" copper tubing bent with standard brake line bender
1 1/2" ID to 3/8" Barb connector
I used pipe tape for every joint except the compression joint.

EDIT: I drilled the hole with a regular High Speed 13/16" bit. I used an awl to create a starter dimple, and sprayed with drill lube to keep from overheating. I then cleaned it up with a file. The top was cut out with a grinder and a cutting wheel disc.
Here is a crude drawing:
2085-TEMPvalve.jpg

Thanks, I'll save this post. doesn't sound to terribly hard.

I keep meaning to ask, who is your avatar? That guy is so familiar, but I can't place him.
 
Ever seen the movie "Office Space" ? He is Lawrence. The dude was also on The Drew Carey Show. I think that his name is Dietrich Bader or something like that.
 
God Emporer BillyBrew said:
Thanks, I'll save this post. doesn't sound to terribly hard.

Regarding the valve assembly, once I had the right parts, finally, it was incredibly easy to assemble. Just remember to use pipe tape. Takes a couple of crescent wrenches and a minute or 2. I actually assembled and stripped it a number of times in dry fit before I put the final assembly on.

The thing that took the longest was drilling the holes in the manifold. that was about 10-15 minutes.
 
Truble, would reccomend re-bending your manifold to the maximum diameter, to allow plenty of room for the trub to whirlpool. Perhaps using a 90 degree ell just inside? I hadn't thought to add a manifold to my own, but I use hop pellets in paint sacks, so don't need to restrain hops. Still, the manifold would maximize trub settling.

I like the way you cut the top to fit a lid. Good work.
 
Good thought. I have been wondering about it. The reason that I went with that size is simply because that was the size of the piece of scrap. I do have more tubing, but I need to check the efficiency of my chiller w/ a 5 gal batch before I commit to shortening the coil that I have. If the chiller needs more help, then I am extending it.

I probably will end up re-engineering it a couple times, but I was intrigued with using as much scrap as possible. I am going to try and brew this weekend, so we will see.
 
Truble said:
It is purely so that I can drain to my primary without having to lift anything. I am going to make a venturi aerator that will go inline to the primary.

Parts list (off my head-I will doublecheck and correct when I get home)

1 Brass Full Flow 1/2" ID Ball Valve. Make sure you get a full flow
2 Stainless Fender Washers
1 1/2" ID Brass Hex Nipple- This is a regular nipple, but instead of being close or having pipe in the middle, it has Hex to put a wrench on. This also provides a place to back the washer up against.
2 High Temp O rings-These are made to be snug around the nipple.
1 1/2" Brass ID Threaded to 3/8" compression coupling
1 Manifold from 3/8" copper tubing bent with standard brake line bender
1 1/2" ID to 3/8" Barb connector
I used pipe tape for every joint except the compression joint.

EDIT: I drilled the hole with a regular High Speed 13/16" bit. I used an awl to create a starter dimple, and sprayed with drill lube to keep from overheating. I then cleaned it up with a file. The top was cut out with a grinder and a cutting wheel disc.
Here is a crude drawing:
2085-TEMPvalve.jpg

I just found out that a friend's dad owns a beer distributor and he is going to get me a keg. One question about the manifold - do you have any "trub"le with it clogging with trub when you drain to primary? This looks like a great idea and I want to try, however, my other experiments have ended with me jeri-rigging up something just to get my transfers to work and me with this face :mad: I didn't want to go to the trouble only to have to make that face again.
 
Truble said:
"What would I do with a million dollars??! I tell you what i'd do......"

"Two chicks at the same time"


Nice work man. I am just about to rig a similar setup and switch to all grain. Whoohoo!!!! Man I love to brew!
 
I wonder and would like to ask you guys opinion, if you think a keggle made with the bottom of the keg cut off and the top now the bottom would be a good idea. I wondered if using a 2" clover-clamp and 1 1/2"full port ball valve with a small collection glass jar might be a possibility. I figured you open the valve upon shutdown and then when wirlpooled the trub would fall into the collection jar (with made fitting to connect to clover fitting). Afterwards you simple change from a jar connection to tubing connection and empty the kettle into primary. Or in the way I will do it, empty into hop bag resting in lauter grant then pumped into the therminator and into the primary.

I know the slope isn't that great in the bottom of a keg, but it is good enough to pull the trub to the center of the kettle after whirlpooling. Just an idea, getting as many as I can before I go completely electric.

Oh, how much problem do the elements give you in the way of turbulance when whirlpooling? Do you guys with electric kettles have any problems with a close and compact trub pile? I am curious to know as much as possible on direct contact heating elements in the boil.:tank:
 
Orfy, would you provide a parts list for the picture above? I'd like to order/pickup this week and finish my keggles. Search for Keggle Parts lists and couldn't find a good one. Your pic with a list would be perfect. Thx

Do you use the teflon(?) washers instead of hightemp orings? OR are they just missing from the pic?
 
Back
Top