My 6 tap mini fridge kegerator build

Homebrew Talk - Beer, Wine, Mead, & Cider Brewing Discussion Forum

Help Support Homebrew Talk - Beer, Wine, Mead, & Cider Brewing Discussion Forum:

This site may earn a commission from merchant affiliate links, including eBay, Amazon, and others.

rebel_scum

Well-Known Member
Joined
Apr 12, 2014
Messages
63
Reaction score
11
Started a build for a 6 corny kegerator using a 4.9 cu ft fridge I got on the cheap.

I considered doing a keezer, as I am concerned about it being able to hold temp at 40 ish but I had pretty good luck with a similar build for my fermentation chamber which is about 60% larger with a smaller (4.1 cu ft) fridge, so I figured I would give it a shot.

Here is my progress so far- any advice or questions are always welcome:

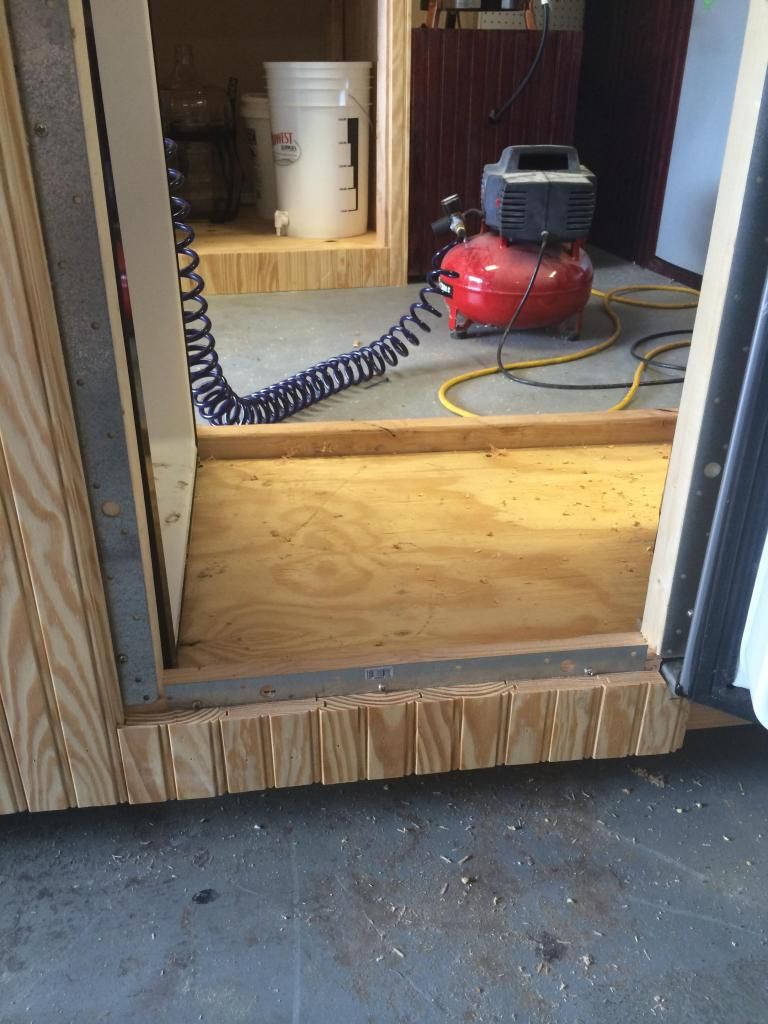
First thing was framing the bottom to hold the fridge, a 20# co2 tank, and 6 5 gallon pin lock corny kegs:


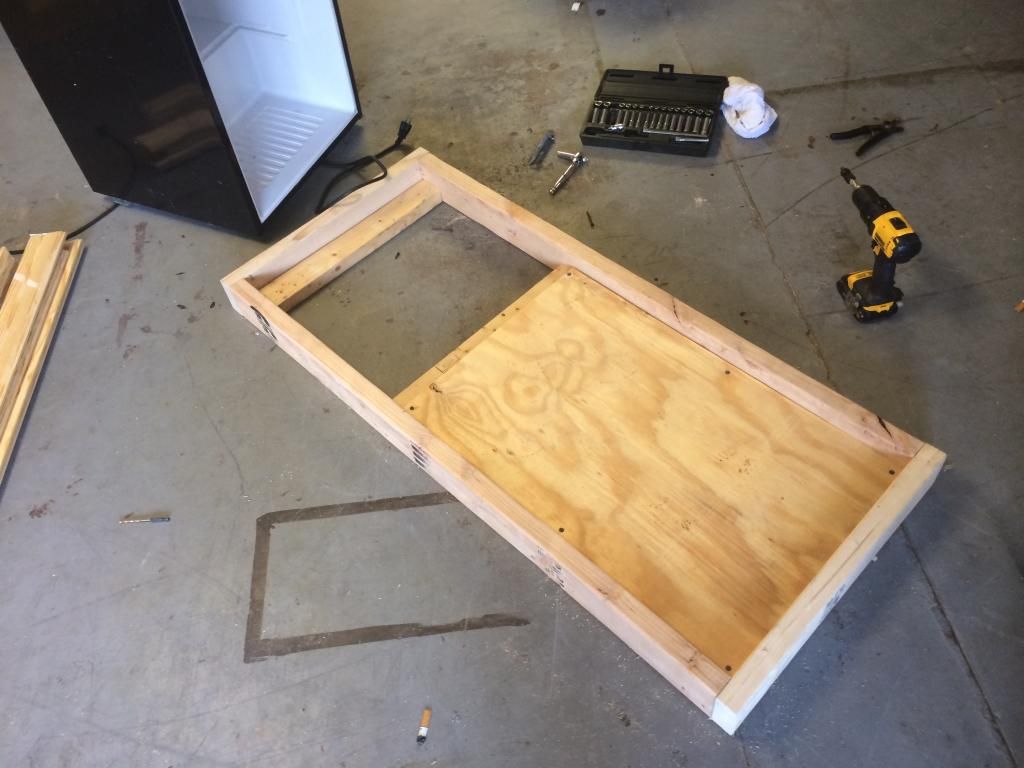
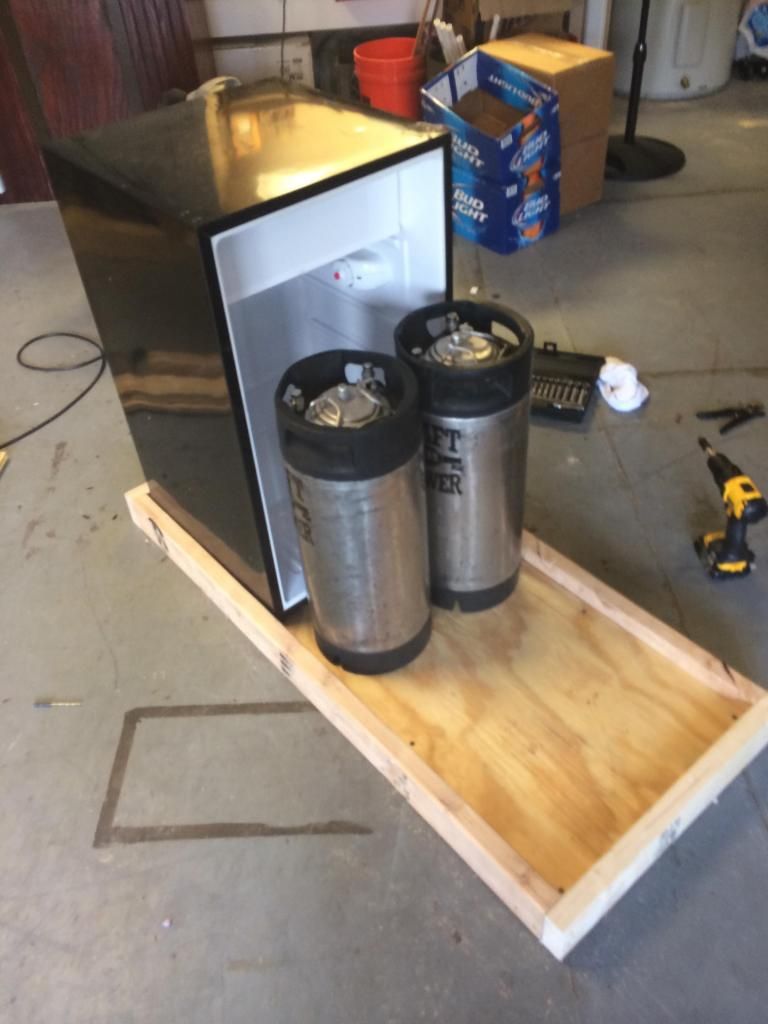
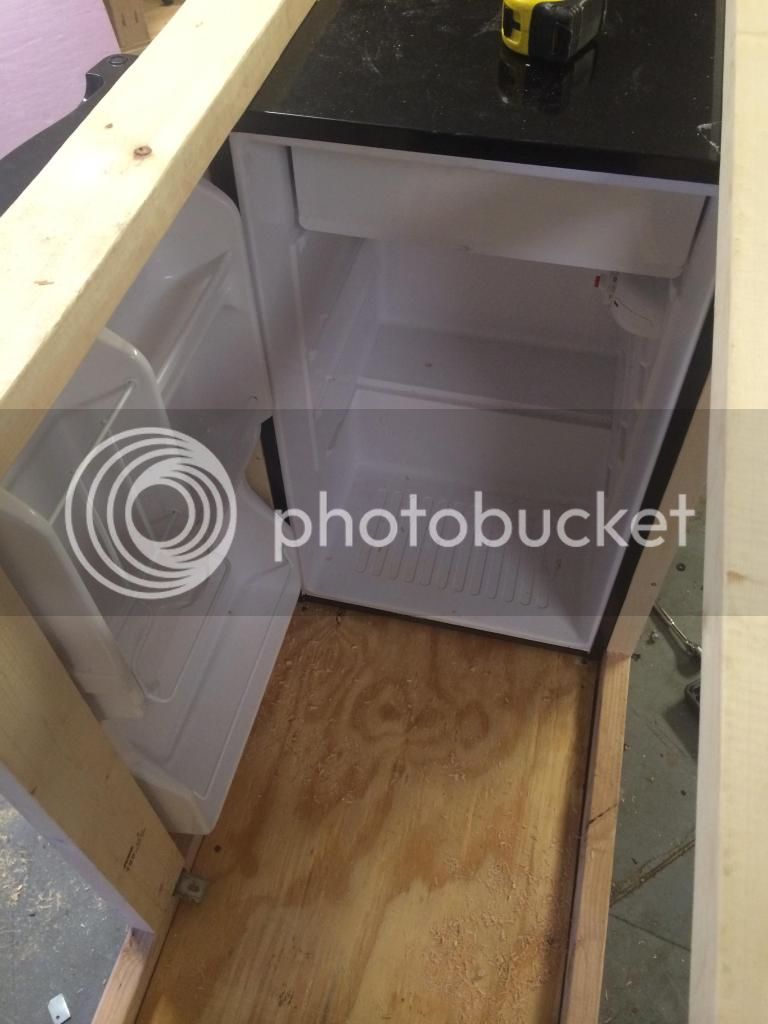
The co2 tank fits nicely directly inside the actual fridge, and 6 kegs will fit with plenty of room to spare.

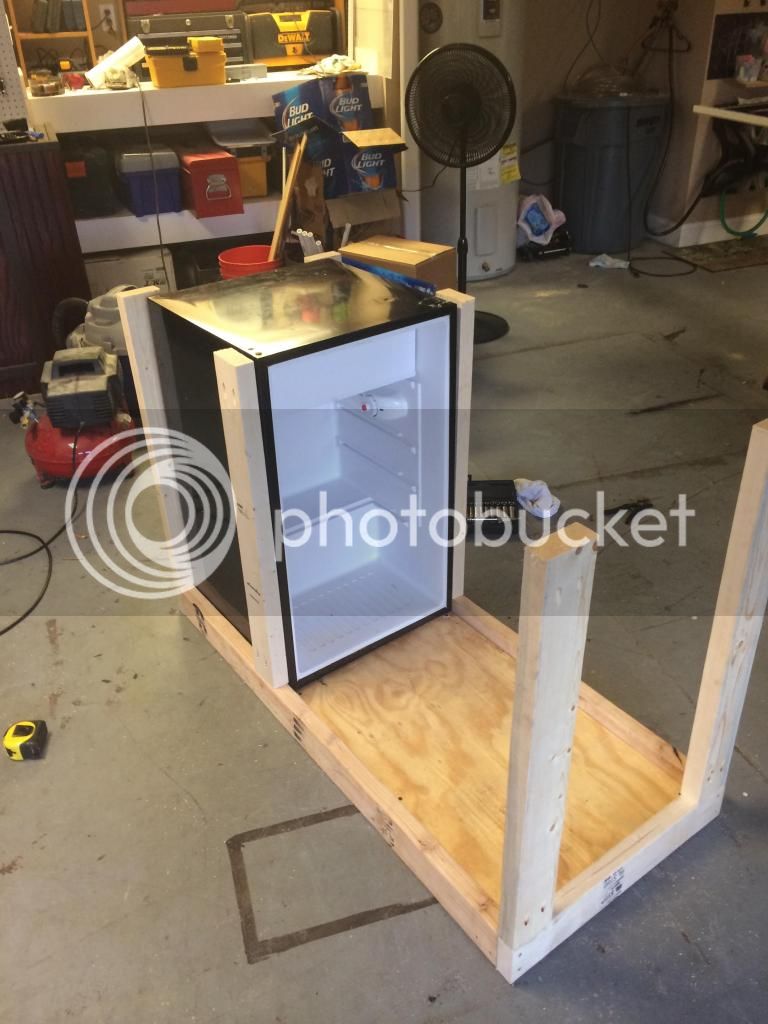
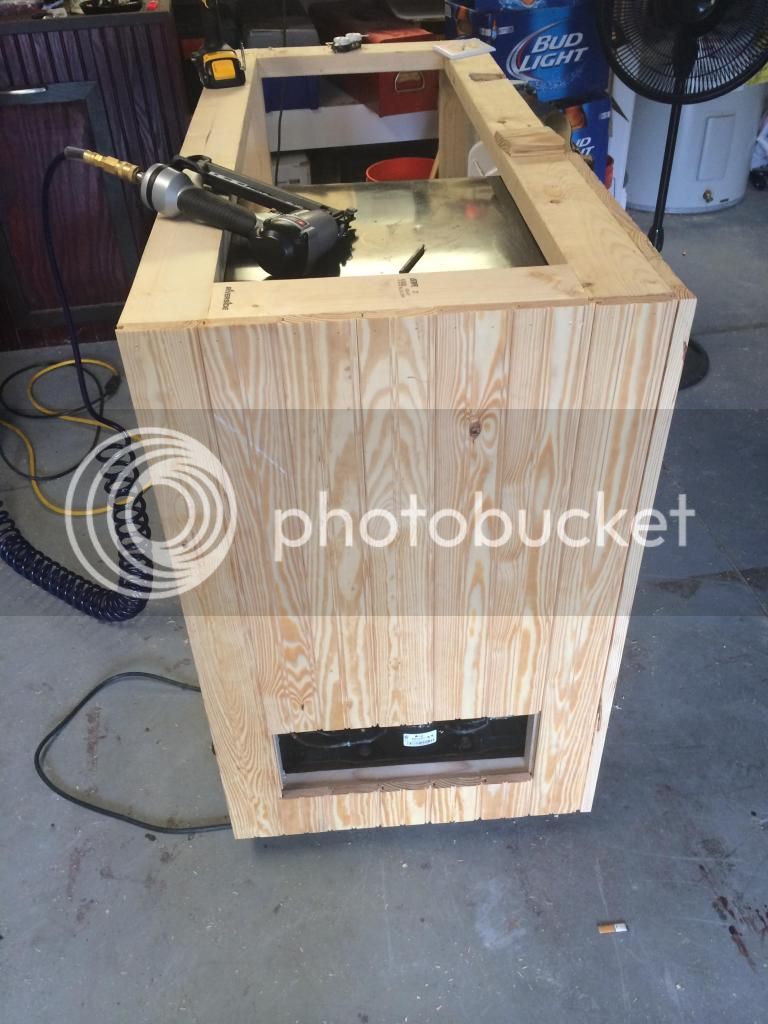
I built the sides next, I made pocket holes with a kreg jig in case I need to pull the fridge out later down the road.


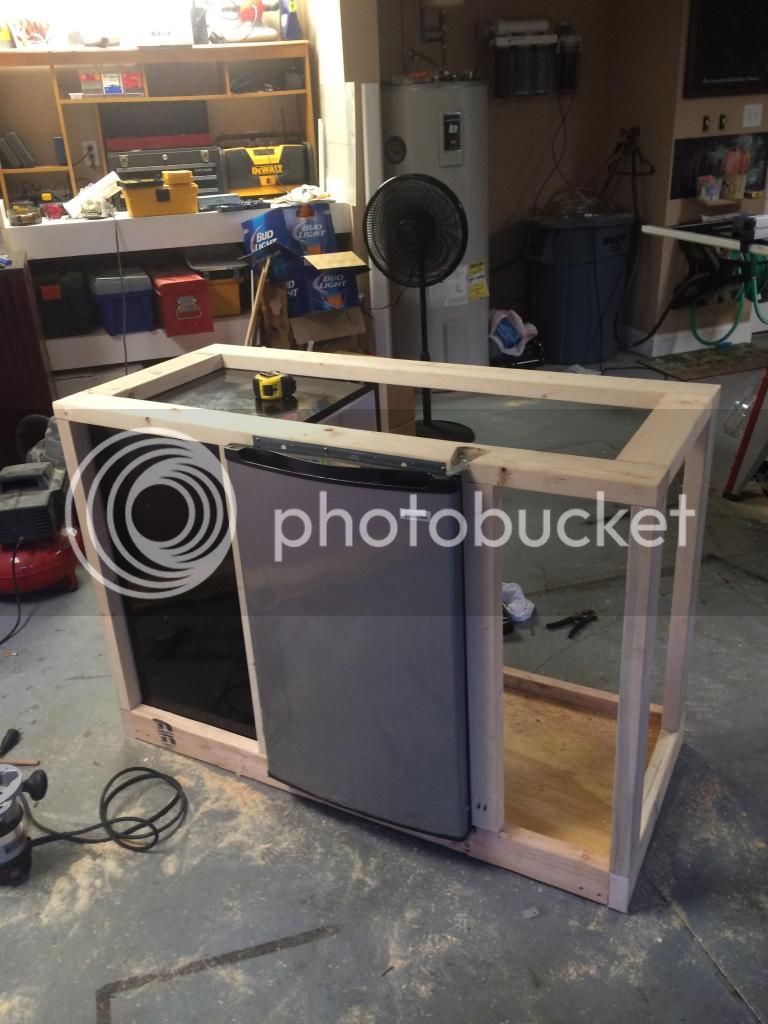
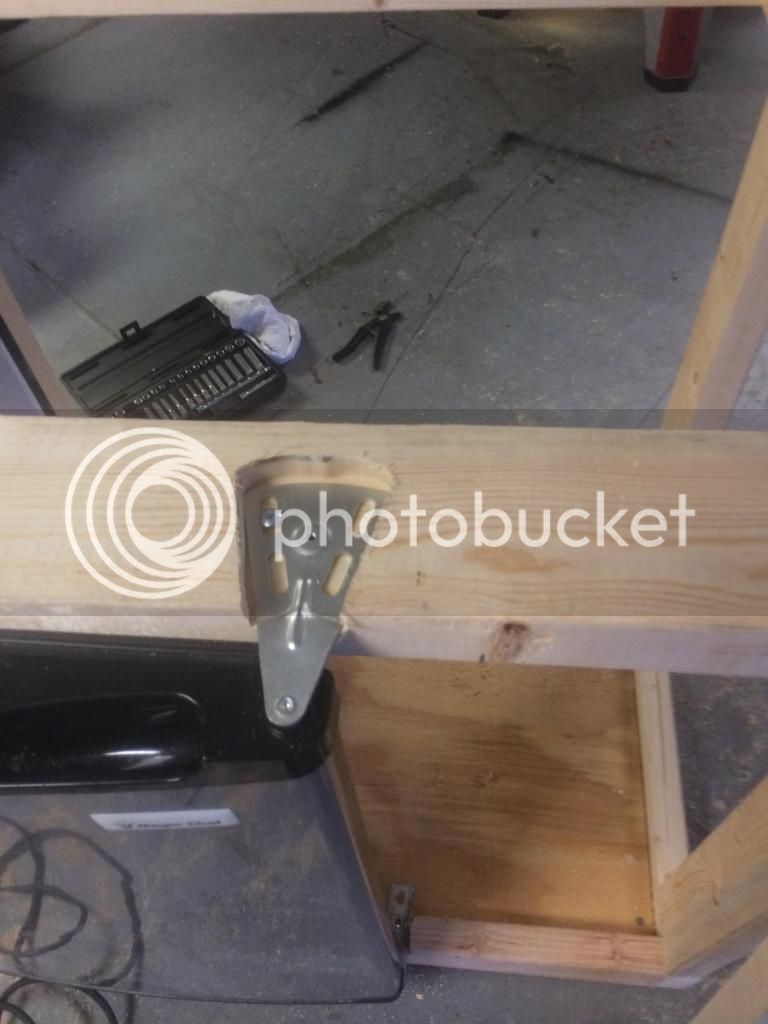
Built the top frame and routed out the door hinges, I screwed some galvanized strip around the door opening to utilize the gasket on the original door:


Inside view:


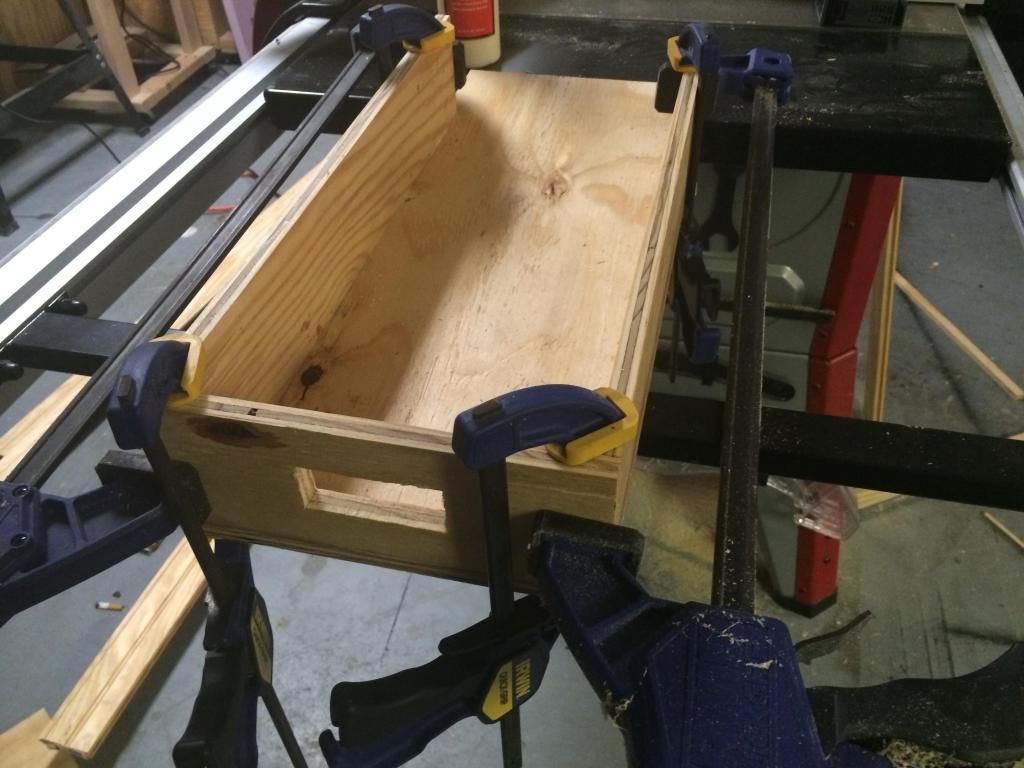
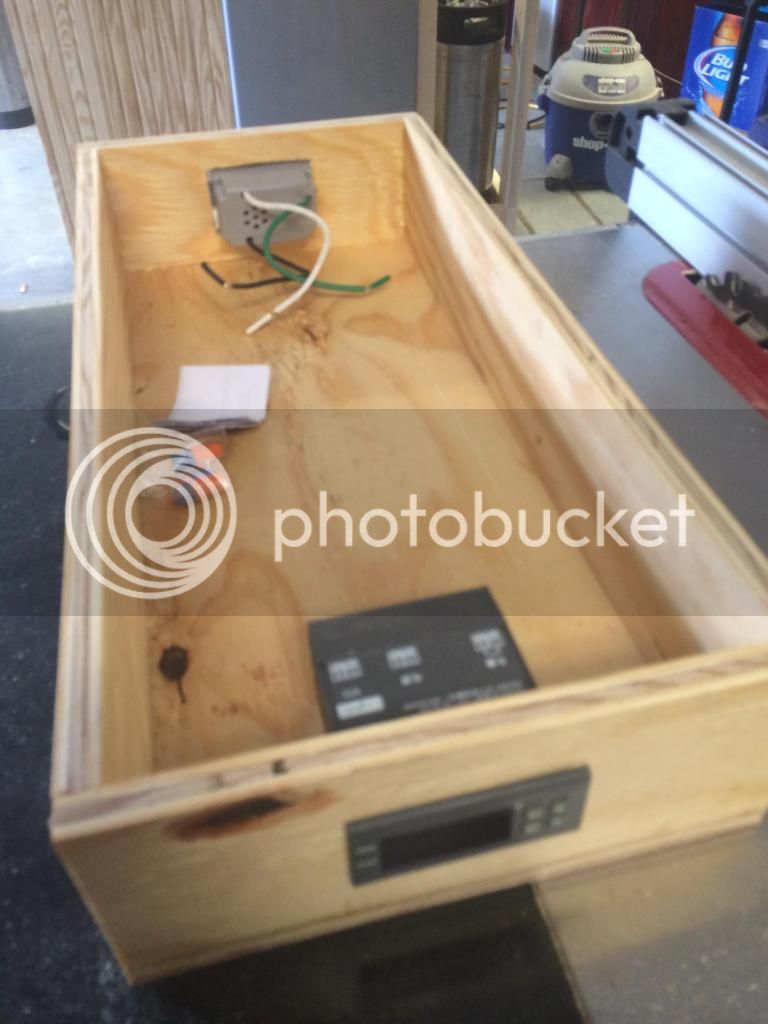
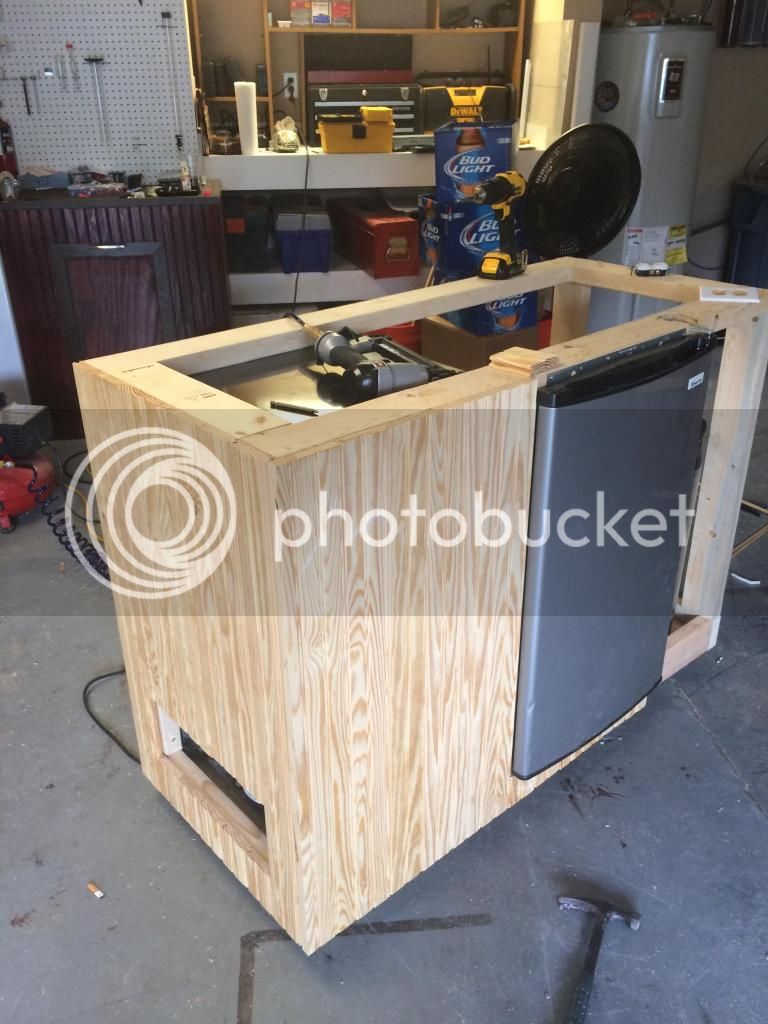
Building a box to house the controller- I am going to try to get it flush mounted on the right hand side of the front part but I am still trying to figure out how:


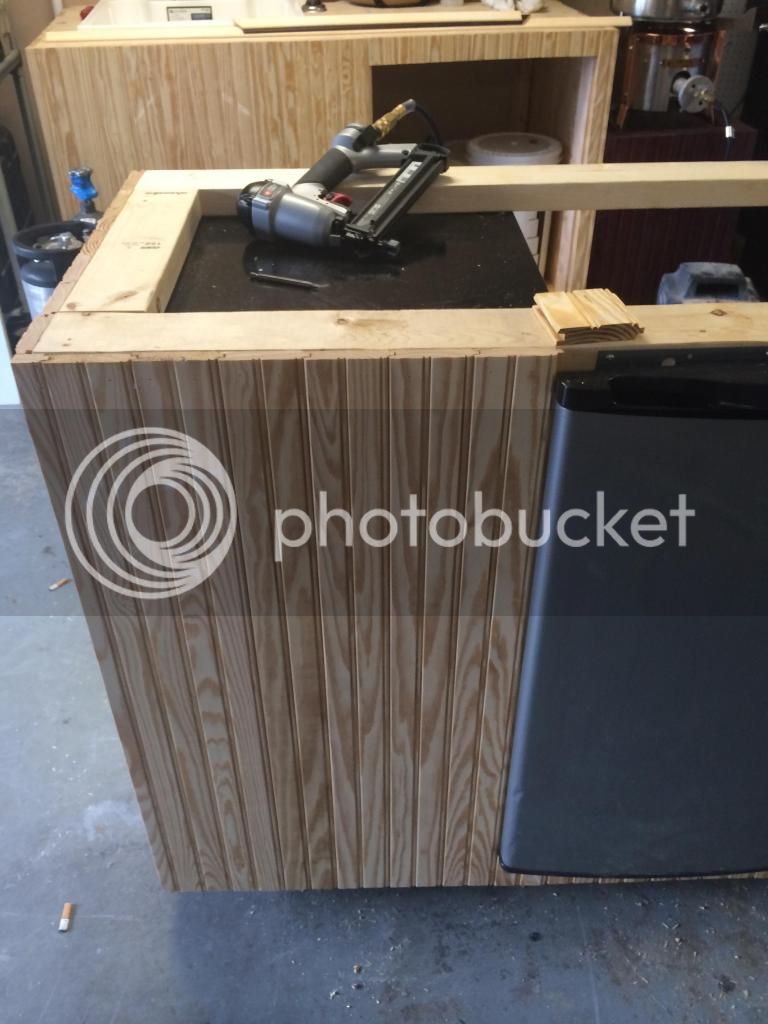
Nailed the trim to the left side and the front, the STC will be mounted on the right side once it is wired up:


That's it for now- Ill keep updating as I go.

Thanks!
Jeff
 
Thank you for all the kind words!

Worked on it a bit today-

Cut the back panel and jigged out a hole for the recessed plug:


Wired up the STC with a bit of help from number40fan (thanks again). Test ran it and it works like a champ!


Close up of the recessed outlet in the back:


Back panel dry fit- everything lined up pretty good:


STC in it's home- I had to use some brackets to mount it up there:


Started the R 7.5 insulation, I am covering it with some FRP which is a plastic sheeting like they use in restaurant kitchens:


Finished up the right side trim work, I thought the STC controller would look nice flush mounted to the front- it was a bit tricky to line up the cuts but it worked out pretty well I think:


And here's the inside with the FRP installed- I will seal it off with some silicone caulk after it dries completely:


That's it for now- I need to figure out whether or not two more 2 tap towers will fit in the space between the fridge and the STC box- it took up a bit more room than I had anticipated at first. I believe the tap towers need to be exposed to the cold air correct? I only have about 20" of space to put 3 two tap towers across- they are 3.5" at the base and about 6" between faucets-
 
I would definitely put some fans in there for your tower(s). I have a 4 tap T tower on mine and the first pour is always foamy due to the taps being near room temp. I see your outlet has USB ports on it, so I'm guessing fans are going to be in the build.

Are you maxed at 20"? If not, i would look to do a coffin box. You could do that and I've seen one or two posts where someone made a wooden T or H tower that was insulated very well. Maybe that's a better option.

On another note....that's a heck of a job you did for your ferm chamber in your other thread. Pretty ingenious to use a mini fridge to have a commercial style kegerator.
 
Thank you!

I have 2 thermaltake fans (USB) that will be pushing the air around from the mini fridge- unfortunately I already purchased a stainless cylinder style tap tower so I am kinda stuck using it. I need to buy 2 more for 6 taps total, I suppose I could get a 3 tap tower and run 5 kegs instead of 6. I am also considering offsetting 3 towers in a "V" shape, which would allow better clearance between the faucets but wouldn't look as nice IMHO, and might cause probs with the drip tray set up.

Thanks again for the kind words! Hope the mini fridge is up to the task!
 
What's your projected depth measurement for the whole unit on this build?
I'm running into a problem with most freezers I'm looking at being too deep (~34 inches +) for the spot I was looking for in my house.
 
Glad to help with the wiring. That outlet gave me an idea for my keezer build.

As for the taps, as long as you have room for the bases to poke through the bottom, you should be ok. Put the outer two bases as far out as you can in the 20" available and then center the third between them....that is if it will look like you want it too. If I drew my diagram correct, it would leave you 2 1/4" between the second tap of the first tower and the first of the secong tower. Should look uniform.
 
What's your projected depth measurement for the whole unit on this build?
I'm running into a problem with most freezers I'm looking at being too deep (~34 inches +) for the spot I was looking for in my house.

I can't make out the name, but it looks exactly like the GE unit that I have. It is 20" wide. So add the 3" of 2x4, possibly 1 1/2" of paneling and you would be at 24 1/2" in depth with the fridge sitting sideways.
 
Wow. 40fan is like a Jedi! The total depth is 23.75"- pretty darn close estimate!

I went and made a diagram too lol- kinda came to the same conclusion. I wasn't considering that the outer 2 faucets could overhang the airspace as long as the center of the tower was clear- that should leave me plenty of room to mount them side by side.

Do I need to insulate the insides of those towers?
 
You really should keep them open to allow the cool air to get in there and keep the beer in the lines cool, but you'll risk condensation. If you insulate, then the first pour will be warm(er) and foamy. I'd insulate it myself. How much beer can there be in a 3/16" line about a foot long? Damn...my CDO is going to kick in and I will have to find that answer.
 
Hahaha! I will try both ways and see what works best. What should I use to insulate with?

Made some more progress the last 2 days-

Installed the two thermaltake USB fans:


Sealed the seams with silicone:


And cut and mounted the top:


I still need to do a minor amount of sealing, and tonight when I did a test run I ran into a problem- I couldn't get the temp down below 50 degrees and the compressor was running constantly just to achieve that.

I was concerned from the get go about the fridges ability to cool that much airspace, so now I am a bit stumped. There must be a way to help the compressor out a bit- I am considering a few options:

1. Adding a small 5000btu A/C unit to the right hand side- there are a few around $100 bucks that would fit. Not sure what to do about condensation and "fooling" the unit to cool down to 40 degrees or so. I would also like some input on whether or not the combination of the fridge and the unit would be enough to keep the coils from icing over

2. Sealing it up better and adding some more insulation to the inside, and adding a couple more fans to increase circulation (or perhaps relocating the fans? they are blowing out directly from the freezer compartment currently)

3. Scrapping the fridge idea and trying to find a chest freezer that will fit inside the current frame I have built. Input to what size and model freezer would fit 6 cornies and a 20# co2 tanks would be appreciated. I can modify the frame and reuse all the wood I have if need be.

Any help would be appreciated- I am going the open a new thread to try and attract some attention with a new title here in a few.

On a better note I kegged my first beer tonight- a dunkel- and its in the garage carbing as we speak! Brewing a Pliny Clone tomorrow!

Thanks-
 
Did you have insulation on the top when you ran this test?

As for insulating the towers, cut a circle out of the insulation you are using now and then notch a couple spots for the hoses to pass through.
 
Yeah- I insulated the top all the way across the top of the mini fridge.

I ran out of silicone yesterday- I got almost all the seams except the top and the right hand side done with what I had. I have a can of "good stuff" too- might try that on some spots tomorrow.

When I unplugged the fridge the chamber was rising ~1 degree every 5 minutes or so- so this leads me to believe that sealing it up and grabbing a couple more fans might do the trick. This is also the least expensive option lol so I will try it first and then move on to other options if it doesn't work.
 
I think that this can be done with more insulation. My 10-12 year old GE that looks just like yours, but all white has been beaten and abused (door left open for days--accidently--on more than one occasion) and still cools like a champ.

Just scanned back through everything and I didn't see any floor insulation.

I used some stuff called R-Max from Home Depot for my Keezer build. The 2" stuff has a R-13 rating.
 
I used r7.5 due to the fact it is the same width as the 2x4's I used for the frame- making a nice flush insulation when wedged between the plywood and the inside. Add the wood outside and I should be around a 10 rating I imagine.

The bottom is insulated underneath the FRP from the right side to where the fridge starts- the only places in the entire build that aren't insulated are the actual 2x4's for the frame.

I went ahead and unplugged it for the night after it stuck at 50.5 degrees- the compressor was pretty hot to the touch and I didn't want it running all night long. If I can get it to cool down to around 38-40, I can set the compressor delay on the STC to around 5 minutes which would allow the compressor a rest and wouldn't get the beer over about 45 or so.

When it was running, it was dropping the temp ~1 degree every 5 minutes once it got to below 60. so if it can get to 40- it would effectively be running about 25 minutes at a time with a 5 minute rest between cycles. I don't know all that much about compressors but that seems like it might burn up pretty quickly.
 
I hate starting a post where I apologize first Any reason why you couldn't buy a small , I'm thinking 7 cubic feet or so. Chest freezer ? Use your stc-1000 for temp control. The exterior body and shape you can reclaim the wood you used. Your Skill with wood seems humbly underrated
 
I was just looking into keezers again actually- my first instinct was to build one , but my buddy had that mini fridge and he only wanted 30 bucks for it so I figured I would give it a shot. It worked really well for my ferm chamber build, and the vast majority of the materials outside of the fridge were leftovers from that project, so I really haven't dropped any big money into it.

Only problem I have with a 7 cu ft is that there's absolutely no way for me to fit the 6 kegs I want along with a big 20# co2 tank in one- so I will have to go for a bigger one- which effectively negates using the original structure unfortunately.

So what I have decided to do is to build a keezer with a maytag 14.8 cu ft chest freezer- I can repurpose the 2 perlick faucets I already have in the tower I bought, and I just cancelled the other 2 towers that were en route from keg connection and replaced them with 4 more faucets and shanks to make it coffin style.

Then I will just leave the mini fridge effort as is ( I will finish the top and seal it up a bit better ) and try to sell it as a fermentation chamber. By my estimates it should hold 3-4 carboys pretty nicely and the temp holds just fine for ales.

I am pretty disappointed, I really liked quite a few aspects of the mini fridge build (front access, smaller footprint, etc ) but I really think a keezer will be more reliable in the long run. I will start a new build thread tomorrow and keep you guys updated.

Thanks for the compliment on my woodworking- it has been a hobby of mine for many years now. And thanks to number40fan and everyone else for the advice and encouragement!
 
What if you added a second mini fridge on the other end of the enclosure? If you had a fridge on each end, with fans blowing towards the center, would that help? Maybe you can find a second fridge used on the cheap to keep you from sinking more on a chest freezer.


Hoping to get started on mine soon as I also have the Maytag. I'm tired of having to let some of my carboys sit until one of my kegs in my current keezer kicks.
 
Just a thought if you want to pursue this further, could you give up one keg or the co2 inside and replace it with a bucket of ice? If the fridge it maintaining cold decently well it could definitely help with the initial temperature change.
Also if you have a way to put the kegs in there after they've been brought down to serving temp already that'll help too.
 
So I sealed the living s*it out of this thing and managed to get it to hold around 45 degrees.

As much as I liked this project, I do believe I am going to make it into a fermentation chamber instead of using it as a kegerator. I will either sell it eventually or maybe I will use it to ferment my own beers, I usually have 2-3 carboys at different stages of fermentation and it might be good to be able to keep this one at 64-66 and then move some to the main one after primary fermentation has ended at around 72-74 or so.

Bought a 14.8 cu ft maytag chest freezer a couple days ago and construction is now underway- keg connection order should be here tomorrow afternoon- its like Christmas in July!
 
Do you have any insulation between the wood and the sides/top of the fridge? If so, that may be your problem. Even if you have empty space between the wood and the fridge, you still might not be able to dissipate enough heat through the skin of the fridge to be able to cool efficiently. Maybe some air flow in that space is really what you need. And if you have insulation between the fridge skin and the wood, you're trapping all that heat inside.

It probably just needs more run-time to get to the temperature you need. If the temp is still coming down when you unplug it, then it's still cooling, just not very quickly. Cooling that much air to the temperature you want is going to be a challenge with the little fridge. Then once you get there, keeping 6 kegs cold shouldn't be too bad. Their thermal mass is such that you shouldn't get too much of a swing. A real test would be to fill 6 kegs with ice water and see how often it runs over a few days. Refrigerators are most efficient when they're mostly full of cold stuff.

Of course, now that you've bought a chest freezer, it probably doesn't really matter at this point. It's a nice ferm chamber anyway.
 
Bought a 14.8 cu ft maytag chest freezer a couple days ago and construction is now underway- keg connection order should be here tomorrow afternoon- its like Christmas in July!

14.8? You're going to need more kegs. :D
 
Mr. FS- I had no insulation around the fridge, although I did wrap the outside of the fridge with ply on the back and t&g planks on the side and front.

I am considering a few options with what to do with it, including putting a couple of stout faucets/nitro on her and running at ~55 degrees- I like my dark beers pretty warm. If so I will vent the back and slap a couple cooling fans to dissipate the heat from the fridge exterior.

40fan-Hope to have the keezer done by Monday- it actually is pretty tight with 6 cornies and a 20# co2 tank. Little room on the hump for some bottles/yeast, or I can squeeze in a carboy to cold crash if needed.

Cheers!


Sent from my iPhone using Home Brew
 
Even if you have empty space between the wood and the fridge, you still might not be able to dissipate enough heat through the skin of the fridge to be able to cool efficiently. Maybe some air flow in that space is really what you need. And if you have insulation between the fridge skin and the wood, you're trapping all that heat inside.

Of course, now that you've bought a chest freezer, it probably doesn't really matter at this point. It's a nice ferm chamber anyway.


This is exactly the problem. You need more air movement around the sides of the fridge for it to dissipate the heat from the coils embedded under the skin of the fridge. Maybe add some cut outs along the bottom and top to allow for convective current and augment that with some fans to blow air around the sides.

But as also mentioned, you've already got a keezer build in the works so this is probably too late. Unless you want to "fix" it so you can sell it as a kegerator...


Sent from my iPhone using Home Brew
 
I'm planning on doing exactly what you have here. I've gone through 2 keezers and managed to kill them both by drilling into the interior wall in order to mount the gas manifold. After 2 keezers dying a slow death (about 2 years each time before the died) I've learned my lesson to never pierce the interior wall of a freezer, but I'm also sick of custom building a cabinet around a freezer just to do it all over in 2 years.

I thought if I build an insulated chamber within an attractive cabinet and chill it with a mini fridge, just as you have, I can just swap out the fridge if it ever breaks without having to rebuild a cabinet each time. I want it to be a coffin kegorator so I also like the idea of front-loading without having to pull the cabinet away from the wall each time I want to open the lid. I'm sad to hear that you've had trouble achieving your temperature... it's making me rethink the whole project. I've seen many fermentation chambers built this way without complaints about the temperature but maybe they aren't trying to achieve anything below 40.

I still plan to try it. Maybe your problem is lack of heat dissipation as others have mentioned. I plan to add some air circulation around the fridge to remove heat. I'll also keep it in the basement which doesn't ever get too hot so ambient temperature won't stress the system. Just need to get a fridge off of CL. Watching for deals...
 
That is pretty extensive! Not sure if I am wanting to take something of that magnitude on- and the keezer is coming along nicely right now. I didn't take a bunch of pics but here are a few- it's pretty much a direct descendent of jester's build I am sure you have all seen with a couple of mods:

First the cage, I added some airspace around the front and sides for ventilation:


The coffin- I ran the STC from the middle of the tap board and put an outlet on the back:


Top and coffin done and working correctly:


Hooked up my dunkel to a picnic tap. Then got pretty drunk on it and found this the next morning:


(The picnic tap had a slight leak I failed to notice... that's about 4 gallons of pretty good dunkel on the freezer floor :( )

Side panels built and dry fitted:


Mounted the sides and front, trim attached:


All lit up! Working like a champ, I hooked up my blueberry hefe and it is pouring nicely-

 
I didn't mean to suggest that you should take your mini fridge apart - just reinforcing the idea that if you give it some breathing room it should work fine for a kegerator and you can sell it as such.

Nice work on the keezer!


Sent from my iPhone using Home Brew
 
Looking good man - you do nice work. Sorry to hear about the Dunkel. Damn picnic taps strike again.

Cheers.
 
Back
Top