Make your own precision SS temperature probe

Homebrew Talk - Beer, Wine, Mead, & Cider Brewing Discussion Forum

Help Support Homebrew Talk - Beer, Wine, Mead, & Cider Brewing Discussion Forum:

This site may earn a commission from merchant affiliate links, including eBay, Amazon, and others.
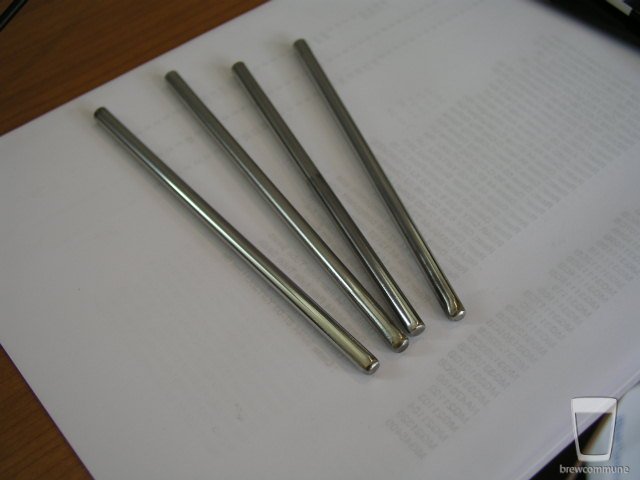
Inspired by Bull's beautiful work on these I decided to make my next probes from SS but not wanting epoxy or silicone for fear of it eventually leaking I decided to TIG weld the end shut. I just recently got this welder and my finest welds are embarrassing at best but I figured I'd give it a shot anyway. I got some 1/4" OD X .028 wall SS tubing and 3/16" SS rod that fit the ID fairly tight.

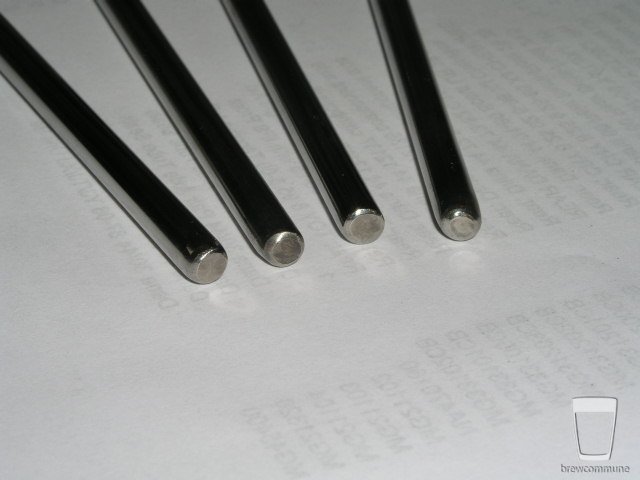
Welding .028 wall material to 3/16" rod proved to be quite a challenge, for me at least. After burning an inch or so of tubing away, I finally figured out that the best way to do it was form the puddle on the rod and then use the torch to quickly push it to the tubing until they fuse. Anyway, here's the result:


SS_Probes.jpg

SS_Probes_2.jpg

Derrin; you made me proud of your efforts and look at the results, congrats.
That is exactly what i'm talking about vs epoxy, make the ends look like a one piece item with the tubing. The best part you can make your probes to any length like I posted above in a real long probe 18" to 20" long for the fermenter mounted in the lid. Not a store bought item a custom made for your needs item. I must ask what welder do you have? Auto dark hoods sure saves on arc tracks on a finished part besides sticking the tungsten causing contaminating the tip then the regrind the tip PITA process. You are going for the stainless 1/4" to 1/2" NPT adapters?
One more item I always tell others that weld a lot or only a couple times a year time passes fast and a lease bottle will get you in the end. Best to buy the largest owner own bottle like the 250 / 280 cu/ft. It will hurt you on the initial purchase but save you money over time without paying the lease and about the same cost to refill, not much more than a smaller bottle. They get you on the basic exchange fee with many returns vs less with a larger bottle. Also less trips to get a bigger bottle refilled. Many PITA's you can avoid with long term thinking. Go practice and enjoy Tig. There are some days that is better to just walk away from Tig instead of fighting a welding problem. Been there done that. PS; check into the www.millerwelds.com forum. There is a Q & A section, projects with people from basic newbie's to NASA grade welders, ranch repair to home project hobby welders.
A great forum for answers on any welding problems you might encounter.
 
Hey Derrin, very nice job! Those look excellent and are making me second-guess my procedures.
I am going to have to look into finding someone around here with a tig. I can weld, no problem. But the goodies in MY garage limit me to AC stick. I am not thinking a 1/32 6013 is going to help me here! hehehe
 
I have a Miller 180SD. I'd prefer an inverter based welder for the electric bill, but this is a great machine. I bought a 20cuft bottle first and that was a complete waste. Now I own a 94cuft bottle and that's much better. Cost me $14 to fill 20cuft and only $24 to fill 94, go figure.

I'll be using compression fitting adapters, I've used them extensively in the past with great results.

I have some extra material if anyone is interested I could make a few more of these at custom lengths.
 
bull8042; with the stainless plug in place even soft solder will work on the stainless, just use lead free. Granted it does not flow as good as 50/50.
Lead in the solder explains why i'm slow in the head, no wait the house I grew up in had iron pipe. Smelting lead casting bullets that's what did it over the years. This is my story i'm sticking to it with the War Department.
 
Therimistor output is not linear, so without a pretty large lookup chart, you wouldn't be able to just measure the resistance.
temp_plot~0.jpg


This is a graph I did with a 10K thermistor glued to a DS18B20. It's a temp vs the analog value on a microcontroller pin, but it still give you an idea of what the thermistor algorithm graphs out like.

Wow that was not a pretty graph picture so that leaves that idea out.

You could just build another probe and use an LM34 like the OP. You would have to supply it 5 clean volts but it provides 10mV per *F output and a voltmeter would quickly tell you what temperature it was. ie: 850mV would be 85*F.

Now this I can live with, questions;
I have a GUN-HO switching power supply with 7 flat milti pin connectors, a small computer fan I believe it was a computer power supply unit
Output: +5V 18.0A, +12V 6.0A, -5V 0.3A and -12V 0.3A
6" x 5 1/2" x3 1/2" thick with the strange 3 pin staggered vertical pins power in and out on it. This would be considered a clean voltage power supply for my fermenter temp probe needs correct?
I was told that a resister must be used as a shunt across unused power output leads, this I do not understand unless it's hard on the power supply to run without a load on it? It sounds like I should get a ma meter instead of placing a Fluke out of service and install everything in a neat little tin box for this remote fermenter temp reading probe project.
 
It sounds like an ATX computer power supply. There are a pair of pins in there that need the resistor for the supply to turn on. That would be a very clean power source. The rest of the outputs do not need a load as far as I know, just the two pins that turn it on and it can't be a simple short like a switch.

Google ATX power supply and you'll find the solid info.
 
Darrin; Thanks for the heads up with that source of information you posted i'll look into that company after this reply. This power supply I have it has 4 leads to a click click on / off switch and turns on the power supply with the super quiet low flow output fan. With the Fluke 87 on yellow & black on any group of flat connectors i'll read 5.08 V DC, on the black & red i'll read 11.11 V to 11.10 V DC. Strange not 12 V DC readings so it does turn on. Will this 11.11 V DC come up to 12 V DC if a load were put on the leads making the power supply wake up for a stable under load output vs open circuit? There also is a white and blue wire out to the multi pin connectors. The surplus I got if from was around for over 55 years they shut their doors so I cry now. You could go there and fill a sandwhich bag to the max nice and fat so you can just zip the top shut all with 1/4 watt resistors a selection from 10 ohm to meg ohm scale, a "variety pack". They look at it and say $5 that's enough "ok with you?". These power packs they had a box on a pallet full 1,000 pounds worth for $2 each. Extruded aluminum 0.375 ohm 25 or 50 watt resistor would cost $0.75 and $1 each. Wire, pots, caps, motors, flat ribbon wire, X formers wall pack to 150# HV, transistors, LED's all sizes and shapes you name it and all super cheap. Many fractional hp geardrive 90 V DC full ball bearing motors perfect for brewing mixers plus other voltage and in AC & DC. A minimum 4 hour candy store purchasing many not what your looking for items in the first place. The Oakland airport expansion kicked them out then the high rent warehouse
put them out of business. This made me cry I lost my home away from home and now what Radio Suck for parts.
The question I have is what to do with the third lead from the LM34 sensor with only two leads from the power supply? Case ground to the stainless fermenter and the power supply case all connected together? Elecrtician here not a electronics person, last wire pulls we had 37,000 pound wire reels with 3,950' of 12KW 4 conductor wire. I do have 25 watt pencil point solder guns.
Thanks. Carl.....
 
Sounds like a cool place.

I had thought about soldering the SS but I was afraid the flux required to get solder to wet-out on SS might eventually corrode the contacts and solder joints of the sensor itself. Hence the TIG work. I can solder with the best of them so it would have been much easier.

Anyway, you need to look up a spec sheet on the LM34. Of the 3 leads, one is power, one is ground and the third is the signal you need to read. They are very low current and since you're not looking to constantly measure something, you could always just power it from a 9V battery as needed if you wanted too.
 
Just to let everyone know that has been reading thus far, I have edited my original recommendation of the use of 5-min epoxy. I have found that the epoxy I have will soften if left in contact with water and/or sanitizer solution. This is unacceptable and therefore not a suitable solution for our needs as a temperature probe.
I contacted Derrin who has been posting in this thread and inquired about making some probe bodies for me. Turns out, he has been set up to do this for a while.
They are already listed on his site - Stainless Steel Temerature Probe Ends at Stirplates.com and are the perfect solution. His pricing is barely above cost for the material and shipping is practically negligible. He shipped mine the same day I ordered and I had them within a few days.
They are excellent and very well made. I have no doubt that leaking will not be an issue. The welds are void-free and being highly polished, there are no places for bacteria and nasties to hide.
 
Sounds like a cool place.

I had thought about soldering the SS but I was afraid the flux required to get solder to wet-out on SS might eventually corrode the contacts and solder joints of the sensor itself. Hence the TIG work. I can solder with the best of them so it would have been much easier.

The muratic acid reduced with water applies as if your using water only with an acid brush. It will rinse off just as easy as if you used just water for a flux. If your worried add a spoon full of baking soda to a cup of warm water, mix then apply to neutralize any residual acid from the flux inside the probe. Even with a warm soapy water bath plus a air blast to dry the inside of the probe housing there is no acid to "might eventually corrode the contacts and solder joints of the sensor itself". There are no "contacts" on the sensor to begin with just the sensor leads that you will solder your cable leads to. What about the corrosion created from the flux at that solder connection? If you seal the cable leaving the stainless steel probe with any silicone product you have added acetic acid to the probe as this is released when silicone sealer cures with the humidity in the air.

I still would add a couple cc's of thermal heat paste to pot or sink the sensor into before installing the sensor so that it will sink into the grease for the best heat transfer and readings. Call it overkill heck to do it right and once as it only takes a couple seconds to apply. Then you know you did your best. Good enough does not apply here.
 
I'm glad i found this thread. I was currently thinking about using thermocouples and an amplifiers to do immersion temperature (i'm new to IC/tempature controls). What do you use for your IO collection? I'm currently looking at using Phidgets Inc. - Unique and Easy to Use USB Interfaces for its analog input usb controller. Any tips?
 
I'm glad i found this thread. I was currently thinking about using thermocouples and an amplifiers to do immersion temperature (i'm new to IC/tempature controls). What do you use for your IO collection? I'm currently looking at using Phidgets Inc. - Unique and Easy to Use USB Interfaces for its analog input usb controller. Any tips?

That looks like an interesting solution, but I'm personally using a LabJack U3-LV.
I can't say which is better as I don't know much about the Phidgets though. The Phidget looks like it has very limited versatility. With the LabJack, you have 2 analog outputs and 4 digital I/O, and another 16 that can be configured digital in, digital out, analog in. It also has 2 timers and 2 counters on board that allow you to do PWM control, like a heater for instance. Granted, it costs a little more, the much greater versatility is definitely worth it.
Also, I would shy away from using thermocouples in favor of thermisters or linear sensors like the ones mentioned here in this thread. Thermocouples are just not as accurate because of a much wider design range. Plus they are much harder to work with requiring special extension wire if you need to lengthen your cable.... And you can forget using plain old plugs and sockets for any connections. Too specialized in my opinion for our use.
 
Also, I would shy away from using thermocouples in favor of thermisters or linear sensors like the ones mentioned here in this thread. Thermocouples are just not as accurate because of a much wider design range. Plus they are much harder to work with requiring special extension wire if you need to lengthen your cable.... And you can forget using plain old plugs and sockets for any connections. Too specialized in my opinion for our use.

Even besides that, the price was way too much. With all of the equipment I was looking at 50 dollars per probe and that is going cheap and doing some work myself. If I wanted to buy an automotive thermocouple amplifier it was 300 bucks for a 4 probe component (not including the probes). Not to mention i would need to calibrate them because even after the amp they aren't linear. Anyways, i ordered enough stuff for 5 thermister probes last night for about 50 bucks, 10 vs 50 each... big difference. You saved me a bunch of cash and time.

I'm going to check out the labjack to see if it would be easier for me.

ps: Darrin already shipped my sheeting, anyone interested in this project should look to him first.

I am glad I could help. I think you will find the LabJack is the way to go unless you want to learn the language for programming the Arduino. I wrote my program in Labview and DAQFactory. DAQFactory is a great SCADA/HMI software package, and if you are only monitoring a few sensors the Express version that is included with the LabJack for free will do what you want to do. You don't have to use an HMI though. It will run fine on a laptop and use the keyboard and mouse for the interface. Of course, if you want to get fancy, you could use a touchscreen LCD on your pc and not rely on the mouse at all.....
Labview is icon based programming like Indralogic drive programming if you know PLCs. DAQFactory is sort of C based scripting language. I know PHP, which is very similar, so it was easier for me.
Also, Derrin is a great resource for many things. Hopefully, this will encourage him to add himself to the vendor list and get his name out there. I am definitely going to get one of his stirplates when finances permit.
 
I am glad I could help. I think you will find the LabJack is the way to go unless you want to learn the language for programming the Arduino. I wrote my program in Labview and DAQFactory. DAQFactory is a great SCADA/HMI software package, and if you are only monitoring a few sensors the Express version that is included with the LabJack for free will do what you want to do. You don't have to use an HMI though. It will run fine on a laptop and use the keyboard and mouse for the interface. Of course, if you want to get fancy, you could use a touchscreen LCD on your pc and not rely on the mouse at all.....
Labview is icon based programming like Indralogic drive programming if you know PLCs. DAQFactory is sort of C based scripting language. I know PHP, which is very similar, so it was easier for me.

My day job is writing a HMI/SCADA :)... I don't get free hardware though, so I was trying to find a cheap solution. All of my automation can be done on a PC I don't need any real time applications so I don't NEED a PLC (although i found some affordable ones on ebay, i just don't know if i'll ever get stuck needing to pay full price to expand). That's why I'm looking for just simple usb io collector. LabJack looks slick, I need to decide now. I liked phidgets io controller/lcd screen combo for 90 bucks (Phidgets). I wanted to use that for quick temperature viewing. Another thing i like about phigets is it will serve up the data over tcp so you can make a remote application that can collect from multiple sources w/out the need for a full blown SCADA.
 
My day job is writing a HMI/SCADA :)... I don't get free hardware though, so I was trying to find a cheap solution. All of my automation can be done on a PC I don't need any real time applications so I don't NEED a PLC (although i found some affordable ones on ebay, i just don't know if i'll ever get stuck needing to pay full price to expand). That's why I'm looking for just simple usb io collector. LabJack looks slick, I need to decide now. I liked phidgets io controller/lcd screen combo for 90 bucks (Phidgets). I wanted to use that for quick temperature viewing. Another thing i like about phigets is it will serve up the data over tcp so you can make a remote application that can collect from multiple sources w/out the need for a full blown SCADA.

I can relate. I have a MicroLogix 1500 at home with a 32-point input card and 32-point output card that would make a great base. BUT, I would have to have an analog input card to read my temps..... and write my own PID loop for the heater control..... find an HMI.... create all the tags and handshaking... Oh, CRAP NO! Way too much trouble and money for me. Plus, I am not overly profficient in RSLogix, so I can see where you are coming from. Plus, I am a hardware engineer, not a programmer. So I found myself getting a little out of my comfort range.
I do like your option of using TCP though. That could be useful.
If you get a LabJack, PM me with your email address and I can shoot you some code over for you to see what I have done. Actually, I could just comment out the function calls to the device and you could run it without all the errors. At least that would give you an idea what DAQFactory can do.
I just got a new hard drive and reinstalled everything, so I still have to install Windows in VirtualBox so I can install DAQFactory before I can modify the code. For some reason, no one want to port these developement platforms to Linux.....
 
Also, Derrin is a great resource for many things. Hopefully, this will encourage him to add himself to the vendor list and get his name out there. I am definitely going to get one of his stirplates when finances permit.


Thanks for the complement! Just FYI; I was all set to pop for the vendor list here as it is money well spent, but my website was craptaclular at the time and I couldn't very well spend good $$ to send people to that. Now I like my website but my "business money" is tied up in a larger inventory buy to support the website. I figured I couldn't launch a nice site and Google campaign without inventory to back it up so I purchased enough components to have about 30 stir plates in stock, plus nearly $100 on SS for probe ends and thermowells.

Anyway, as soon as I move a few more plates I'll definitely add myself to the vendor list here. HBT has been great in referrals to the new site and the response from the regulars who have become customers is just fantastic.

Thanks,
Derrin
 
The muratic acid reduced with water applies as if your using water only with an acid brush. It will rinse off just as easy as if you used just water for a flux. If your worried add a spoon full of baking soda to a cup of warm water, mix then apply to neutralize any residual acid from the flux inside the probe. Even with a warm soapy water bath plus a air blast to dry the inside of the probe housing there is no acid to "might eventually corrode the contacts and solder joints of the sensor itself". There are no "contacts" on the sensor to begin with just the sensor leads that you will solder your cable leads to. What about the corrosion created from the flux at that solder connection? If you seal the cable leaving the stainless steel probe with any silicone product you have added acetic acid to the probe as this is released when silicone sealer cures with the humidity in the air.

I still would add a couple cc's of thermal heat paste to pot or sink the sensor into before installing the sensor so that it will sink into the grease for the best heat transfer and readings. Call it overkill heck to do it right and once as it only takes a couple seconds to apply. Then you know you did your best. Good enough does not apply here.

I can't answer to the what affect the acetic acid might have on the contacts but that explains why curing silicone always smells like vinegar! I do know that all electronics fluxes are "rosin" based, but I'll admit I didn't spend any time looking up what that means to discuss it. I do know from experience that they are non-corrosive and in fact protect copper rather than attack it.

The flux I have experience with for silver soldering is very aggressive and corroded and attacked everything including my concrete. It did a fantastic job! I know there is very little chance of getting solder to wet-out with SS without such a flux so I would be very concerned about what it might eventually do to the contents. As you already pointed out, a thorough cleaning would mitigate these problems however as a welder I'm sure you agree that while there are decent alternatives to TIG welding there is no substitute.

If you'd like to test your multi-meter with an LM34, PM me your address. I have some that I'm not experimenting with anymore and I'll mail one to you.
 
The flux I have experience with for silver soldering is very aggressive and corroded and attacked everything including my concrete. It did a fantastic job! I know there is very little chance of getting solder to wet-out with SS without such a flux so I would be very concerned about what it.

Derrin; the cut muratic acid is thin like water even after soldering with a propane torch, it wets and sucks the solder into the joints better than sweating copper fittings that are properly cleaned. A rinse with water and they are clean enough to drink out of. No sticky burnt flux or any other mess.
I myself was impressed with how easy SS is to solder.


As you already pointed out, a thorough cleaning would mitigate these problems however as a welder I'm sure you agree that while there are decent alternatives to TIG welding there is no substitute.

If you'd like to test your multi-meter with an LM34, PM me your address. I have some that I'm not experimenting with anymore and I'll mail one to you.

Derrin; i've been rather busy with surgeons and doctors about my back, sorry for the late return reply. What is the diameter of the LM34 unit?
I have some .035" wall thickness .250" SS tubing off a NUMI job (chebbie/Toyota adventure in Fremont California 23 miles from home). This leaves me dead nuts at 0.180" ID or 4.572mm maximum. What's the LM34 probe's diameter. Plan "B" is to go to .028" wall thickness .250" SS tubing if necessary.
Thanks for the offer as at the moment I have nothing but my uncut keg collection and a BCS-460 unit from Adam at the moment as I sold everything including the brewing system. I have a mill next on my list but at the moment i'm lucky to just walk to the curb and back.
If needed PM isn't a problem, thanks. Carl.
 
Hey Carl, the 0.028" wall leaves just enough room inside for the sensor to slip in with little room to spare. 0.25" OD and 0.038" wall probably won't leave enough ID to get the sensor in.
Now, get your sorry butt better so you can get back to putting that rig together and brew something.

Bull
 
Yeah, I don't have a dimension on the sensor itself but I know with .028 wall there isn't room for an RCH between the sensor and the ID. If the tubing is welded you might even have to clock the sensor so the flat notch is in line with the seam. Doesn't seem to be an issue though.

PM me your address and I'll drop these LM34's in the mail. Or, if you prefer, I have some LM35's that are calibrated *C.
 
Hey Carl, the 0.028" wall leaves just enough room inside for the sensor to slip in with little room to spare. 0.25" OD and 0.038" wall probably won't leave enough ID to get the sensor in.
Now, get your sorry butt better so you can get back to putting that rig together and brew something.

Bull

Hey bull; that would be .035" wall thickness not .038" as you posted above boss. Is it that close that .014" smaller tube would not make the L34 fit? Anyone mike or dial caliper a LM34 unit and if so what is the diameter? If it's that close and it being so short I would use 400 grit sandpaper and make it fit. If not i'll have to purchase some .028" wall thickness tubing. It's just that I have .035" wall .250 SS tubing in stock.

Bull; I have to switch medical plans to get the surgeon I want in San Francisco. He's way better than any Stanford spine medical surgeon bar none. He said two discs need the fragments plasma cut away from the spinal column nerves NOW before it turns into permanent nerve damage. This is the important items as there are many more not as bad to worry about later. I'm alive on percocets I did not go for the burning of the nerves like the pain management doctor wanted to perform. A smart move on my part by my surgeon I was told besides he has my first MRI records of 19 months ago plus the 11 new ones (PET) showing increased damage over time. So far over 2 1/2 hours with him in his office 100% free. There is more to this story why, a PM is due by me to you in the near future, more to explain.
 
Yeah, I don't have a dimension on the sensor itself but I know with .028 wall there isn't room for an RCH between the sensor and the ID. If the tubing is welded you might even have to clock the sensor so the flat notch is in line with the seam. Doesn't seem to be an issue though.

PM me your address and I'll drop these LM34's in the mail. Or, if you prefer, I have some LM35's that are calibrated *C.

Thanks Derrin for your probe offer, I will PM you as one probe would be great as a starting point. Now I know how tight they fit inside .028" tube. Sounds like my .035" x .250 SS tubing is useless for this probe but will be used for other probes with plenty of room to spare plus potted in thermo grease. The .035" SS tubing will be used with Digi-Key 10K probes to control the BCS-460 I purchased from Adam last month. This means I must order .028" wall thickness when I get ready for this odd fermenter probe project as it will be inserted into the sealed lid on a 15.5 gallon keg, i'll add a cone and make it my fermenter. The SS probe will be app 22"-24" in length my first guess.

For the last 2 years this back has me all stopped as dead as a ship's telegraph in that same position.
Funny, I have a complete one on a pedestal as well one that has the column length only 5" below the cast head of one piece. It had a rod off each lever inside the head and out the back to control two bier taps. A counter top item from a bar years ago that was a garage sale item. Just another of those must have items for me.
Derrin; i'll PM you, even being a useless POS on percocets I must do something or go nuts. I have a 5 volt computer power supply plus want to learn more about these probes. My future intentions are to use a LM34 for the fermenter at one location (house) with a Digi-Key Corporation - USA Home Page 1% tolerance 10K resistance probes on the brewing unit for the BCS-460 controller.Thanks again. Carl....
 
I made temp probes and all kinds of other HVAC/R stuff in high school at a really small factory.

Building Automation Products, Inc. (BAPI) - Sensors for HVAC/R, Temperature, Humidity, Zone Pressure and Air Quality. BAPI manufactures Room, Wall, Duct, Immersion and Outside Air sensors and transmitters featuring high quality thermistor, RTD or sem

If I would have known they could be useful some day, I might have acquired some. I made about 1,000 duct sensors a day, or about 100 thermostats a day. Wild time. No not really, that job made me want to go to college.
 
hey guys, i am just getting up to speed on this thread today. is this probe safely able to be dropped into a betterbottle to monitor fermentation temperature over the whole process? any issues with corroding the probe or anything else?

currently i just do ambient air temperature monitoring with a 1wire sensor from hobbyboards hooked up to a NSLU device. gives me very basic RRD graphs and has a web server to host it. very basic all around - i am considering dabbling with an arduino and a few of these sensors if you don't think there is an issue with the long exposure to the fermenting goodness.
 
It can if you use Stainless Steel for your probe body. Also, scratch any ideas to use Epoxy in general. I had no long-term success with the general purpose stuff and went with Derrin's welded bodies. I am VERY happy with them. just make sure the cable entry is sealed well if you are going to completely submerge it.
 
If you could find a way to drill another hole in a stopper than you could buy the 12" probe from Derrin, then you could stick it all the way into the wort and still have the cable entry on the outside of the carboy. Then you could use the original hole for your airlock.
 
If you could find a way to drill another hole in a stopper than you could buy the 12" probe from Derrin, then you could stick it all the way into the wort and still have the cable entry on the outside of the carboy. Then you could use the original hole for your airlock.

Derrin actually sells a 16" thermowell with a flared end so it stays positioned in a hood or bung. I just bought one, and he shipped it out in about 1/2 and hour!

:ban:
 
thanks for this thread! i've used 1wire in the past but bought a premade device. i wired up my first chip as a test tonight and it actually works despite my umm "awesome" soldering skills. i have two more chips to use with the probes i ordered from derrin. rock on.

:ban:

the chips seem to be hard to find online these days. i ordered three from this site if anyone is looking: Dallas Semiconductor - DS18B20+ - Allied Electronics
 
any tips for inserting the chips into the probe? i can't seem to fit mine. website says it's the same casing size as derrin says will fit.
 
any tips for inserting the chips into the probe? i can't seem to fit mine. website says it's the same casing size as derrin says will fit.


They should slide right in. They're very snug but should go. Do you have several chips/probe ends to try? Is it every combination?

Edit: I just saw your post above this post. I debur the mouth of each one but I may not have cleaned it well enough. Look and see if I left a lip by accident.

Sorry for the trouble. I guess I'll have to start using a chip as a go/no-go gauge.
 
hey derrin, yea i just got your two probe ends in the mail today. i'm the one you shipped to in colorado. I have a 4" and 6" and two chips, all seem too tight to go in. These are the chips i have, if i read it right it is the same casing you mention on your site: Dallas Semiconductor - DS18B20+ - Allied Electronics

you mentioned the lip - yea i thought of that but honestly don't know a whole lot about metals or hardware in general - i tried rubbing it down slightly but didn't know what to use. any suggestions for something that might help?


Well, you shouldn't have to mess with it in the first place. I'm sorry I missed it, I'm just surprised it's both of them. Send me an email so I have the right info. I'll get you two more out right away to get you working asap and then I'll worry about getting those back.

If you have a Dremel tool with a grinding stone that'll knock it right off. Oherwise a small round file but like I said, you shouldn't have to deal with it.
 
One thing I have done is scrape the sides of the IC with a razor knife or fine sandpaper to reduce the radius a hair. If there is an edge left on the tubing (I would be surprised having some of Derrin's probe bodies myself), a chainsaw file or needle file will knock it off too.
Don't go overboard if you decide to work on the IC though. You want a slip fit, but slightly snug so that you still have good contact with the tubing.
 
Ok I'm about ready to build me a temp probe for monitoring the temps of my fermentation, and wonder if putting some silicone under some heat shrink tube and letting it cure would be a good way to waterproof the leads going into the probe. Just in case I decide to submerge it for extended periods. My first choice would be to get a probe long enough to insert through the bung, but who knows what might happen in the heat of the moment!
 
Ok I'm about ready to build me a temp probe for monitoring the temps of my fermentation, and wonder if putting some silicone under some heat shrink tube and letting it cure would be a good way to waterproof the leads going into the probe. Just in case I decide to submerge it for extended periods. My first choice would be to get a probe long enough to insert through the bung, but who knows what might happen in the heat of the moment!

After you insert the sensor into the probe body, hook it up and make sure everything is working well. Then you could force a little silicone down the tube around the wire and let it cure like you are talking about. The shrink tubing would really just serve as a strain relief then. I think that would work well.
 
I was planning on using the LM34 because it was already in F and linear, but what would be a good tracing software to use with it? And, what would be suitable for providing clean 5V? A computer PSU or Wall DC Adapter? How would the sensor connect to the PC?
 
Back
Top