Keep It Simple: Single Tier, No-Sparge, RIMS

Homebrew Talk - Beer, Wine, Mead, & Cider Brewing Discussion Forum

Help Support Homebrew Talk - Beer, Wine, Mead, & Cider Brewing Discussion Forum:

This site may earn a commission from merchant affiliate links, including eBay, Amazon, and others.

nyx

Active Member
Joined
Aug 12, 2013
Messages
27
Reaction score
1
It's that time again! Time for yet another brew rig build.

Design Considerations


  • Keep it simple
  • 10 gal capacity
  • No swapping hoses
  • Single tier, single burner, single pump
  • Easy to clean

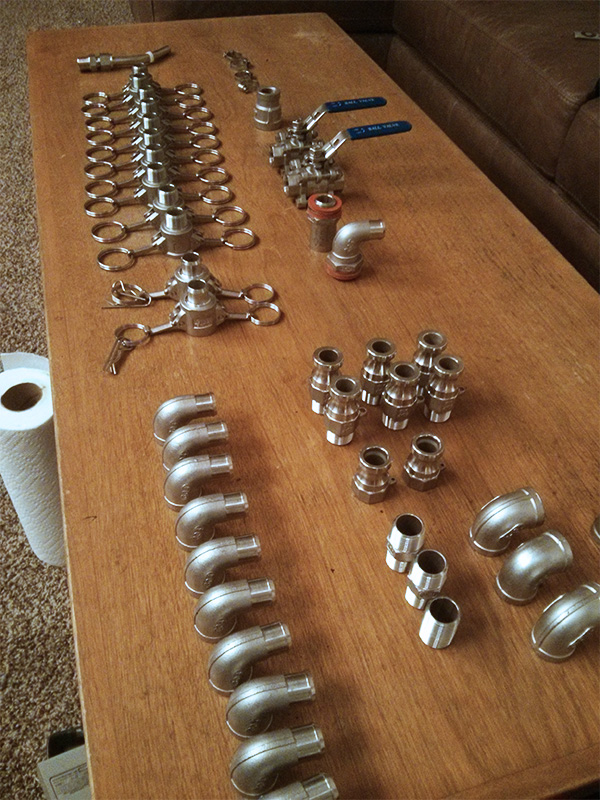
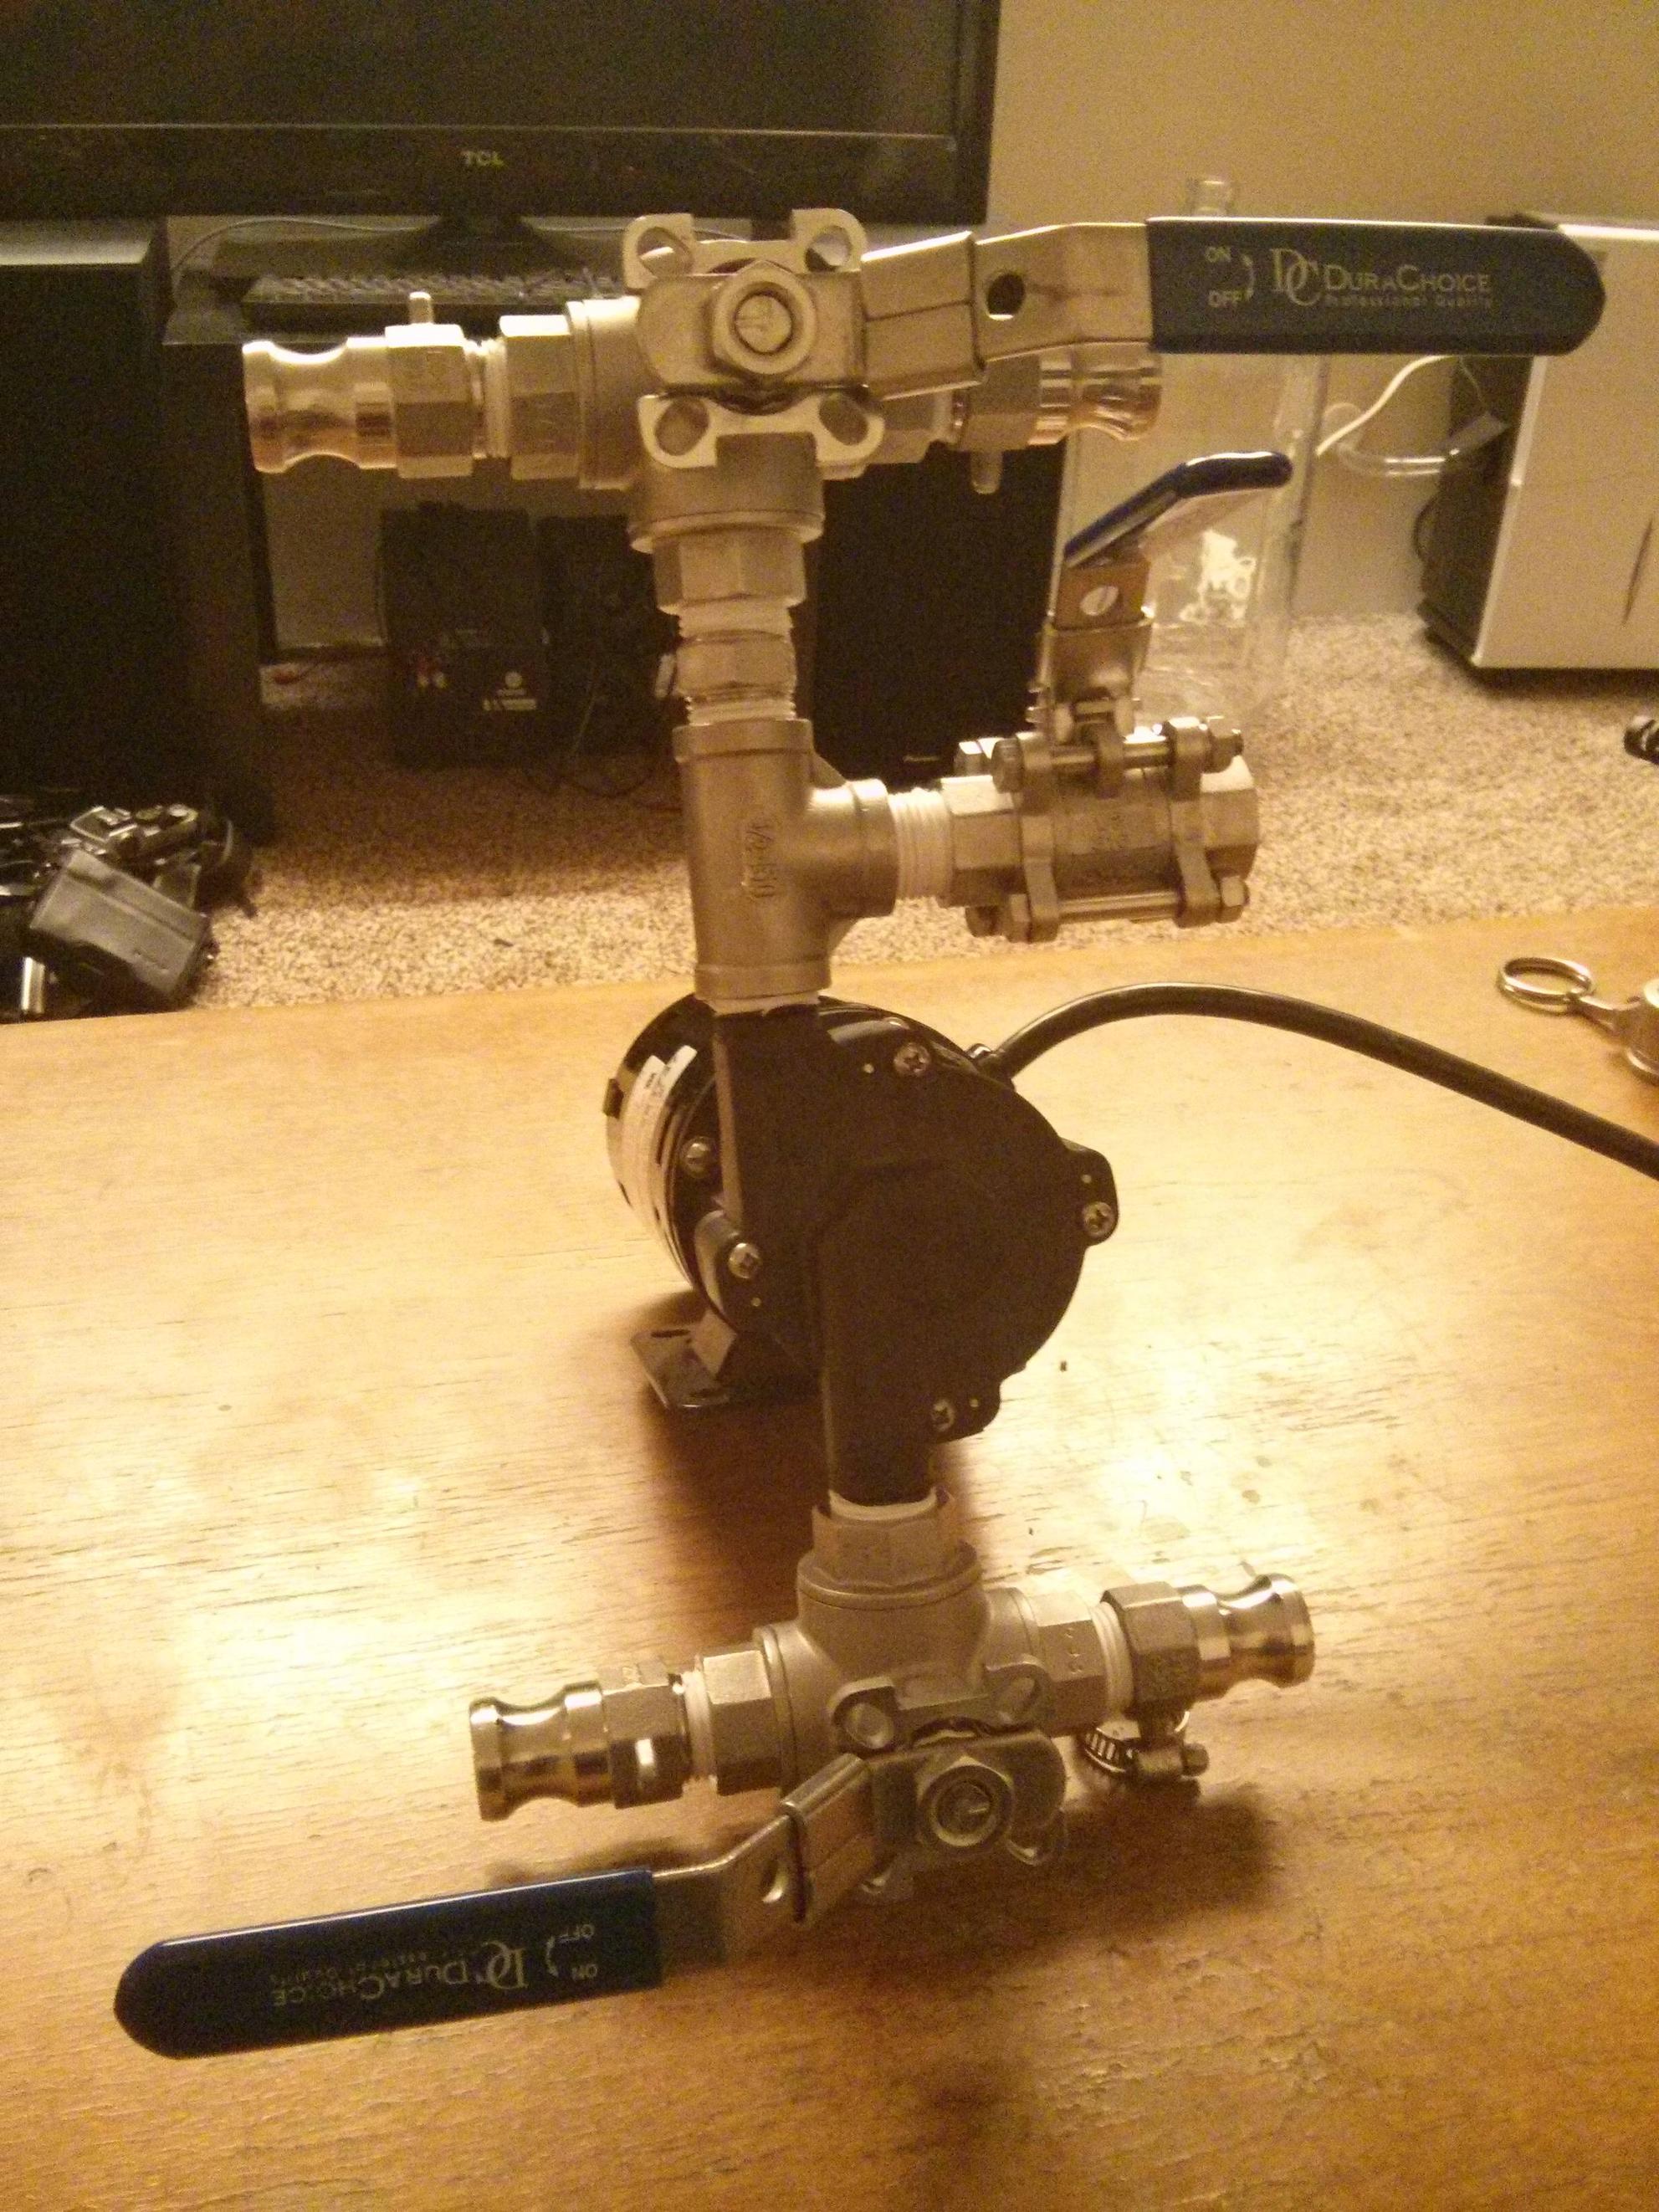
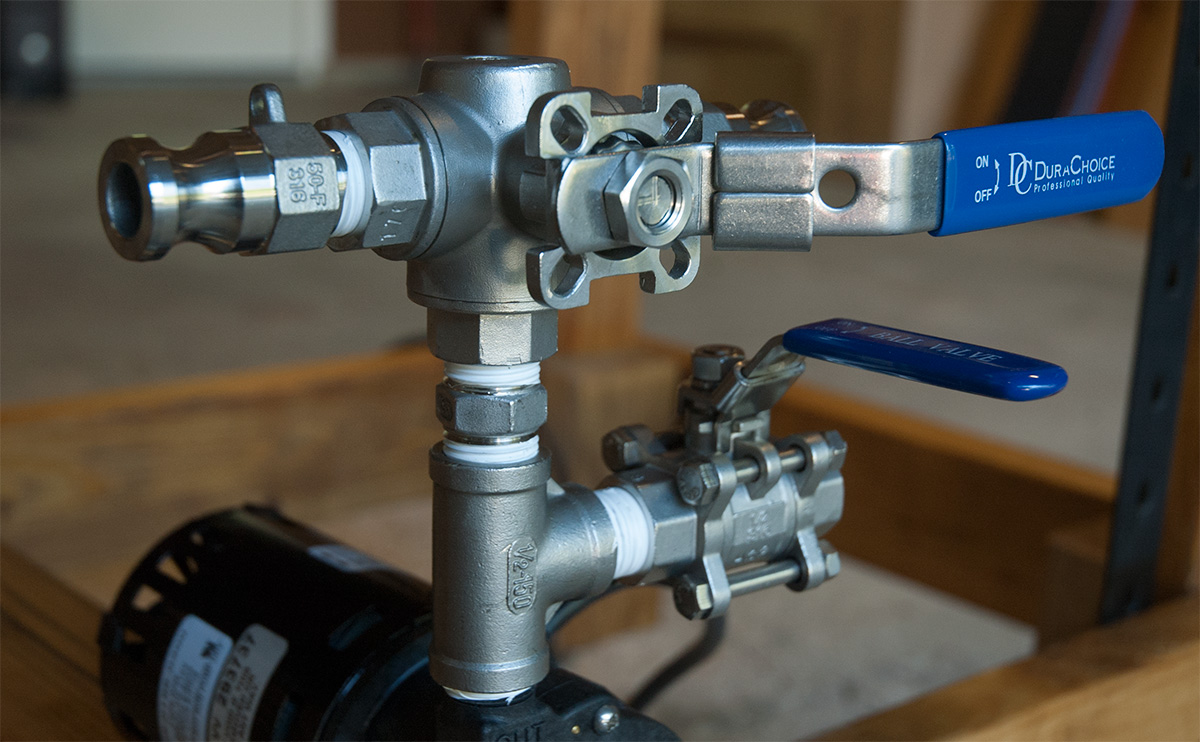
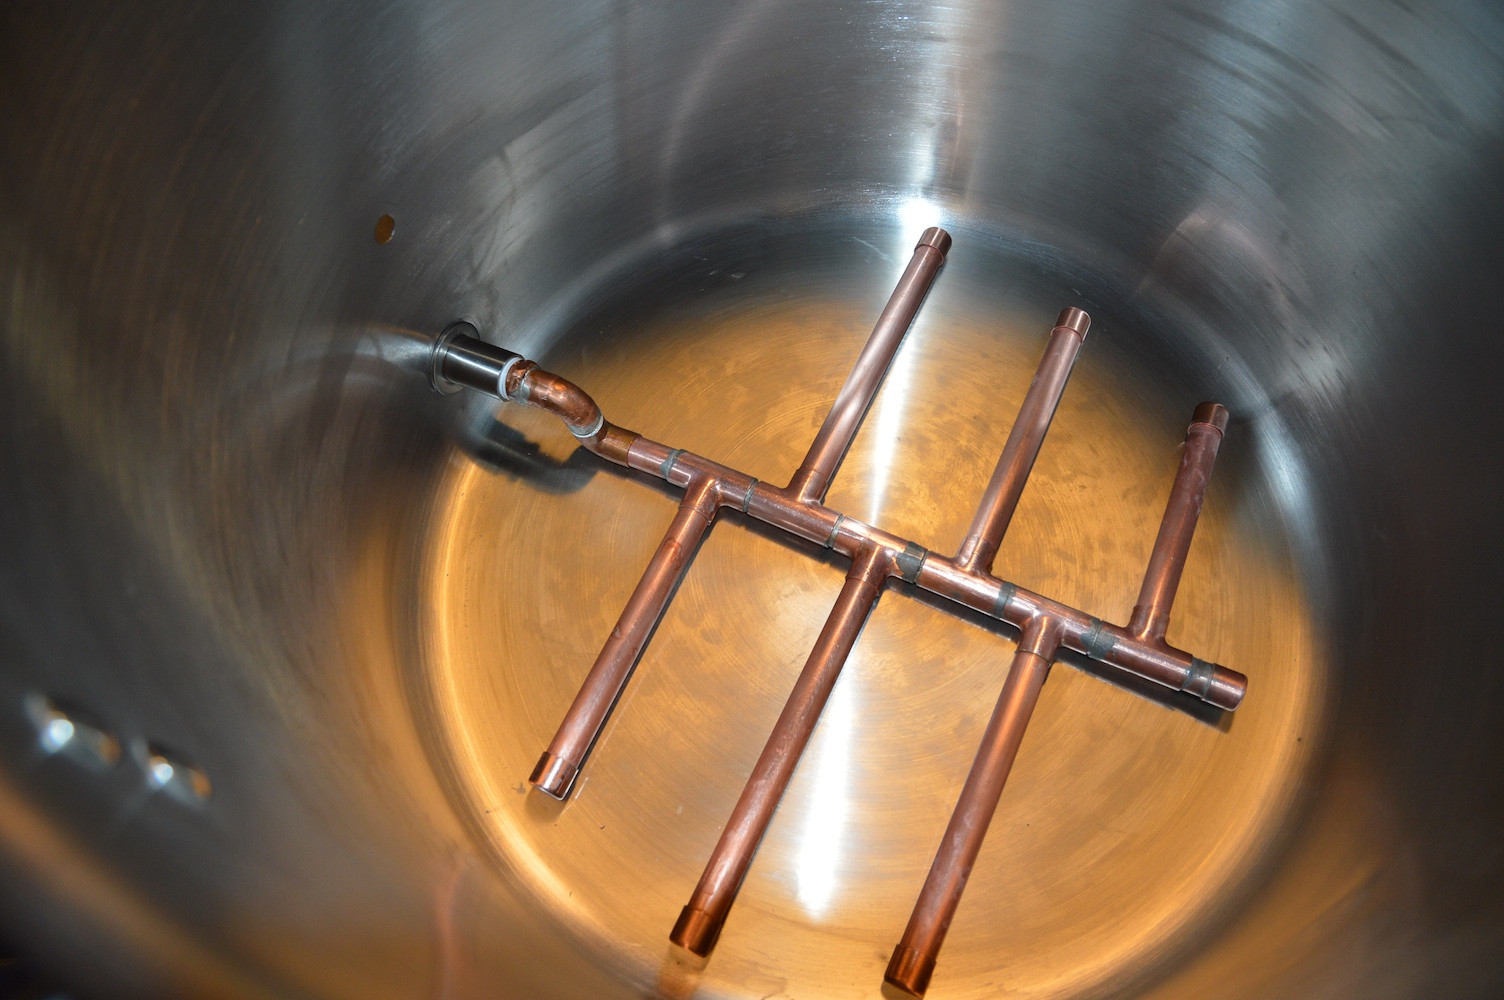
I've ordered the rest of the fittings and they should be delivered this week. I'll update this thread then with more information on the plumbing and how the system operates.

Until then, it isn't much more than a simple brew stand.
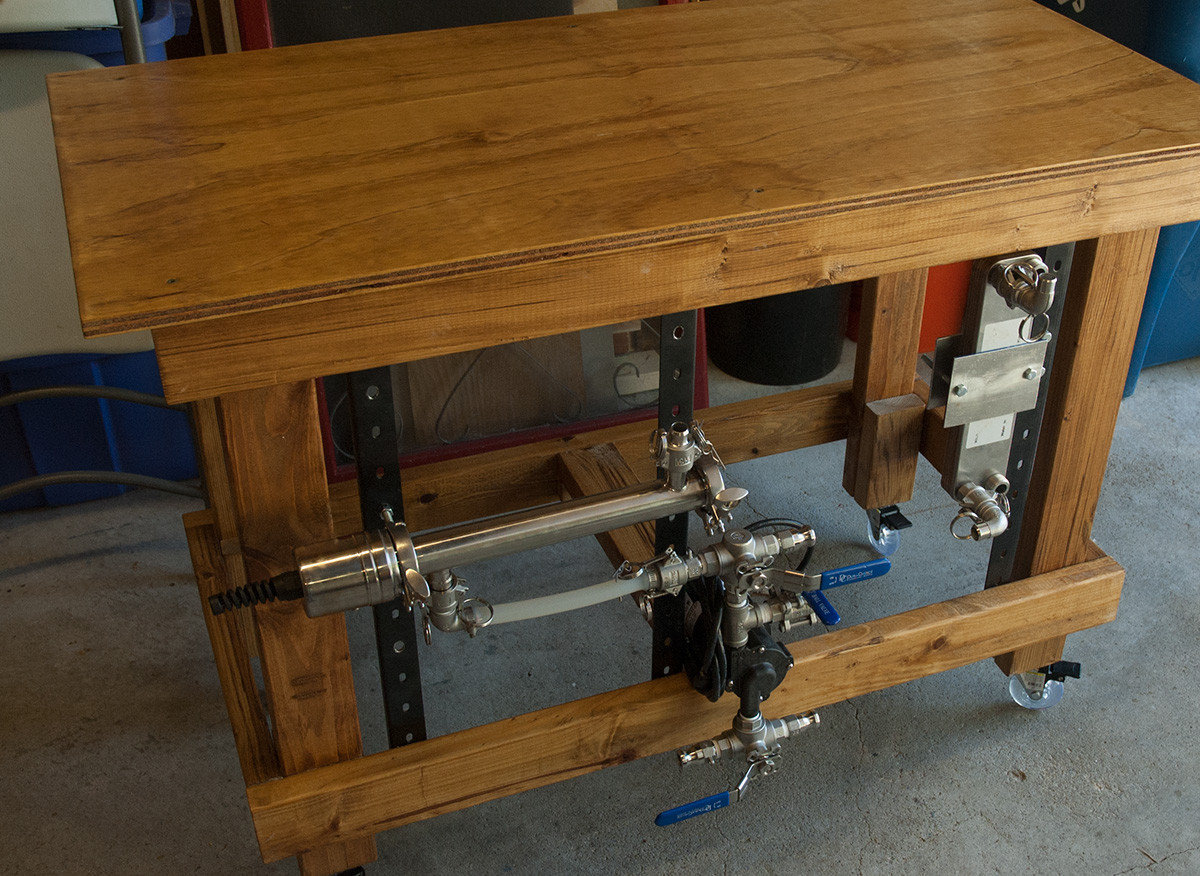
The Stand

fyp7LOK.jpg


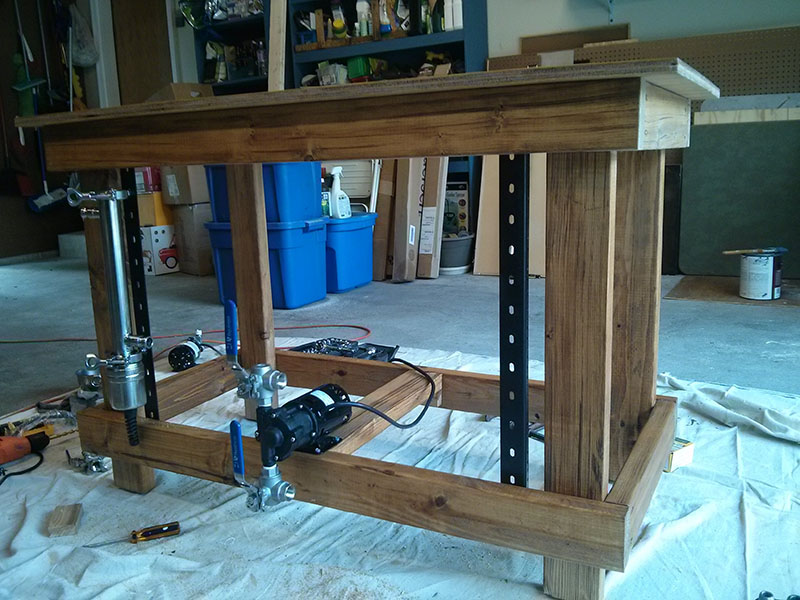
For this first iteration, I decided to build the stand out of 2x4s. Total cost was about $30 and it took about a day to build (if you know what you're doing, I imagine it'd go a lot faster). I used some stain left-over from a previous project. I plan to finish it with some spar urethane.

The top of the stand is made from a 2'x4' sheet of 3/4" plywood. Home Depot sells lots of 2'x4' "hobby sized" plywood, so that meant one less thing to cut on the table saw.

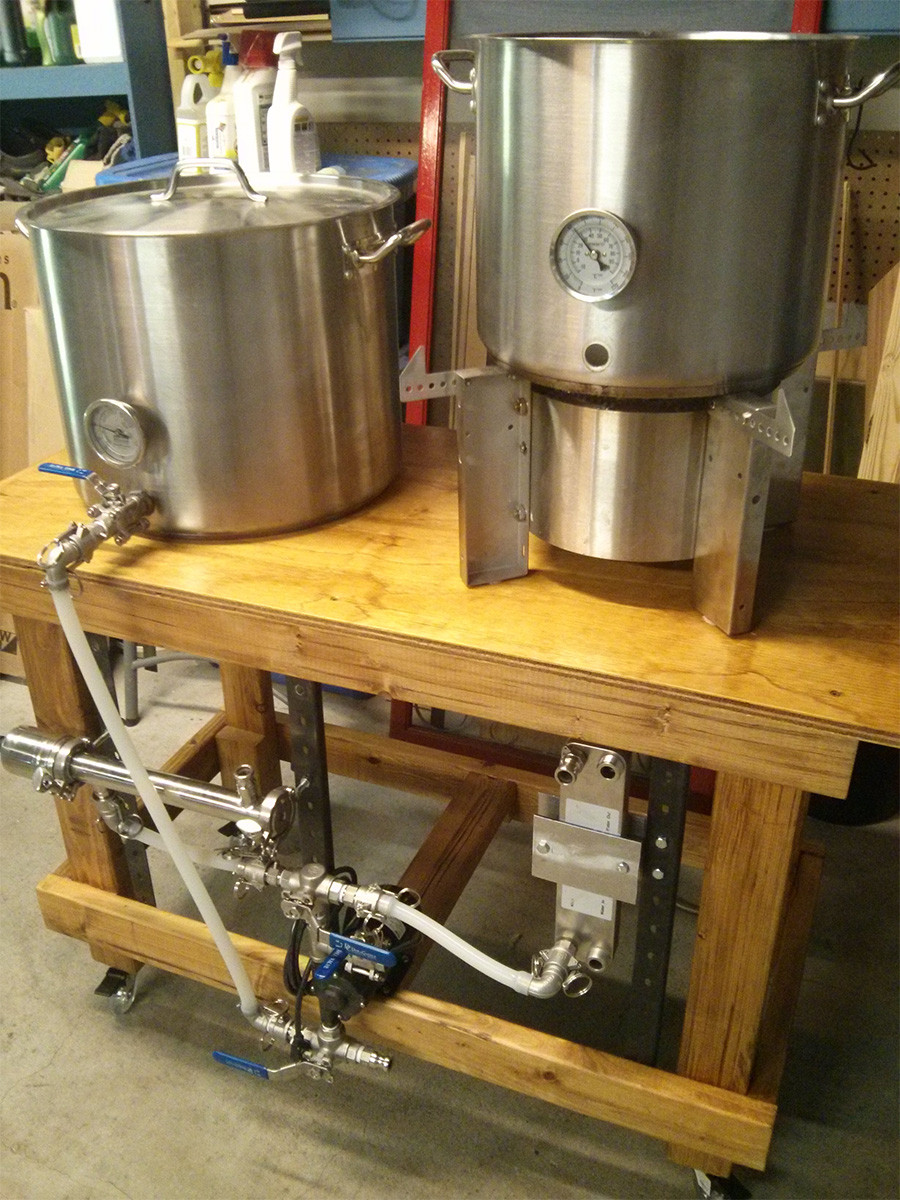
I plan to place large ceramic tiles under the mash tun and boil kettle. I've been brewing on another wooden table for a while now and I've found this provides a more than adequate level of insulation.

Bbr6NxG.png


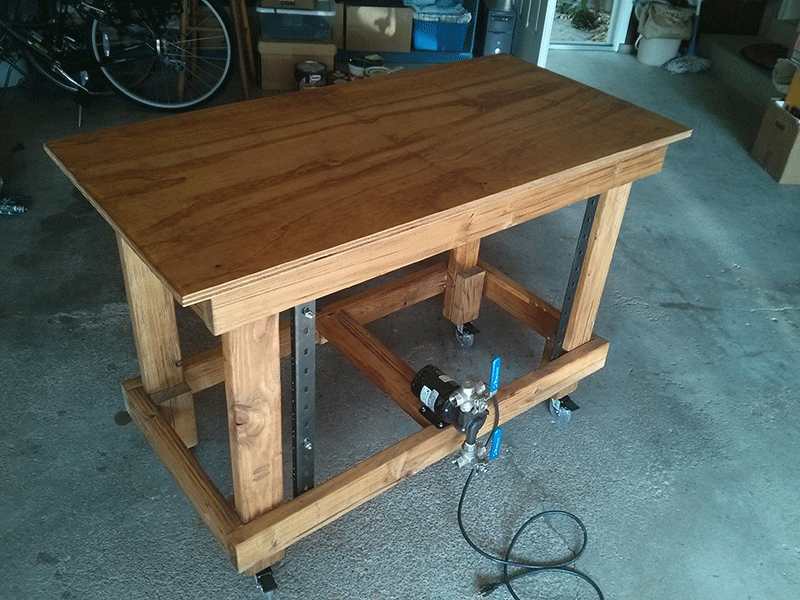
The casters are from Harbor Freight, are rated for 200lb, and can be locked.

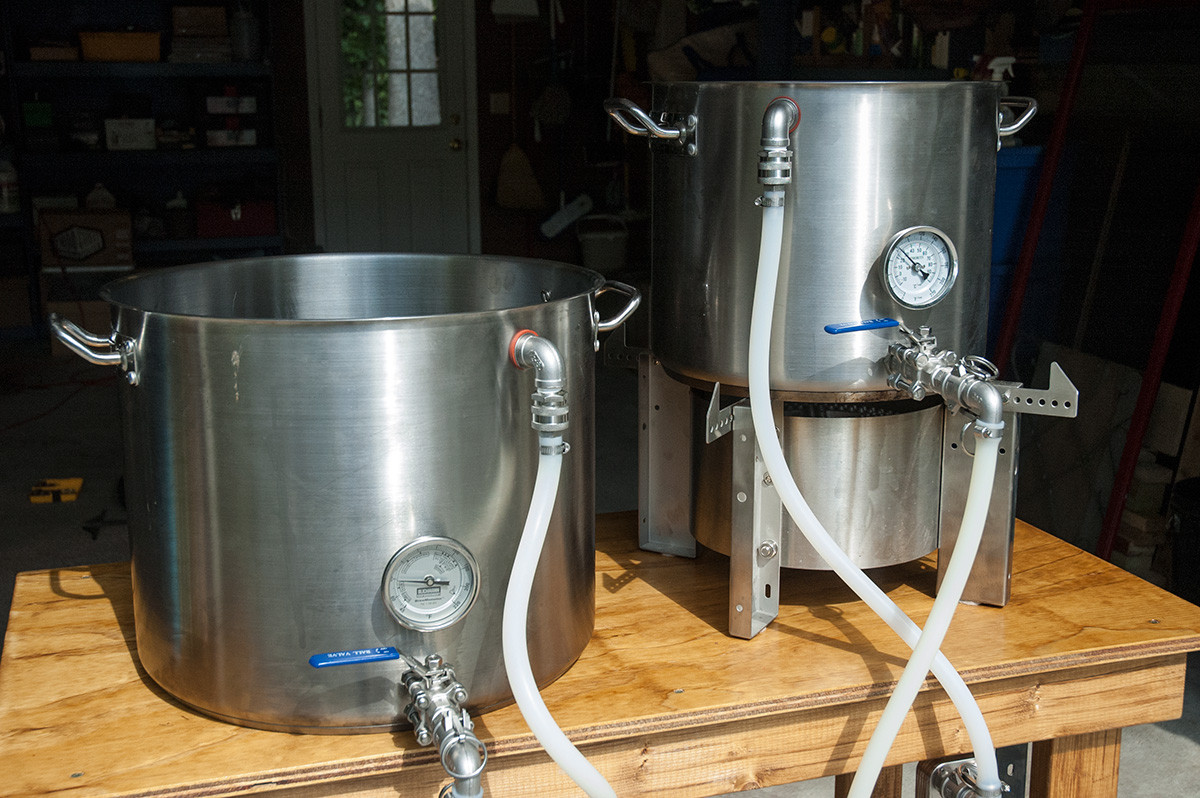
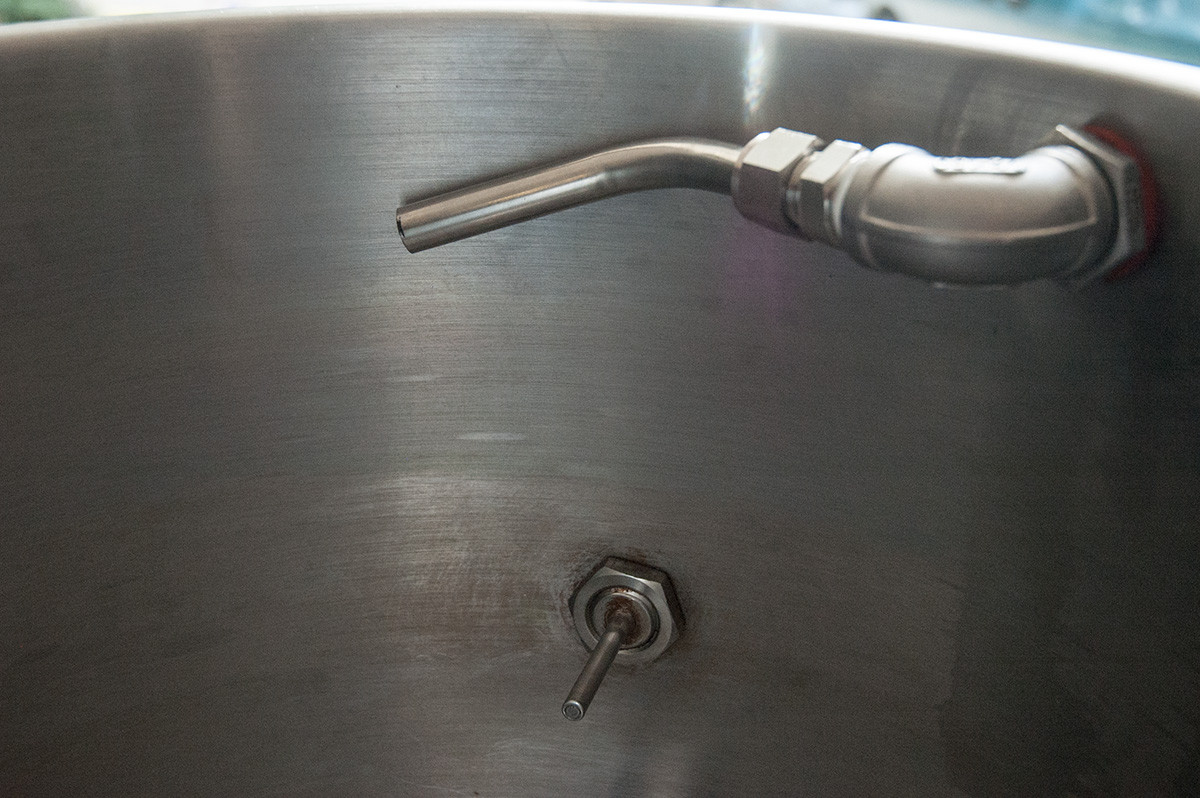
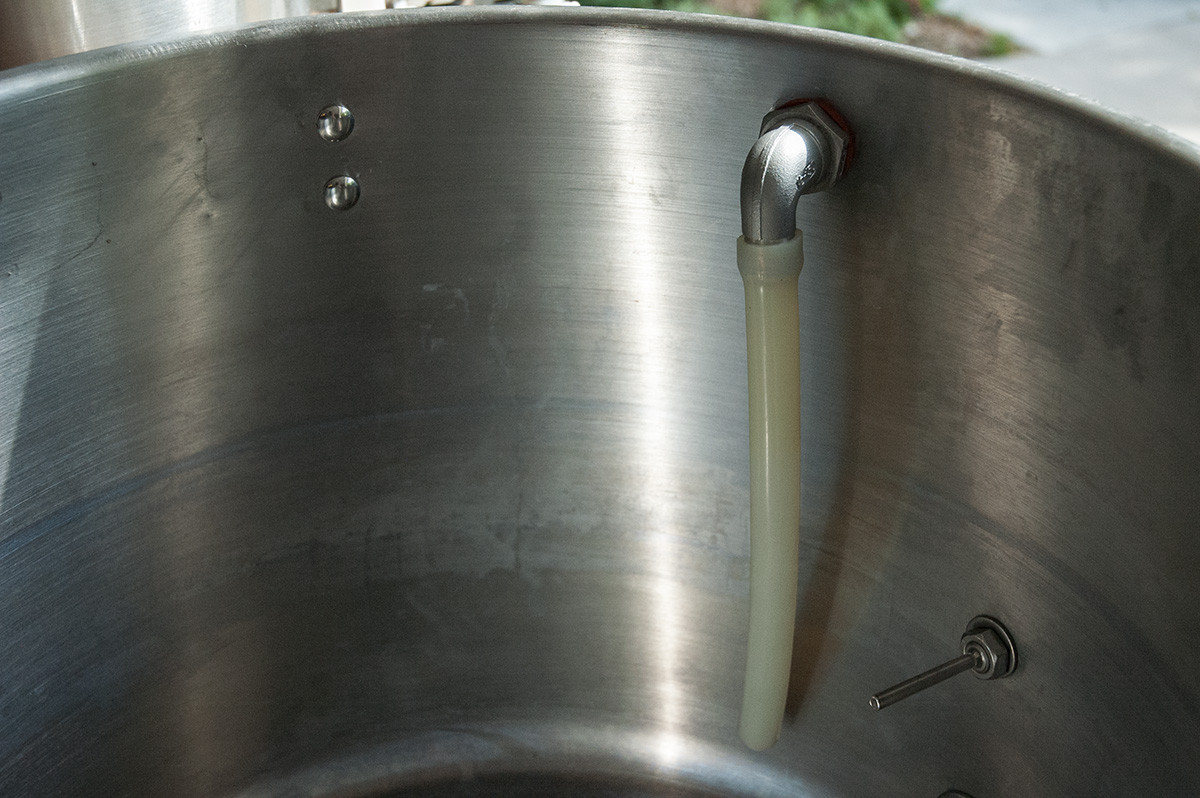
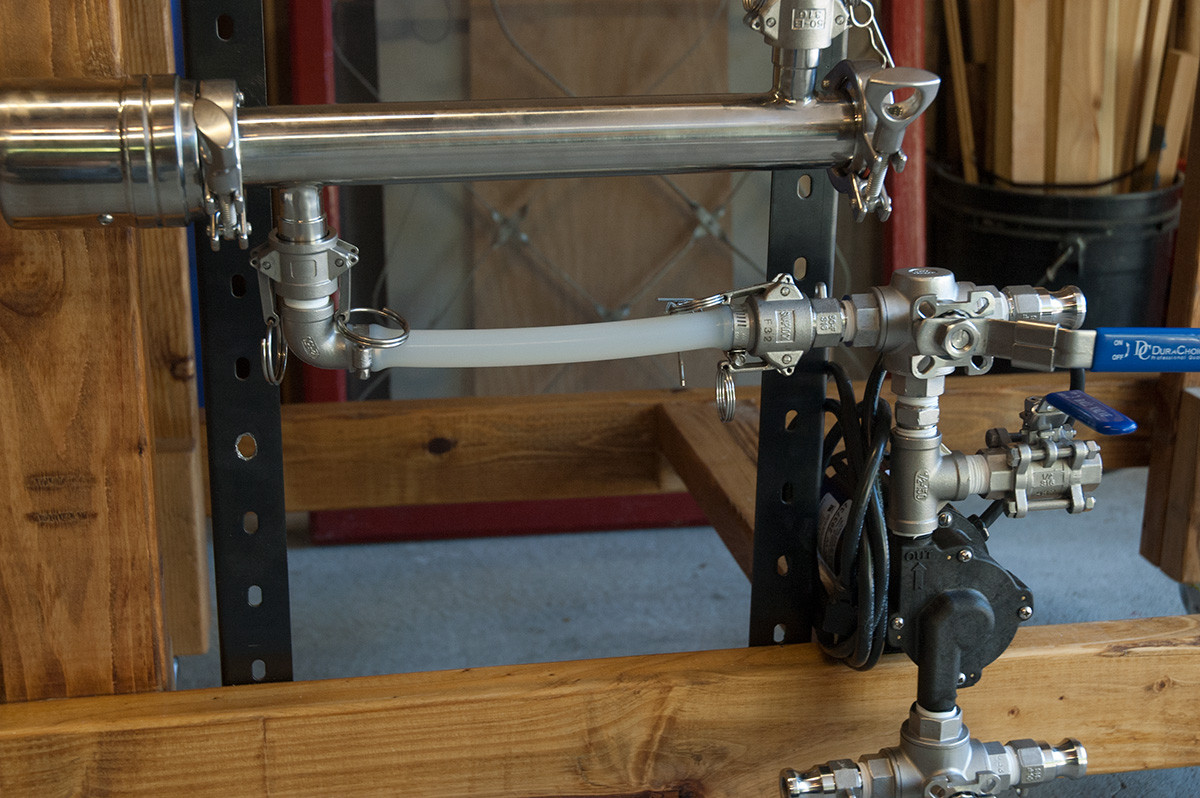
The metal rails began their life in a 19" rack. I found 'em in a pile of scrap in the garage and cut them to size with a hacksaw. They're very rigid. The RIMS tube will attach to the left rail with 2 1/2" bolts and jam nuts, and the plate chiller will attach to the right rail.

Everything is glued and screwed with 2 1/2" deck screws. The rails and pump are attached with large hex-head wood screws.
 
Thanks boss! Love your Brutus 20 build. I see I'm not the only one using the DudaDiesel 3 way ball valves. How are those working out for you?
 
Got the fittings in the mail today. Big shout to Bobby at Brew Hardware and the folks at Bargain Fittings!

iX8hPkd.jpg


Also got the first coat of spar urethane on the brew stand.

Hopefully I'll have some time tonight to do another coat of urethane and work on some plumbing!
 
Put the pump manifold together last night.

The three way ball valve on the bottom lets me accept flow from either the mash tun or the boil kettle. The three way valve on the top lets me direct flow to the RIMS tube or the plate chiller. The valve in the middle is dual-purpose: priming the pump and dumping the chilled wort into the fermenter.

Sorry about the ****ty pic.

huMCyXg.jpg
 
Got the pump and the RIMS tube mounted to the stand.

0N0iukU.jpg


You'll notice that the RIMS tube is mounted horizontally in this picture. I plan to experiment with different placements to see what works best.

OUXtpRc.jpg
 
Another quick update.

Built a temporary bracket for the chiller and got a little plumbing done.

402v9lc.jpg


u9pYXHU.jpg
 
This system is looking great! I recently starting working on a nearly identical system. Are you doing a no HLT sparge or no sparge at all? Also, are you using a single pump system? I was thinking of doing a double pump system since my current pump has a tendency to overheat (damn Arizona). What are you using to attach your RIMS tube to the bracket?
 
Interesting that you went with the RIMS horizontal, I usually see it vertical.

I've been testing out a similar system (2 kettles with RIMS) and I'm curious what you're looking at from an efficiency standpoint when it comes to recipes.
 
Looking great. What element are you using?

Bobby, I haven't picked up the element yet, but I'm planning on running a 4500W, 240v element at 120v. I've got a 30A, 120v dedicated circuit to play with, but I figure 1225W should be plenty for maintaining my mash temperature. Any recommendations?

This system is looking great! I recently starting working on a nearly identical system. Are you doing a no HLT sparge or no sparge at all? Also, are you using a single pump system? I was thinking of doing a double pump system since my current pump has a tendency to overheat (damn Arizona). What are you using to attach your RIMS tube to the bracket?

cfeags, The plan is to have two kettles, the mash tun and the boil kettle. The mash water is heated in the boil kettle, pumped into the mash tun, and recirculated through the RIMS for the mash. Meanwhile, the "sparge" water is heated in the boil kettle. It's pumped into the mash tun and the full volume is recirculated at mash-out temps before being transferred back into the boil kettle.

This would be using one pump (although I have a second which I may introduce in a future redesign). The RIMS tube is from Brew Hardware. Bobby's design is real slick; he's had nuts welded on to the triclover clamps. I use some 2 1/2" long bolts, jam nuts, and lock washers to mount it. I'll take a close-up pic later this morning.

Interesting that you went with the RIMS horizontal, I usually see it vertical.

I've been testing out a similar system (2 kettles with RIMS) and I'm curious what you're looking at from an efficiency standpoint when it comes to recipes.

jpalarchio, Yeah? I've seen a number of examples of both arrangements. In my first post, you can see the tube mounted vertically. I plan to test both configurations. Do you know if anyone has done any comparisons between the two? I'd think that like a pump, you'd be fine with either as long as the output is higher than the input.

I don't really play the efficiency game, but when I've done no sparge brewing like this in the past, I've generally gotten between 60 and 70% efficiency, depending on how much grain I'm mashing (this was without any recirculation). For really big beers, I can always run-off into a third vessel and do a traditional batch sparge.

This brew stand is really just a prototype. For $30 of materials and a few days of my time, I figure it's a good way to test out plumbing ideas, wiring, etc. Version 2 of the brew stand will almost certainly be about 30% wider in order to accommodate a third kettle for when I want to take a little more time and do a batch sparge. What has your experience been?

Thanks for all the questions and feedback, everybody. This is fun.
 
I don't really play the efficiency game

Me either. I think it's relevant to know your efficiency to be able to work with recipes and come close to the targets but I have zero interest in trying to chase down maximum efficiency.
 
Put the kettles on the stand and worked on some more plumbing.

The large kettle is the mash tun, and the smaller of the two is the boil kettle. I plan to upgrade the boil kettle to match the mash tun. Until I do, I'm limited to 6 gal batches.

Still need to drill the holes for the recirculation ports, but it's getting closer.

vCCbtJE.jpg


Right now I'm using a custom copper manifold in the mash tun. It works really well but it's already starting to get pretty gross. Probably going to get a custom false bottom made.

AfqmSNQ.jpg
 
...Right now I'm using a custom copper manifold in the mash tun. It works really well but it's already starting to get pretty gross. Probably going to get a custom false bottom made.

You could make a similar one out of CPVC. You're not direct firing (anymore).

Nice build!
 
Got the plumbing mostly done. Still need to fix the weldless bulkheads (I wasn't paying attention and installed them completely wrong :tank:
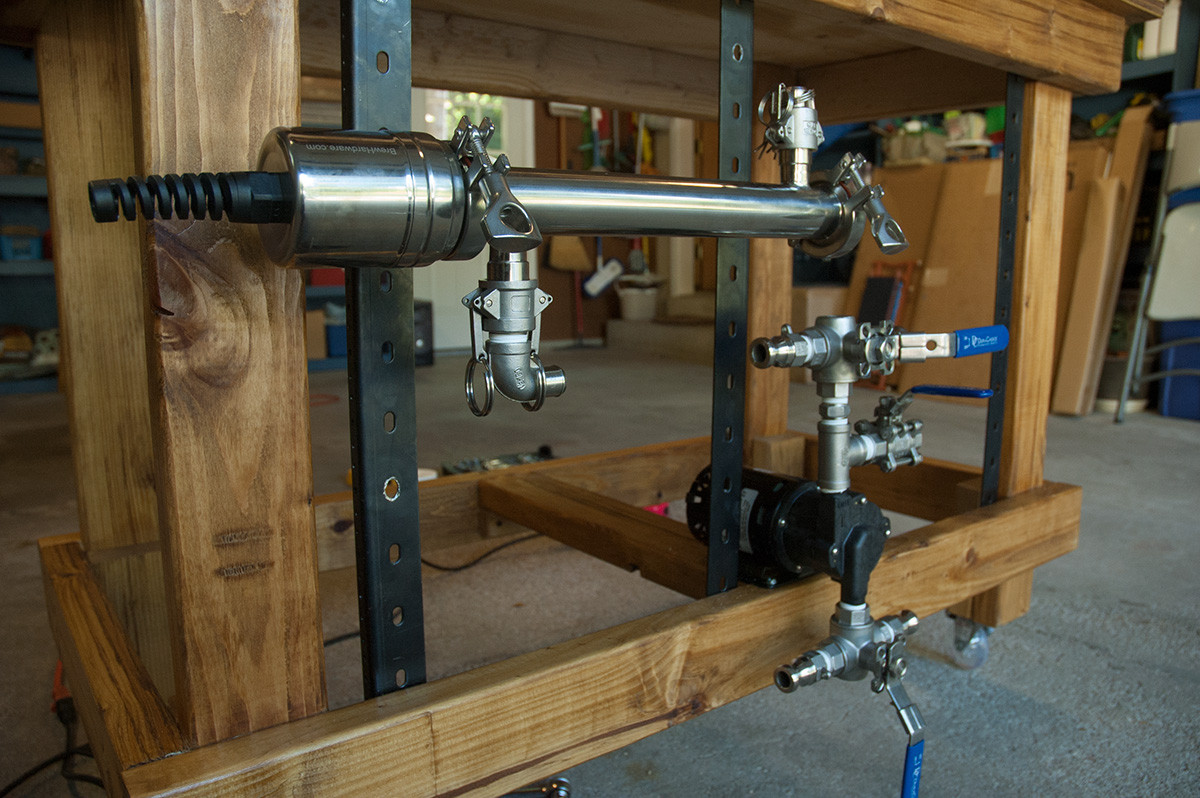
), shorten up a couple hoses, attach a few hose clamps, double check all my connections, and check for leaks.

DmYnsvy.jpg


A close up of the plumbing:

Mr3NIzp.jpg


And the kettles:

gcdc24Z.jpg


The whirlpool assembly in the boil kettle:

gNWcrVY.jpg


Wort return in the mash tun:

CtGtq8s.jpg
 
Nice work! Can I ask why you used different QDs at the elbows for the recirc fittings?

Also, where did you get the whirlpool setup? Is that from Bobby too?
 
This looks like a nice setup quite honestly, and I may consider something similar for myself.
Quick question on the chilling flow path. Can you describe how you go from the chiller outlet to your fermenter? As it's 3am I guess I'm just not getting it- and first real look I've had at a 2 vessel setup.
 
Nice work! Can I ask why you used different QDs at the elbows for the recirc fittings?

Also, where did you get the whirlpool setup? Is that from Bobby too?

'Eh, I used the QDs because I had them on hand. They're way easier to use than camlocks, but have a slightly slower flow rate and are a little harder to clean. They're also about 2x as expensive.

The whirlpool fitting is from Bargain Fittings.

Can you describe how you go from the chiller outlet to your fermenter? As it's 3am I guess I'm just not getting it- and first real look I've had at a 2 vessel setup.

See the ball valve to the right of the pump? If I close the top three-way valve and open this one, it serves double-duty as a way to purge air from the pump head, and a dump into the fermenter. I could also disconnect the return QD from the boil kettle and cram the hose down in the carboy, but that'd mean disconnecting hoses, something I'd like to avoid.

What are you going to be using on the 'controls' side of things?

You mean in terms of a PID? I picked up one of these. I plan on housing it, the solid state relay, and assorted wiring in some kind of box. How it looks and where it's mounted are still TBD. Got any suggestions?

Cheers everyone!
 
Last edited by a moderator:
See the ball valve to the right of the pump? If I close the top three-way valve and open this one, it serves double-duty as a way to purge air from the pump head, and a dump into the fermenter. I could also disconnect the return QD from the boil kettle and cram the hose down in the carboy, but that'd mean disconnecting hoses, something I'd like to avoid.

By closing the top three-way and opening the purge valve I can see the flow path out of the bottom of the BK, to the pump and out the purge valve. Not seeing how the chiller fits in.
What am I missing?

Thanks and again I like the idea of this two vessel system (plus not disconnecting hoses)
 
You mean in terms of a PID? I picked up one of these. I plan on housing it, the solid state relay, and assorted wiring in some kind of box. How it looks and where it's mounted are still TBD. Got any suggestions?

Cheers everyone!

Maybe something similar (but smaller) than what the electricbrewery guys used for an enclosure such as this?
 
Last edited by a moderator:
Alright, sorry guys. After seeing the countertop brutus 20 and how that recirc's the cooled wort back into the pot, I see now you simply recirc on this set up as well instead of going straight from the chiller to the fermenter.
Never realized that people recirced out of the chiller back to the boil kettle.
 
Ibrewaletx, yep, you got it! Sorry for the late reply; busy day at work. Yeah, the wort leaves the chiller and returns to the boil kettle. I used to run my wort straight through the chiller and into the fermenter in a single pass, but I found that in order to hit my pitching temperatures, I had to drain the kettle really slowly. Now, I never saw any DMS production (which of course can be a concern if you're not getting your wort to <140f quickly), but I also ended up with a lot less cold break, and what did precipitate out would end up in my fermenter.

I'm digging that enclosure you linked to! I looked at a few similar boxes, but they were either very small or very expensive (or both). That looks both spacious and reasonably priced. Cheers!
 
Putting a pricing sheet together for this project for myself - costs add up quickly but quite honestly I can piecemeal a lot of it and still get use out of the equipment as I move forward.

nyx, what size is your mash tun?

I can see plunking down for one new kettle (use my old one for a while for the 2nd), the chiller and pump initially - and picking up the fittings, RIMS tube and control panel / PID after some more pay days.
Good stuff, look forward to seeing you finish this.
 
The mash tun is 15 gal. This is the one. It's really heavy duty.

I'll try to come up with a parts list soon.

Piecing it together is exactly what I did. I already had the kettles, the pump, some QDs, and some 1/2" silicone hose. The RIMS tube was another $150, and I probably dropped about $200 on all the various fittings. The three-way ball valves were another $65 (sort of an impulse buy after one too many beers).

I've experimented with recirculating without the RIMS tube and found that with a water heater blanket (foil-wrapped fiberglass insulation) wrapped around the mash tun, I only had to turn on the burner every 20 minutes or so. It's totally doable. With a recirculation port and the lid on, you'd have even less heat loss.

What are you brewing on right now?
 
I just brew with a 8gal pot and batch sparge from a 48qt cooler- I heat up my water (HLT) in a 5 gallon stainless pot borrowed from the kitchen. I am looking to set up something that is a real brewery, so will look this route.

Interesting about not using the RIMS tube and recircing- that may be a step I take to start with.
 
It works OK. Ultimately I got tired of having to watch the mash temp. The insulation helped a lot though, as did slowing down my recirculation rate. A tight fitting lid would help even more. And short hoses. Anything to minimize heat loss.

It was good experience, and I feel more confident with my new design having done some recirculation mashing already. Also, I was able to repurpose all of the equipment, so in that sense it didn't cost anything.
 
Well, I brewed on this last weekend and I can't say I was thrilled.

It was fun throwing the valves and watching the wort move from one kettle to the other, but the three way ball valves are hard to control precisely and I was shocked at how much equipment loss I had between the RIMS tube, the chiller, and all the hoses.

I'm already planning out a radical redesign which I think will work much better. Stay tuned.
 
Back
Top