You are using an out of date browser. It may not display this or other websites correctly.
You should upgrade or use an alternative browser.
You should upgrade or use an alternative browser.
Heatstick = awesome!
- Thread starter BackBayBrewing
- Start date

Help Support Homebrew Talk - Beer, Wine, Mead, & Cider Brewing Discussion Forum:
This site may earn a commission from merchant affiliate
links, including eBay, Amazon, and others.
Pixalated
Well-Known Member
That's a bit dramatic ")
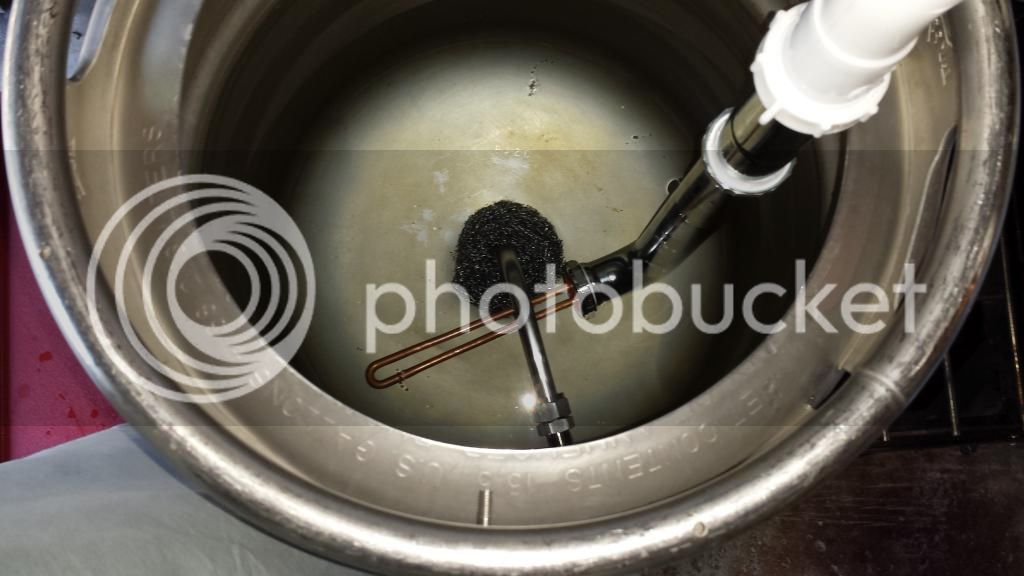
Heatsticks with no jb weld.
I rounded the nut on the heater element and this allowed it to slip back in the metal drain pipe which then allowed the 1 1/2" to 1 1/4" drain pipe nut to seal on the gasket. Heater element was first pushed through the gray gasket and was able to use a 1" copper female pipe thread fitting to draw the heater element to the gray gasket. My only concern is the gray gasket and may replace with a silicone high temp food grade gasket.
Haven't done a full brew session yet but did bring 7gal of 120º starting water to boil in 35 min using both 2000 watt sticks. Heat rose at a rate 10º every 4 min.
federaleigh
Member
Heatsticks with no jb weld.
I rounded the nut on the heater element and this allowed it to slip back in the metal drain pipe which then allowed the 1 1/2" to 1 1/4" drain pipe nut to seal on the gasket. Heater element was first pushed through the gray gasket and was able to use a 1" copper female pipe thread fitting to draw the heater element to the gray gasket. My only concern is the gray gasket and may replace with a silicone high temp food grade gasket.
Haven't done a full brew session yet but did bring 7gal of 120º starting water to boil in 35 min using both 2000 watt sticks. Heat rose at a rate 10º every 4 min.
How is this working out for you? Any leaks? Did you keep the gray gasket or go with a new one?
Finding a gasket was not easy. I ended up using a 1" Tri Clover Gasket Silicone.
Here's the link:
http://www.brewershardware.com/1-Tri-Clover-Gasket-Silicone-TC10SILGASKET.html
I had to alter it so I didn't get leaks. The copper fitting I used I ended up cutting the excess copper off the fitting so I basically just had a copper nut that screwed onto the stick. What I had left over was used as a punch for the center of silicone gasket. I sharpened the copper pipe fitting end and centered it on the gasket and used a hammer to punch out the center hole so that it fit snugly over the heating element. I also had to carefully cut of the raised ring that runs on both sides of the gasket so that it was flat on both sides. The reward off all this is that I now have a stick I can take apart and replace elements if I need to.
I have brewed 7 12 gallon batches so far with no problem.
Rhuarc
Well-Known Member
I have not read the entire 53 pages in this thread, but do have a question. What is your average indoor stove element? I would love to build one of these 2000W sticks to be able to compliment the electric stove using a 10g pot. Has anyone tested boil times for 7g water using both the stove element and a heat stick?
Pixalated
Well-Known Member
I brew in a bag, and I can bring 8 gallons to mashing temps in under 30 minutes. After mashing it takes under 30 minutes to bring it to a boil. My pot is wrapped in reflectix which helps a lot.
Rhuarc
Well-Known Member
I brew in a bag, and I can bring 8 gallons to mashing temps in under 30 minutes. After mashing it takes under 30 minutes to bring it to a boil. My pot is wrapped in reflectix which helps a lot.
Is this using an electric stove and heating element?
Pixalated
Well-Known Member
Yes, I have the electric element on and the heat stick.
After the wort comes to a boil, I can shut off the stove and still maintain a vigorous boil. This slows down my evaporation a bit.
After the wort comes to a boil, I can shut off the stove and still maintain a vigorous boil. This slows down my evaporation a bit.
NBABUCKS1
Well-Known Member
Not sure how to search the thread but...
I did my first boil last night w/ my 2000 watt stick in my keggle. It Boiled, but it was not vigorous. If I put two heat sticks in there it is vigorous, but w/ one it's a light boil.
Will insulating w/ that metallic bubble wrap help enough to make for a more vigorous boil? Or is it a waste of money?
What volume of water are you heating? I get a vigorous boil using 2600 watts and 7 gallons of wort.
Insulating the kettle will help as well as partially covering the top of the kettle. I wrap my kettle with a movers blanket. If the metallic bubble wrap is cheap okay, but otherwise find something around the house.
You might have a voltage drop problem if you are not close to the main breaker panel. If you have a volt meter check the voltage at the socket with no load and then with one stick running, see if the supply voltage takes a big dip.
Heatsticks with no jb weld.
I rounded the nut on the heater element and this allowed it to slip back in the metal drain pipe which then allowed the 1 1/2" to 1 1/4" drain pipe nut to seal on the gasket. Heater element was first pushed through the gray gasket and was able to use a 1" copper female pipe thread fitting to draw the heater element to the gray gasket. My only concern is the gray gasket and may replace with a silicone high temp food grade gasket.
Haven't done a full brew session yet but did bring 7gal of 120º starting water to boil in 35 min using both 2000 watt sticks. Heat rose at a rate 10º every 4 min.
I took your idea and used a 1" NPS stainless steel lock nut and a silicone o-ring. Got the lock nut from bargainfittings.com. I could not get a seal without it. I thought filing the nut on the element would be much more difficult, but it's made of a very soft material (aluminum I guess) and a bastard file made quick work of it, took me about 30 minutes. I will be testing the assembly this week sometime.


TheCanisDirus
Well-Known Member
Would love to see a DIY for this sealant-free stick! I need to make one and would prefer to avoid using any sealants if possible.
TheCanisDirus
Well-Known Member
Finding a gasket was not easy. I ended up using a 1" Tri Clover Gasket Silicone.
Here's the link:
http://www.brewershardware.com/1-Tri-Clover-Gasket-Silicone-TC10SILGASKET.html
I had to alter it so I didn't get leaks. The copper fitting I used I ended up cutting the excess copper off the fitting so I basically just had a copper nut that screwed onto the stick. What I had left over was used as a punch for the center of silicone gasket. I sharpened the copper pipe fitting end and centered it on the gasket and used a hammer to punch out the center hole so that it fit snugly over the heating element. I also had to carefully cut of the raised ring that runs on both sides of the gasket so that it was flat on both sides. The reward off all this is that I now have a stick I can take apart and replace elements if I need to.
I have brewed 7 12 gallon batches so far with no problem.
Would you be able to post dissembled pics of your new set-up? Going to try building one of these but def want to stay away from any sealant.
I took your idea and used a 1" NPS stainless steel lock nut and a silicone o-ring. Got the lock nut from bargainfittings.com. I could not get a seal without it. I thought filing the nut on the element would be much more difficult, but it's made of a very soft material (aluminum I guess) and a bastard file made quick work of it, took me about 30 minutes. I will be testing the assembly this week sometime.
I did this as well. Never thought to post it. I didn't need to round the element, simply center it and tighten the nut. I did use a dab of sealant on the threads with Teflon tape. I don't trust tape on coarse threads like that.
Sent from my SCH-R970 using Home Brew mobile app
TheCanisDirus
Well-Known Member
1" Silicon sealing washer (if you search silicon gasket you'll never find it) also available from Zorro tools. Got mine off them via eBay.
Sent from my SCH-R970 using Home Brew mobile app
Any pictures of your version without the filed element collar? Curious to see how it fits without the filing.
No, I'd rather not disassemble it. It simply fit inside the bell of the pipe and I placed the nut over it. It was a hassle to keep it strait as I tightened everything together. A round element base would have been better, but this worked. The threads received a bit of Teflon tape and silicon sealant. The sealant should be food safe. Mine wasn't, but there isn't really any exposed and I let it cure for a week, then boiled with it in 5% ph for an hour to remove any possible flavors/surface contaminates. A sealing washer goes over the compression nut, and a 1" npt ss nut over that. Also used Teflon tape and a bit of sealant on the threads here. I was worried that wort might make its way through the threads and short out the stick, that is the reason for the sealant on the threads.
BTW, I did not seal contacts on the backside of the element with jb weld or whatnot. I figured that if it is built right there is no need for it. It works great!
Sent from my SCH-R970 using Home Brew mobile app
BTW, I did not seal contacts on the backside of the element with jb weld or whatnot. I figured that if it is built right there is no need for it. It works great!
Sent from my SCH-R970 using Home Brew mobile app
I just don't get how a good seal is being made between the pipe and compression nut. Does the rounded element go in deep enough for the flat sealing washer to contact both surfaces? If so then that is perfect!
Sent from my SCH-R970 using Home Brew mobile app
Sent from my SCH-R970 using Home Brew mobile app
I just don't get how a good seal is being made between the pipe and compression nut
As said above, with Teflon tape and silicon sealant.
The weak link will still be the pipe connection and plumbing nut.
I have made and repaired heat sticks for years, and have found cleaning contact surfaces with rubbing alcohol and sealing with silicon sealant to work pretty darn well, yea nothing lasts forever, but that's why I keep a spare or two ready to go.
Fwiw, I would still coat the electrical connections on the element with silicon sealant as an extra measure. Also, leave the end of the stick open for a few days, as I found out the hard way uncured sealant is a conductor not an insulator.
Wilserbrewer
Http://biabbags.webs.com/

I have a question and I think I know the answer but feel stupid enough to ask it anyways. I have a 20 amp circuit in my garage, I know because I put in the 12g wire and I know the breaker is 20amp, it is also GFI but the question is that it has a standard style outlet (put in by the builder), meaning 2 vertical and ground opposed to the styles on saw on here with 1 vertical, 1 horizontal and ground.
Can I use the outlet as is for 20 amp or do I need to get a new outlet and corresponding plugs etc....
Can I use the outlet as is for 20 amp or do I need to get a new outlet and corresponding plugs etc....
I would not recommend using a 15a outlet for 20a. That may not be safe even though the manufacturer needs to engineer in a margin of safety. I.e., if I were to (hypothetically of course) push 22a @220v through a15a 120v rated plug (hardwired to my hlt) it would get warm to the touch, but still work fine. I would keep an extinguisher nearby and NEVER leave it alone or place it near combustibles All hypothetical here
Long story short... no-one is going to recommend you do something potentially unsafe, that is your decision. My bigger concern would be destroying the gfci. They are very sensitive and degrade with abuse. A failure would possibly ruin an entire batch.
Long story short... no-one is going to recommend you do something potentially unsafe, that is your decision. My bigger concern would be destroying the gfci. They are very sensitive and degrade with abuse. A failure would possibly ruin an entire batch.
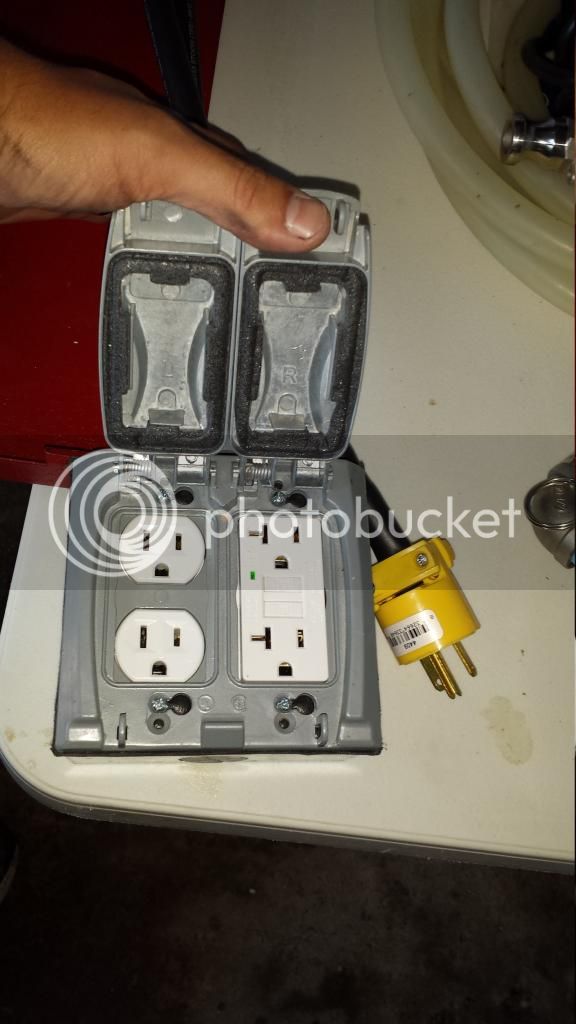
Most modern kitchens built in the last 20 years have at least one and likely two 20 amp outlets on dedicated circuits. The newer 20 amp horizontal plugs are for specific large draw 120v tools like a table say or floor sander, btw I have never seen an appliance with the 120v 20a style plug?
From what I have read, there is no great danger in drawing 17 or 18 amps from an outlet on a 20 amp service, but I would like to hear more information from those in the know.
These specific plugs are intended to prohibit plugging a large draw 20 amp appliance into a 15 amp circuit, and not necessarily the opposite application.
20 amp 120v outlet in my kitchen.

Wilserbrewer
Http://biabbags.webs.com/
Most modern kitchens built in the last 20 years have at least one and likely two 20 amp outlets on dedicated circuits. The newer 20 amp horizontal plugs are for specific large draw 120v tools like a table say or floor sander, btw I have never seen an appliance with the 120v 20a style plug?
From what I have read, there is no great danger in drawing 17 or 18 amps from an outlet on a 20 amp service, but I would like to hear more information from those in the know.
These specific plugs are intended to prohibit plugging a large draw 20 amp appliance into a 15 amp circuit, and not necessarily the opposite application.
20 amp 120v outlet in my kitchen.
View attachment 217362
Wilserbrewer
Http://biabbags.webs.com/
Yes, that is what I have, I have a home built in 2013 and all circuits have a GFI outlet on the circuit somewhere and also there are several 20a circuts to places like the bathrooms and kitchen
So is there any recent updates on what sealant to use? Are people happy with JB weld as far as longevity/strength and the fear of putting something unwanted into the wort? Or is there a better alternative?
I used JB weld in the past, on my most recent sticks I used 100% silicone. The silicone takes a few days to cure, and needs to breath to cure, so don't cap the stick until the silicone is cured.
FWIW I prefer the silicone...clean all surfaces well before assembly, I also wipe with rubbing alcohol to be sure thre are no trace oils left and the silicone sticks well.
Also the chrome nut in a 1 1/2 x 1 1/4 fits better than the zinc nut supplied with the drain pipe IMO.
Wilserbrewer
Http://biabbags.webs.com/
I used JB weld in the past, on my most recent sticks I used 100% silicone. The silicone takes a few days to cure, and needs to breath to cure, so don't cap the stick until the silicone is cured.
FWIW I prefer the silicone...clean all surfaces well before assembly, I also wipe with rubbing alcohol to be sure thre are no trace oils left and the silicone sticks well.
Also the chrome nut in a 1 1/2 x 1 1/4 fits better than the zinc nut supplied with the drain pipe IMO.
Wilserbrewer
Http://biabbags.webs.com/
very good, any specific type of silicone I am looking for? I am thinking of taking a shopping list to home depot today.
something like this? too bad it's red
http://www.homedepot.com/p/Unbranded-Hi-Temp-Silicone-Caulk-57500/202809239
I'm thinking about building one of these to supplement the propane use, and the help stir my mash when i need to heat it a bit to temp (got lower temps than math said I should the last 3 times.)
I have some of the 3M Scotchcast resin #4...anyone able to chime in on the food grade-ability of the cured resin? Here is the MSDS. Nothing I read said it was NSF, but nothing says that it is not food grade....I hate MSDS, and I deal with them all the time.
Thanks,
I have some of the 3M Scotchcast resin #4...anyone able to chime in on the food grade-ability of the cured resin? Here is the MSDS. Nothing I read said it was NSF, but nothing says that it is not food grade....I hate MSDS, and I deal with them all the time.
Thanks,
cantrell00
Well-Known Member
- Joined
- Jul 6, 2013
- Messages
- 840
- Reaction score
- 116
I haven't read through this REALLY long thread so forgive me if this has already been covered...
Could you use a 120v 2000 watt heat stick to maintain mash temps in a typical Gott/Igloo cooler?
I'm wondering if it could be suspended in the MLT, recirculated with a pump & controlled with a simple STC 1000 temp controller?
I have power limitations in my garage so I would always boil on a burner. Obviously maintaining ~5 gallons @ 148-155 degrees is a lot less demanding than sustaining 8+ gallons of boiling water.
Particularly when you can heat the strike water with a burner before hand.
OR possibly by dropping a IC into the mash while recirculating from the MLT with the drop in element?
The difficult thing is turning the heat on/off on demand. Electric is the way to go. I've never been interested in doing that with gas burners. Pilot lights & solenoids are too far into the weeds for me. Electrical heat is as simple as a flick of the switch. Literally.
I've always been intrigued with RIMS/HERMS & this seems like a cheap option to test the water without getting over your head.
Anyone tried one as I just described?
So is there any recent updates on what sealant to use? Are people happy with JB weld as far as longevity/strength and the fear of putting something unwanted into the wort? Or is there a better alternative?
I don't like epoxy. There is little to no opportunity to repair something that is buried in the stuff. I simply grounded everything well and sealed the stick up. I didn't cover the back of the element in anything. I am sure to always use a gfci. Works well. Food grade silicone gaskets and Teflon tape did the trick.
I don't like epoxy. There is little to no opportunity to repair something that is buried in the stuff. I simply grounded everything well and sealed the stick up. I didn't cover the back of the element in anything. I am sure to always use a gfci. Works well. Food grade silicone gaskets and Teflon tape did the trick.
yeah, I was kinda thinking of that approach, what did you ground to if you didn't screw the hole in the side of the chrome tube?
yeah, I was kinda thinking of that approach, what did you ground to if you didn't screw the hole in the side of the chrome tube?
This is covered somewhere in this thread...I prefer to splay the ground wire out and fold it back over the threaded portion of the drain tube, when you screw the large cap nut on, the ground wires are crushed in the threaded mechanical connection, then trim off the excess wire.
found it for you....
https://www.homebrewtalk.com/f170/heat-stick-grounding-439100/
Testing mine out today....
Just enough juice to run the element and pump. :rockin:
She's alive!!!!
10gal of strike water from 68°F to 170° in 31min with heat stick and propane in keggle! This use to take about an hour or more.
:rockin:
Just enough juice to run the element and pump. :rockin:
She's alive!!!!
10gal of strike water from 68°F to 170° in 31min with heat stick and propane in keggle! This use to take about an hour or more.
:rockin:
This is covered somewhere in this thread...I prefer to splay the ground wire out and fold it back over the threaded portion of the drain tube, when you screw the large cap nut on, the ground wires are crushed in the threaded mechanical connection, then trim off the excess wire.
found it for you....
https://www.homebrewtalk.com/f170/heat-stick-grounding-439100/
This...
I did the same thing and it worked great. There is a lot of play in the threads to allow for this.
so is there any benefit of the 90 degree option? It has been said that direct contact with kettle and element doesn't cause anything which I would see as the only negative for the straight option.
so is there any benefit of the 90 degree option? It has been said that direct contact with kettle and element doesn't cause anything which I would see as the only negative for the straight option.
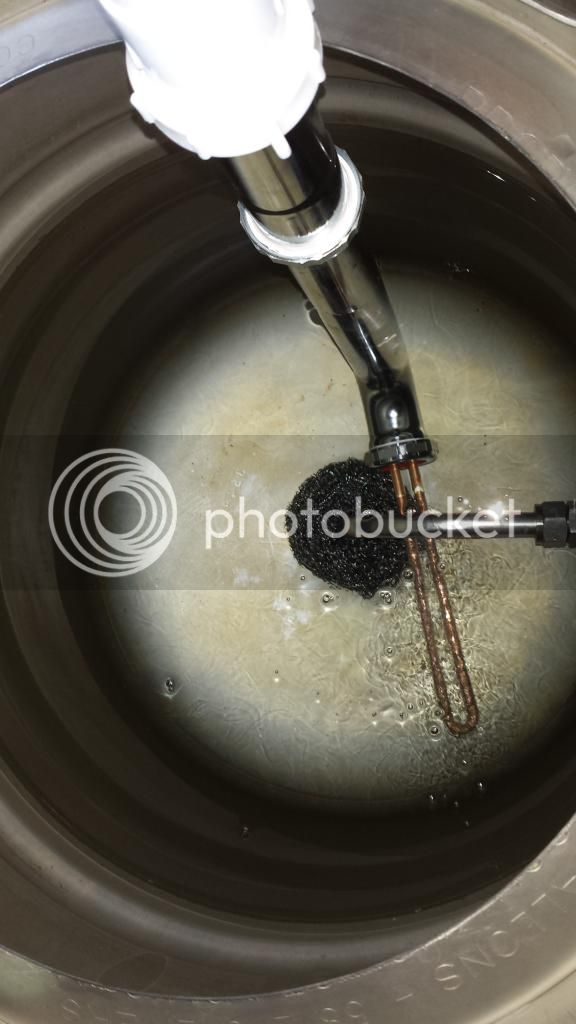
Mine is 90° and has contact with the dip tube in my keggle...no issues after one boil. Two more scheduled this week, but I also got some 1" lock nuts/o-rings in the mail to get the seal a little more proper.
I would think that maybe the heat rising straight up the the seal on the straight versions would be an issue...maybe that's why some seals are failing?
thanks, yours looks pretty nice, I would prefer the 90, I am thinking of getting a 24" chrome pipe so it is all pipe in the kettle
http://www.amazon.com/dp/B00FL6NAPA/?tag=skimlinks_replacement-20
24" is a bit overkill but I can't find anything between 15 and 24. I think the kettles I'm looking at are 18 or so
Last edited by a moderator:
thanks, yours looks pretty nice, I would prefer the 90, I am thinking of getting a 24" chrome pipe so it is all pipe in the kettle
http://www.amazon.com/dp/B00FL6NAPA/?tag=skimlinks_replacement-20
24" is a bit overkill but I can't find anything between 15 and 24. I think the kettles I'm looking at are 18 or so
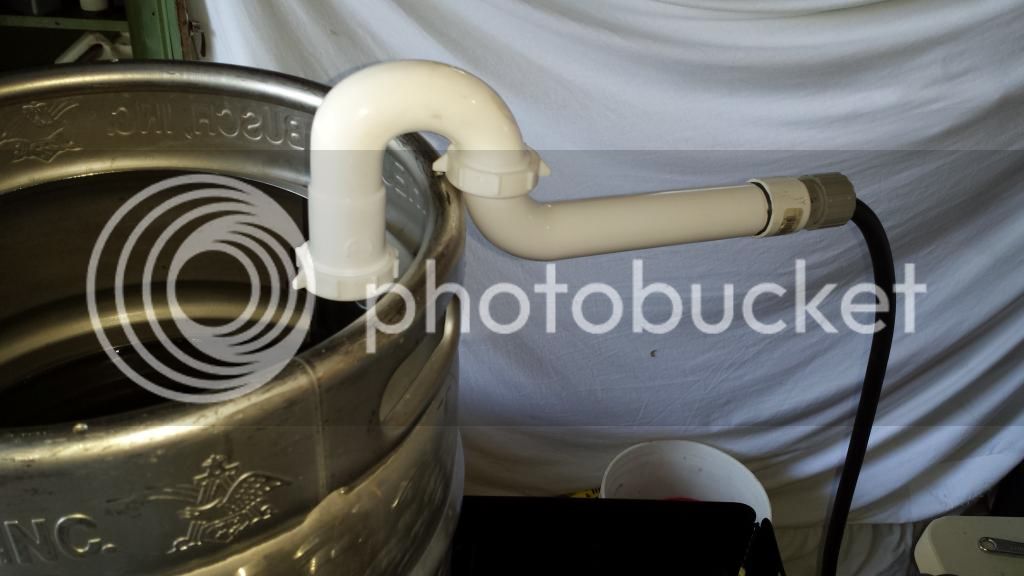
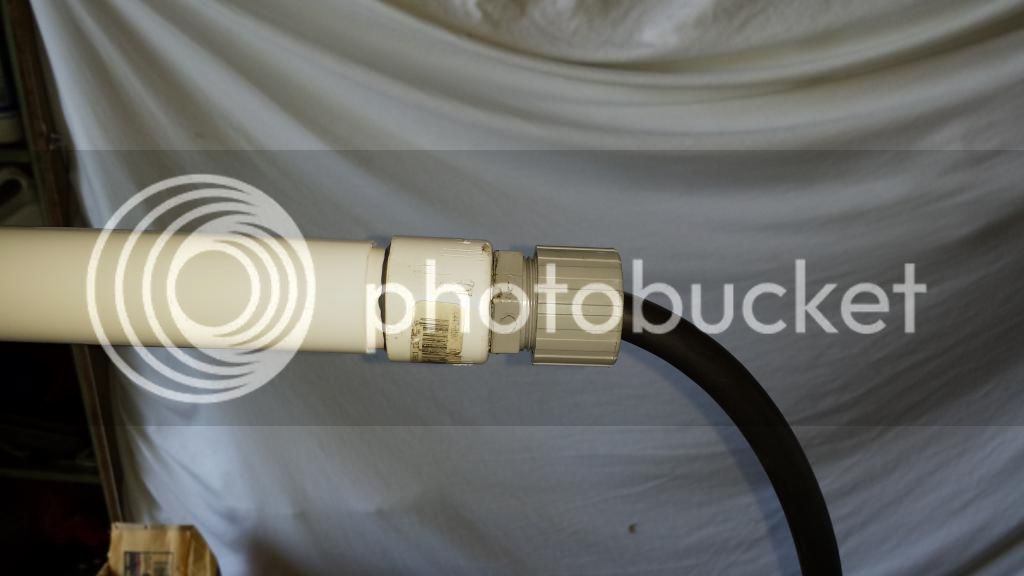
Mine is a 16" chrome trap arm, plus a 6" chrome extension so the plastic parts a kept some distance from boiling/steam.
I would have gone with a longer waste arm if there were any at the stores I stopped at. If I see one in the future, I may upgrade. The plastic parts are from a "trap-in-a-bag"...$2.50 for all the plastic. This allowed me to get the cord out away from the propane heat coming up around the keg.
Last edited by a moderator:
Similar threads
- Replies
- 4
- Views
- 1K
- Replies
- 1
- Views
- 668
- Replies
- 0
- Views
- 638
