Grainfather!!

Homebrew Talk - Beer, Wine, Mead, & Cider Brewing Discussion Forum

Help Support Homebrew Talk - Beer, Wine, Mead, & Cider Brewing Discussion Forum:

This site may earn a commission from merchant affiliate links, including eBay, Amazon, and others.
Just ordered a Grainfather,graincoat,mangrove jack spider,refractometer and preordered the new controller�� So excited....hope it boils ok.

Can't wait!!!

Jamie

brewed quite a bit with my grainfather, just a couple things

1. That stupid check valve is a pain in the dick, i have taken it out and its not going back in.

2. Longer hose on the inlet of the chiller, this would make cleaning easier so it doesnt have to sit on top.

3. Im certain the grainbed isnt staying at the proper temperature when mashing, now this is a complicated problem because grainbed drainage is different with each brew. Im brewing this weekend and i want to stick my remote thermometer in the middle of my grainbed and monitor the temperature.

This unit is still so great for apartment brewers!

Got my grainfather today courtesy of http://finalgravityhs.com/ whoever was on the other end of my endless facebook questions... thank you. They were on top of my tracking numbers and other stuff, which given the weather lately here in the midwest... is impressive.

My LHBS was actually poopooing on the grainfather on its build quality (saying things like flimsy etc). Now I took this with a grain of salt as while they may know grains, they seem to know dick about engineering. They had assembled my brewbucket before hand and didnt seem to know how o-rings worked.

Initial impressions... wow.. the quality on mine? Very high. Welds are tight, everything fits, nothing is missing / dented / scratched. Overall parts quality to me seems insanely polished. Parts have a great weight to them and feel very solid. i can't find a single fault with any part that came with this system.

ok I can find one. You do need to find some sort of clamp for whatever your preferred method of wort chillling will be. My cold water inlet needs a clamp where it meets my faucet and its barbed fitting (again did not surprise me at all).

my cobrewer is flipping his ****. he didnt know I ordered one. We have done a multi tier system for years now. now.... we get to brew inside while watching hockey or whatever we want.....yeah nice. Also distilling is for sure in our future.

My graincoat doesnt arrive till next week. having said that my temp test is as follows.

filled with ~5g hot water. temps read at ~135*.

time to hit to strike temp of ~152 = 17min. not bad.

currently running time to hit boil temps.

44mins @212* from 152*

regrets of buying this? none.

also have a hopspider that I got from ritebrew. it is the mangrove jack one with the 800micron mesh for ~35 shipped. cant beat that. ill probably be ordering the new controller as soon as feb hits and they become more common.

My EE roommate and cobrewers wife were both quite impressed by this thing.

edit: mental note, make sure the valve on your bucket is closed before pumping 200* water into it...
 
i can't find a single fault with any part that came with this system.

I have one complaint. There are marks for Liters, but not Quarts. With the Liter marks going in between the Gallon marks, it makes it really hard to judge how much liquid is in the tank.
 
What mash water ratios are people using and how thick can you go ? 1.25 quarts per pound ?
 
I have one complaint. There are marks for Liters, but not Quarts. With the Liter marks going in between the Gallon marks, it makes it really hard to judge how much liquid is in the tank.

no handle. makes cleaning a bit more difficult.
 
no handle. makes cleaning a bit more difficult.

I brew next to my laundry tub, so cleaning is just a lift and dump. I use the controller bracket as my lift handle. It positions the unit so the outside pipe is out of the way of the edge of the tub and the controller doesn't fall out.
 
I brew next to my laundry tub, so cleaning is just a lift a1nd dump. I use the controller bracket as my lift handle. It positions the unit so the outside pipe is out of the way of the edge of the tub and the controller doesn't fall out.

yea i started doing that too, but i dont see why a designated handle never made its way into the blueprint. seems like a no brainer for a "kettle" to have a handle. even the products of similar design have handles.
 
What mash water ratios are people using and how thick can you go ? 1.25 quarts per pound ?
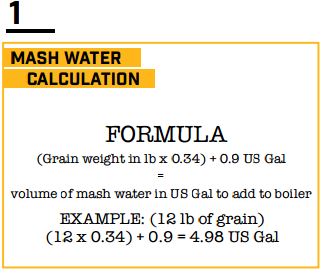
Hi. Because of the mash water formula used by GF, it varies from about 1.8 qt/lb for 8 pounds to ~ 1.55 qt/lb for 20 pounds. Most people either use the online calculator(be sure to pick US), the formula from the manual (below), or a tweaked version (I use # x 0.3255 to account for my smaller boil off rate.) I strongly recommend you use the formulas by GF, if you try to go too thick, you won't get nearly the performance or efficiency you're after. Ed
:mug:

2017-01-21 06_59_24-gfinstructions.pdf.jpg
 
if you try to go too thick, you won't get nearly the performance or efficiency you're after. Ed
:mug:

Thicker mash = more grain in the basket = higher gravity beers if you can keep the efficiency up.

Thicker mash = higher enzyme concentration = better efficiency, if you can keep the temperature consistent and sparge all the sugar out after the mash.

What performance are you speaking of ?

The Grandfather is basically a 3V mash system sitting on top of a boil kettle. The principles that applied in a 3V system should work on it too ?

Edit: 0.34 gallons/pound x 4 quarts per gallon = 1.36 quarts per pound. That is a decently stiff mash. Way, way stiffer than what most BIAB systems are using. The 0.9 gallons must be the amount of water under the basket and in the plumbing.
 
Thicker mash = more grain in the basket = higher gravity beers if you can keep the efficiency up.

Thicker mash = higher enzyme concentration = better efficiency, if you can keep the temperature consistent and sparge all the sugar out after the mash.

If you're up for some reading, you'll find that the mantra of thicker mash = better efficiency isn't true. I provided this link to you earlier in this thread. I'm guessing you haven't had a chance to read it yet.

http://www.braukaiser.com/wiki/inde...ity_and_efficiency_in_single_infusion_mashing

Just click the link, scroll about 75% down the page. There you'll find an experiment labeled "Mash thickness". It is quite fascinating. If you don't want to read the experiment write up (it's quite short, FYI), here's an excerpt from the conclusions.

"The thickness of the mash doesn't seem to effect the fermentability of the wort that is produced but thinner mashes can significantly improve the conversion efficiency. As a result brewers who see low efficiency from their mashing may try to use a thinner mash (3-4 l/kg or 1.5 - 2 qt/lb) as they were shown to convert more starches."

If you have literature that indicates the opposite of what Kai says is true (i.e. thicker mash = better efficiency) I would love to read it to compare it to Kai's results. But please don't say "this is how superstar brewer John Doe does it, therefore it must be right." That's not a valid argument.
 
Thicker mash = more grain in the basket = higher gravity beers if you can keep the efficiency up.

Thicker mash = higher enzyme concentration = better efficiency, if you can keep the temperature consistent and sparge all the sugar out after the mash.
@TexasWine answered that above.

What performance are you speaking of ?

The Grandfather is basically a 3V mash system sitting on top of a boil kettle. The principles that applied in a 3V system should work on it too ?
No, I don't think so. A standard 3V system allows the grain to soak in the entire mash amount. The GF uses more of a "dynamic" mash where the wort is continually recirculated through the grain bed.

"Performance" in that the wort cannot flow freely through the grain bed during recirculation and extract as much sugar. If the wort cannot flow through the grain, it must go down the overflow pipe, which means the mash temp of the grain bed goes down (because there's not enough heated wort to keep it high,) and it cannot extract as many sugars, ergo lower conversion efficiency & performance.

Edit: 0.34 gallons/pound x 4 quarts per gallon = 1.36 quarts per pound. That is a decently stiff mash. Way, way stiffer than what most BIAB systems are using. The 0.9 gallons must be the amount of water under the basket and in the plumbing.
You are correct, it is a pretty stiff mash (much more so than typical BIAB,) but I said if you get too much thicker, you loose the ability the get a good recirculation of wort.

Don't take my word for it. Read all the posts in this thread about poor efficiency and you'll see it almost always winds up being crush of the grist, failing to push the top plate down on the grain bed during sparge, and failure to follow the GF recommend MASH & SPARGE volumes. Ed
:mug:
 
20th Grainfather brew day in the books. This is an awesome machine if anyone is having doubts about getting a Grainfather don't. Btw get a grain coat as well. Well worth the extra 50.
 
@TexasWine answered that above.


No, I don't think so. A standard 3V system allows the grain to soak in the entire mash amount. The GF uses more of a "dynamic" mash where the wort is continually recirculated through the grain bed.

1.36 quarts per pound and continuous mash recirculation is standard mash tun procedure on 3V systems.

The overflow pipe is unique to the GF, but I think it is ingenious. Every mash tun should have one.
 
If you're up for some reading, you'll find that the mantra of thicker mash = better efficiency isn't true. I provided this link to you earlier in this thread. I'm guessing you haven't had a chance to read it yet.

http://www.braukaiser.com/wiki/inde...ity_and_efficiency_in_single_infusion_mashing

Just click the link, scroll about 75% down the page. There you'll find an experiment labeled "Mash thickness". It is quite fascinating. If you don't want to read the experiment write up (it's quite short, FYI), here's an excerpt from the conclusions.

"The thickness of the mash doesn't seem to effect the fermentability of the wort that is produced but thinner mashes can significantly improve the conversion efficiency. As a result brewers who see low efficiency from their mashing may try to use a thinner mash (3-4 l/kg or 1.5 - 2 qt/lb) as they were shown to convert more starches."

If you have literature that indicates the opposite of what Kai says is true (i.e. thicker mash = better efficiency) I would love to read it to compare it to Kai's results. But please don't say "this is how superstar brewer John Doe does it, therefore it must be right." That's not a valid argument.

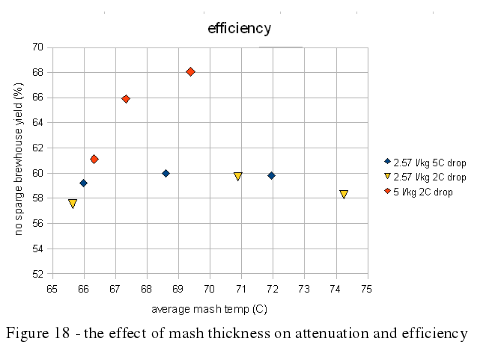
Here is the chart that accompanies that statement:
https://www.homebrewtalk.com/attachment.php?attachmentid=385698&stc=1&d=1485050684

Notice the label on the Y axis : NO SPARGE Brewhouse Efficiency.

Of course a thinner mash is going to result in a better efficiency when you don't sparge. There is more water to carry the sugar off the grain.

I sparge. I'm interested in efficiency when sparging occurs. Starch conversion is an enzymatic reaction. The greater the concentration of enzymes (alpha and beta amalyse), the better the conversion will be, unless there are other limiting factors or the conversion itself isn't the limiting factor, ie both go to completion because the malt is well modified and/or the mash is given enough time to get to completion.

The other issue with that paper is that the mash efficiencies were low out of the box, less than 70%. There might be other issues at hand.

Thank you for providing this paper for discussion. It is very interesting.

No sparge brewhouse yield.png
 
Really? I thought only in a RIMS or HERMS setup is there recirculation. Lacking that, doesn't the mash sit static in the tun (cooler) unless it's stirred? Then, you might get some limited recirculation by vorlaufing before the sparge. My point wasn't that 1.36 is too thick, rather less than that might not work so well. Ed
:mug:
 
An arrangement to permit overflow caused by a sticky grain bed to be dumped back into the wort, preventing a spill, is also present in the Zymatic. It is actually necessary in that system, as the wort is being stored externally; wort would continue to flow even with a stuck sparge. The Grainfather doesn't store wort externally so a stuck sparge would result in stopped flow - thus no overflow. The only reason the flow continues is the overflow pipe, which continues to feed the pump.

In my primary system it isn't an issue because a stuck sparge would prevent any flow. That means I would know about it right away and could try to fix it. With an overflow path, it would be easy to not be aware of poor flow through the grain bed until it is too late (poor mash efficiency). I watch the Gfather carefully to ensure that very little goes through the pipe. Every now and then I turn off the pump and observe how long it takes for the liquid level to drop. If you aren't getting good flow, it is a double whammy. The grains aren't being properly rinsed, and the temperatures in the bed aren't being controlled. The overflow pipe serves only to conceal the problem.
 
Really? I thought only in a RIMS or HERMS setup is there recirculation. Lacking that, doesn't the mash sit static in the tun (cooler) unless it's stirred? Then, you might get some limited recirculation by vorlaufing before the sparge. My point wasn't that 1.36 is too thick, rather less than that might not work so well. Ed
:mug:

The 3V gravity systems probably don't recirculate, but pretty much anyone with a pump and single tier 3V system is generally circulating. The HERMS and RIMS have to circulate to add heat.

I totally discounted gravity systems when I spoke of 3V systems because it has been so long since I've used such a system.
 
An arrangement to permit overflow caused by a sticky grain bed to be dumped back into the wort, preventing a spill, is also present in the Zymatic. It is actually necessary in that system, as the wort is being stored externally; wort would continue to flow even with a stuck sparge. The Grainfather doesn't store wort externally so a stuck sparge would result in stopped flow - thus no overflow. The only reason the flow continues is the overflow pipe, which continues to feed the pump.

In my primary system it isn't an issue because a stuck sparge would prevent any flow. That means I would know about it right away and could try to fix it. With an overflow path, it would be easy to not be aware of poor flow through the grain bed until it is too late (poor mash efficiency). I watch the Gfather carefully to ensure that very little goes through the pipe. Every now and then I turn off the pump and observe how long it takes for the liquid level to drop. If you aren't getting good flow, it is a double whammy. The grains aren't being properly rinsed, and the temperatures in the bed aren't being controlled. The overflow pipe serves only to conceal the problem.

The overflow pipe does another thing. It prevents vacuum underneath the bed from compacting the bed. And it catches an overflow situation thus ensuring flow past the heating surface thus preventing scorching. Of the 2 features, I consider the first to be more important than the second. It is one thing to have a stuck sparge with an uncompacted bed. Having a bed that compacts due to a vacuum under it makes the problem way, way worse. The vacuum is a postive feedback cycle on the issue.

Wanna feel for what the GF would be without that pipe ? Check out this thread on the Colorado Brewing Systems and the issues they have with keeping flow through the bed (even with very thin mashes) as well as scorching that results.

https://www.homebrewtalk.com/showthread.php?t=575659

When I said unique, I was speaking of conventional mash tuns. I don't consider the Picobrew to be anything conventional.

By the way, how much goes down the overflow pipe is irrelevant to the flow through the bed. The height of the pipe above the bed sets the static pressure for flow through the bed regardless of how much goes down the pipe.
 
The 3V gravity systems probably don't recirculate, but pretty much anyone with a pump and single tier 3V system is generally circulating. The HERMS and RIMS have to circulate to add heat.

I totally discounted gravity systems when I spoke of 3V systems because it has been so long since I've used such a system.

Recirculating systems lose heat so those who choose to recirculate generally need HERMS or RIMS to make it work. If you don't want to recirculate you don't need RIMS or HERMS.

When I added a recirculation pump to my original three tier rig I added a heat exchanger as well - but only because I needed that to compensate for heat losses caused by the recirculation. Of course, once I added the complexity of a pump and related plumbing, it wasn't long until I moved everything over to a single tier stand. Most folks who recirculate will incorporate some auxiliary heating method - and most will use a single tier setup. I am in the process of helping a buddy install a HERMS setup on the his two tier rig, though.
 
By the way, how much goes down the overflow pipe is irrelevant to the flow through the bed.

I have to disagree with that. If if it is all going down the pipe, there is NO flow through the grainbed and the mash is over - whether complete or not. If that happens, I want to catch it and save the brew.
 
I asked the same question to the folks at Grainfather, they said don't worry about that button...lol! I'm not really worried about it now since I have the new controller on the way.
 
Here is the chart that accompanies that statement:
https://www.homebrewtalk.com/attachment.php?attachmentid=385698&stc=1&d=1485050684

Notice the label on the Y axis : NO SPARGE Brewhouse Efficiency.

Of course a thinner mash is going to result in a better efficiency when you don't sparge. There is more water to carry the sugar off the grain.

I sparge. I'm interested in efficiency when sparging occurs. Starch conversion is an enzymatic reaction. The greater the concentration of enzymes (alpha and beta amalyse), the better the conversion will be, unless there are other limiting factors or the conversion itself isn't the limiting factor, ie both go to completion because the malt is well modified and/or the mash is given enough time to get to completion.

The other issue with that paper is that the mash efficiencies were low out of the box, less than 70%. There might be other issues at hand.

Thank you for providing this paper for discussion. It is very interesting.

I think I understand now what's happening. You originally said thicker mash = better efficiency. But what you actually meant is sparging = better efficiency.

No one will argue that sparging results in higher brew house efficiency than no sparge, all other things being equal. But whether to include a sparge is irrelevant of mash thickness. Let's not confuse the fine folks here perusing HBT by saying a thick mash results in better efficiency, because it doesn't.

Of course I'm sure there's an upper limit to the water/grain ratio above which this no longer applies. I'm just not sure any of us home brewers will ever see it.
 
I have to disagree with that. If if it is all going down the pipe, there is NO flow through the grainbed and the mash is over - whether complete or not. If that happens, I want to catch it and save the brew.

If the drainpipe is above the bed, whatever can go through the bed will go through the bed, irregardless of what goes down the pipe. The pipe is just taking the excess if the pump is pumping more than the bed can take. The only way the drainpipe can take all of it is if the bed is stuck.
 
Working cleaning new Grainfather and had some questions about control box. Can't find instructions or video for my version...not sure if it's the oldest one? Not sure what the */rst button does. Can set temps ok

View attachment 385702

Can anyone give me some info on this or where to find it?

Also change the hysteresis on your controller too, its set at 2*. I just did mine yesterday while I was setting it all up / giving it the first clean.

[ame]https://www.youtube.com/watch?v=NTIxjCD07vU[/ame]
 
i tried to change my hysterisis and i can get to F04 but i cant make a change to the value...

and now my set light tries to maintain a low temperture not the high one!

like my burner comes on if i set my temp to 100 f and my water is at 150... WTF
 
If the drainpipe is above the bed, whatever can go through the bed will go through the bed, irregardless of what goes down the pipe. The pipe is just taking the excess if the pump is pumping more than the bed can take. The only way the drainpipe can take all of it is if the bed is stuck.

I think you might want to consider path of least resistance. I have tested this and posted my findings in past posts.

Using the return valve to slow the flow will help set the bed when you start and slowly you can adjust as the mash process continues.

Do some testing with a temp probe in the mash tun. It will shock you! You must start with your strike water at least 10 degrees higher to have a chance of start at 152.
 
I think you might want to consider path of least resistance. I have tested this and posted my findings in past posts.

Using the return valve to slow the flow will help set the bed when you start and slowly you can adjust as the mash process continues.

Do some testing with a temp probe in the mash tun. It will shock you! You must start with your struck water at least 10 degrees higher to have a chance of start at 152.


So...you're saying that after adding the grain the temp drops 10F? If so, it makes sense as the grain enters the strike water at a much cooler temperature (room) and quickly absorbs water...that happens in cooking all the time. I'm new to all grain with my GF and have brewed extracts and cooked wort forever. I wonder what the impact is on my cooking with the GF with this kind of swing variable. I've only done four recipes thus far and only half (two) have been in target gravity range. Certainly my efficiency is off and I have to measure better next time as I have the gear and metrics to do so. I'm holding off for the GF Connect - more so because I'm a gadgets guy. Nonetheless, the beer I've cooked thus far has been pretty good and I'm sure will improve. Observations, metrics and notes are always made. It's a fascinating and rewarding hobby all the way around and I'm looking forward to upping my game and the lifelong learning that's part of it all. (Some side notes and thoughts included lol)
 
Also change the hysteresis on your controller too, its set at 2*. I just did mine yesterday while I was setting it all up / giving it the first clean.


https://www.youtube.com/watch?v=NTIxjCD07vU


Making sure I have this, changing hysteresis to 1* will make for more accurate holding of desired mash temps. Which is one of the whole darn reasons we all got Grainfather in the first place. Cool! Thanks a lot man.

Also regarding the "*/rst " button in the left lower corner...grainfather people communicated to me after asked on FB that this is left from the cooling phase of the temp controller and that if you push it "you risk changing the configuration of the control box and we won't be able to get it back to normal [emoji4]" [direct quote]


Correct on the temp. It's adjusting where it kicks on the element. So you have it set for 152 it wouldn't kick on till it hits 150. Now it kicks on at 151. It's similar to the cooling differential setting on an inkbird 308.

Will it make a difference? Maybe it will, but the OCD scientist in me likes precision and accuracy.

And I did exactly as he does in the video it does in fact work. This on a brand new Grainfather.

Though I'll be getting the new connect controller asap. Having total granular control of the heating element tickles my fancy.


thanks, that helped alot. So incase anyones wondering what this stupid controller does ill try to explain. When you change the UNI and says FAC its resetting to factory defaults and wants to re-enter the new values you want. I work with controllers like this everyday at work and this is by far the most china-fied POS ive ever used.

if F08 is not on HOT, this thing will not work.
 
Never tried measuring the grain bed temp in the middle. When I add my grains and stir like heck, if I started out 10 degrees high at mash in, it always looked like I was overshooting by 6 or 7 degrees so I started gradually reducing the mash-in temp so as not to overshoot. My beers ended up finishing drier and at a lower FG than they were supposed to and I am now wondering if it was because I was mashing at a lower temp than what I thought I was and what was indicated (which would reduce the non-fermentable sugars). I may try starting out 10 degrees high on mash-in and mashing 2 or 3 degrees higher than what I want, or stir the mash for longer than I have been trying to achieve a more uniform grain bed temperature before starting the timer.
 
Made my second batch this weekend. 44% mash eff, and 56% brew house. Sparge lasted 4 minutes with 4 gallons. Top plate was dropped to the top of the grain bed. I can't figure out what is going this wrong to be so bad. Target OG of 1.057 after a pound of sugar as well. Measured OG of 1.038. Sad times ahead.


Also, I think my controller died. The power off position and boil position still run as mash mode. Any ideas?
 
Sounds like either the switch on the boiler is in mash position or a bad switch on the boiler. The switch on the controller just controls power on and whether or not the controller cycles the element on and off. Boil- Constantly on; Mash - temp controller cycles on and off; Off- power off to the element. The two position switch on the boiler simply is either in the boil position -1600w or mash-400w.

EDIT: Re read this, and it sounds like the controller switch may be bad since the element is still on in the off position.
 
Last edited:

Latest posts

Back
Top