Fermentation

Homebrew Talk - Beer, Wine, Mead, & Cider Brewing Discussion Forum

Help Support Homebrew Talk - Beer, Wine, Mead, & Cider Brewing Discussion Forum:

This site may earn a commission from merchant affiliate links, including eBay, Amazon, and others.

MAC80

Active Member
Joined
Aug 1, 2018
Messages
43
Reaction score
3
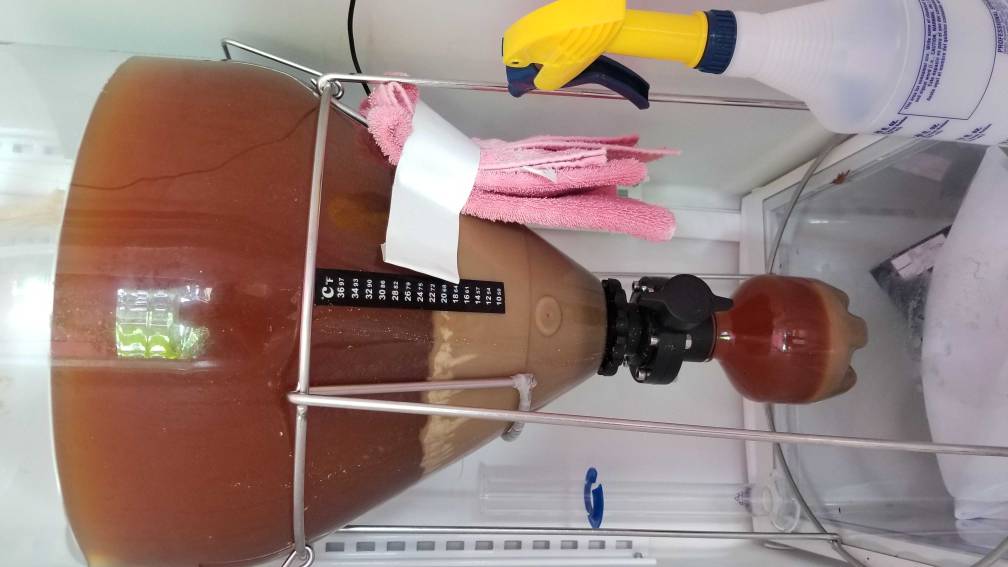
Got my first brew in the fermenter last night and pitched the yeast. Used WLP095 and it says should start in 5 to 15 hrs. Fermentation doesnt appear to have started yet. I let my chamber cool to 68 and it is holding steady. Is it normal for it to take longer than the 15 hours to notice the fermentation?
 
Did you do a starter? Was the yeast about the same temp as the wort you pitched it into?

If there was a major temp difference between the yeast and the wort, it might shock the yeast and then they'll take longer to become active.

Unless the yeast is compromised (sat in the hot sun for hours, for instance, or wasn't refrigerated at some point prior to pitching), it should be fine.

BTW, how do you know it hasn't begun? What kind of fermenter are you using? Does it have an airlock?

No I didn't use a starter. This is my first time and didnt want to try doing that as well. It was a pure pitch liquid yeast. Yeast and wort were both about 73°F. I have a fermentasaurus and I dont see any activity but then again dont really know what to look for either
1534101554813.jpeg
 
Hmmmm.....

I see the yeast ball on the bottom....why do you have that active at this point? Too late to do anything about it, but usually that's for harvesting yeast later. I see a big layer of trube and what might be yeast on the bottom of the fermetner, wondering what dropped through to the yeast ball on the bottom. Have you closed it or is the valve open? Guessing open.

I don't see a krausen yet, which is a layer of tan-colored foam on top of the wort, may have some green streaks in it from hops. What kind of airlock do you have? Any bubbling?

The usual advice is relax, don't worry, have a home brew. But you don't have any yet so just relax.

One more thing: White Labs says optimal temp for fermentation for this yeast is 67-70. Looks like you have it in a fridge, which is good, but if it were me, I'd not have that at any temp higher than 67. Looks also like you have a temp probe held against the fermenter with a towel to insulate it from ambient, that's good.

BTW also, White Labs says this yeast is more estery than WLP001, can produce more diacetyl, and would benefit from a rise in temp at the end of fermentation.

Here's the White Labs page for the yeast: https://www.whitelabs.com/yeast-bank/wlp095-burlington-ale-yeast
 
Hmmmm.....

I see the yeast ball on the bottom....why do you have that active at this point? Too late to do anything about it, but usually that's for harvesting yeast later. I see a big layer of trube and what might be yeast on the bottom of the fermetner, wondering what dropped through to the yeast ball on the bottom. Have you closed it or is the valve open? Guessing open.

I don't see a krausen yet, which is a layer of tan-colored foam on top of the wort, may have some green streaks in it from hops. What kind of airlock do you have? Any bubbling?

The usual advice is relax, don't worry, have a home brew. But you don't have any yet so just relax.

One more thing: White Labs says optimal temp for fermentation for this yeast is 67-70. Looks like you have it in a fridge, which is good, but if it were me, I'd not have that at any temp higher than 67. Looks also like you have a temp probe held against the fermenter with a towel to insulate it from ambient, that's good.

BTW also, White Labs says this yeast is more estery than WLP001, can produce more diacetyl, and would benefit from a rise in temp at the end of fermentation.

No airlock. Using a sealed pressure system. Not much pressure built up yet though. I have a spunding valve on the system. The valve is open and has been that way since before the yeast was pitched. The bottom ball is just trub I believe. Just nervous that I screwed up the first batch. I have the temp set at 68 because thats what temp the package recommends until day 7 then up to 70-72
 
Hmmmm.....

I see the yeast ball on the bottom....why do you have that active at this point? Too late to do anything about it, but usually that's for harvesting yeast later. I see a big layer of trube and what might be yeast on the bottom of the fermetner, wondering what dropped through to the yeast ball on the bottom. Have you closed it or is the valve open? Guessing open.

I don't see a krausen yet, which is a layer of tan-colored foam on top of the wort, may have some green streaks in it from hops. What kind of airlock do you have? Any bubbling?

The usual advice is relax, don't worry, have a home brew. But you don't have any yet so just relax.

One more thing: White Labs says optimal temp for fermentation for this yeast is 67-70. Looks like you have it in a fridge, which is good, but if it were me, I'd not have that at any temp higher than 67. Looks also like you have a temp probe held against the fermenter with a towel to insulate it from ambient, that's good.

BTW also, White Labs says this yeast is more estery than WLP001, can produce more diacetyl, and would benefit from a rise in temp at the end of fermentation.

Here's the White Labs page for the yeast: https://www.whitelabs.com/yeast-bank/wlp095-burlington-ale-yeast
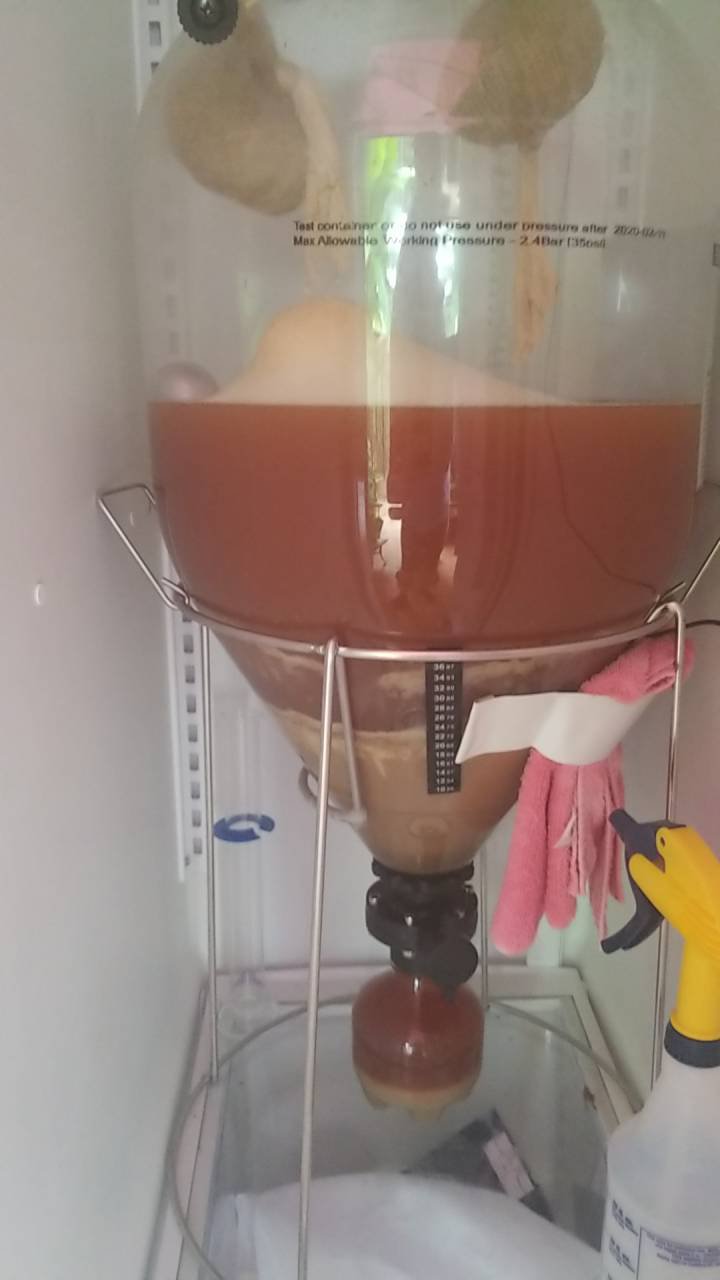
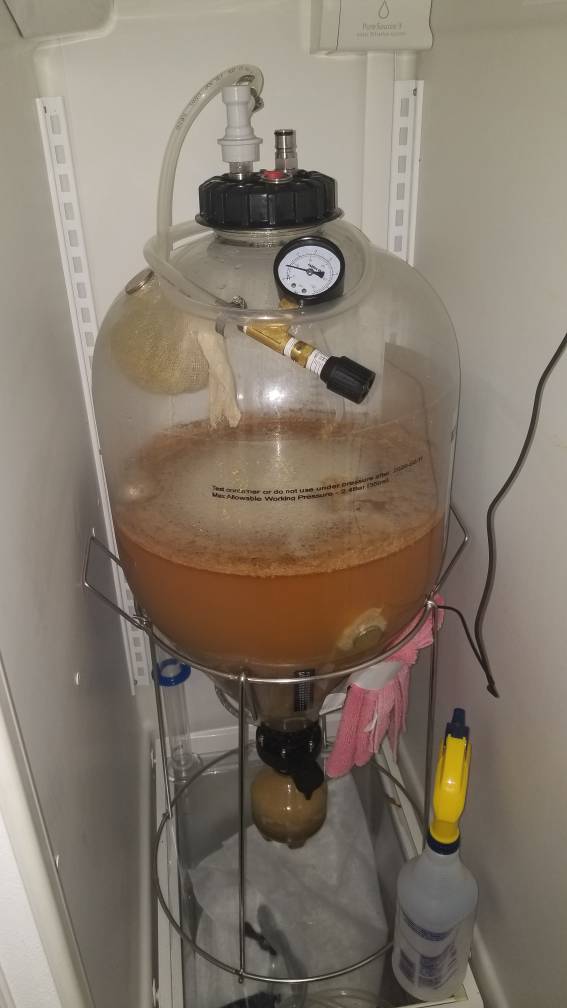
Thanks for the advice. It took about 24hrs but it looks like it is doing fine[emoji2]
1534167894562.jpeg
 
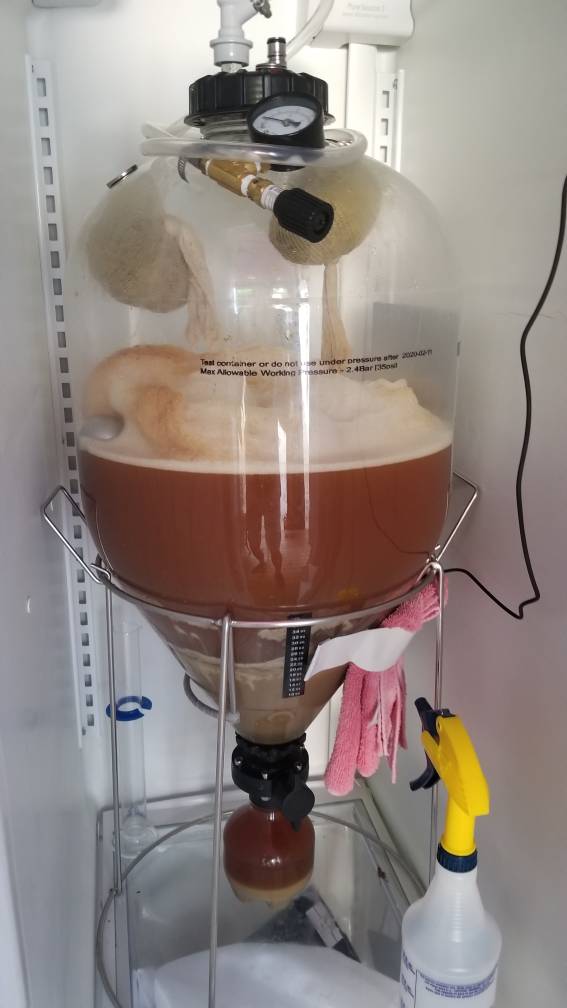
That looks weird. Never fermented under pressure in a vessel that's clear, but two things are unusual to me: first is the krausen is not evenly distributed across the surface of the wort.

Second is that there doesn't appear to be much going on; that trub layer should be less dense, as the yeasties do their thing.

Why fermenting under pressure? Is this your first brew day?

I'm guessing those lumpy things on top are bagged hops? What's the scoop on that? Going to drop them in when the time is right, or something else?
Yes this my first brew. Fermenting under pressure to keep it sealed off. After fermentation it will be transferred to a keg using a closed loop. No oxygen other than what little amount is left i. The sealed keg. That is hops in mesh bags held up by magnets. Others have had trouble using the jar or the bottom due to the small opening when trying to dry hop. I will add one on day three and the second on day 7 per instructions.

To be completely honest I dont really know what I am doing. Trying several things that I have read about online. The krausen had just started to form this morning when I took that pic. I am at work but wife sent me a pic and it seemed to be spreading out. I will be home soon and hope to get a better look.

I just asked her to check the pressure and its a little high so I think its becoming more active. I wasnt sure the spunding valve was accurate so I set it a little high.

Hopefully it turns out ok
Update...

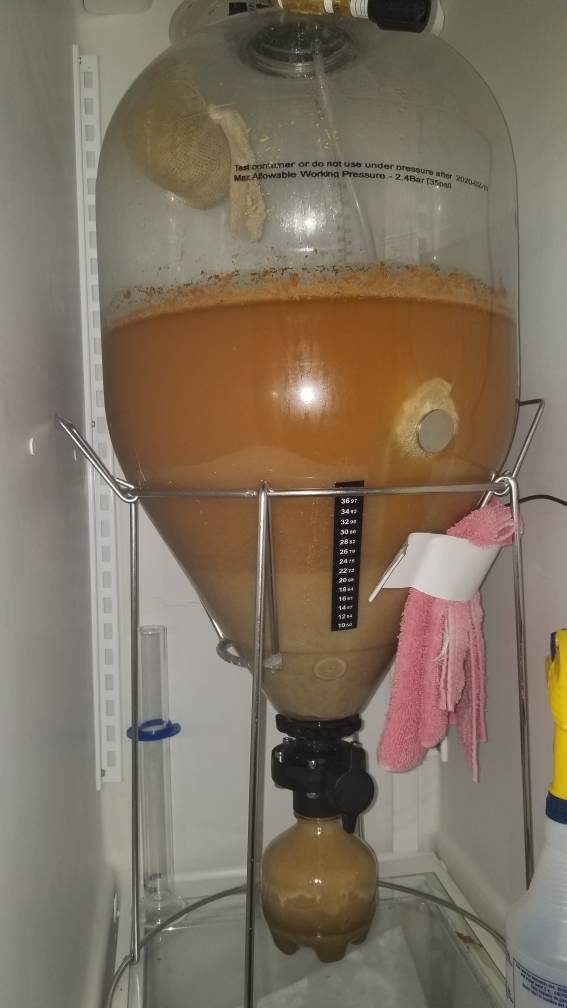
Seems to be fine guess I am paying way to much attention to it
20180813_183612.jpeg
 
Update...

Seems to be fine guess I am paying way to much attention to itView attachment 583531

Nah....you'll know you're paying too much attention to it when you pull up a chair just to watch.

I don't know what fermenting under pressure does to krausen, but I've never done that--though I do close off the fermenter toward the end of fermentation to let the beer self-carb.

You don't have to ferment under pressure to "keep it sealed off." Most people--I'd say 99 percent or more--will typically use an airlock to isolate the inside from the outside, and use Star-San or Vodka in the airlock to provide a barrier to any nasties that would want to enter. The yeast produce prodigious amounts of CO2 during fermentation, and that will bubble out of the airlock.

To be honest, I'd reduce the internal pressure unless you have a specific reason for wanting to ferment under pressure.

************

OK, your first brew. I'm sure it'll be beer. I remember my first one vividly. There seems like so much to learn!

If I may, let me make a few suggestions. First, at the outset, simpler is better. Brewing isn't rocket science, but neither is it simplistic. The fewer moving parts in recipes, process, etc., the less there is to go awry, as you learn to pull all the levers in the proper sequence.

Second, I believe an excellent approach for new brewers is this: every time you brew, try to do something better. You'll find the process becomes easier, and the effectiveness of the brew day will improve. Continuous quality improvement. For instance, next time, you might focus on how you oxygenated your wort prior to pitching. (The bare minimum is to vigourously shake the wort to try to mix air into it. Yeast need oxygen to build cell walls when they reproduce, and at the beginning of fermentation oxygen is not your enemy, it's your friend. After fermentation is complete, oxygen is your enemy.

Third, I personally think doing a starter is a little bit of a stretch for a new brewer. Dry yeasts work remarkably well, and you can even just sprinkle them on top of the wort. You can rehydrate them before pitching, but even dry at the pitch they work.

Anyway, welcome, and ask your wife to post a pic of you sitting on a chair in front of your fermenter, watching it. :)
 
It looks like every thing is right.

But the OP skipped Fermenting 101 and went directly to Fermenting 103. I have been brewing 7+ years and would be nervous doing the processes involved.
 
I really need to get a wort chiller. Decided to use my new conical fermenter (SS Brew bucket) and skipped the ice bath while still in the boiler pot. Poured the hot wort in thinking it would cool in a few hours. It's been 7 hours and I'm still above 100F....[emoji849][emoji21] this fermenter should maintain temp with no problem once I get it down though [emoji51]
 
Cool. Like the oxygen effort. How do the hops drop in, i cant tell?

Btw, i have had many wl yeast take a while to start. Especially when closer to date. I prefer dry honestly, but wpuld use either. Seems sometimes i am stuck with whatever lhbs has. I dont lodo but a tip i heard from drew beechum, was to fill keg with sanitizer and then push all liquid out. Guarantees sanitization and no oxygen. Hope i have that right.
 
Good job OP with those dryhop magnets. I'd be interested to hear how that works out. You are effectively storing the hops at room temperature in a co2 blanket for several days. Not sure if this would damage them of if the co2 protects them.
But if this is your first brew, awesome!
You'll like the fermentasaurus once you figure out its quirks. Biggest thing it to put clean wort in there so you don't get blockages. Look at doing a whirlpool in your kettle, or if you are brewing extract you should be clean anyway.
 
Those magnets are sweet. @MAC80, the rest below is in response mostly to @Sadu, so don't overly concern yourself with it yet--you have other places to worry about before you get there, but nice job with the magnets.

I've been struggling with how to dry hop and maintain a zero-oxygen environment once fermentation is complete. On my last batch, I waited until I had about 10 points of gravity left to attenuate, and dropped in a hop tube. Not optimal because I would have rather done it after fermentation was complete, but I'm trying to do low-oxygen brewing and it was the only way I could think to do it.

But hops in bags suspended by magnets? That's brilliant.

There are other ways I could have done it...one is put the the hops in the keg prior to purging w/ CO2 from the fermentation, and then rack on the hops there. I've been passing the CO2 from the fermentation into the keg to purge it--no sense wasting that free source of CO2, and it's pure--but I'm venting the keg so the CO2 has someplace to go.

But I've wondered--would I lose much or most of the aromatics in those hop pellets by doing it this way? Same with suspending the hops above the wort as it ferments--would the hops give up too much of the aromatics to defeat the aroma-goal of dry-hopping?

I don't know. Anyone have an idea on this? Might be worth a separate thread so as not to derail this further than what I've done here.
 
Good job OP with those dryhop magnets. I'd be interested to hear how that works out. You are effectively storing the hops at room temperature in a co2 blanket for several days. Not sure if this would damage them of if the co2 protects them.
But if this is your first brew, awesome!
You'll like the fermentasaurus once you figure out its quirks. Biggest thing it to put clean wort in there so you don't get blockages. Look at doing a whirlpool in your kettle, or if you are brewing extract you should be clean anyway.
I wondered myself what this would do to the hops! I will keep you posted. This being my first brew I don't have anything to compare it to. I did extract but didn't put the boil hops in bags. I think next time I will to help keep that from making it to the fermenter. I already like the fermentasaurus a lot. I have enjoyed being able to see this process and know that it is completely sealed
 
Cool. Like the oxygen effort. How do the hops drop in, i cant tell?

Btw, i have had many wl yeast take a while to start. Especially when closer to date. I prefer dry honestly, but wpuld use either. Seems sometimes i am stuck with whatever lhbs has. I dont lodo but a tip i heard from drew beechum, was to fill keg with sanitizer and then push all liquid out. Guarantees sanitization and no oxygen. Hope i have that right.
You could pull the magnets off and let the hops drop but I think I going to leave them attached and just slide them down. That way I can pull them back up out of the way when I transfer from the fermenter to a keg
 
The biggest advantage of the Fermentasaurus is that it's clear. I also ferment in kegs and while stainless is great, you are less in control because you can't see anything.
You are totally on the right track with the pressure fermenting and keeping oxygen to a minimum, plus fermenting in a temp controlled fridge.
To be nailing this stuff on brew #1 is very unusual, but awesome.

Couple more things to think about.

- That yeast layer at the bottom isn't really as deep as it looks. It tends to stick to the sides of the cone a bit.
- You can squeeze the collection bottle repeatedly to unblock the valve and loosen some of that yeast in the cone. Do this a few times as fermentation finishes up to encourage the yeast/trub into the collection bottle. In that photo you can see the collection bottle has beer in it still. It is possible to get it filled with yeast using this method.
- Use a hop basket / spider in your boil to keep the hops out of the fermentor. The weakness of the Fermentasaurus is the small collection bottle and small bottom valve. Anything you can do to reduce trub is helpful here.
- If you have to depressurise for any reason, all that yeast in the cone will go into suspension again. Just means you have to wait another couple of days for it to drop out again, but can upset your plans if you need to move the beer out for the next brew to go in.
- Hop bags can get in the way of the floating dip tube. But because you can see inside you can shunt things around to get it working again. This problem is harder to fix in an opaque keg fermentor.
I do love the fact that I can see what is going on! The reason I have all of this on the first brew is because I did a lot of reading and watching video's to find what I thought would be the best method. Not wanting to bottle condition lead me to the fermentasaurus, through several different google searches.

I tried to squeeze the bottle but it is under pressure enough that I cant do it. Wish I would have thought about that before fermentation began.

I plan to slide the hop bags down with the magnets and back up again to try and keep them from getting in the way of that pickup tube. Tested this dry (without liquid and it seemed to work, hopefully the liquid doesnt make a difference.

I do have one question though...
How do I know when it's time to add the first dry hop? Should krausen been gone before I do that?
 
Update...

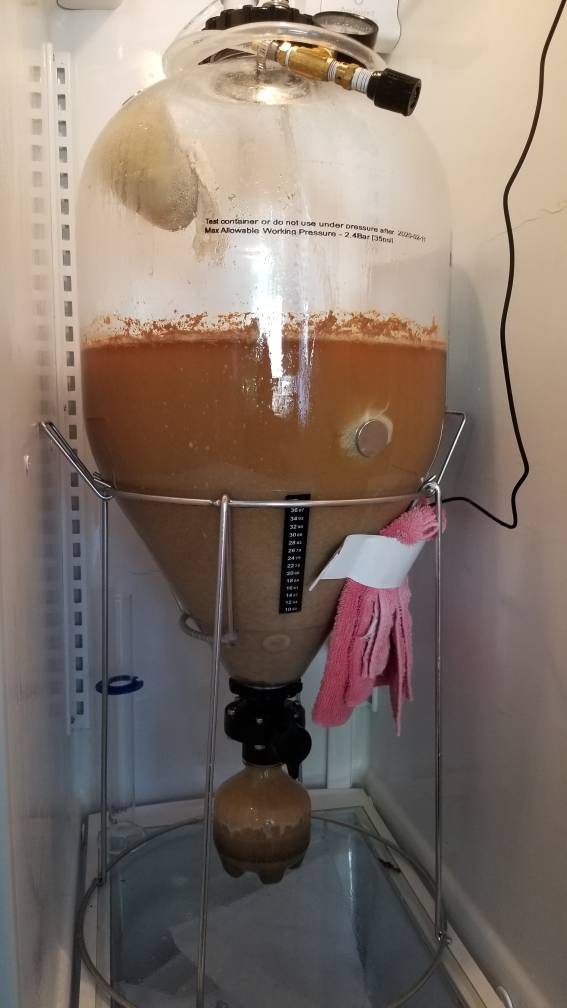
So I pulled my first dry hop down yesterday. This would have been day 4 since pitching the yeast(day 3 since first krausen) and everything has changed today. Krausen is thin and lots of activity!

The color is lighter and seems to be a lot of yeast falling. I was able to squeeze the ball and free it up. Not sure if dry hop changed it or fermentation is just ending.

Anyway... it has been a joy to watch this process and had a little sample last night and it seemed to be on the right track. If nothing else you can check out the pic and see the first dry magnet still connected to the hops

Cheers!
Forgot the pics!
20180816_172154.jpeg
20180815_191440.jpeg
 
Thered debate on when, how and how long to add hops. Try it and find whats best for you. I like 3 days before kegging. Others put in during day 3. One week, two weeks. See whats best. Great work.
 
Be careful sliding it down like that. All it takes is one scratch to harbor bacteria that you will have a hard time eliminating and can ruin every batch of beer you make. That's the down side to plastic fermentors. I would drop them and just deal with working around them. I like the idea though, I might try something similar but set it up to just open and drop the hops.
 
Be careful sliding it down like that. All it takes is one scratch to harbor bacteria that you will have a hard time eliminating and can ruin every batch of beer you make. That's the down side to plastic fermentors. I would drop them and just deal with working around them. I like the idea though, I might try something similar but set it up to just open and drop the hops.
No! Don't say that! How do you know if you get bacteria? This looks muddy anyway and have no idea what it should look like. Isn't pet material food safe anyway?
20180817_210327.jpeg
20180817_210335.jpeg
 
Grain to glass in under 10 days, huh? Impressive!
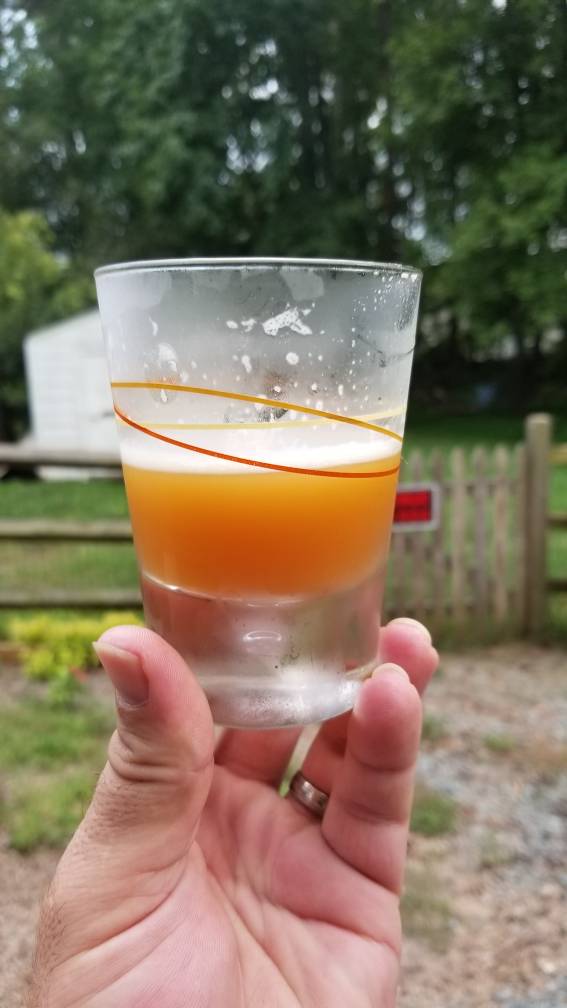
Extract but its been 12 days. I hit my final gravity and transferred to a keg. Not sure if it is right but if not lesson learned. I have read that fermentation under pressure is faster. I was reading where some do lagers under pressure in 2 weeks which os much shorter. The gravity was good and the taste was fine at 71°. First try so I am sure I did several things wrong. I just hope its drinkable. Headed home to find out now
 
Extract but its been 12 days. I hit my final gravity and transferred to a keg. Not sure if it is right but if not lesson learned. I have read that fermentation under pressure is faster. I was reading where some do lagers under pressure in 2 weeks which os much shorter. The gravity was good and the taste was fine at 71°. First try so I am sure I did several things wrong. I just hope its drinkable. Headed home to find out now
Under pressure itself will no speed things up. However, under pressure you can ferment at faster and higher temps with no off flavors.

10 days you should be fine.
 
Under pressure itself will no speed things up. However, under pressure you can ferment at faster and higher temps with no off flavors.

10 days you should be fine.
I guess thats what I was referring to. That fermentation finished faster and I turned up the temp as recommended by the yeast I used
 
Grain to glass in under 10 days, huh? Impressive!
It didn't do well. It had hardly any carb and was very dark. Did a force carb, going to let it sit and see what happens. Probably could have stayed for a few day in the fermentasaurus. Lesson learned. Will have to say aroma is perfect and flavor isn't far off
 
Yeah, patience is the hardest part about homebrewing. Do a sour with Roselare or something to build up your resolve—takes about a year before you can even think about bottling or kegging it. :)
 

Latest posts

Back
Top