Ferm Chamber Build

Homebrew Talk - Beer, Wine, Mead, & Cider Brewing Discussion Forum

Help Support Homebrew Talk - Beer, Wine, Mead, & Cider Brewing Discussion Forum:

This site may earn a commission from merchant affiliate links, including eBay, Amazon, and others.

NautiDogBrewingCo.

NautiDogBrewingCo
Joined
Aug 6, 2013
Messages
156
Reaction score
19
Location
East Lansing
Documenting my fermentation chamber build. Thanks to all of you that have posted your builds, they were an inspiration and a guide.

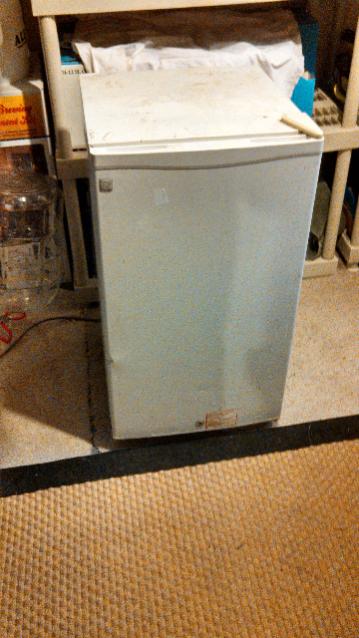
I started this project yesterday and hope to complete it shortly into the new year. I used scrap wood that I had in the basement, a $10 garage sale mini fridge, silicone sealant, wood glue, and nail gun. Then I picked up foil tape and R7.5 1.5inch rigid insulation from HD. The chamber sits in the basement under my front stoop that previously was unused.

The chamber is about 24" deep, 30" wide, and 34" tall. It's more than enough room for two 6.5 gallon fermentors.

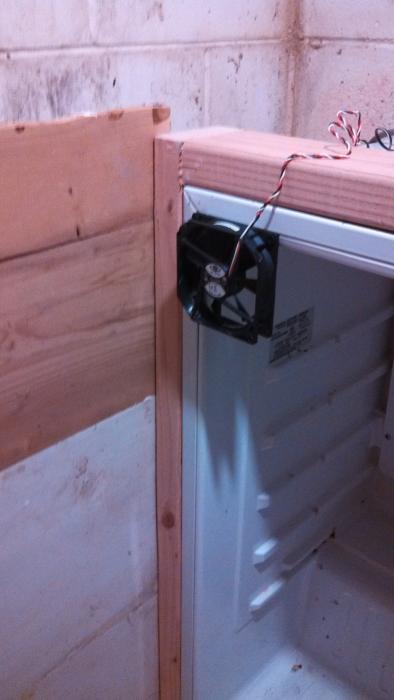
I'll use a STC-1000 for temperature control. I installed a computer fan that will circulate air whenever the compressor turns on and I plan to add a paint can light for a heating element.

Any suggestions, questions, and comments are welcome. Let me know what you think!

More pics to come!
ForumRunner_20131215_215057.jpg
 
ForumRunner_20131215_220508.jpg
Framing the fridge with 2x4s

ForumRunner_20131215_220546.jpg
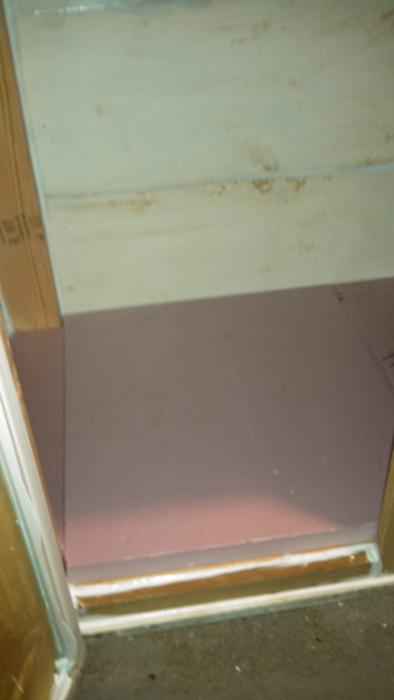
Attached the floor boards, 30" wide and 24" deep.

ForumRunner_20131215_220616.png
Built the back wall and sealed the joints with silicone.

ForumRunner_20131215_220650.png
Finished the top and front with an opening for the door.

ForumRunner_20131215_220708.png
Installed the fridge door. Had to bend both of the mounting brackets at 90* angles to be able to attach them. Works just fine.
 
A look at the computer fan that was installed with three small screws. Again, the fan will run off of the STC 1000 and turn on whenever the compressor does.

IMG_20131214_134212_476.jpg
 
I added two layers of insulation (3" total) on the floor this morning and will work on adding it to the back wall and roof throughout the week.
 
Installed most of the insulation this morning. Now I just need to pick up a can of spray foam to seal things up then tape all the corners. The pic below shows the 3" of insulation on the floor.

I added 3" of insulation to the side wall and 1.5" to the wall with the door and the back wall.

pic1.jpg
 
I finished sealing the chamber tonight using foil tape on all seams.

ForumRunner_20131217_211615.png
The entrance to the chamber.


ForumRunner_20131217_211642.png
The right side, closest to the fridge.


ForumRunner_20131217_211657.png
The left side wall.


I will be covering the floor of the chamber with leftover laminate flooring to provide protection and a smooth surface.

I plan to install the heat lamp after Christmas with hopes that Santa brings the STC 1000 along with a few batches of ingredients.

I'll continue to post pictures as I go along. Cheers!
 
Very nice build. I did something similar with an old office frig.

Thanks for looking, SeeMont!

In your build, how did you get the fridge door to seal? I thought it would magnetically adhere to the foil tape, but it doesn't. Should I put small metal flashing around the opening?
 
I installed the paint can heat lamp today. Total cost of that project was $4. I bought an extension cord from the surplus store for $1 and the light assembly for $3. The guy at the paint store gave the paint can to me for free because he said it was for a good cause, BEER! Thanks, guy!

I had the light plugged in for about a minute and could feel the heat radiating from the can. I positioned the can in front of the computer fan to help with hot air circulation. It should work just fine.

I installed a 6" LED, battery powered, closet light that I can switch on and off. It's directly above the door opening and lights the chamber for loading and unloading. (Stanley, $7 at the hardware store)


ForumRunner_20131219_095454.png
Even though there is at least 1/2 inch of air space around the can, I masked off the surrounding insulation with foil tape to help reflect heat and prevent the insulation from melting if the can gets too hot. You can see the LED light at the top of the pic.


ForumRunner_20131219_095519.png
I also drilled a small hole in the paint can lid so that I can tell when the light is on. Big thanks to this site for the paint can idea and directions.
 
Sorry I am late getting back to you. To seal the door, I took strips of sheet metal about 3/4" wide and tacked them on the mating surface. I covered them with the foil tape. I have a good seal. In my build, I used 1" framing material and 1" foam, filling all gaps with foam. One mistake I made is spraying sanitizer on the inside, there must have been a reaction with the foam insulation, it was bad and took a while to go away.
 
That's good to know! I will pick up some type of metal flashing as soon as I can. And I'll remember to keep the sanitizer away from the foam.

Does your 1" of insulation perform well enough for you? Or do you have a lot of heat loss/gain that causes a lot of compressor cycles?
 
So far my chamber is doing well, It is placed in my unheated shop and being in Western Montana the inside temp is about 34 degrees. I am able to maintain a 65 degree temp with my 45 watt paint can heater. One thing I added is a layer of paver brick for some thermal mass, if this helps or hurts??? My temp probe is placed in small container if water to stop the fluctuation if temp when I open the door. My chamber is also on casters so I use the top if it as a moving counter.
 
The STC 1000 was delivered today. I will start working on it tonight or tomorrow and will likely have the project finished this weekend... just in time for my next batch.
 
I finished the temp controller last night. Here are a few pics.

I used a 3 gang outlet box, two 15A outlets, and a 18awg extension cord. My fridge uses 18awg, so I figured that would be sufficient.

The controller is completely portable and it was very easy to set up.

Thanks to everyone who posted about wiring these in the past. It was a big help. Cheers!

1388756733046.jpg


1388756745507.jpg


1388756757344.jpg


1388756773512.jpg
 
Good Job. The temp controller is amazing. One thing I did was install a plug inside the chamber. I included two wires, One for the heater and another for a fan to keep the air circulating. I ran these wires directly into the controller box and made my connection there. Drilled a hole and mounted an out of the way box. Just an idea.
 
That's a great idea, SeeMont. Maybe I will tinker with it down the road. Right now, I just need to get the door to seal and I will be all set to put it in use.
 
Great build. Your paint can heater may become obsolete. Incandescent light bulbs are out as of 1 Jan '14.
 
Great build. Your paint can heater may become obsolete. Incandescent light bulbs are out as of 1 Jan '14.

Just picked up a 6 pack of 60watt bulbs the other day. :) I have a 100 watt bulb in there now.

But I might be switching to a personal ceramic heater at some point anyway.
 
Last night I sealed the door with magnetic tape and turned the chamber on. It started at 50*F at 5:30p and it was up to 65*F (the set temp) by 7:15p when I checked on it again.

One thing though... There was a vinegar like smell and a little condensation on the inside of the paint can heat lamp. Is this something I should worry about? I have no idea why the can would put out an odor like that or why it would have condensation on the inside of the can. Any suggestions as to why? Or what to do next?
 
I think the smell is from the silicon sealer. My ferm chamber had a similar smell for a while. BTW, I use a pet med ceramic reptile bulb.
 
Wow, that is the same smell I had and I thought is was from the cleaner. I washed my chamber with baking soda and water and then have placed containers of soda in to absorb the smell, this has seemed to work. I have been using mine for about three months. I've used it for maintaining a 60 degree ale temp, using a 40 watt bulb and am now cold crashing two kegs. When I am done, I have unplugged the chamber and let it air out. The worst is my last batch and i had a exploding carboy. What a mess to clean up. The beer turned out fine.
 
Well, I couldn't wait. I brewed a Cream Ale today and have it fermenting at 65 degrees. I also have my Blonde Ale carbonating in the keg in there. The basement is about 55 degrees so the increase in temp should help the carbonation a bit.
 
The smell is probably from the silicone or RTV sealer used.......It is "acetic acid", and is corrosive until it is fully cured, at which time the smell will be gone!

And, iffn you are interested, "RTV" stands for "room temperature vulcanizing", and it cures the best and quickest in the presence of moisture, ( regular old silicone too).
 
Thanks for the info, Stealthcruiser. The smell has subsided a bit in the past few days and it is not nearly as bothersome as it once was.

I also checked on the Cream Ale today... it's bubbling away nicely and everything looks great. The chamber seems to be doing the trick.

I appreciate all of the comments, views, and help along the way. Cheers!
 
Thanks for putting together such a detailed build. I'm going to try and get one of these together soon. Does it matter where the paint can is located, either top or bottom of the chamber? Was just wondering about heat rising and not being distributed at the bottom.
 
Thanks for putting together such a detailed build. I'm going to try and get one of these together soon. Does it matter where the paint can is located, either top or bottom of the chamber? Was just wondering about heat rising and not being distributed at the bottom.

It's been my pleasure! Thanks for looking.

As far as the location of the heater, I chose to elevate it and move it to a side wall so that it would not take up floor space. I can fit 2 carboys and a keg in the chamber, maybe more. It's high enough that I can slide carboys under it and it's in a position that is easy for me to access the bulb and inside of the can.

If I had to do it over, I would try to use single pieces of wood for the walls rather than piecing together scrap wood. My method was much cheaper and that was the idea, but single pieces might be better.

So far, I am pleased with the performance of the chamber. We'll see how it holds up.
 
Sparty: Thanks so much for doing this. I wish I had this before I did my build. If anyone is planing on doing this, it is pretty cool to be able brew and control the temp. I currently have two kegs under CO2 pressure and chilling them down. This really is allowing me to be more creative and productive.
I don't know what your chamber ended up costing you, I have about $60.00 in mine butI got the frig for free.
 
Nice build. I just finished something similar. One thing I did differently was to wire the computer fan to be on all the time. I figured it would help keep the temp more consistent in the chamber.
 
I appreciate the kind words. The chamber is working very well. I have it up to 68*F for a Pale Ale right now and it's bubbling like crazy.

The fan can be used in conjunction with the heat cycle or the cooling cycle. Right now, I have it set up to run when the heat lamp runs because the ambient temp in the basement does not need the chamber to be cooled at all, only heated. I don't even know if I will ever need it to be cooled, unless I try to get it to lager temps.

I would venture to say that I've put about $85 into the chamber. $65 for insulation and foil tape, $10 for the fridge, $10 for calk/silicone/screws. I had all of the wood around the house.
 
Spartybrews, where did you put the temp probe?

The temp probe is in a small glass vial of water at the bottom of the chamber, against the back wall.

I did not want to insulate and tape it to the fermentor because I wanted the freedom to move them in and out or from side to side without worrying about the probe.
 
The temp probe is in a small glass vial of water at the bottom of the chamber, against the back wall.

I did not want to insulate and tape it to the fermentor because I wanted the freedom to move them in and out or from side to side without worrying about the probe.

How do you account for the actual temperature of the fermenters during fermentation with this method?

I just wired up my own chamber with the stc-1000, but I have not yet used it. The only remaining issue is what to do about the probe.
 
I have fermometors on the side of all the fermentors I use. I have been setting the chamber temp about 2*F below the desired fermentation temp, given that the work of fermentation adds about 2*F. So if chamber temp is 68 then Ferm temp should be 70.

I put the probe in water because this helps keep it stable. It fluctuates less in water than it would in air.
 
Where do you keep your probe? I'm at a loss since I have 2 buckets going at the same time. Same yeast temp profiles. I just think attaching it to 1 of the carboys would not be accurate. I use a cup of water at this point. Thanks.


Sent from my iPad using Home Brew
 
Looks great man! I saw that it fits 2 carboys and a keg. Is that the same space as two buckets? I assume it is just wanted to make sure sinse I have never seen a carboy. Noob...lol. also, do you use the floor space inside the fridge?
I am asking cause I think I am gonna try this one soon.

Again great job!!

Sent from my SCH-I535 using Home Brew mobile app
 

Latest posts

Back
Top