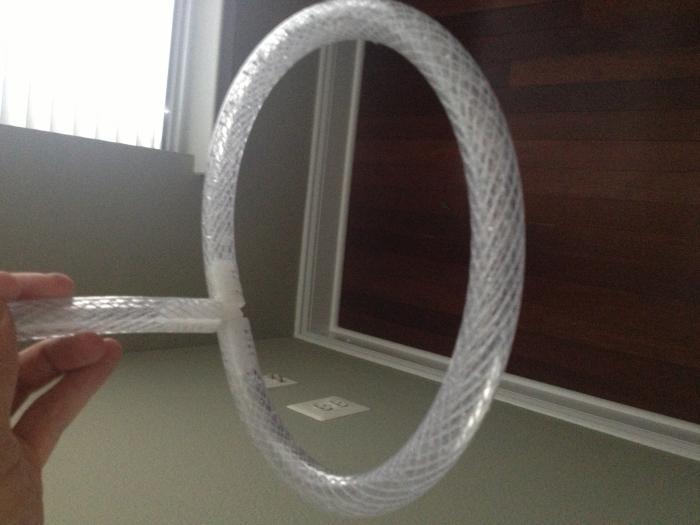
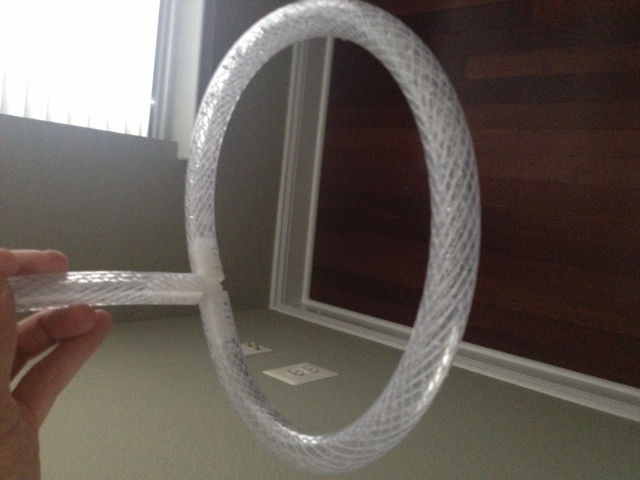
OK - built a sparge assembly today to attach to the hose coming off my HLT. Total cost was $1.93. Ingredients for success:
- Watts Nylon Hose Barb T Connector A-291 $1.93
- leftover high temp hose
- small drill bit
- drill
- electricity
- eyesight, one or both
- hands or other mechanism with hand like dexterity
- coordination of hand/eye or mechanism/eye
- energy, of which you have endless (if you're reading this)
- frugalness
- homebrew chillin' in the fridge
The T connector has three barbs on it. As you can see - hopefully the photos attach - the sparge hose attaches to two of those barbs, the third barb connects to your HLT - and hopefully you have a ball valve with the appropriate barb coming off your HLT.
The hose from the HLT to the MT can be passed through a hole you cut through the lid of your MT if you so desire (haven't decided if I'd cut this hole or not - using 10 gal cylindrical coolers for HLT and MT).
Control the water output by drilling less or more holes in the tubing which is your "sparge assembly".
Total time = a matter of minutes after you pick up the T connector from your local hardware (HD in my case).
Will test this thing out this week - though preliminary kitchen sink tests resulted in positive signs. i.e. water drips out of holes drilled in tubing as it flows through the t-connector!
Arguably the cost would be a little above $1.93, perhaps priceless given the ingredients for success listed above, but total outlay for today, without taking into account, making use of other tools and materials which otherwise would have gone to waste, puts the cost of this project in the basement. Now will it perform? I can't see why not as long as you calibrate it (by drilling the appropriate number of holes in the appropriate places) to output 1 qt of water per minute (plus if you have a ball valve on you HLT then you have an extra bit of control over the sparge process).


- Watts Nylon Hose Barb T Connector A-291 $1.93
- leftover high temp hose
- small drill bit
- drill
- electricity
- eyesight, one or both
- hands or other mechanism with hand like dexterity
- coordination of hand/eye or mechanism/eye
- energy, of which you have endless (if you're reading this)
- frugalness
- homebrew chillin' in the fridge
The T connector has three barbs on it. As you can see - hopefully the photos attach - the sparge hose attaches to two of those barbs, the third barb connects to your HLT - and hopefully you have a ball valve with the appropriate barb coming off your HLT.
The hose from the HLT to the MT can be passed through a hole you cut through the lid of your MT if you so desire (haven't decided if I'd cut this hole or not - using 10 gal cylindrical coolers for HLT and MT).
Control the water output by drilling less or more holes in the tubing which is your "sparge assembly".
Total time = a matter of minutes after you pick up the T connector from your local hardware (HD in my case).
Will test this thing out this week - though preliminary kitchen sink tests resulted in positive signs. i.e. water drips out of holes drilled in tubing as it flows through the t-connector!

Arguably the cost would be a little above $1.93, perhaps priceless given the ingredients for success listed above, but total outlay for today, without taking into account, making use of other tools and materials which otherwise would have gone to waste, puts the cost of this project in the basement. Now will it perform? I can't see why not as long as you calibrate it (by drilling the appropriate number of holes in the appropriate places) to output 1 qt of water per minute (plus if you have a ball valve on you HLT then you have an extra bit of control over the sparge process).


