DIY Jaded King Cobra Immersion Chiller

Homebrew Talk - Beer, Wine, Mead, & Cider Brewing Discussion Forum

Help Support Homebrew Talk - Beer, Wine, Mead, & Cider Brewing Discussion Forum:

This site may earn a commission from merchant affiliate links, including eBay, Amazon, and others.

schiersteinbrewing

Supporting Member
HBT Supporter
Joined
Mar 25, 2013
Messages
619
Reaction score
140
Location
Stanton
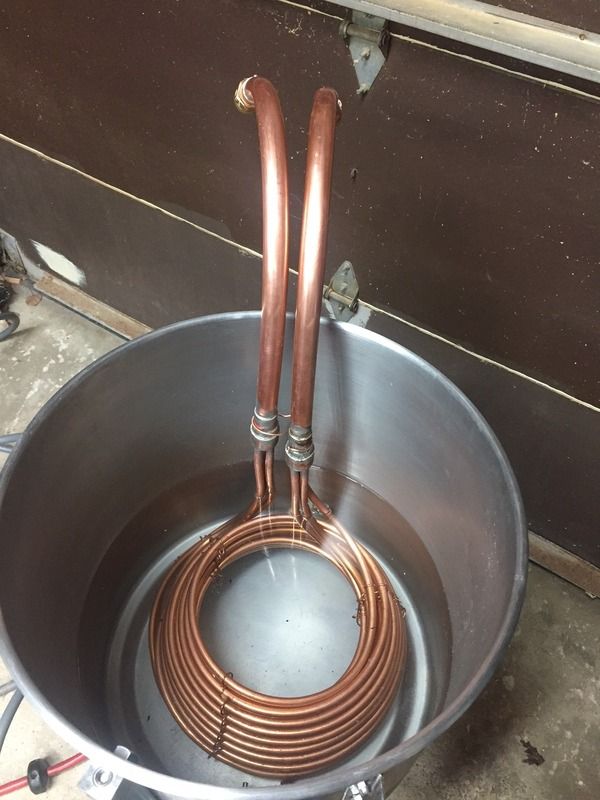
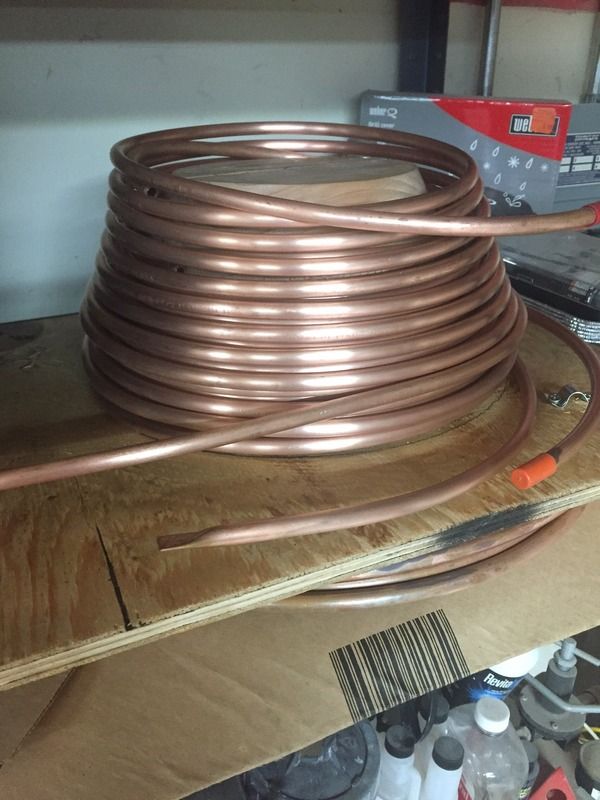
I was given 75ft +/- of soft 3/8 copper that came out of an old dentist office that carried oxygen. So I spent the day making a King Cobra.

Mine
View attachment ImageUploadedByHome Brew1457999442.884152.jpg

Theirs
View attachment ImageUploadedByHome Brew1457999463.956393.jpg

Straightened out the 3/8 as best I could. Found a flower pot that tapered to my liking. Wound the copper around the pot 6 times and left a tag end, did this 3 times. Used approx 24ish feet of the 3/8 per coil. Then cleaned the outside of the copper with a sink full of star San and a scotch brite pad. Then took some 12ga romex wire I had, stripped the insulation off, weaved it around the coils and pulled tight. Took 2 - 3/4in copper caps and drilled 3 holes in them just big enough to snugly fit the 3/8 copper. Took a piece of 3/4 copper and cut 2 nipples to tie the 3/4 - 1/2 reducer to the 3/4 cap. Then finished out the rest in 1/2 rigid copper. Sanded, fluxed and soldered all connections. Then pressure tested, no leaks. And then a final cleaning of star San again. Now to test it compared to the Jaded Hydra I have.

My hats off to Jaded these things aren't easy to make. Took approx $30 in some fittings and 7 hours of work. Would have been easier and nicer looking if I used new copper.

Dimensions 15in diameter, 5 in tall. Just bairly fits into my 64qt bayou classic kettle. Why did I build this when I already have a Hydra? With the false bottom in my kettle my Hydra is halfway out of the wort when I do a 5 gal batch. I have the false bottom in to keep my BIAB bag and chiller off the element. Also, now I can brew and chill two batches at once with my other eBIAB system, and either one can double as a pre chiller in the hot ground water summer months.
 
Last edited:
Haven't tested it out yet. I will post the numbers as soon as I do. As far as comparing I haven't used a single coil in a long time and sold mine when I bought my Jaded hydra
 
Scuffed the surfaces really well used plenty of flux and a higher silver content solder (for strength). The 3/8 pipe sticks through the inside of the cap about 1/2in. I've picked the unit up by the neck and shook it quite hard and the joints are holding string with no leaks under pressure.
 
75 feet of free copper.
7 hours of time. So a full day paid plus lunch and no breaks.
Sounds like jaded pricing should be increased.
I have a friend with one of their chillers. It's no joke. Fastest thing I've seen chill wort to fermentation temps.
 
Nice build. I too am concern over the solder strength of the cap w/ 3 drill holes for the 3/8 pipes. I am wondering if one could put a slight flare to the ends of the 3/8 pipes inside the cap then solder???? I am no plumber but have sweated many a pipe in my life.
Thoughts??
I too would love to see a picture of the cap.
 
My son and I are working on two of these right now. First I agree Jaded price is more than fair for these but this is a nice project for us to work on together.

We found some 3/8" tubing on CL from a retired HVAC guy for $0.40/ft. I have a 2D drawing program and designed the coils with correct ID and OD and height. I have a lathe so I turned a cone with the proper dimensions.

I made a wire wrap jig like I found someone here made and used 12 gauge wire I had. Used 3 wire separators per coil.

We are at the stage where we need to make that critical solder joint. I too am afraid a solder joint between the cap and tube may not take the lifting load. Like the OP I was going to use a tube cap for the manifold but I was going to use a 1" cap then a 1" to 3/4" reducer and 3/4" pipe/fittings:

OP'er couple questions:

1) Three 3/8" holes seem to be a tight fit on a 1" cap how did you fit these in a 3/4"?

2) Can you give me hints on how you drilled the holes? (i.e. Did you use a step drill or progressively step up?)(I usually have bad luck with the bit grabbing thin metal like this)

Other options for this joint:

- mentioned here flare the ends after inserting them in the cap.
- I see you can get small cutoffs of 1" solid copper rod. I was thinking you could insert say a 3/8" thick piece of this into the 1" cap and drill the three holes and sweat this disk and 3-3/8" tubes.
- WOW! I see Jaded now has a custom made manifold that gives the 3/8" tubes maybe 3/16" of solder length and the fitting reduces to I believe 5/8" tube size that they use. (Trying to see if they will sell me the components above the 3/8" tubing.

Thoughts and suggestions welcomed.

Thanks,

Mike
 
Mine is not quite the same as Jaded's, but I liked the concept of splitting it into multiple coils. I just did two coils for simplicity. I was also concerned about the minimal contact for that joint, so I used copper reducers and a T-fitting. It worked out really well. I've used it several times now with great results. It requires a 1/4" to 1/2" reducer to transition from rigid to soft tubing. Those are hard to get for me locally. I ordered them from Amazon.

Here's my build on my WordPress site.
 
NeoBrew thanks for the link and info.

Yesterday I did a sample solder joint of the 3/8" tube to 1" cap. I put a small flare on the tube after inserting it into the cap. I haven't sweated copper pipe in some time but the joint came out very good. The solder flowed nicely around the flare and on the non flared end of the tube. I took a hammer and struck the tube a few times and the joint didn't get disturbed at all. I would have no problems lifting the weight of the chiller through just one soldered tube.

I also have discarded the idea to use 3/4" straight pipe and fittings to make the goose neck. I finally found a local plumbing supplier that sold cut lengths of 3/4" coiled soft tubing. This will eliminate many solder joints. Glad to get some good info on this site.

Mike
 
Nice build NeoBrew, definitely a possibility.

@ mbq: I think all soft tubing might be problematic with bending. I usually hold and shake the rigid pipe to speed wort chilling. I kinda use it like a handle.
Also do you think you can fit 3 flared 3/8" into the 1" cap? Just seems too big especially flared.
 
Finished up my chiller Saturday morning. Drilled the three 3/8" holes in the 1" cap and couldn't get the three tubes in it. Ends up the tubing was about 0.007" too big. So I had to drill 25/64" holes.

Also found, like questioned above, there is not only not enough space for flared end on the three tubes but once you slide them into the cap there is no way to get a flaring tool on them.

I soldered the two caps on without the reducer on then and seemed like no leaks. Then I soldered the remaining joints. I'm a bit embarrassed at the poor solder job I did but guess I can clean it up later with some sanding.

Hooked it up the a garden hose with no restriction on the outlet and no leaks (well, there was a small drip at the male pipe to hose adapter - might need more teflon tape). Then I totally blocked the outlet and still no leaks!

I had to try it out so I boiled 6-1/2 gallons of water and from flame out to 70F it took 4-1/2 minutes. Fantastic! Plus I was using one of those expanding hoses (regular hose was frozen) which I'm sure reduces the flow.

Again thanks for all the info I gathered here.


Here is the bending form I made on my wood lathe:


Mike
 
OP'er couple questions:

1) Three 3/8" holes seem to be a tight fit on a 1" cap how did you fit these in a 3/4"?

2) Can you give me hints on how you drilled the holes? (i.e. Did you use a step drill or progressively step up?)(I usually have bad luck with the bit grabbing thin metal like this)


Sorry for the delayed response, life has become very busy and my brewing/forum time has taken a severe hit.

1) It was a very very tight fit on the 3/4 cap but I managed.
2) I have metal bits that are for slow speed drilling with a starter on the tip. I just took it very slow.

I do like the mention about flaring the ends.

BTW nice build looks much better than my hack job.

No problem - thanks for getting back. I may build one with a 3/4" cap since it will eliminate a solder joint.

I forgot to mention I used a step drill from Harborfreight for the initial 3/8" hole and then a separate 25/64" bit. I used a clamp block on my drill press to hold the cap during drilling. The breakout of the holes was pretty nasty. Maybe I should have used the 25/64" bit from the other direction to reduce the tearout). I cleaned it up as well as I could but I don't think it bothers anything.

Mike
 
Back
Top