
Here is the build of my mobile beer dispenser. I wanted to be able to have up to 4 different home-brews and be able to pack them in and out easily (I am making two of these). Jockey boxes are great but I really want something more compact. I decided 2.5 gallons of each homebrew would be enough. So this is what I came up with:
Parts List:
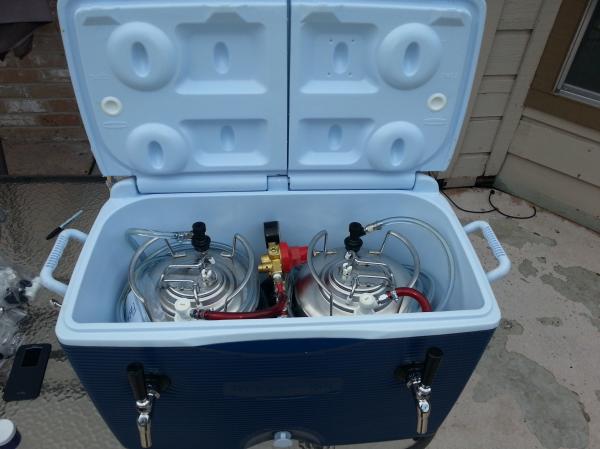
- 2 x 2.5 Gallon Ball Lock Keg W/ Metal Handles
These kegs are 13 inches high and 9 inches in diameter. These are the only ones I have tested, so I do not know if others will fit. A word of warning, I have five of these in various sizes that were ordered at different times. Four of them were great but one I received appeared to have the handles re-welded. When I was washing it out, the inside of the handle welds were rough and not sanitary. If you buy these be sure to check the inside welds of the handles. I did not have any problems exchanging it with AIH.
- Rubbermaid 45 qt. Blue Wheeled Cooler
This is a great cooler, it has wheels and a telescoping handle.
If you have a regulator, it will need to be modified a bit to fit inside the cooler. The high pressure gauge (tank pressure gauge) needs to be removed and the outlet plugged. The CGA580 tank fitting will also need to be replaced with a paintball adapter fitting. The threading on both of these will depend on the regulator you are using, make sure you check the threading of your regulator.
- Hex Plug " MPT
- Paintball Adapter II
Alternatively, AIH has a regulator that is modified like the above regulator:
The Adapter II Paintball Gauge
You will need either a Y adapter for the above regulator and might need one if you are modifying your own
- Brass Y For Regulator
and an additional shutoff check valve
-Taprite Check Valve with Duckbill Shut-Off
- 20oz CO2 Tank
- 2x 3" Shank
These really need to be 3" shanks. It can be done with larger shanks but they will need to be mounted higher on the cooler so that they are above than the keg bodies. Also, if you can get shanks with tail pieces, go with them (the above shanks do not have them). If not, you will need these:
- 2 x 3/16 tailpiece assembly
- 2 x Beer Faucets
I use Perlick faucets, I like them because they pour great, stay clean, are relatively maintenance free and they are monogrammed with my initial.") Of course you can use any that suit your needs.
Of course you can use any that suit your needs.
- 2x Tap Handles if your faucets to not already come with them
- 2x Gas Ball Lock White Disconnect Barbed or MFL with swivel nut and barb
- 2x Beer Ball Lock Disconnect Barbed or MFL with swivel nut and barb
- 2x 10 feet 3/16''ID x 7/16''OD Thick Wall PVC beer line
- 2x 1 foot 5/16''ID x 9/16''OD Thick Wall PVC Gas Line
- 8x Stainless Steel Adjustable Hose Clamps for beer and gas connections
Tools:
Measure and mark the location where you want to install the taps

Drill the holes for the shanks with the spade bit or hole saw.

If you are using the ⅞" spade bit, you will get some burrs on the inside of the cooler, trim these with a knife or razor blade.

...so that it is nice and clean

The split lids are removable. You might want to remove it at this point, it can get quite annoying closing on your head and arm.

Now install the 3" shanks. It is best to put the taps and shanks together before installing the shanks. It gives you something to grip when tightening them down.

Tighten them down until 3 or more full threads show through the back of the shank nut. It will dimple the back and front of the cooler, but that is okay. This gives enough room for the tail piece and keeps the taps from tilting to either side.


Now add the tail piece and rubber gasket and tighten down until it is nice and snug. If it does not tighten enough you will need to tighten the shank nut a bit more.

Now attach your 10 foot beer lines to the tail piece and the liquid disconnects use hose clamps to keep from leaking.

Finally attach the gas lines to the regulator and the gas disconnects and you are set


Parts List:
- 2 x 2.5 Gallon Ball Lock Keg W/ Metal Handles
These kegs are 13 inches high and 9 inches in diameter. These are the only ones I have tested, so I do not know if others will fit. A word of warning, I have five of these in various sizes that were ordered at different times. Four of them were great but one I received appeared to have the handles re-welded. When I was washing it out, the inside of the handle welds were rough and not sanitary. If you buy these be sure to check the inside welds of the handles. I did not have any problems exchanging it with AIH.
- Rubbermaid 45 qt. Blue Wheeled Cooler
This is a great cooler, it has wheels and a telescoping handle.
If you have a regulator, it will need to be modified a bit to fit inside the cooler. The high pressure gauge (tank pressure gauge) needs to be removed and the outlet plugged. The CGA580 tank fitting will also need to be replaced with a paintball adapter fitting. The threading on both of these will depend on the regulator you are using, make sure you check the threading of your regulator.
- Hex Plug " MPT
- Paintball Adapter II
Alternatively, AIH has a regulator that is modified like the above regulator:
The Adapter II Paintball Gauge
You will need either a Y adapter for the above regulator and might need one if you are modifying your own
- Brass Y For Regulator
and an additional shutoff check valve
-Taprite Check Valve with Duckbill Shut-Off
- 20oz CO2 Tank
- 2x 3" Shank
These really need to be 3" shanks. It can be done with larger shanks but they will need to be mounted higher on the cooler so that they are above than the keg bodies. Also, if you can get shanks with tail pieces, go with them (the above shanks do not have them). If not, you will need these:
- 2 x 3/16 tailpiece assembly
- 2 x Beer Faucets
I use Perlick faucets, I like them because they pour great, stay clean, are relatively maintenance free and they are monogrammed with my initial.
Of course you can use any that suit your needs.- 2x Tap Handles if your faucets to not already come with them
- 2x Gas Ball Lock White Disconnect Barbed or MFL with swivel nut and barb
- 2x Beer Ball Lock Disconnect Barbed or MFL with swivel nut and barb
- 2x 10 feet 3/16''ID x 7/16''OD Thick Wall PVC beer line
- 2x 1 foot 5/16''ID x 9/16''OD Thick Wall PVC Gas Line
- 8x Stainless Steel Adjustable Hose Clamps for beer and gas connections
Tools:
- ⅞ inch Hole saw or spade bit
- Drill
- Tape measure or yard stick
- Marker
- Flat and/or Phillips head screw drivers
Measure and mark the location where you want to install the taps
Drill the holes for the shanks with the spade bit or hole saw.
If you are using the ⅞" spade bit, you will get some burrs on the inside of the cooler, trim these with a knife or razor blade.
...so that it is nice and clean
The split lids are removable. You might want to remove it at this point, it can get quite annoying closing on your head and arm.
Now install the 3" shanks. It is best to put the taps and shanks together before installing the shanks. It gives you something to grip when tightening them down.
Tighten them down until 3 or more full threads show through the back of the shank nut. It will dimple the back and front of the cooler, but that is okay. This gives enough room for the tail piece and keeps the taps from tilting to either side.
Now add the tail piece and rubber gasket and tighten down until it is nice and snug. If it does not tighten enough you will need to tighten the shank nut a bit more.
Now attach your 10 foot beer lines to the tail piece and the liquid disconnects use hose clamps to keep from leaking.
Finally attach the gas lines to the regulator and the gas disconnects and you are set
