DIY Glycol Chiller

Homebrew Talk - Beer, Wine, Mead, & Cider Brewing Discussion Forum

Help Support Homebrew Talk - Beer, Wine, Mead, & Cider Brewing Discussion Forum:

This site may earn a commission from merchant affiliate links, including eBay, Amazon, and others.

vonski

Active Member
Joined
Oct 10, 2017
Messages
29
Reaction score
9
No brew experience yet... but refrigeration, I have the tools. Almost sourced everything need to do 10 gal batches. Decided to build a chiller before brewing to stay consistent. 1/3hp condensing unit and insulated 6 gal tub on a welded stand. Spent about $900. It's under vacuum now to ensure no leaks.
To do: program the XR60 cx, mount the temp probe and insulate the lid w/ bulkhead fittings, charge with 134a and list keeps going.
Wanted to post pics

20180310_164642.jpg

20180310_164718.jpg

20180308_222005.jpg

20180307_215211.jpg
 
That's cool looks good I'm building one out of an ac unit. Since you have the background maybe you can answer my question, my ac unit has an electronic thermostat. I'm thinking of just cutting the power leads for the compressor and the fan and wiring them together so I can use my own thermostat. My question is, is there anything else that is needed that I would be bypassing by using only the compressor and fan? Also where did you get the insulated tub? Cost? Also you should check out craftbeerpi for the controller.
 
Tecumseh 1/3hp 134a C/U $310, filter dryer $18, cap tube $12, XR60CX $111, cbox $17, Tank $63, Lid $23, insulation $32, evap copper 3/8” x 50' $38, 38x12 insulation $0.58 ft, Pig tail $12, electrical crimp ends pack $6, service cord $20, 5 gal glycol 70% w/blue die $63, Sheet metal $40, Steel and wheels guess $50+, zip ties and anchors $10, silicone $6 and …. It adds up, most prices with out tax and only the tank/lid had shipping costs.

Not enough time or $ to make my own tank, vacuum molded fiberglass and inject foam. Found usplastics Tamco 6 gallon tank #5349793 and lid #14563. The square shape should made it easy insulate with Home Cheapo 2”x4'x8” r7.7 Rigid Foam not the Styrofoam bs.
20171128_200610.jpg


Drew a plan.
20171119_171938.jpg


Local tin knocker made me a sheet metal box: a base (didn't use) and with two sides.
20180212_172450.jpg


Base is 1-1/2”x 1/2” rectangle tube and wheels (two strait and two swivel w/ locks), cut and mig welded together.

NO IDEA WHY I changed my mind, but bought a larger tank (10 or 11 gal), insulated and mounted it. Hated it and went back to the original plan. Don't ask why the lid is huge in the pic. Waist of $ and time. ( For Sale by the way)
20180225_160452.jpg


Back to the plan. Tank in, cut insulation to fit the sides and bottom. Silicone to stop air leaks that cause condensation. I didn't insulate to the top of the tanks lip edge that added an extra 1” of sheet metal hanging out the bottom. Had to make a small cut in the sheet metal but it fit over the steel base to easily screw together.

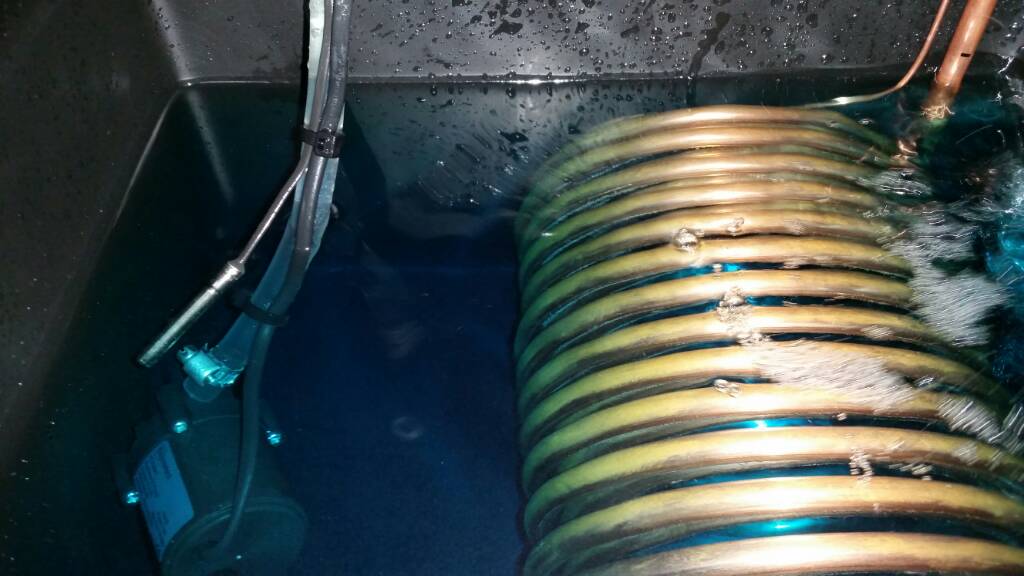
3/8 refrigeration soft copper is used as the evaporator. It is super easy to bend and super easy to kink. Must be supported at all times when bending or rolling. Hand rolled 50 ft 3/8 soft copper around 4 inch abs with rubber coupler to add more OD. 14 wraps and 14 wraps back over itself, with enough to pipe to the unit.

Don't ask about the beer or outdated calendar of women in waders. Bent the copper to the suction on the compressor, insulate and sweat the cap tube in. Nitrogen purge always when sweating copper to keep the inside clean. 15% Silver will handle high psi no fux needed. Cap tube length and ID is determined by gas, HP and temp range. Trick is to use a wire stripper to score the tube enough and brake it off clean not to influence the ID. I used .040 ID and 79” to target a medium temp range. C/U is rated at high temp. We will see how it goes.
20180309_200233.jpg


Used a Dixel XR60CX 120v universal controller in a cbox, comes with 2 nickel temp probes (might have to go Stainless). It can interface out to the net, alarms, psi controls and the list goes on... Look at that later. Need to setup temp parameters and the defrost cycle. Defrost to stop ice build up. It does a ton I will never use. Best part there is a hot key to copy and easily load on another controller. Check out xr60 Emerson installation start up pdf.
 
Cap tube is backwards. Used almost every inch of the Evap coil. In a vacuum. Torched some insulation.
20180314_213832.jpg


Knife used to cut the board insulation with.
20180317_213530.jpg


120V power. Making this post I realized I wired it with the neutral to the overload hot. Fixed that.
20180318_150051.jpg

Power to the controller, #1 and #6. Controller Comp load #5 to overload with C/F fan. Comp runs, fan runs.
Netural to controller #7, comp current relay #2 with fan.
Ground to the compressor and base.
Temp probe to #11 and #12
2018-03-17%2020.49.40.jpg


Drilled holes in the lid, screwed the 90 degree npt to barb fittings directly in the lid. Ferm control pump in the front and discharge in the back over the evap. Don't like the splash it makes, fix later.
20180317_201505.jpg


20180317_201715.jpg


Used copper to setup a mock ferm to test load and charge the system. 50/50 glycol and DI water.
20180318_164449.jpg


Ground check okay. Spent hours trying to wire the probe. P1 and P2 error... Re-read the directions, realized the the temp probe is not for the evap but the room temp. Set controller to off cycle defrost initiated / temperature treminated TC3 and set the temp target at 34 degrees. Disabled the evap temp probe to get rid of the P2 error.

Tried to weight in the refrigerant charge but screwed that up. Charging to superheat. Runs like a champ.

Later seal and insulate the top. Maybe a sheet metal cover. Oh yea, brew some beer.

What target temp do I run?
 

Attachments

  • 20180317_201511.jpg
    20180317_201511.jpg
    69.4 KB · Views: 145
What target temp do I run?

I have a similar question myself. I've not found a definitive answer yet.

I suppose it depends on what you want to do with it, and how much beer you're trying to control.

I use a draft line glycol chiller for my setup, and have it set to 19F -- I've read many places that you want to be about 15F lower than your lowest set point.. (and you want your glycol mix to have a freeze point 20F below your setpoint to prevent freezing on the coils/etc.. )

I typically keep primary fermentation in the 50F to 70F range depending on the style I'm doing.. but then I cold-crash or lager at 35F..

if I'm in the beginning of the fermentation cycle and won't need to cold crash for a week or two, I'll raise my glycol temp to 40F, since that allows the chiller to run less.
 
Back
Top