DIY glycol chilled plastic conical fermenters

Homebrew Talk - Beer, Wine, Mead, & Cider Brewing Discussion Forum

Help Support Homebrew Talk - Beer, Wine, Mead, & Cider Brewing Discussion Forum:

This site may earn a commission from merchant affiliate links, including eBay, Amazon, and others.
FYI, I have the pages all assembled. I think they're all accounted for. Many are a bit rough, and I will not be able to scan them with document feeder. Hand scan. It's going to take some time. Plus I cannot start for a couple of weeks at least. If there is something critical you need now I can try to tell you, but please be patient or maybe the HBT member with the raw HTML can send to you in meantime.

TD
 
I have finished scanning in all available pages from the now defunct www.plasticconical.com site.
The files were scanned in color from color printouts of the web page. some are cropped, but some aren't. The full file size is 133MB zipped.
let me know via PM if anyone is interested in having this. 133MB is really big, and I might be able to send the component parts individually, though this would be challenging. It may be easier to setup a personal space on my home network for folks to download.

at any rate. it is available.

TD
 
I made the coil just small enough to squeeze through the opening then expanded it a little to reach the holes through the top once it was inside. I use a cip spray ball the 1/2" one from brewershardware it works good, no need so far to remove the coil. If needed though I can just remove the compression nuts and the orings that seal the nuts to remove the coil.
Chrisl77,
I have not had any luck with sealing the lid and my last batch had some funk to it (not a good funk). I am planning on switching to the plastic lid like yours, but have a couple of qustions. What type of plastic did you use for the lid and what is the thickness? Also, what pump are you using for your CIP with the spray ball?
 
wow, a 1/3 hp pump! I bought two pumps: 1/6 & 1/4 HP as I recall, one for the glycol, one for the CIP duty. forget which is which.

I'm fermenting my first beer now. Its been going for a week, and doesn't taste bad, but I don't think it's entirely air-tight. I had left for vacation the morning after I pitched the yeast. I have not seen any air-lock/blow-off bubbling, but probably missed most of the fermentation. Its at about 62%AE with expected 82%, though I stupidly screwed up my mash and mashed waaayyy too high. Might finish a little higher than planned. I might ultimately consider changing over to stainless if I end up with any non-intentional sour beer.

TD
 
It's hard to leak test these.

I think the best way is to see if you get blow off tube bubbling activity. I tried to pressurize mine and spray down some dish soap and water on the parts that are supposed to be air tight. It made a mess, and I never saw any bubbles. But I don't know how much pressure I would need in order to tell if I was fine or not. Again, no bubbling in blow off after first week of fermentation, and it has a few more points to go still. I suppose one way to tell is by tasting the finished beer and see if it tastes oxidized or infected, that might be a sign of air leak, though infection could also be from contaminated plastic that resists sanitization.

The original design does call for air tight fittings on the glycol and blow-off/CIP stem using O rings, washers and nuts. The lid was never really detailed as far as how to get it airtight. Near air tight might be good enough though.

I have seen some stainless conicals that could be easily adapted to my system, and I might eventually go that route. Though it would require significant fiddling around in order to pull it off: reapplying insulation, finding a way to get the tanks to fit into the cut-outs, and finding a tank that would have the appropriate ports in the right locations to work with my setup. Funny thing is that the blichman 13.3 gallon is nearly a perfect fit, if it weren't for the price. I already have all the TC fittings which are nearly half the expense, and the compression fittings for the glycol.

TD


Sent from my iPad using Home Brew
 
On my plastic inductor tanks I make the lid air tight by removing the thread ring,and then buying a foamy plastic weather sealer for doors that you can get at Lowes and the like. It is the only one that Lowe's carries with a double bead.
and a sticky side like this:
077578012551sm.jpg


The one at Lowe's is white and that's what I use. I leave it doubled up and run it just right up next to the holes all the way around the top of the Inductor Tank after removing the threaded flange ring. Then I put the flange ring back on. This sandwiches one of the double seals under the flange ring. The remainder of the 8.5 ft weather seal roll I put on the under side of the lid where the flange and the lid come together. This makes the Inductor tank air tight.
 
Anyone have any info on how to program the BCS? I have my system all built, now just having an issue with the programming. I am only using the BCS-462 to control 6 ferm tanks and the glycol cooler (as well as pump), so should be fairly simple. I am just a moron when it comes to this type of thing. Any help would be incredibly appreciated. Thanks all!
 
PM sent. I can send you packet's original walk through instructions on how to do this. It's easy. I was intimidated by the BCS interface and still am, but Packet's instructions are simple and do what you'll need.

TD


Sent from my iPad using Home Brew
 
I sent out the files so far to seven members. haven't heard back if they had any problems with accessing via Google Drive.

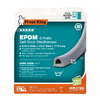
Ordered that Frost King Tape to achieve air tightness. For the inner ring of the lid, I applied a crap-ton of Silicone sealant, then screwed it back onto the conical. For two others, I skipped the screws.

I bought the manway gasket for the lid, and I really don't think its air tight. I bought them before the person suggesting them reported they didn't do the trick.

TD
 
Hey Tricky. I received all the scan files that you sent last night. Just as a heads up for yourself, I think a couple pages are out of order, but non-the-less, an awesome and crucial save on your behalf. Thank you so much for the contribution! Just one question, for anyone reallly; When building the ladder logic so the glycol pump runs anytime any of the coils is activated, or the ac unit is activated, how do I set it up to run the ac and 6 tanks? Just mimic what was applied to rung 0-3 on rungs 4-6 and add the same output 7 on the right hand side? If this doesn't make sense, let me know and I will try and explain better. Thanks all, and especially Tricky!!
 
I'm not entirely sure the answer to your question, but I think you're on the right track. I'd just duplicate the same settings for all of the tanks/processes in the ladder logic setup area.

You should have instructions on setup of the hysteresis, which will let you control how wide you'll want your setpoint to fluctuate. I think I have mine set at about two or three degrees, and for the most part, the fermentation stays where it is supposed to be.

TD


Sent from my iPad using Home Brew
 
I was wondering if I could get in on receiving those pages. I was pretty disappointed when the website went down, but alas, a save!
 
I would like to know if anyone has had a problem with their comp fittings leaking inside the fermenter. I work with these daily and tho we normally do not have problems, we do have leaks.
 
I would like to know if anyone has had a problem with their comp fittings leaking inside the fermenter. I work with these daily and tho we normally do not have problems, we do have leaks.


This is why all my connections to the glycol chiller are outside the fermentor ... Because I didn't trust the connections well enough to be on the inside - nor do I think I'd notice a very slow leak if it happened on the inside.


Sent from my iPhone using Home Brew
 
If you really wanted to test for a leak INSIDE the fermentor, even though it is FOOD GRADE SAFE PPG I am using, you could drain the the tank, and run a simulated fermentation at ambient temps to avoid condensation, and then you could see if any fluid accumulated inside.

TD
 
BTW- I've had numerous requests for the PDF scans of printouts from packet's original instructions.

if you have NOT been sent the files, AND have previously requested, let me know and I can send to you.

I think I might have deleted or lost one of the recent requests

TD
 
I'm not entirely sure the answer to your question, but I think you're on the right track. I'd just duplicate the same settings for all of the tanks/processes in the ladder logic setup area.

You should have instructions on setup of the hysteresis, which will let you control how wide you'll want your setpoint to fluctuate. I think I have mine set at about two or three degrees, and for the most part, the fermentation stays where it is supposed to be.

TD

If you look at the ladder logic, each "section" vertically is broken into 4 "rungs". The way that packet has it laid out, it fits in the first section, due to only having 3 fermentors. My question comes when adding additional fermentors. Do I add them horizontally to the left, or do I repeat the process in the next section down, but utilizing the same "OUT" process ("OUT7" on the right) as the section above? My assumption being, that I could keep going down, and as long as I labeled the end function on the right the same as the section above, it would still run through the same final process (being that all of the fermentors would activate the glycol pump). Make any sense at all? if not, my apologies, just got off another 14 hr day at work lol.
 
I think you'll have better luck posting this on the embedded control concepts forum or in the electric brewing thread. I really don't fully understand the ladder logic stuff, and I'm afraid I have no clue how to answer your question.
Jon, one of the developers I think, over on the ECC forum could probably give you the direct answers you need.

TD


Sent from my iPad using Home Brew
 
I was wondering if I could get in on receiving those pages. I was pretty disappointed when the website went down, but alas, a save!


For all who want the pages, send me your email address and I will send to you via Google drive

Another member might host the file so as to make my life simpler.

A while back someone posted that they had the HTML pages from the defunct plastic conical site? If so I might like a copy of those too.

Also, as an FYI, there had been some changes to the Driver board wiring on the plastic conical site, since I printed out my page. I may have made the annotation. I'll need to verify what that change was, but it didn't seem to be anything critical. I think it was the ground connection.

TD


Sent from my iPad using Home Brew
 
I would like to know if anyone has had a problem with their comp fittings leaking inside the fermenter. I work with these daily and tho we normally do not have problems, we do have leaks.


Oh there is no leak on the compression fittings! I had a problem last night with my system that had been described before.

I had been connecting the cooling coil to chill some cider I'm making, and the hoses were not long enough to allow it to rest in the fermentation bucket I'm using for the cider, without disconnecting them first. Anyway, I chilled the cider and then disconnected the coolant QDs. Even for just a short while, the coolant in the coils warmed up enough to make it impossible to connect the QDs back into the coil. If there was going to be a coolant leak, it would have dissipated the pressure. I ended up using a rubber mallet on the QD to overcome the pressure and release some coolant.

Word to the wise: don't disconnect the coolant QD fittings while cold. Consider making your tubing a bit on the longer side for these connections.

TD


Sent from my iPad using Home Brew
 
Im about to build one of these setups. I got in on the Kickstarter for the Bru-Gear conicals and am waiting for them to arrive. One of the questions I have is do the coolant quick disconnects need to be stainless? I'm not finding any that are not made of steal.
 
Not sure about the necessity for stainless. The PEX fittings after all are brass. The coolant I used has additives to prevent corrosion and fungal growth and a pigment to help detect leaks, and is food safe. That said, I wouldn't want it in my beer. The QD's by the way, do leak a fair bit of coolant when used: more than a few drops, less than an ounce. I'd guess between a teaspoon and tablespoon worth.

I have been KEENLY eyeing those Bru-gear tanks and also the kettles. Its hard to get through to them by email. I'm wanting to go all electric and not sure if I just want to convert my 15 gallon Blichmann kettles with the boil coil, or go another route. I'd really like to upsize to 20 gallon kettles. Bottom line is, PLEASE let me know when you get your conical and and other reviews about Bru-Gear.

TD

FYI- i sent out the files to all who have requested to date.
 
For all who want the pages, send me your email address and I will send to you via Google drive

Another member might host the file so as to make my life simpler.

A while back someone posted that they had the HTML pages from the defunct plastic conical site? If so I might like a copy of those too.

Also, as an FYI, there had been some changes to the Driver board wiring on the plastic conical site, since I printed out my page. I may have made the annotation. I'll need to verify what that change was, but it didn't seem to be anything critical. I think it was the ground connection.

TD


Sent from my iPad using Home Brew

I've got a blog i had been meaning to revamp for my homebrewing. I can host them there if you'd like.
 
Borderlands... Sorry.


Sent from my iPad using Home Brew

No problems my man, also just noticed you were near Orlando. It's a little off topic but I'm in Oviedo myself. Any recommendation for brew clubs around these parts?
 
On my plastic inductor tanks I make the lid air tight by removing the thread ring,and then buying a foamy plastic weather sealer for doors that you can get at Lowes and the like. It is the only one that Lowe's carries with a double bead.
and a sticky side like this:
077578012551sm.jpg


The one at Lowe's is white and that's what I use. I leave it doubled up and run it just right up next to the holes all the way around the top of the Inductor Tank after removing the threaded flange ring. Then I put the flange ring back on. This sandwiches one of the double seals under the flange ring. The remainder of the 8.5 ft weather seal roll I put on the under side of the lid where the flange and the lid come together. This makes the Inductor tank air tight.


I bought some of this stuff. Please post a pic of how you applied it. My lids are most probably NOT air tight.

Thanks!

TD
 
Remove the lid, and then remove the screws holding in the lid's screw in flange. Next apply the the seal around the top allowing the seal to go right up to and slightly over the holes that secure the flange to the inductor tank.
10676226_10205064437593689_4072572439993536759_n.jpg


Take the remainder of the seal and simply apply it around the underside of the lid.

1939420_10205064436833670_1994439091621699674_n.jpg


Half of seal should remain under the flange when done.

1236844_10205064438513712_1713801716698712394_n.jpg


The seal under the Flange seals that part of the fermenter and the screw in lid is sealed by the ring on the under side of the lid. The white color made it difficult while taking pictures. I feel the white seal is better than the gray because the white shows any dirt or dried beer. The seal can take bleach, PBW, Star san, and or rubbing alcohol. During the taking of these pictures I inspected for any dried beer between the seal and the flange and there was none. I have used this conical for years... so its water and beer tight as well.

10635727_10205064434473611_8792822225168958899_n.jpg


Hope this helps
 
Thanks a ton!

Nice pics! What are the block-like components in the last picture?

The flange I had actually sealed with a generous amount of silicone directly to the tanks, so trying to remove that now would likely prove impossible. I think mine have air leaks through the lid to flange contact point.

I am hoping that one roll will let me do three lids (no flanges).

Any tricks to getting the straight moulding into a curved application without wrinkles?

TD

Oh, and by the way, for any who've sent me a PM requesting the PDF scans but haven't yet received them, please try downloading them from the member who has hosted them on his home webpage - he has posted a link in his sig.
 
I have been KEENLY eyeing those Bru-gear tanks and also the kettles. Its hard to get through to them by email. I'm wanting to go all electric and not sure if I just want to convert my 15 gallon Blichmann kettles with the boil coil, or go another route. I'd really like to upsize to 20 gallon kettles. Bottom line is, PLEASE let me know when you get your conical and and other reviews about Bru-Gear.

As an update on the Bru Gear fermentors, I got an email from them with the pictures of the final product. They look good and I am happy with the changes that were made for the final product (as far as the pictures go at least). This is their facebook page and there are some pictures on there of the fermentors: https://www.facebook.com/BruGear

As far as I know they are only fulfilling kickstarter backers right now but who knows what their future will bring. I did order 3 tanks and am not sure if Ill need/have space for more than 2 :(
 
No big secret the curve is gradual enough and the seal is quite pliable. The items that look like blocks are my old chilling system that doesn't work real well. They are salt water aquarium chillers. One arrived slightly damaged so they sent another, and told me to leave the other one out for UPS..... No one ever took it so I installed both after the one just wasn't getting it done. I'll be trashing this fermenter and buying 2 new ones when I go to the new glycol chiller, and putting the peltier chillers on a bucket.
:D
 

Latest posts

Back
Top