
Inspired by HomeBrewTalk members. Thanks to all of those who have posted on this topic.
First step; find the refrigerator for the best price. Got mine on Amazon for $169 with free shipping.


Next, remove and modify the door. The model that I bought had the interior door panel glued on. I carefully removed the seal and shelving and cut the panel flat. I then glued a piece of white paneling on to make it visually appealing. I've seen many other great ideas, such as a dry erase board.


On to the tower I chose to drill a 3 inch hole to accommodate the custom shaft/false top hold down that I conjured up using standard plumbing PVC (I get into this later in the article). I found it easier to drill the hole from the inside as opposed to from the outside. To each his own, I guess. Just be careful not to drill through anything you are not supposed to.


Now on to the access hole. I chose to drill a hole through the shelf at the bottom of the refrigerator to accommodate my temperature controller probe and electrical line for my tower cooling fan. Basically, it's an access hole for pretty much anything you need to run into the refrigerator from the outside. It could be made bigger or smaller to accommodate your needs. I used stand plumbing PVC.


Time to fix the interior light switch. Because I modified the door, the light switch no longer has the ability to be turned on and off when the door is opened and closed. For now, a paperclip will solve that problem. I used pliers to bend the paperclip. I actually had to do it several times before getting it right.

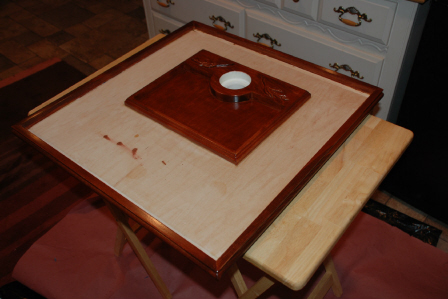
Next, the false top. I used 2 pieces of inch plywood. The first to raise the top above the door hinge (notice the notch for the hinge). The second as the base for everything to come.


In the middle of the last step I created the custom shaft/false top hold down and mounted it in between the tower wood mount and false base.


Time to cut the tiles. I cheated and rented a tile cutter from Home Depot. The tiles are glass.


Stain and polyurethane. I chose MinWax Red Chestnut and semi-gloss polyurethane.
Glue tiles to base. Use the right adhesive for the job. I used special adhesive for glass tiles.

Grout tiles. The grout color I chose was Delorean Gray.

Mount tower. I chose to purchase a dual tower and drip tray from our friend Brian at Birdman Brewing.

Mount false top to refrigerator. This is were the custom shaft/hold down comes in.

For all of the pictures, see the following link.
http://photos.johnborsch.com/FullScreenSlideShow.aspx?gallery=3642075&mt=Photo
I hope you like it.
John

First step; find the refrigerator for the best price. Got mine on Amazon for $169 with free shipping.
Next, remove and modify the door. The model that I bought had the interior door panel glued on. I carefully removed the seal and shelving and cut the panel flat. I then glued a piece of white paneling on to make it visually appealing. I've seen many other great ideas, such as a dry erase board.
On to the tower I chose to drill a 3 inch hole to accommodate the custom shaft/false top hold down that I conjured up using standard plumbing PVC (I get into this later in the article). I found it easier to drill the hole from the inside as opposed to from the outside. To each his own, I guess. Just be careful not to drill through anything you are not supposed to.
Now on to the access hole. I chose to drill a hole through the shelf at the bottom of the refrigerator to accommodate my temperature controller probe and electrical line for my tower cooling fan. Basically, it's an access hole for pretty much anything you need to run into the refrigerator from the outside. It could be made bigger or smaller to accommodate your needs. I used stand plumbing PVC.
Time to fix the interior light switch. Because I modified the door, the light switch no longer has the ability to be turned on and off when the door is opened and closed. For now, a paperclip will solve that problem. I used pliers to bend the paperclip. I actually had to do it several times before getting it right.
Next, the false top. I used 2 pieces of inch plywood. The first to raise the top above the door hinge (notice the notch for the hinge). The second as the base for everything to come.
In the middle of the last step I created the custom shaft/false top hold down and mounted it in between the tower wood mount and false base.
Time to cut the tiles. I cheated and rented a tile cutter from Home Depot. The tiles are glass.
Stain and polyurethane. I chose MinWax Red Chestnut and semi-gloss polyurethane.
Glue tiles to base. Use the right adhesive for the job. I used special adhesive for glass tiles.
Grout tiles. The grout color I chose was Delorean Gray.
Mount tower. I chose to purchase a dual tower and drip tray from our friend Brian at Birdman Brewing.
Mount false top to refrigerator. This is were the custom shaft/hold down comes in.
For all of the pictures, see the following link.
http://photos.johnborsch.com/FullScreenSlideShow.aspx?gallery=3642075&mt=Photo
I hope you like it.
John