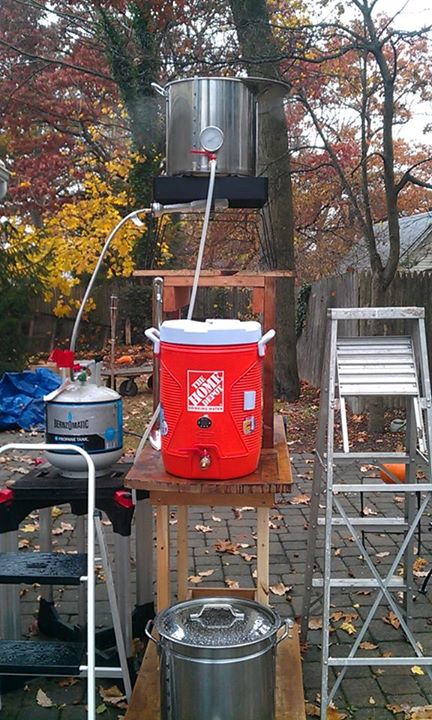
Couple extracts under the belt... ideas for good starter all grain setup

Homebrew Talk - Beer, Wine, Mead, & Cider Brewing Discussion Forum

Help Support Homebrew Talk - Beer, Wine, Mead, & Cider Brewing Discussion Forum:

This site may earn a commission from merchant affiliate links, including eBay, Amazon, and others.

canofworms

Active Member
Joined
Jul 16, 2014
Messages
44
Reaction score
9
Location
Southern California
So have done 2 successful extract brews (NB Pliny and NB Caribou Slobber) and have two more kits I plan on brewing in the next 2 weeks. Have a fermentation chest (thanks to sunny California) and 3 keg keezer setup working well.

Looking forward to trying an all grain brew soon and have done a good bit of research on the different setups. Looking for any advice on which route to go. Would like to purchase equipment that will be able to serve me well as my setup evolves.

Any help would be greatly appreciated!
 
What equipment do you have now? How big is your pot?
I recommend BIAB. If your LHBS doesn't sell bags then buy from brewinabag.com. They're very good quality bags, so easy to use and clean, and the owners are upstanding and respectable to their customers. Quality and professionalism go a very long way with me. :)

BIAB is a great way to get started in all grain without a massive investment. The pot will be where you'll spend some cash if you don't have a large one already.
 
I also have to recommend BIAB. I like doing it so well that I have no plans on ever doing it any other way. It simply works great.
 
If you decide to do conventional all-grain, here is a basic set-up for outdoor or garage brewing. (See the attachment for a picture of an earlier system that I used.) It allows you both to control temperature and fine-tune your process to ensure proper sanitation. This is for 5 gallon infusion mashes.

10 gallon hot water tun
10 gallon insulated water cooler (Rubbermaid) - for sparging.
10 gallon boil kettle
2-Tier gravity stand
Two high pressure burners
Two propane tanks
Large, metal spoon
A good digital thermometer
Hydrometer ( a refractometer is nice, too, but not necessary)
High temp silicon tubing
Immersion chiller
Fermentation chamber (I use glass carboys and a temperature-controlled chest freezer)


Put your hot water tun on a burner at the higher tier. I built my two-tier system out of an old children's workbench salvaged from my school, and some 2x4's. It;s ugly but it works for me. I load mine one gallon at a time and fire it up first thing in the morning. A sight glass and a thermometer are convenient but not necessary. I always leave a smaller, second pot on the stove with hot water - because you never know when you're going to need hot water, and it also helps with clean up. If I need to transfer water, I use 1 gallon plastic water jugs.

A ten gallon insulated cooler will allow you to brew beers with a higher gravity. You won't regret the relatively small initial investment over a 5 gallon cooler. I put in a digital thermometer from Brewhardware.com because I like to know what my mash temps are without having to open the cooler.The installation is a bit tricky but you can probably purchase one pre-made from somewhere if you want. Put in a bazooka screen and you can both batch sparge and fly-sparge. I rest high temperature silicon tubing on the top of my mash when I am ready to fly sparge and go very slowly; as long as there is a least an inch of water on the top and I go slowly, I don't run into issues with channeling, because the pressure of the water level on top remains fairly constant.

Don't bother getting fancy with your boil kettle. You're boiling wort. A sight glass and analogue thermometer are not necessary. Figure out your levels and mark them on a large metal spoon using a grinding tool of some kind. I used a dremel tool and a metal grinding bit, but a drill will work here too (or a metal file). A digital thermometer will let you know when the temperature has fallen sufficiently after cooling the wort to start transferring to the fermenter. The only heavy lifting that I do using my gravity process is to lift the cooled boil kettle onto the first tier so that I can transfer to fermenter. Six gallons of wort is heavy but not impossible to lift to the level of my waist. Just make sure that you’ve cooled it down beforehand…

You can mash in the insulated cooler by adding hot water to the grain and stirring it. Programs like BrewSmith will allow you to figure out how much water to add to how much mash, etc. (Add hot water to raise the temperature, or cold water to lower the temperature, if you need to. The goal, though, is to mash for 60 - 90 minutes without having to adjust the temperature.) Lately I've been mashing-in with cold water in my boil kettle and slowly bringing the temperature up to two degrees higher than my mash temperature. When I transfer the hot mash into the cooler, it generally falls back to the temperature that I want, and only falls a degree or two further during the mash. I clean out my boil kettle during the mashing process, and then I'm ready to sparge.

I put a small bazooka screen in my boil kettle because frankly, I suck at whirl-pooling. I also use Irish Moss finings 10 minutes before the end of boil, and gelatin before cold-crashing my fermenter and transferring to a keg. I ferment in glass carboys, using a temperature-controlled chest freezer as a fermentation chamber.

I am moving away from infusion mashes and am learning how to do decoctions - but this is just another aspect of controlling temperatures for specific times during the mash, and employing a longer fermentaion and aging process. Decoctions are also more labor intensive and involve more toys. The outline above is more than sufficient for ales.

5 gallon system.jpg
 
I would say it depends on how much you are willing to invest. I just brewed my first all grain batch last weekend. The new gear I invested in was done on the cheap, but it worked out nicely. I put together a 15 gallon aluminum kettle, to include drilling out the holes for and installing the spigot and thermometer, for under $100. For my mash ton, I did the basic 10 gallon home depot cooler and installed the spigot. I just bought a SS braided water heater line and removed the inner plastic lining turning it into a mesh screen. I didn't get any blockages. The cooler setup probably cost me $60-$75.

I don't have a hot liquid tank (which i will remedy eventually), so I just used a cleaned/sanitized bottling bucket to hold my wort while sparging.

If I had $500 at the time I put this together to dump into it, I may have just bought a pre-built setup from my local home brew supply store, to include a SS kettle, but the aluminum kettle worked fine (it's super light and durable enough and it seems faster to heat liquid up).
 
My only advice, don't start with an 8gal kettle.

Its just not enough! I struggled with actually bottling 5 gallons for a long time and this has a lot to do with it.
Get something big enough to account for all the loss.
 
I went big for my very first setup so I can grow into it. Its a HERMS system. For kettles, I bought jarhills 96/70/49 qt stainless stock pots. in gallons, equates to 24/17.5/12.25 gal. On ebay, the 96qt stainless is going for 39.99. if you can find a better deal on stainless, let me know. I had no issue with boiling over at all in the 96qt which I use as my BK and MLT (I bought 2 sets). I was going to turn the 49qt into a conical fermenter by cutting the bottom out and welding a cone to it, but that didn't work, so im going with a Toledo Metal Spinning custom model.
For the stand, I went with a wooden single tier Brutus 10ish design. I went with wood just because I am better working with it. 3 piece ball valves were purchased from jaded brewing for 9.99/per. couldn't beat the price.
Sight glasses for the kettles, weldless bulkheads, silicon tubing, thermometers, and camlocks were purchased from BobbyM.
A chugger pump was purchased from morebeer.com as they had it on sale for $96 I believe. The HERMS coil was purchased as a copper coil from an online metal retailer. The burners are the BG-12 which I got from amazon. I also bought a LP orifice for them for $7/per burner. The regulator (bayou classic) for the burners I just got at lowes for $20-30.
Total, I am im around $1100, but that included a minifridge and building a ferm chamber with insulation etc, a sheet of steel for the cone (conical), and other incidentals that you already will have. I also keg my brew. Your cost will be significantly lower than mine was. If you'd like more info, or parts needed, feel free to PM me.:mug: Yes, my gas manifold is dangling. I am tinkering on it.

IMG_0291[1].jpg
 
My only advice, don't start with an 8gal kettle.

Its just not enough! I struggled with actually bottling 5 gallons for a long time and this has a lot to do with it.
Get something big enough to account for all the loss.

Agreed. I typically lose 1 to 1.5 gallons an hour during the boil and another quarter gallon due to trub, mash tun space below the spigot, and contraction of wort during cooling. Since I typically boil for 90 minutes, that means that I can lose up to 2.5 gallons of wort during the boil. In addition, you need some head space in the boil kettle to help avoid boil-overs. Get a 10 gallon boil pot for 5 gallon batches. You won't regret it.
 
What equipment do you have now? How big is your pot?
I recommend BIAB. If your LHBS doesn't sell bags then buy from brewinabag.com. They're very good quality bags, so easy to use and clean, and the owners are upstanding and respectable to their customers. Quality and professionalism go a very long way with me. :)

BIAB is a great way to get started in all grain without a massive investment. The pot will be where you'll spend some cash if you don't have a large one already.


Wow, Thanks to all for the replies! Great Forum!

So I know my first regret in this process was going to be my 8 gallon brew pot I purchase. Has been great for full wort boils of extract but now see the error of my ways....

My equipment is pretty normal extract stuff:
8 Gallon Mega pot
Darkstar burner
SS immersion wort chiller
2 - 6 gallon primary glass carboys
1 - 5 gallon secondary (Only used once for the DIPA to try and get it a bit clearer)
and the normal other small bits and pieces, bungs, blow off tubes and such.

So sounds like I have to upgrade the brew pot as well.

Maybe a stupid question but is a wood brew stand safe with burners so close??
 
Yeah, if you don't already have the full boil side of things, 10gal kettle for 5gal batches + burner + immersion chiller is pretty vital.


Really outside of that, if you look at BIAB and find it's not for you, I'd say go the cooler + fitments + either braided hose and/or manifold route to get started on a mash tun. A gravity-fed 2-tier 2-burner setup or a 3-kettle pump-driven HERMS might be a bit much to bite off for a "starter" setup. I still heat up strike / sparge water in kettles I had from my extract days on the stove. If you don't have a decent thermometer consider that too, or if you do go cheap, check it for calibration in ice water here and there (and possibly at mash temps with another thermometer if you have any fellow brewers over on brew day, etc).


Next step past that I would say would be a crusher so you can store uncrushed grains longer / control your crush / condition grain if you wish.
 
Wow, Thanks to all for the replies! Great Forum!

Maybe a stupid question but is a wood brew stand safe with burners so close??

Not stupid at all! In fact, I did have the wood char, as I knew it would, but I was impatient and wanted to get my first brew in. It didn't char when I didn't have a heat shield on to guard the thermometers, but when I installed the heat shields due to thermometers shutting off because they were too hot was when they began to char due to the heat having no where to escape. I lined the inside front (the part that charred) with cement board and never had an issue since. I mimicked scubasteves build from this forum located here: https://www.homebrewtalk.com/f11/scubas-herms-build-36267/
 
My advice is to be patient and get the good stuff.

I waited a full year before I bought a single piece (straight to all-grain, skipped extract). If you wait and keep looking on craigslist you'll eventually find great deals.

I would also caution you to really think about the common advice to go big. I went with 15 gallon kettles thinking I could go back and fourth between 5 gallon batches and 10 gallon, but I was wrong. The placement of the thermo's on these big kettles make it impossible to do smaller batches.

Cheers! It'll be fun no matter what you do.
 
If you need to do things on a cheaper scale (I had to, I'm a college student), $30 cooler with plumbing fittings, a SS braided water supply for a filter in your grain bed, and a cheap burner work just fine. So does my 10 gallon aluminum bill kettle, you just have to do a hard bill on our before using it to brew. I never tried BIAB but I've heard great things.
 
Back
Top