Cake pan + skateboard wheel + bike brakes = homemade peristaltic pump??

Homebrew Talk - Beer, Wine, Mead, & Cider Brewing Discussion Forum

Help Support Homebrew Talk - Beer, Wine, Mead, & Cider Brewing Discussion Forum:

This site may earn a commission from merchant affiliate links, including eBay, Amazon, and others.
WOW! This is an awesome build!! Going to look up parts now! Where did you find the 2 piece metal hose clamps?

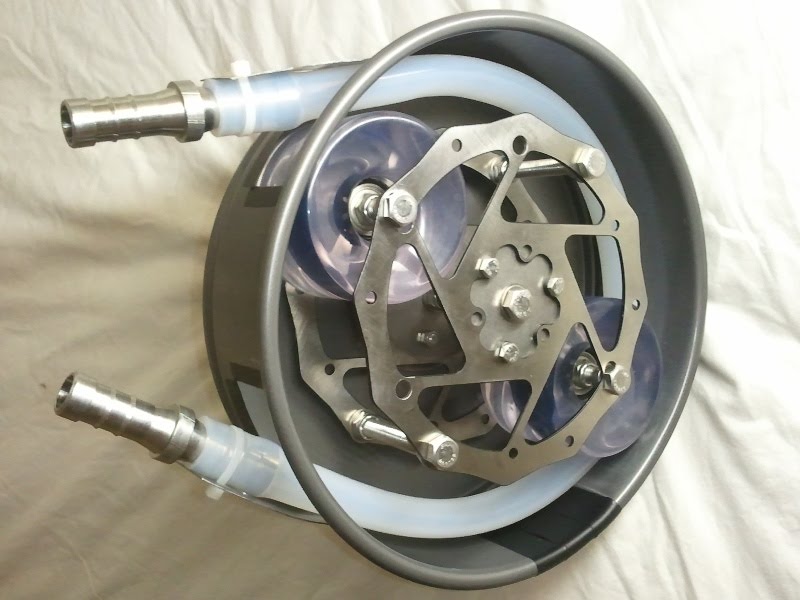
I think you might be referring to the 3/4" Triclamp to 1/2" tube adapters, they were purchased from eBay and can be rather hard to find. 1" triclamps are more common. A stainless hose barb coupler or other fitting could also be used. The idea here is that you can tighten down the tube so it doesn't slip in or out of the pump but it won't compress the actually tubing.

Sweet build man !!!
I was just thinking. If a kernel of grain or a hop particle got caught under the wheel it might get smashed in to the tubing causing some sanitation issues or premature wear on the tubing.

maybe that's why the dude in the youtube video had them spring loaded?

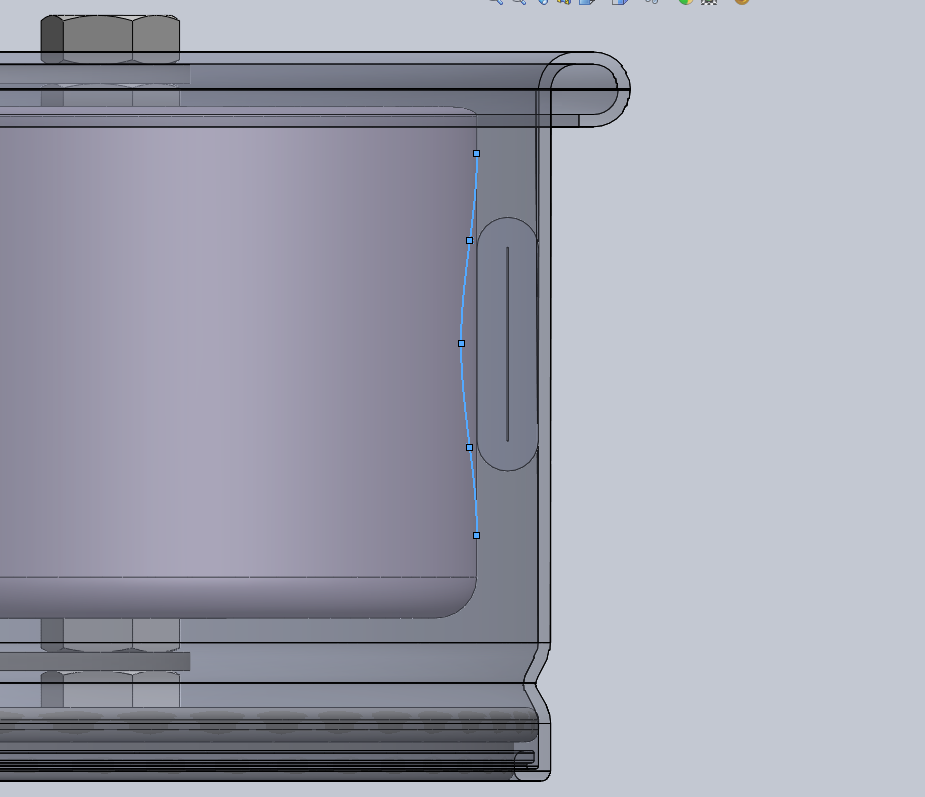
With the slots set in the brake discs I can change the amount of occlusion:

occlusion.gif


Less occlusion = longer tube life and less chance of wear from particles (grains) but less performance. I will have to settle on an appropriate amount of occlusion so the pumps prime well but maintain long tube life. I think the springs might be helpful for dealing with out of center tolerances and maintaining a constant pressure on the hose.
 
this is out of control! great idea. I never thought about making my own pump and this seems to be doable, if only my growing list of DYI was smaller... damn DYI forum!
 
this is out of control! great idea. I never thought about making my own pump and this seems to be doable, if only my growing list of DYI was smaller... damn DYI forum!

I'm sure your DYI list is quite small. Your DIY list on the other hand is probably large. :ban: (sorry couldn't resist)
 
This is beautiful. I wonder if you could power that with a bicycle. I'm sure you could AND it would be a workout worth doing. The wort is worth it! :ban:
 
That is a incredible piece of work you have created there.

Are you mainly creating this as a challange just to see if you can do it? Based upon the cost, it looks like functional peristaltic pumps are available for less cost (based upon my googling - I actually had never heard for these pumps until this post). Don't let me dissuade you though, that is awesome work.
 
Any desire to sell them once you get a working model?

I barely have enough time to build my own brewery so I doubt I would have time to make anything for sale. But if the design actually works I could probably put together a more detailed set of build instructions.

That is a incredible piece of work you have created there.

Are you mainly creating this as a challange just to see if you can do it? Based upon the cost, it looks like functional peristaltic pumps are available for less cost (based upon my googling - I actually had never heard for these pumps until this post). Don't let me dissuade you though, that is awesome work.

Not knowing the specifics on the pumps you found I would say, in general, a pump that has the same capacity as what I have planned are usually only available used and can be quite costly. I had a hard enough time finding one to meed my requirements let lone the matched pair I am planning. Many the cheaper pumps available on eBay are for moving much smallwe quantities of liquid but I know some members have had good success with premade pumps or pump heads. I have had a good time designing and building it however. Thanks for the compliments.
 
seabass07 said:
I can't wait to see this thing in action!

I will post a video when I hook it up to a proper motor and mount. Using the drill is a little awkward right now, especially since there is almost no way to hold it steady.
 
I will post a video when I hook it up to a proper motor and mount. Using the drill is a little awkward right now, especially since there is almost no way to hold it steady.

could you just put the "pump" face down and push down on it with the drill? or do the disc brakes protrude from the cake pan?
 
could you just put the "pump" face down and push down on it with the drill? or do the disc brakes protrude from the cake pan?


The bolts heads on the brakes do stick out a mm or two from the front of the cake pan.

I spent an hour or so today and rigged up a simple mount using some scrap wood. Filled a bucket with about 3 gallons of water dyed green and shot a couple of videos for you guys:


I didn't have the zip ties around the output tube tight enough and eventually it just blew apart. I don't plan on running the pump this fast in my actually brewing process. Oh and on youtube you can watch it in up to 720p!
 
Last edited by a moderator:
If it helps; skateboard wheels can be turned on a lath very easily and reshaped with a wood file.
 
Have you thought about using some concave wheels? That's if they even exist. They may form to the tubing better and also keep it aligned.

If it helps; skateboard wheels can be turned on a lath very easily and reshaped with a wood file.

Thanks for the input. It would be hard to get a uniform occlusion of the tubing if the wheel wasn't flat. Below is a quick sketch to illustrate. If I had a bit larger diameter on the hub I might be able to cut into the skateboard wheel leaving small "lips" at the top and bottom. But the hub is already expanded to the max so I have to make due with what I have. All that being said, I didn't really run into the issue after going with the second revision. I still might play around with tubing lengths to determine the best size for the pump.

Grooved_Wheel1.PNG


I ordered a stepper motor and driver last night and they should be here on Wednesday. The whole setup won't be ready until a shaft coupler comes in which might take a week. In the meantime I have a mount to build and some programming to tackle. Should be an exciting weekend I hope.
 
I am not sure of the exact reason why but the rollers on my professional peristaltic pumps that I use at work are convex and not concave. I am thinking it has something to do with the folding over of the tubing at the top and bottom being thicker when collapsed. I just thought I would put it out there before yo go making any changes that might be in the wrong direction.
 
I am not sure of the exact reason why but the rollers on my professional peristaltic pumps that I use at work are convex and not concave. I am thinking it has something to do with the folding over of the tubing at the top and bottom being thicker when collapsed. I just thought I would put it out there before yo go making any changes that might be in the wrong direction.

Usually in the pro style pumps the "cake pan" isn't flat, it almost matches the shape of the wheel IIRC.
 
This is totally awesome. I'm thinking that it wouldn't be too hard to form depression on the ID of the cake pan and use a convex shaped wheel to more closely mimic the commercial designs.
 
Looks like a smart build. You could even add some double barbs where the hoses enter the cake pan to make the hose replacement easier and cheaper. Seems like the hose would be under quite a bit of stress, especially if the liquid is hot.
 
I've used peristaltic pumps many times for groundwater sampling, and I think your idea would work very well in a home brewing setting.
 
Usually in the pro style pumps the "cake pan" isn't flat, it almost matches the shape of the wheel IIRC.

You sir are correct. I took a closer look today and the walls are slightly concave and closely match the convex shape of the rollers. I wonder why I noticed the rollers and not the walls before?
 
Looks like a smart build. You could even add some double barbs where the hoses enter the cake pan to make the hose replacement easier and cheaper.

Thanks, one step ahead of you, just got a bunch of parts in from McMaster a couple days ago:

PumpIsoRev2_2.jpg


With the cost of these 5/8" hose barbs I don't know if it made anything cheaper but it should be easier to use and should hold together better. Cheaper than another set of tri-clamp to hosebarb adapters I guess. I chose 5/8" barbs as they stretch the 1/2" ID silicone tubing a bit which should help with keeping the tubing in place and they don't restrict the flow.

The stepper motor and driver arrived from Keling (thanks Yuri!) on Wednesday. The 2-day shipping time was well worth the slightly higher cost than eBay sellers from China. I made an experimental piece of code in Labview to control the stepper with unsatisfactory results. There is too much CPU overhead in LV controlling individual parallel port bits so I am unable to get the higher speeds that I want. Looks like I will have to implement the stepper control in my microcontroller HW, I have a few extra PWM channels open so it shouldn't be too bad.

Here are some pictures of the motor mount I designed using slightly modified items from McMaster:

Pump_motor_mount1.PNG


motor_mounted_to_pump1.jpg


The motor mount is rock solid! I am waiting for the shaft coupler before I can tell if all of this is really going to work. It will hopefully be here on Monday. Also arriving on Monday is some stainless rectangle tubing I plan to make a pump mount out of:

Pump_mount_model1.PNG


I tried to make a sturdy design that is flexible to changes in my final brewery design. I should be able to move the pump up or down, left or right, depending on where the final placement needs to be.
 
Peristaltic pumps are fantastic.
  1. You can pump slurries/chunks/junk
  2. Fantastically easy to clean!
  3. You only need to worry about the hose when pumping fluids(acidity/abrasion often eat regular pumps up quickly).
  4. You can meter or dispense specific quantities of liquid if needed.
  5. You can pump non-filtered fluids.(I.E. #1)
  6. Also, you reduce turbulence of your fluid!

Another note, you don't need full occlusion of the tubing.
And lastly, adding more rollers is going to decrease the life of your hosing, but at this price I think you can afford to replace parts.
 
Why reinvent the stepper motor driver? You can buy driver ICs for a couple bucks and control with a simple steps/direction control. I know that you can buy stepper drivers from places like pololu and sparkfun.
 
Why reinvent the stepper motor driver? You can buy driver ICs for a couple bucks and control with a simple steps/direction control. I know that you can buy stepper drivers from places like pololu and sparkfun.

I purchased a driver along with the motor, letting the Chinese handle this for me.

I think a better term for what I intended to implement in labview and have since then have been working on adding to my microcontroller would be a stepper speed controller. The driver is really the muscle where a speed controller provides the brains. The driver I own has three control signals: driver enable, direction, and step pulses. I have been working the timing of the pulses and the logic behind direction and enable/disable. To accelerate/decelerate I need to provide a smooth transition from long step pulses to shorter and shorter duration pulses. There are drivers that provide this functionality natively but they get spendy for the power outputs required for this size motor.
 
Ever think of using it for an IV infusion device for Elephants. Might be a market for it at zoos and Elephant sancuaries. With a stepper motor metering dosage could easily be calculated and a elephant has about 450 liter of blood so it seems about the right size.
 
Ever think of using it for an IV infusion device for Elephants. Might be a market for it at zoos and Elephant sancuaries. With a stepper motor metering dosage could easily be calculated and a elephant has about 450 liter of blood so it seems about the right size.

I can honestly say, the thought of that never crossed my mind. If the zoos come calling I'll have to cut you in on at least 10% of the profits :cross:
 
The driver I own has three control signals: driver enable, direction, and step pulses. I have been working the timing of the pulses and the logic behind direction and enable/disable. To accelerate/decelerate I need to provide a smooth transition from long step pulses to shorter and shorter duration pulses. There are drivers that provide this functionality natively but they get spendy for the power outputs required for this size motor.

I don't think the duration of the step pulses is important...I've never seen a stepper driver that cared. Typically they just trigger off a high-to-low or low-to-high transition.
 
I don't think the duration of the step pulses is important...I've never seen a stepper driver that cared. Typically they just trigger off a high-to-low or low-to-high transition.

There may be different kinds of drivers but for at least the one I am using the motor will move once for each full square wave that arrives at its input. To determine the speed at which the motor steps (number of steps per second/minute/whatever) the duration or period of each pulse needs to be controlled.

My driver performs 1/2 steps by default so for each square wave cycle input it will move my motor 0.9° (motor is a default of 1.8° per step). To achieve 1RPM I need exactly 400 pulses every 60 seconds (1 revolution = 360° = 200 * 1.8° or 400 * 0.9°). For the motor to step at a higher rate the number of steps per minute needs to increase so the square wave period decreases.
 
I noticed on your original design the inlet and outlet hoses crossed paths prior to exiting the pan creating a concentric path for the rollers. I was going to suggest to you to have them exit prior to crossing paths but you did this modification on your revision. I have one other suggestion. Due to the low spot in the pump rotation it seems this will cause some vibration and stress on the axis as the rollers engage and disengage the tubing. As a suggestion I would try to add a short length of the same diameter tubing as a buffer between the two exits. This should make the pump operate smoother and last longer with less vibration as the rollers will be evenly engaged at all times. Great idea and use of off the shelf parts, keep up the good work!
 
Have you tried to hold a constant motor speed and use a valve to throttle the input to the pump? I think that this would be useful in a manual setup where computer control wasn't practical.

With a positive displacement pump you wouldn't want to restrict the suction or discharge. Throttling pump speed or recycle flow is about the only way to control it.
 
Back
Top