BrewPi@ESP8266, no need of RPI and Arduino.

Homebrew Talk - Beer, Wine, Mead, & Cider Brewing Discussion Forum

Help Support Homebrew Talk - Beer, Wine, Mead, & Cider Brewing Discussion Forum:

This site may earn a commission from merchant affiliate links, including eBay, Amazon, and others.
Ahhh i found the problem

Code:
"b":"0"
cannot be 0

this works:
Code:
U:{"i":"1","c":"1","b":"1","f":"9","h":"2","p":"12","a":"28FF593F7415037C"}

I am sorry. I was in a rush to give the wrong example.
According the wiki,
To set "Beer Sensor", you should set
.."c":1,"b":1,"f":9 ...
"Chamber Sensor" is
.."c":1,"b":0,"f":5 ...

My experience agrees to it.

BTW, I embed the files into the code, so that uploading files is no longer needed if you are not going to change or develop the pages.
 
I found that the new ESP8266 Async Web Server break my implementation of Server Side Event. The result is duplicated messages. That's why you saw multiple entries.
Don't worry, it won't affect the normal usage of BrewPi. Only pages are affected.
I've updated the setting page as temporary fix. I am evaluating using official supported WebSocket instead of self-crafted Server Side Event to solve this issue. Stay tuned.
 
Yes i noticed that as well , when i did the list command h{} one time it gave me the correct results, the other time it gives me 5 times the same results so thats probably also what happens on the setup webpage
 
I just fixed this by ditch my implementation of Server Side Event and using WebSocket of the library.

For those who have used SPIFFS tool to upload data files, you must upload the new data files to get the new version work.
I would suggest to just erase the SPIFFS by esptool.py, like

esptool.py --port /dev/ttyUSB0 erase_flash

However, doing so also erase the WiFi network setting, which means you need to setup the network again.
After that, you won't need to upload the SPIFFS files, but you still can if you want. The files on the SPIFFS take higher priority over embedded ones.
 
Last edited:
Cool, got it compiling - but I'm moving of course so everything is now packed up. Will try it out in a few weeks.
 
Has anybody put together a "cookbook" set of instructables for us regular people on how to set this project up.
Basically what I need is step one. I'm just learning PuTTY and I think everything with BrewPi starts there.Sounds like this is Arduino IDE.
 
Has anybody put together a "cookbook" set of instructables for us regular people on how to set this project up.
Basically what I need is step one. I'm just learning PuTTY and I think everything with BrewPi starts there.Sounds like this is Arduino IDE.

I have a page of step-by-step setup instructions:
http://vito.tw/brewpiless/
 
Would the brewpi arduino shield that connects all the LCD, rotary encoder, probes etc, plug and play with the WeMos D1 R2 V2.1.0?

this looks like a great project.
 
We are having a little trouble getting the forums started. Tried link exchanges, banner exchanges, beer web ring and search engines. Anyone know of any other way to bring a little traffic to get things started?

Also anything wrong with the forums? Any changes need to be made for people to be more opted to post?

Thanks! Any suggestions and coments help!

Unfortunately no, the boards and display different to this project.


Ed: don't ask me where I got that quote, I had tried to quote the post above this one!
 
Unfortunately no, the boards and display different to this project.


Ed: don't ask me where I got that quote, I had tried to quote the post above this one!

That is a somewhat random quote... bit of a shame that but i guess given the price difference between the two different Wemos' it wouldn't break the bank getting the cheaper one and starting from scratch(ish)
 
Here is a dropbox link to the lua files.

This sets up the ESP module as a monitor only. Like I said, I wanted to keep the lid on my MT closed and still monitor the temp inside.

PM me if you need any help.

https://www.dropbox.com/sh/71xafsz4faiu77d/AACN0cog0PTFYUm84T6xFjtwa?dl=0

I am very interested in what you have done. I assume others are too. Could you start a thread with a couple pics etc. I didn't want to hijack this thread but I reckon others would also find this very useful in the future.
 
I am very interested in what you have done. I assume others are too. Could you start a thread with a couple pics etc. I didn't want to hijack this thread but I reckon others would also find this very useful in the future.

I will see if I can start putting something together, school has started and working for a University has made my time limited.
 
Hoping someone has seen this before and can help - I tried to compile and upload the firmware to an ESP826612E and I keep getting the error 'Documents/Arduino/libraries/ESPAsyncTCP/lwipr_compat.c:269: multiple definition of `ax_port_write'. There are a couple of other similar errors, all in the ESPAsyncTCP library. Has anyone seen this before? Thanks in advance!
 
Hoping someone has seen this before and can help - I tried to compile and upload the firmware to an ESP826612E and I keep getting the error 'Documents/Arduino/libraries/ESPAsyncTCP/lwipr_compat.c:269: multiple definition of `ax_port_write'. There are a couple of other similar errors, all in the ESPAsyncTCP library. Has anyone seen this before? Thanks in advance!

I checked the library and found that it was updated 4 hours ago.

Two options you might have for now.
First, re-download the library if yours isn't the latest.

Second one, use the version that I am using. The author of ESPAsyncWebServer seems to be very active and changes code frequently. Therefore, I packed the library that I use in case it break my code. You can find all libraries here:
https://dl.dropboxusercontent.com/u/70004161/library.zip
 
FYI,
According to this page, D3 isn't a good choice for cooling control.
https://zoetrope.io/tech-blog/esp8266-bootloader-modes-and-gpio-state-startup

Therefore, I've change the PIN assignment. I try my best to use the same PINs as Thorrax does, so that if you wan to use Raspberry PI to get the most of BrewPi, you can upgrade/change to Thorax's solution by just uploading the firmware. (and of course you have to setup RPI).
However, Thorax doesn't use Rotary Encoder, but I do. Luckily, I can have the same heating and cooling control PINs. I tried all combinations to find one that my rotary encoder works, but I can't guarantee your setup will work. If the ESP8266 won't boot up, please try disconnect the rotary encoder.
 
pocketmon to help the test of us out, since you have yours working. Could you list your working pin out?
 
pocketmon to help the test of us out, since you have yours working. Could you list your working pin out?

It is listed in the Github:

ESP8266 GPIO NodeMcu Label Connect to
GPIO16 D0 Heating Actuator*
GPIO5 D1 I2C SCL
GPIO4 D2 I2C SDA
GPIO0 D3 Door (not used)*
GPIO2 D4 rotary pin PushDown
GPIO14 D5 Cooling Actuator*
GPIO12 D6 Temperature Sensors
GPIO13 D7 rotary pin B
GPIO15 D8 rotary pin A

I didn't really test heating because it's summer now.
I thought my rotary encoder module, KY040, has pin A & B pulled-up, but it seems not- ESP8266 won't boot up normally if GPIO15 is pulled up. It is weird enough, or maybe I just don't really understand the circuit.

The rotary encoder is in fact unnecessary, since you can control by the web page easily. I use it just because I already build it.

I have mine up and running on a Wemos D1 clone (not mini).

I am getting temperature readings. I am testing out the relays, looks like it isn't working quite right. I'll do some testing. *Edit, I think I have it all sorted out now.

The only thing that is disconcerting is the display on the web page says "Controller not updating data" and I need to refresh.

A moment ago, it said "waiting 18hr and something" when it was supposed to be waiting 10 min to heat.
 
Update on the testing.

It's the heating that isn't working. I'm too tired to check if I have over-looked some small (large) detail.

I'm pretty sure the pins are all correct after triple checking and that I have the correct device settings.

I'll have to have a look tomorrow, but I do not think D0 is working for heating.

Needing to refresh the browser is still annoying to get updated data on the "lcd" display.
 
I have found out what is wrong.

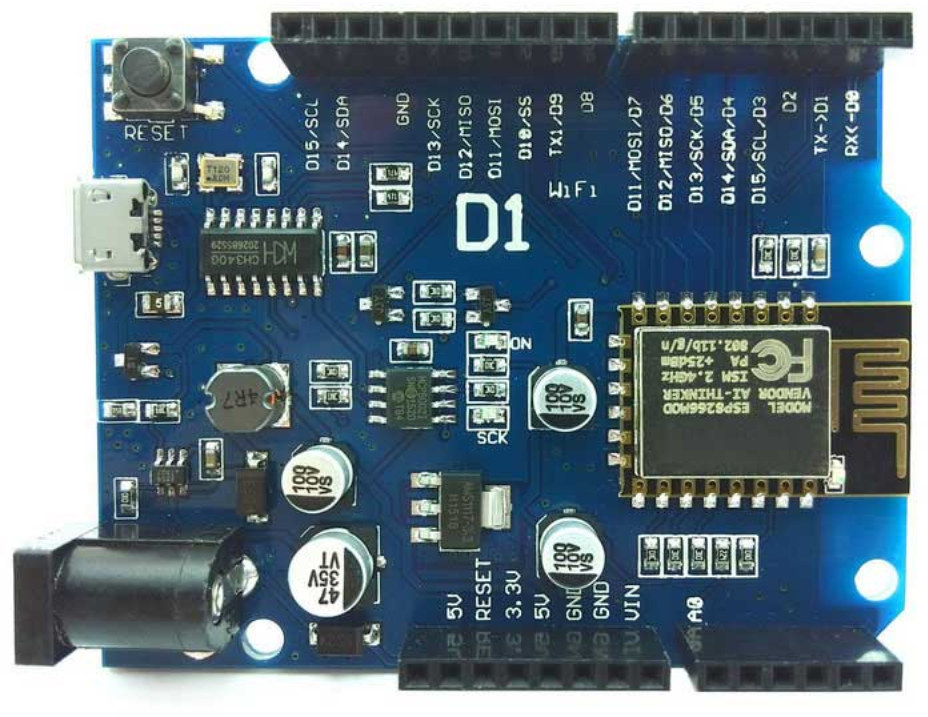
On this board:
ESP8266_BOard_Arduino_UNO_Headers_large.jpg


I connected the heating to D2 NOT D0. D0 did not work.
D0 and D1 are marked RX and TX respectively, so I guess it makes sense the GPIO is moved to a different number.

Anyway, these settings have the heating and cooling relays working.

Screen Shot 2016-08-23 at 10.37.55 PM.png
 
I have mine up and running on a Wemos D1 clone (not mini).

I am getting temperature readings. I am testing out the relays, looks like it isn't working quite right. I'll do some testing. *Edit, I think I have it all sorted out now.

The only thing that is disconcerting is the display on the web page says "Controller not updating data" and I need to refresh.

A moment ago, it said "waiting 18hr and something" when it was supposed to be waiting 10 min to heat.

I am working on the "Controller not updating data" issue, which is related to WebSocket. I've added some code which will try to reconnect after disconnected. However, it doesn't seem to solve this issue totally.

In my opinion, the labeling of the PINs doesn't make much sense. Maybe they are trying to mimic Arduino, but most of the documents and code just use native GPIOn, like GPIO0 and GPIO2. That's the reason I also list the GPIO number in the table.
 
I checked the library and found that it was updated 4 hours ago.

Two options you might have for now.
First, re-download the library if yours isn't the latest.

Second one, use the version that I am using. The author of ESPAsyncWebServer seems to be very active and changes code frequently. Therefore, I packed the library that I use in case it break my code. You can find all libraries here:
https://dl.dropboxusercontent.com/u/70004161/library.zip
Thanks @pocketmon - that fixed the problem!
 
After a few trials, I found that WebSocket isn't solid on both my iPhone and ESP8266.
The mobile safari on iPhone seems to lose connection without notification. Keep recreating the connection will crash ESP8266. Therefore, I decide to roll back to ServerSideEvent but with the built-in SSE implementation.
You might need to 'reload' the page to get the new file effective because the browser caches files.
 
Safari is notoriously incompatible with this sort of application. Try chrome I think half your issues may be resolved
 
Safari is notoriously incompatible with this sort of application. Try chrome I think half your issues may be resolved

I've used chrome for a while until it failed to resolve every domain name I connect everyday.

The main reason I ditch WebSocket is that reconnection makes ESP8266 crash. WebSocket on chrome seems to be better, but SSE has better overall performance.
 
I've used chrome for a while until it failed to resolve every domain name I connect everyday.

The main reason I ditch WebSocket is that reconnection makes ESP8266 crash. WebSocket on chrome seems to be better, but SSE has better overall performance.

It works for me.

Well done.
 
Now back to the "waiting 18hr" glitch.

What I'm doing is replicable. If I set the mode to cool, wait the time and allow the relay to turn on it works fine. When I change from cooling to heating it waits the 10 mins then switches on, then off straight away and says "waiting 18hrs".

I can get the heating to turn on if I go back and set it to heat again.

I am using "fridge constant" and "beer constant" modes. I haven't tried it in profile mode.
 
I'll post a pic of the display this time it happened on the cool cycle. I had it on heat, then changed it to cool in fridge constant mode. It said 2 mins left heating and counted down until it switched off. Then it did the 10 minute countdown and then this display came up.

I left it to do it's thing and it started "cooling" within a few minutes.

Maybe I don't understand what this message really means, but it seems like a glitch. At least it seems like the heating/cooling cycle continue relatively quickly after.

Screen Shot 2016-08-25 at 10.24.23 PM.png
 
I think I replicated this with the full blown brewpi.

But it displays "waiting for peak". Then the relay clicks on after a min.

Now I don't know what "peak" is, but I wasn't fooled into thinking I had to wait 18hrs for something to happen.
 
I'll post a pic of the display this time it happened on the cool cycle. I had it on heat, then changed it to cool in fridge constant mode. It said 2 mins left heating and counted down until it switched off. Then it did the 10 minute countdown and then this display came up.

I left it to do it's thing and it started "cooling" within a few minutes.

Maybe I don't understand what this message really means, but it seems like a glitch. At least it seems like the heating/cooling cycle continue relatively quickly after.

It's interesting. There are minimum time for starting compressor, heater, and etc. You can find those constants in TempControl.h. However, none of them has such a big value. The maximum one is COOL_PEAK_DETECT_TIME, which is 1800 seconds.

The temperature usually goes lower after the compressor stops. That's what the "wait for peak" for. The algorithm of BrewPi will wait for and record the 'peak'(lowest temperature when cooling) to get a better estimation in the following cycles.

I am no expert of BrewPi itself. The code is from Elco, and the porting to ESP8266 is done by Thorrax. However, I might have found a bug or typo in the Brewpi Code. Let me do some research before trying to alter the code which I am not really familiar with.

---------TL;DR-----------------------------------
The code to print "Waiting for .." is at
LcdDisplay::printState(void);
The only way to print "Waiting for 18hxxmxx" is when the state is "WAITING_FOR_PEAK_DETECT", which is the only case "Waiting for" can happen. The 'time' value is supposed to be 'UINT16_MAX'(65535) and supposed not to be printed. That is exactly what it does on Arduino. However, the code to decide if "time" should be printed compares 'time' to "UINT_MAX". 'Int' on Arduino is 16bit, but it is 32 bits on ESP8266( I guess because it has a 32bit processor). Therefore, the 'time' value of 65535 is printed and overwrites the 'peak'. Try to do some math, you will get the numbers from 65535.
-------End of TL;DR-----------------------------------

Update:
The version from Thorrax that I am using is v0.2.4. In 0.2.10, it has been fixed. Therefore, I already fixed it and push to Github. It doesn't really affect anything but display, so don't worry about it.

Once I replicated the conditions with brewpi, I was much less worried. Nice to have it working properly though. Great work.
 
I don't know how useful this is but I'll post the link anyways.
https://hackaday.io/project/13271-esptool-gui

That will help the first flash. However, if building the image can be done, flashing should not be an issue.

After that, the software(or firmware) can be updated via Web Page at

http://[the IP or "brewpi.local"]:8008/systemupdate

I've been doing this for a while. Doing everything in front of my desk is more convenient.
 
Update:
1. I was wrong about the rotary encoder. Now the rotary encoder is not supported by direct connecting to ESP8266.
2.To support the rotary encoder, an additional PCF8574 board is necessary. Please check the source code for detail information. (I don't recommend to do this. Therefore, I am going to save some typing about it.)
3.Soft AP mode is supported, which makes it possible to work alone without a router. The detail information can be found at github.
 

Latest posts

Back
Top