yes over 140 degreesIs the effluent hot?
You are using an out of date browser. It may not display this or other websites correctly.
You should upgrade or use an alternative browser.
You should upgrade or use an alternative browser.
Boil kettle condenser - no overhead ventilation needed
- Thread starter BrunDog
- Start date

Help Support Homebrew Talk - Beer, Wine, Mead, & Cider Brewing Discussion Forum:
This site may earn a commission from merchant affiliate
links, including eBay, Amazon, and others.
- Joined
- Oct 6, 2017
- Messages
- 1,555
- Reaction score
- 801
I’ve gone back and forth on a condenser due to not having a drain and my wife’s request for odor control. I put a hood in during my basement remodel and it works great but the noise level during a brew day is kind of a drag so I’m rethinking my decision. I was interested in Spikes lid until I saw how much water it uses.
@Bobby_M any idea when you’ll be able to replenish stock on the slayer and bulkhead fittings?
@Bobby_M any idea when you’ll be able to replenish stock on the slayer and bulkhead fittings?
OP
OP
yes over 140 degrees
Ok. Make sure the drain tube is open... meaning there are no bends where the hot effluent can collect. It needs to be a straight path down so there is air free to move through the tube along with the effluent.
Don't remember seeing it asked before:
I don't really want to leave the condenser cantilevered off the thin Foundry lid. Was thinking of clamping the condenser along the wall and using barbed fittings with silicone tubing to go from the lid to the condenser. Think 1/2" tubing would be too small over <2' travel?
Just mount to the side. It’s not going be as efficient with a narrow long tubing. I’m more of a fan of the side mounts: Then can easily add hops without making the lid heavy and awkward for adding hops. You can always cap it off during BIAB if you’re concerned about losing volume.
On a different note: i semi-recently started using my BIAB pulley to support my steam condenser. Super easy and cheap.
On a third note: i was having issues with the condenser working when running a tube directly from the condenser to my sink or floor drain. As mentioned above , i think this was because of the angle the tubing had to make... to solve this, i have the condenser draining straight to a bucket with a spigot. Then tubing from the spigot to my sink. This way, draining from the condenser is not slowed.
Pic
Attachments

Last edited:
Haha. Wow, what a story!So I’ve been working on a lager fridge made from plywood, styrofoam and fiberglass. I felt it was necessary to make this since there was a line up for kegs and conical fermentors in my beer display fridge. So I built this thing in the garage, hauled it up to the 8th floor (by elevator) then went back down to the garage to get the paint I bought today to paint it. So I grab my paint, two plastic buckets that I used earlier to concrete in some cracks between the garage and an outside footing that allow rats to thrive under my garage. I’m traveling up the elevator and the plastic bag holding my paint breaks and the 2 L red paint can falls out of the bag and opens on contact with the elevator floor. Hmmm? I have a paint brush and a couple of buckets. I start to transfer the paint from the floor to an open bucket that has the open paint can in it. Things going through my head? Who will the first person to use the elevator think that I murdered? 2 ladies from the 4 th floor made some exclamatory remarks that I couldn’t translate to English but sounded like “What is that stupid foreign guy doin now?” The other blood curdling worry was how soon will my wife catch me? Wifey shows up and asks “where’s Marney?” (Daughter) By then I had most of the liquid paint in one of the buckets. One foot is clearly submerged in red paint and the other is outside the ring of the spreading pool but licking up splashes of paint from the paintbrush hitting the inside of the bucket. If I move I spread more paint. Wifey says get the F@&k out of the elevator so I can clean it. Fine! Fill your boots...after applying the free red paint to my lager fridge upstairs and cleaning up the spills and buckets. Here I am into my third Quarantine pale ale. Still married and planing on testing the condenser on Sunday. There’s a few technical things that I wanted to throw out there for advice but I think I’ll go for it on Sunday and see what happens.
I’ve gone back and forth on a condenser due to not having a drain and my wife’s request for odor control. I put a hood in during my basement remodel and it works great but the noise level during a brew day is kind of a drag so I’m rethinking my decision. I was interested in Spikes lid until I saw how much water it uses.
@Bobby_M any idea when you’ll be able to replenish stock on the slayer and bulkhead fittings?
I would be BSing you if I guessed at an ETA.
Islandboy85
Well-Known Member
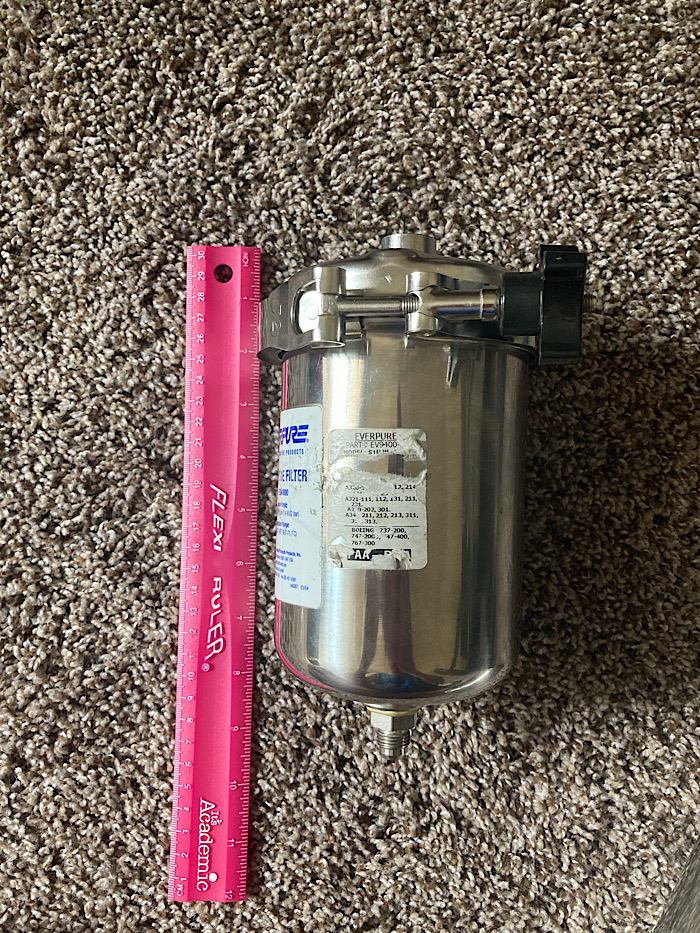
So I was exhausted last night when I flipped through this post. Pre-emotive apologies if I missed this question, but if the vertical tube is wider than 2” with a 2” inlet does it allow for greater cooling capacity. I’ve got a couple Everpure stainless filter housings that were scrapped out of some aircraft. They are about 7” tall and 4” wide. An 80 degree spray pattern would fully cover the width of the housing in just under 2.4” of vertical space leaving about 4.5” of condensing and draining. So, obviously a standard 2” tri-clover tee requires no fabrication/welding, but could I get better performance with roughly 4 times the volume?
Attachments
Efficiency is driven by how much surface area of spray pattern can be maintained so larger diameter chambers are better up to a point. What point? It's hard to say. The increasing spray diameter is no longer beneficial if the temp of the spray gets so hot that it doesn't condense the steam.
In any case, make sure your spray pattern doesn't put water into the entry port or you'll be adding water to the boil.
In any case, make sure your spray pattern doesn't put water into the entry port or you'll be adding water to the boil.
Islandboy85
Well-Known Member
Thanks Bobby. I figure since I have a couple laying around a tri-clover ferrule is cheap enough to try out in one of em. I brew outside, but can see the benefits of lower boil power and for the next house where I’ll be brewing in the garage. We don’t have great water temps in Dallas, but we have great water pressure, so I’d be willing to bet the higher water volume would cover it enough.Efficiency is driven by how much surface area of spray pattern can be maintained so larger diameter chambers are better up to a point. What point? It's hard to say. The increasing spray diameter is no longer beneficial if the temp of the spray gets so hot that it doesn't condense the steam.
In any case, make sure your spray pattern doesn't put water into the entry port or you'll be adding water to the boil.
Did another system test with water, then with a brewday. At 55% power with the 9gph spray tip I am only boiling off .5 Gallons per hour. It is ok, but man do I need a lot of grain for these batches compared to open boil.
Why do you need a lot of grain? It should take the same grain to reach the same final volume and gravity. You reduce your volume and increase the starting gravity since there will be less volume reduction and thus increase in gravity.
Reducing boil-off volume forces a reduction in the pre-boil volume in order to get the same post-boil volume. Reducing the pre-boil volume for a fixed amount of grain causes a reduction in the lauter efficiency (assuming the lauter process stays the same.)Why do you need a lot of grain? It should take the same grain to reach the same final volume and gravity. You reduce your volume and increase the starting gravity since there will be less volume reduction and thus increase in gravity.
For example, if you do a single batch sparge process, get 100% conversion efficiency, and boil off 1.25 gal, then to get 5.5 gal post-boil @ 1.055, you would need 6.75 gal pre-boil and 9.6 lb of grain. Lauter efficiency would be 88.7%. If you reduce the boil-off to 0.5 gal, then the pre-boil drops to 6.0 gal, the lauter efficiency drops to 86.8%, and the OG drops to 1.054. Not a huge change, but real. To keep the same OG, at the reduced boil-off, the grain bill needs to be increased to 9.9 lbs, an increase of just over a quarter of a lb. The lauter efficiency also drops a little more to 86.3%. (Calculator used.)
So, I think @Frazeart is exaggerating a bit when he says it takes a lot more grain.
Brew on

The solution to increasing boil off is raising the input power. The solution to dealing with that increased steam is more water.
I have some additional higher volume sprayers to goof around with but they are nearly $30 a piece. One solution I've tossed around is inserting a WYE splitter into the sprayer tube to insert say 2 x 6 GPH sprayers or 2 x 9 GPH.
I have some additional higher volume sprayers to goof around with but they are nearly $30 a piece. One solution I've tossed around is inserting a WYE splitter into the sprayer tube to insert say 2 x 6 GPH sprayers or 2 x 9 GPH.
OP
OP
Why can't you mash/sparge with less water? Unless making gigantic beers, you can use the same amount of grain and scale your pre-boil volume down with higher PBSG.
Yes you can mash with a bit less water, but that will reduce your lauter efficiency slightly (unless you change your process), and you will need to add a little more grain to make up for that, if you want to get the same OG. I went thru this two posts above.Why can't you mash/sparge with less water? Unless making gigantic beers, you can use the same amount of grain and scale your pre-boil volume down with higher PBSG.
Brew on
- Joined
- Oct 6, 2017
- Messages
- 1,555
- Reaction score
- 801
Another question....My sump pump is about 20' away. It would be easy and dirt cheap to run say 1" PVC (or bigger or smaller) from my brewing area to the sump. Plenty of elevation to put a nice drop on it. The catch is the sump has a sealed cover for radon mitigation. There's a fan that pulls a vacuum on the sump and footing drains and evacuates it up above the roof line. If I install this line the fan would be pulling some amount of vacuum on the effluent line. Is that a benefit or problem? I could maximize the vacuum by making a sealed connection or minimize it by setting it up more like a washing machine standpipe.
When not in use, I'd have to cap the drain so the radon system can do its job. Its questionable whether the system was even needed--I think the previous owners got taken for about 2k--so affecting its efficiency for an hour on a brew day is not a concern.
When not in use, I'd have to cap the drain so the radon system can do its job. Its questionable whether the system was even needed--I think the previous owners got taken for about 2k--so affecting its efficiency for an hour on a brew day is not a concern.
I wasn't trying to exaggerate per se. It takes an extra pound of grain per brew and hit the same numbers (1.051 OG) at 8 Gallons. Not a big deal certainly except with really heavy stouts and such of which I don't brew much. I am getting used to the system and dialing it in. Just feels so weird to not lose any appreciable volume. More than anything, I am just trying to validate my numbers with other people on here. I want to know why, with a very similar setup I am getting different results. My power level is far higher than what many of you are using.... my cooling water is maxed out (high power nozzle, high pressure hose feed) but I am only gaining 3 gravity points in an over 60 minute boil.
Have you made sure that you don't have any cooling water getting back into the BK? This will reduce your apparent boil-off.I wasn't trying to exaggerate per se. It takes an extra pound of grain per brew and hit the same numbers (1.051 OG) at 8 Gallons. Not a big deal certainly except with really heavy stouts and such of which I don't brew much. I am getting used to the system and dialing it in. Just feels so weird to not lose any appreciable volume. More than anything, I am just trying to validate my numbers with other people on here. I want to know why, with a very similar setup I am getting different results. My power level is far higher than what many of you are using.... my cooling water is maxed out (high power nozzle, high pressure hose feed) but I am only gaining 3 gravity points in an over 60 minute boil.
Brew on
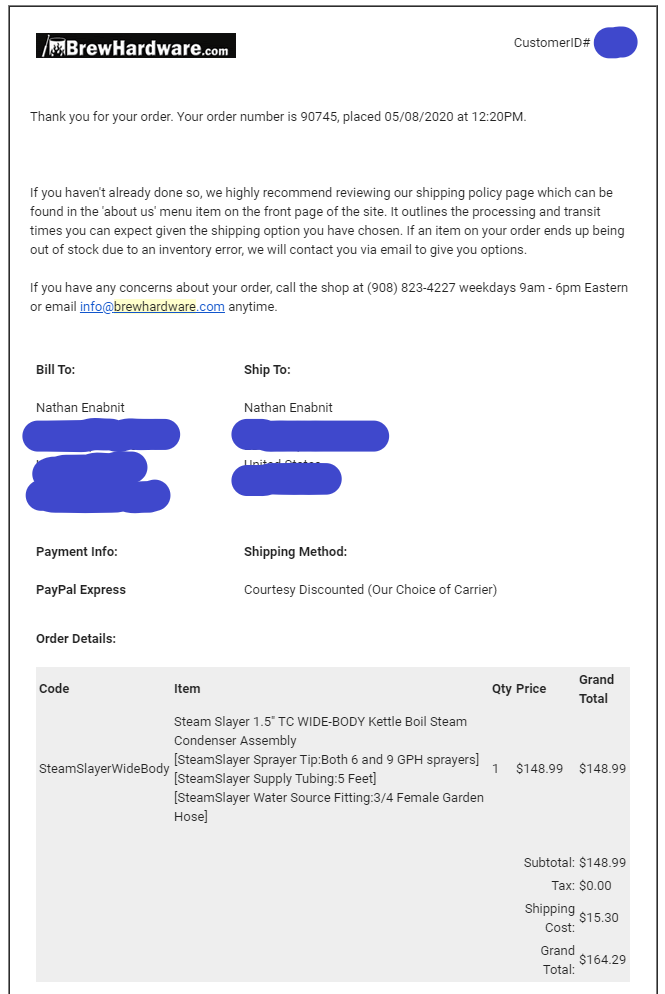
Maybe we can help each other out. I picked up the widebody version and received it a few days ago, but have since decided that I'd instead like to up my kettle to a 20 gallon instead of the 15 I have now. If you are interested, I'll sell it to ya for what I paid ($148.99) + actual shipping. I have taken it out of the box, but that is it. You can PM me if you are interested. If selling isn't allowed within a thread, I'll make a post on the For Sale forum. I also have a 1.5TC bulkhead that I picked up for $20 on amazon that I'm not going to need if you wanted that too. Let me know!I’ve gone back and forth on a condenser due to not having a drain and my wife’s request for odor control. I put a hood in during my basement remodel and it works great but the noise level during a brew day is kind of a drag so I’m rethinking my decision. I was interested in Spikes lid until I saw how much water it uses.
@Bobby_M any idea when you’ll be able to replenish stock on the slayer and bulkhead fittings?
Attachments
- Joined
- Oct 6, 2017
- Messages
- 1,555
- Reaction score
- 801
Well looks like that's going to work out nicely--thanks!
Spraentart
Well-Known Member
- Joined
- Jun 28, 2012
- Messages
- 1,465
- Reaction score
- 900
Is there any guidance around small batch brewing with a steam condenser? I am curious if any of the parts change or if slapping on something like a steam slayer and going will be fine. I am brewing 3g batches in a 6g kettle.
Charlie139
Member
- Joined
- Mar 29, 2020
- Messages
- 10
- Reaction score
- 2

Hi folks...
I tried out my condenser today for the first time
It more or less did the job as expected. My SG dropped 2 degrees of brix over 80 minutes. I turned up the propane until steam started escaping from in between the tack welds on 4 inch hop addition ferrule on my boil kettle lid. I ran the water pressure to the spray nozzle at the previously calibrated level and supplied the pump with municipal water. I’m satisfied with the results but my methods need some refinement. Thanks to all of you that contributed insight into this project. I had other crazy ideas about how to resolve the condensation on my ceiling. This solution is pretty slick.
Charlie139
Member
- Joined
- Mar 29, 2020
- Messages
- 10
- Reaction score
- 2
Supplemental...my final volume was way short of target. I’ll have to do some homework and see if I screwed up the mass or liquor or grain or both or whether something else is going on. I’ll get back with more info...
- Joined
- Oct 6, 2017
- Messages
- 1,555
- Reaction score
- 801
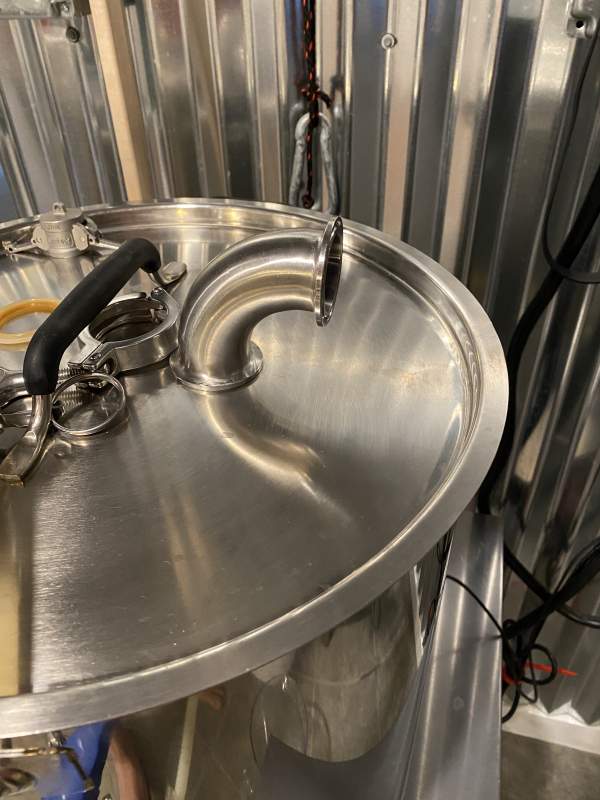
Waiting on the Steam Slayer I bought from njenabnit to work its way through the postal system but was looking at mounting options. I already have a port in my lid where I had a CIP sprayer I no longer use. Thinking of punching the hole larger and putting the port for the condenser here instead of on the side. The dome of the spike lid isn't very pronounced so it will end up pretty flat. I figure I'll need a 3" spool to make this work. Good idea or bad idea?
Attachments
Franktalk
Well-Known Member
- Joined
- Jan 19, 2019
- Messages
- 605
- Reaction score
- 435
It works good on the upper side of the kettle. I have a Spike as well. Unless you are boiling the maximum amount a kettle will hold (nine gallons in a ten gallon kettle) there is no need to impinge the lid with the condenser. I know that you already have a portal for your CIP in the lid, but you only use that after the boil is done. I am glad that my lid is independent of any hoses, appliances, etcetera.
- Joined
- Oct 6, 2017
- Messages
- 1,555
- Reaction score
- 801
My Steam Slayer showed up yesterday. After seeing how much it weights and just setting all the parts on the kettle lid I can see how it would start to get unwieldy. Now working up the courage to drill into my custom kettle. Luckily I have a genuine Greenlee punch set with the right size so it shouldn't be too difficult.
Its better to have it on the kettle. when you have to pull that lid off for hops or whathaveyou, that steam billowing out will burn the hell out of your arm if you don't open it facing away from you. easier if the lid is is light and balanced. easier to add ingredients and to place lid somewhere when doing so. these things weigh a few pounds with the clamps.My Steam Slayer showed up yesterday. After seeing how much it weights and just setting all the parts on the kettle lid I can see how it would start to get unwieldy. Now working up the courage to drill into my custom kettle. Luckily I have a genuine Greenlee punch set with the right size so it shouldn't be too difficult.
Its better to have it on the kettle. when you have to pull that lid off for hops or whathaveyou, that steam billowing out will burn the hell out of your arm if you don't open it facing away from you. easier if the lid is is light and balanced. easier to add ingredients and to place lid somewhere when doing so. these things weigh a few pounds with the clamps.
Yup, best to have on kettle.id hate to have to try and open the lid with that on...
I posted above on how i keep mine stable with my BIAB pulley and rope- simple. So if you BIAB, you may already have all you need to help stabilize it.
https://www.homebrewtalk.com/thread...erhead-ventilation-needed.636955/post-8880877
- Joined
- Oct 6, 2017
- Messages
- 1,555
- Reaction score
- 801
I got the hole punched at lunch. The anxiety building up to drilling into a $500+ custom kettle was way worse than the job. Ready for a boil test tomorrow.


- Joined
- Oct 6, 2017
- Messages
- 1,555
- Reaction score
- 801
I did a boil test last night. Probably will need to adjust down from here but I had a roughly 1 gallon boil off from 7 gallons which would be 14%. That was with my 5500w element at 40% power. I started lower but the boil seamed weak.
Using the 9gph nozzle the effluent was in the 120s which should be fine to go down a drain line to my sump pump which would be ~20 ft of pipe away and would cool more by the time it got there.
Moisture control was amazing.
Using the 9gph nozzle the effluent was in the 120s which should be fine to go down a drain line to my sump pump which would be ~20 ft of pipe away and would cool more by the time it got there.
Moisture control was amazing.
I typically brew ~10-11 gal of wort in my 20G Spike at ~2200-2500W from my induction plate. Boiloff is ~0.85G/hr with a steady rolling boil. I have a 6gph nozzle with pretty high water pressure and come pretty close to that 6gph; I'd estimate effluent temp at 135-140F.
- Joined
- Oct 6, 2017
- Messages
- 1,555
- Reaction score
- 801
Second boil test I got 0.75 GPH boil off @ 35% power and it still seemed good rolling boil. I switched to the 6GPH sprayer and could still stick my hand in the effluent so I'm going to give it a shot there next weekend.
I figured this would be the place to post my questions on what I am seeing. I will start with my story ") .
.
I Just converted over to electric brewing in my basements ( 5.5 gal batches, BIAB). I bought a 5500 Watt Element and a steam slayer. I was brewing outside on propane. My brewing process has stayed the same with the exception that I keep my lid on my kettle now. As far as my settings go with my element, i run at 30% power during my 60 min boil. (I could get by with 25, but it seems that most go with around 30). The last brew I did that I am drinking now (Boston Ale Clone that i have tweaked a little) is great.
I am still learning, and I do have a bad habit of not knowing technical terms..... Unfortantly i have not taken pics yet, but am thinking of it.
Things that I have noticed with my change of my brewing process... When it comes to cleaning, I have noticed a lot of stuff on my kettle. Its like the foam that is created during the boil is getting stuck to the side of the kettle and building up to gunk.
My question is, what is the gunk, and is it normal with the use of a steam slayer.
I use the 6GPH nozzle, I do have the 9, but have not tried it
.I Just converted over to electric brewing in my basements ( 5.5 gal batches, BIAB). I bought a 5500 Watt Element and a steam slayer. I was brewing outside on propane. My brewing process has stayed the same with the exception that I keep my lid on my kettle now. As far as my settings go with my element, i run at 30% power during my 60 min boil. (I could get by with 25, but it seems that most go with around 30). The last brew I did that I am drinking now (Boston Ale Clone that i have tweaked a little) is great.
I am still learning, and I do have a bad habit of not knowing technical terms..... Unfortantly i have not taken pics yet, but am thinking of it.
Things that I have noticed with my change of my brewing process... When it comes to cleaning, I have noticed a lot of stuff on my kettle. Its like the foam that is created during the boil is getting stuck to the side of the kettle and building up to gunk.
My question is, what is the gunk, and is it normal with the use of a steam slayer.
I use the 6GPH nozzle, I do have the 9, but have not tried it
The vacuum formed by the condenser makes the boil bubbles form into a big head of foam. It's kind of like putting a marshmallow in the microwave. You can back off a couple more % on the power input to reduce it.
Would it be best to set the percentage as low as I can go? I know at 25% I hold a temp of 212 (boil), but have not gone any lower.The vacuum formed by the condenser makes the boil bubbles form into a big head of foam. It's kind of like putting a marshmallow in the microwave. You can back off a couple more % on the power input to reduce it.
It seems a minimal "boil" is desirable, and with the assistance of the condenser is probably something to strive for, and then account for in recipe construction. I know when I dropped my hard boil down to just a modest roll (with about a 2/3rds reduction in boil off rate) my beer colors were a shade lighter and I did not notice any loss of hop contributions. I did have to make appropriate adjustments (which literally rolls all the way back to the amount of water to prepare) but fortunately Beersmith made that relatively painless...
Cheers!
Cheers!
I reduced mine down to 23% (5500w element) on my last brew. still had good boil.
Last edited:
OP
OP
You want a gentle simmer. Everyone needs to get over the idea of a "vigorous boil". While a strong boil might feel satisfying, it is bad for your wort, which has been documented by science.
Bad Bubba
Well-Known Member
Has anyone monitored the temperature of their boil? If the condenser creates a vacuum it would mean the wort will boil at a lower temperature. Which would impact hops utilization. I already boil at 201 degrees F which I account for in beer smith.
Similar threads
- Replies
- 30
- Views
- 1K
- Replies
- 0
- Views
- 525
- Replies
- 44
- Views
- 3K